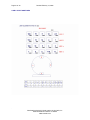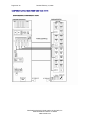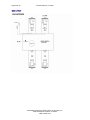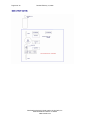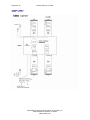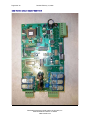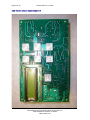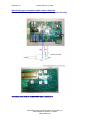
1
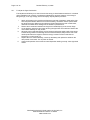
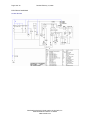
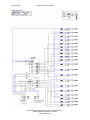
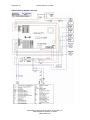
Page 1 of 30
Revised March 22, 2005
Technical Handbook
&
User Manual
KING 420US
Distributed exclusively in North America by Sun Italia, Inc.
2020 Elkhart Road. Goshen. IN. 46526
www.sunitalia.com
Page 2 of 30
Revised March 22, 2005
INDEX
SECTION
PAGE
1.0
INTRODUCTION
3
2.0
2.1
SAFETY WARNINGS
Photosensitivity – know the symptoms
3
3.0
3.1
3.2
3.3
3.4
3.5
3.6
3.7
FEDERAL REGULATIONS
Guidelines for the Salon Owner
Labeling requirements
Timer requirements
Protection from UV lamps
Certified UV lamps
Protective eyewear
Prescription and non prescription drugs
4
4.0
4.1
4.2
4.3
4.4
4.5
INSTALLATION REQUIREMENTS & GUIDELINES
Space requirements
Electrical requirements
Ventilation requirements
Equipment check list
Step by step installation instructions
7
5.0
5.1
5.2
5.3
USER INSTRUCTIONS
Fundamental precautions
Instructions for use
Funtioning
8
6.0
PROGRAMMING INSTRUCTIONS
11
7.0
7.1
7.2
7.3
7.4
7.5
7.6
7.7
7.8
PREVENTIVE MAINTENANCE & CLEANING
Sanitize
Log UV Output
Cleaning the UV Filters
Replacing the Lamp Acrylics
Replacing the UV Filters
Lamp replacement
Certified UV Lamps
Maintenance Log Sheets
12
9.0
TECHNICAL SPECIFICATIONS
17
10.1
TROUBLESHOOTING & ADJUSTMENTS
18
11.0
ELECTRICAL DIAGRAMS
20/27
Distributed exclusively in North America by Sun Italia, Inc.
2020 Elkhart Road. Goshen. IN. 46526
www.sunitalia.com
Page 3 of 30
1.0
Revised March 22, 2005
INTRODUCTION
For the best results and for the safety of your clients, please read this Manual carefully. Please pay
particular attention to the correct safety, installation and maintenance instructions.
It is important that this Manual stays with the tanning system, particularly if the unit is relocated for any
reason.
Note that improper electrical installation of the equipment or unauthorized substitution of electrical
components or optical devices (lamps, filters etc.) may invalidate FDA and/or electrical standards (ETL, UL)
conformance.
The King 420, distributed in North America exclusively by Sun Italia, combines a futuristic Italian design
with state of the art components to offer your Salon clients a truly unique tanning experience.
With its breathtaking open design (no claustrophobia for even the most sensitive of customers) and 360°
all round tanning rays (no need to turn over halfway through the session), your clients are sure to be
delighted by the comfort and the effectiveness of their 12 minute tan. And the advanced body cooling,
integrated ventilation system ensures a really cool experience.
2.0
SAFETY WARNINGS
2.1
Photosensitivity – know the symptoms
Although natural tanning by the sun, and tanning by exposure to ultraviolet lamps is popular throughout the
world, there is still a great deal of confusion regarding the risks and benefits of exposure to ultraviolet rays.
What is known however is that some are more susceptible to sunburn than others, and we generally
classify this susceptibility by skin type. Type I will burn easily while Type IV is insensitive to the sun and
rarely burns.
However, an individual’s sensitivity to ultraviolet light can be heightened by the presence of certain
chemicals on the skin - from the use of common skin care products and cosmetics for instance. These
chemicals are called photo sensitizers and it is important for tanning salon operators to be able to identify
them and to recognize the symptoms.
Photosensitivity can cause a variety of symptoms but is usually observed as red or discolored patches on
small areas of the body. It can also be seen as blotchy form which is sometimes caused by heat as well as
ultraviolet radiation. Other symptoms include rashes and uneven pigmentation, sometimes accompanied by
itching.
Diseases, allergies, medications, cosmetics and lotions can increase photosensitivity, leading to some of
the symptoms described. Photosensitizing diseases include Psoriasis (uncontrolled skin cell growth),
Porphyria (severe, uncontrolled melanin production) and Lupus Erythematosys (swelling of nerve ends)
Medications such as diuretics, birth control pills, antibiotics, tranquilizers and high blood pressure
prescriptions, and other over the counter drugs may affect ones photosensitivity.
The safety and well being of your Salon clients is of the utmost importance, so if there is ever any doubt
about an individual’s photosensitivity, then please do not allow them to tan. If a reaction is noted or brought
to your attention, suggest that your client checks with their physician. Always have your clients read and
sign a consent form before a tanning program commences.
Distributed exclusively in North America by Sun Italia, Inc.
2020 Elkhart Road. Goshen. IN. 46526
www.sunitalia.com
Page 4 of 30
Revised March 22, 2005
3.0 FEDERAL REGULATIONS
3.1 Guidelines for the Salon Owner and Operator
Many States are now actively enforcing Federal Regulations for Sunlamps and Sunlamp Products as
defined by the US Department of Health and Human Services publication 21 CFR. These regulations have
been in effect for many years and are common sense, minimum safety precautions that all of us in the
Tanning Industry should welcome and support.
In the interests of promoting a safe tanning environment for our customers, Sun Italia™ is including a
simplified form of these guidelines in all User Manuals, and we are ready to help any Salon in
demonstrating compliance in their Salon.
Federal Regulations for sunlamp products require compliance in the following categories:
•
•
•
•
•
•
Labeling
Timers
Protection from UV lamps
Certified UV lamps
Protective eyewear
Photosensitivity information
In addition to these mandatory Federal Regulations, we at Sun Italia™ recommend the following health and
safety precautions:
•
•
•
•
•
•
•
•
•
Warning Posters
Equipment Maintenance Logs
Consumer Use Records
Trained Operators
Under age 14 prohibition
Age 14 through 17 restrictions
Pregnancy prohibition
Contact Lens removal
New and yearly client consultations
3.2 LABELING REQUIREMENTS FOR SUNLAMP DEVICES
3.2.1 Warning Labels (21 CFR 1040.20(d)(1)
•
•
•
•
•
Labels must be affixed to all tanning systems in your salon, to inform the user of possible danger in
their exposure to ultraviolet radiation.
DANGER. Ultraviolet radiation. Follow instructions. Avoid overexposure. As with natural sunlight,
overexposure can cause eye and skin injury and allergic reactions. Repeated exposure may cause
premature ageing of the skin and skin cancer.
WEAR PROTECTIVE EYEWEAR. FAILURE TO MAY RESULT IN SEVERE BURNS OR LONG
TERM INJURY TO THE EYES. DO NOT USE THE SUNBED IF ANY OF THE BLUE FILTERS
ARE BROKEN
Medications or cosmetics may increase your sensitivity to ultraviolet radiation. Consult a physician,
before using a sunlamp product, if you are using medications or have a history of skin problems or
believe yourself especially sensitive to sunlight. If you do not tan in the sun, you are unlikely to tan
from the use of this product.
Minimum use distance is 12 inches. Tanning may appear after one session provided your skin is
capable of developing a tan. Allow 24 hours between sessions to obtain a base tan, and up to two
times per week to maintain appearance. Note the recommended exposure schedule for this
product. If you have a base tan you may start at Week 3 of the schedule.
Distributed exclusively in North America by Sun Italia, Inc.
2020 Elkhart Road. Goshen. IN. 46526
www.sunitalia.com
Page 5 of 30
Revised March 22, 2005
3.2.2 Recommended Exposure Schedule:
Skin Type
Sensitive (I)
WEEK 1
WEEK 2
WEEK 3
MAXIMUM
Not recommended
Not recommended
Not recommended
Not recommended
Light (II)
3 Minute
5 Minutes
7 Minutes
10 Minutes
Normal (III)
5 Minutes
7 Minutes
10 Minutes
12 Minutes
Dark (IV)
8 Minutes
10 Minutes
12 Minutes
12 Minutes
Skin Type I
Skin Type II
Skin Type III
Skin Type IV
Sensitive.
Light.
Normal.
Dark.
Burns easily and severely. Does not tan.
Burns easily and severely. Tans minimally.
Burns moderately. Average tan.
Burns minimally. Tans easily. Above average tan.
3.2.3 Identification Label
Each tanning device in your Salon must have a Manufacturer’s Label affixed to the device and contain the
following information:
Name and address of the Manufacturer
Manufacturing Model Number and Serial Number
Date of Manufacture – Month and Year
3.2.4 Certification Label
Each tanning device must have a label certifying that, at the time of delivery of the device, it complied to all
applicable standards of the Federal Regulations 21 CFR.
For example:
THIS UNIT IS CERTIFIED TO COMPLY WITH ALL APPLICABLE FEDERAL PERFORMANCE STANDARDS FOR
SUNLAMPS AND SUNLAMP PRODUCTS AS DETAILED IN THE UNITED STATES DEPARTMENT OF HEALTH AND
HUMAN SERVICES PUBLICATION NUMBER 21CFR PART 1040.20. ONLY THE FOLLOWING LAMPS ARE
CERTIFIED FOR USE IN THIS EQUIPMENT: B.L.V. MHL 1200 and B.L.V. MHL 600
3.3 Federal Requirements for Timers:
Each tanning device is required to have a timer with a maximum timer interval that does not exceed the
Manufacturer’s maximum recommended exposure time. This maximum exposure time is calculated from
the results of precise and extensive measurements mandated by the FDA, using the recommended lamps
for that particular device.
No timer interval shall have an error greater than 10%. For instance, if the timer is set to 10 minutes, it must
time out between 9 and 11 minutes.
Each tanning device is required to incorporate a control that allows the user to manually switch off the
lamps at any time during the session, even if the timer has not timed out.
3.4 Protection from Ultraviolet Lamps:
There shall be physical barriers to protect users of the tanning device from injury caused by touching the
lamps, or by breakage of the lamps. The King™ systems use two polished glass UV filters for safety plus
acrylic covers for added protection.
Distributed exclusively in North America by Sun Italia, Inc.
2020 Elkhart Road. Goshen. IN. 46526
www.sunitalia.com
Page 6 of 30
Revised March 22, 2005
3.5 Certified Ultraviolet Lamps
During the Federal Guidelines conformance process, the tanning device Manufacturer completed an
exhaustive and precise evaluation of radiation safety using the UV lamps and optical filters designed for
use with your particular tanning device.
The only way to ensure an equivalent lamp (and to protect your clients) is to compare that lamp with the
original, by accurately plotting radiation output against wavelength. This comparison is the responsibility of
the alternate lamp manufacturer and the FDA, and certification of the new lamp is provided only if the lamp
is a true equivalent.
Use of non equivalent lamps is a safety hazard to your Clients, and it is the Tanning Salon owner’s
responsibility to ensure that only original equipment lamps are used, or true FDA certified equivalents.
The surest way to ensure the safety of your customers is to request the lamp manufacturer to provide the
FDA conformance number, and for the Manufacturer or Importer of the tanning device to confirm equivalent
lamps in writing.
This is probably the most important aspect of tanning safety in your salon, as the wrong lamps (or filters)
could change completely the tanning pattern of your device – maximum exposure times and recommended
initial exposure times etc. Please take the time to make an informed decision when your lamps need
replacing.
3.6 Protective Eyewear
The FDA guidelines require that protective eyewear, that meets or exceeds the requirements of 21 CFR
1040.20, shall be provided for your clients.
It is the responsibility of the Salon Owner to provide each client with properly sanitized protective eyewear
before each tanning session, with instructions for its mandatory use. There should be documentation in the
salon to verify that the protective eyewear conforms to these Federal standards.
Protective eyewear must be properly sanitized before each use, using an effective sanitizing agent at the
right temperature and for the correct length of time. A test kit or other device to measure the concentration
of the sanitizing solution (at least daily) is recommended.
3.7 Prescription and non prescription drug information
Your Salon should maintain a list of common photosensitising agents available for inspection by your
Clients.
Abnormal or increased sensitivity or burning may be caused by certain foods, medications, cosmetics or
skin care products. Some prescription and non prescription drugs, including but not limited to tranquilizes,
diuretics, anti biotics, hypertension medication and birth control pills may cause this effect.
Posters and leaflets are available from the Sun Tanning Association for Education. Telephone number
(301) 698 9707.
Distributed exclusively in North America by Sun Italia, Inc.
2020 Elkhart Road. Goshen. IN. 46526
www.sunitalia.com
Page 7 of 30
Revised March 22, 2005
4.0
INSTALLATION REQUIREMENTS & GUIDELINES
4.1
Space Requirements
The sunbed is 86” long, 65” deep and 81” high. However, for installation and maintenance of the
bed, there should be a minimum clearance of 12 inches from the rear of the bed to the wall, and 18
inches clearance at both ends.
The recommended room size is 12 ft by 12ft with a minimum of 9ft by 9ft if necessary.
The minimum door size is 36 inches wide. Note that the bed is assembled in the room.
A step up transformer is supplied with the sunbed. This should be placed to the right, rear of the
sunbed. The dimensions of the transformer are 24 inches by 14 inches by 24 inches tall. The Sun
Italia™ supplied disconnect box is mounted on the transformer.
The ventilation system uses 2 twelve inch diameter, flexible exhaust tubes, attached to the rear of
the bed and exiting through the ceiling of the room or directly to the outside air through the wall if
available. 2 twelve inch fans exhaust air through the flexible tubes. The integral body cooling
system includes a coupling to allow the salon to, optionally, connect cool air to the system.
Note that the construction of the room should allow for a make up air flow of 3,000 cubic ft per
minute (cfm). If the room is airtight, this will prevent the proper flow of exhausted hot air.
4.2
4.3
Electrical Requirements.
•
The supply voltage required is 208 to 240 Volts, 3 Phase and Ground. At 208V the load is 100
Amps per Phase and at 240V it is 87 Amps per Phase. The equipment draws approximately 55
Amps per phase on the secondary side (380V) of the supplied transformer. For a 240 VAC supply,
use a 100 amps per phase circuit breaker, and a 125 amps per phase circuit breaker for a 208 VAC
supply. IF THE SALON SUPPLY HAS A HI (CRAZY) LEG, A SPECIAL TRANSFORMER IS
REQUIRED. PLEASE CONTACT TANTECH (PETE OR PATRYK) AT 800 550 4056. NOTE THAT
THE INRUSH CURRENT ON THIS SPECIAL TRANSFORMER REQUIRES A 150 AMPS PER
PHASE BREAKER
•
The customer is required to supply the appropriate 3 phase, 208/240V power and ground
connections, the circuit breakers, and the wiring to the Sun Italia ™ supplied power transformer.
Sun Italia ™ supplies the wiring from the secondary of the transformer (380V, 3 Phase plus Ground
plus Neutral) to the Sun Italia ™ supplied, transformer mounted, Emergency Disconnect Box , only if
the transformer is in the same room as the King. The customer supplies this transformer secondary
wiring if the transformer is not in the same room.
•
Sun Italia™ will supply a 10ft, 380V, 3 Phase Neutral and Ground, flexible cable from the base of
the sunbed to the Sun Italia™ supplied, Emergency Disconnect box which is activated by the
Emergency Stop Button or the back up timer on the Sunbed.
Ventilation Requirements
•
The hot air generated by the high pressure lamps is exhausted from the tanning room by
two high efficiency fans (supplied by Sun Italia™) located at the exhaust outlets.
•
Two, wire reinforced, opaque plastic tubes are connected at the rear of the unit, and are
fed through the tanning room ceiling, exhausting the forced hot air directly outside (roof or
wall mounting), or simply to the ventilated space.
•
Care must be taken to allow approximately 3,000 cubic feet per minute of make up air back
into the tanning room. If the make up air is blocked from entering the room, the partial
vacuum created will reduce the efficiency of the hot air exhaust system.
Distributed exclusively in North America by Sun Italia, Inc.
2020 Elkhart Road. Goshen. IN. 46526
www.sunitalia.com
Page 8 of 30
4.4
Revised March 22, 2005
Equipment Check List
King 420 sunbed
Accessories including:
Technical Manual
Sponge Air Filters (2)
Eye Protection Goggles (2 pairs)
After unpacking, check for any visible damage that may have been caused during delivery of the
equipment. Please retain the packing materials to support your claim for any damages.
4.5
Step by Step Installation Instructions
Refer to the separate King, step by step installation Instructions with photographs
5.0 USER INSTRUCTIONS
5.1 Fundamental precautions:
•
•
•
•
•
•
•
•
Do not touch or work on the equipment with damp or wet hands.
Do not pull the power cables to help move the equipment.
Do not allow moisture to damage the equipment.
Do not allow the equipment to be used by children or without trained supervision.
Do not switch on the equipment while unattended.
Be aware that some of the internal electrical and optical components operate at high temperatures.
So wait a few minutes, after switching off and before removing protective covers, to allow for the
components to cool before touching them.
During normal operation, the cooling fans will remain on for a period after the lamps are turned off.
Do not interrupt this cooling cycle or components may be damaged and the effectiveness of the
lamps reduced.
The use of protective goggles is mandatory as is adherence to the posted exposure schedule.
5.2 Instructions for Use
•
•
•
•
•
•
•
•
Lie down comfortably on the acrylic, with your head to the right
Protect your eyes with the supplied goggles (remove any contact lenses)
Press START to begin the tanning session. (The salon may use an external timer such as T MAX,
in which case the Start Button will not be used)
Push the DOWN arrow to lower the canopy
You may push the stop button at any time to end the session
Adjust the cooling to your comfort by pressing VENT and then the + or – buttons.
At the end of your session the lamps will switch off automatically and the canopy will be raised.
Note that the equipment cooling lamps will continue to run for a time after the lamps are switched
off.
There is also an EMERGENCY RED PUSH BUTTON which will instantly remove electrical power
from the equipment. To raise the canopy under battery control, simply push the Emergency Button
one more time.
Distributed exclusively in North America by Sun Italia, Inc.
2020 Elkhart Road. Goshen. IN. 46526
www.sunitalia.com
Page 9 of 30
Revised March 22, 2005
Hidden Key for Programming (Tasto Nascosto. . .)
The control board (above) is used to check the status of the King and to control various functions:
1.
2.
3.
4.
5.
To set session time
To monitor the operating temperature of the sunbed
To control the speed of the body fans
To check various timers that monitor run time and maintenance schedules etc.
To provide an optional remote link via an RS485 port
Control and Timing Functions
Once the display is turned on the following message appears:
PLEASE
WAIT
Then, after the automatic check of the electronics:
READ THE WARNINGS
10 MIN
The message “READ THE WARNINGS” appears on the display and also the previously set session
time (see Programming) starts to flash.
Distributed exclusively in North America by Sun Italia, Inc.
2020 Elkhart Road. Goshen. IN. 46526
www.sunitalia.com
Page 10 of 30
Revised March 22, 2005
To begin the session press START, and after two seconds the following message appears:
TIME REMAINING in minutes and seconds
REMAINING 9:59
0 0 0 0 0 0 0 0
The session has now started and the lamps turn on. After a delay the body fans start at the MINIMUM
speed. To increase the fan speed press the button V+, and to decrease the speed press the V- button.
The fan speed is shown in the lower line of the display. Note that the remaining session time is
continuously updated.
During the session it is possible to monitor the room temperature by pressing the START button. The
display will show the temperature in degrees centigrade and the remaining session time:
30 C
9:42
0 0 0 0 0 0 0 0
At the end of the session the lamps are extinguished automatically and the cool down cycle begins
with the equipment fans at maximum speed for the programmed time (normally 3 to 4 minutes). The
display will indicate:
COOLING
APPLIANCE
To end the session at any time during the session, press the STOP button.
Distributed exclusively in North America by Sun Italia, Inc.
2020 Elkhart Road. Goshen. IN. 46526
www.sunitalia.com
Page 11 of 30
Revised February 10, 2005
6.0 USER PROGRAMMING
To access the Programming Mode, press buttons V+ and V- at the same time for about 3 seconds.
The following will appear on the display:
To change the session time press V+ (increase time) or V(decrease time) for the required time.
To memorize and to pass to the next program step, press V+ and V- at
the same time
The display will then show:
Press either V+ or V- to set the type of function desired AUTONOMOUS
(this is the normal mode) or SERIAL. To memorize and to pass to the
next program step
press V+ and V- at the same time
U1 SESSION TIME
MINUTES: 10
U2 REMOTE
CONTROL
The display will then show:
A device number is required only when the device is in Serial Function
Mode (RS485) to set the recognition number. Press either V+ or V- to
change to the desired number.
To memorize and to pass to the next program step press V+ and V- at the
same time.
U3 DEVICE
NUMBER
1
The display will then show:
U4
This is a read only display and shows the total number of sessions.
To pass to the next program step press V+ and V- at the same time
SESSION
NUMBER
10
The display will then show
The minutes exceeding the hour of the time the device was in
use. To pass to the next program step press V+ and V- at the same time.
U5 PARTIAL
COUNTER
MINUTES:
10
The display will then show
The hours that the device was in use. To pass to the next program step,
press V+ and V- at the same time.
U6 HOUR COUNTER
HOURS:
Programming is now complete and the regular display will appear.
Distributed exclusively in North America by Sun Italia, Inc.
2020 Elkhart Road. Goshen. IN. 46526
www.sunitalia.com
10
Page 12 of 30
7.0
Revised February 10, 2005
PREVENTIVE MAINTENANCE AND CLEANING
Disconnect electrical power from the equipment before working on any part of the sunbed.
• To clean the external structure use only a soft cloth, clean water and neutral soap if necessary. Never
use alcohol or chemicals or abrasives of any kind.
• Clean the UV filters only with alcohol or proprietary glass cleaners. Never use abrasives. After
cleaning, check the integrity of the adhesive that keeps the filter in place. Replace as necessary.
• Do not touch the lamp glass, even when cold. Remove touch prints with a clean soft cloth moistened
with alcohol if necessary. Clean the lamps and reflectors with a dry, soft brush or lint free cloth.
• Check the uninterrupted flow of cooling air.
1.
2.
3.
4.
5.
6.
7.
The lamps should be replaced approximately every 1,000 hours of operation.
Periodically verify the operation of the lamp cooling fans.
Do not obstruct air vents with towels etc..
Do not interrupt the 3 or 4 minute cooling cycle between sessions.
Periodically lubricate all moving parts.
Check and log the lamp output weekly.
Periodically check the correct operation of the Emergency Push Button, the override timer and the
calibration of the external timer.
7.1
BEFORE EACH TANNING SESSION. SANITIZE
•
•
•
7.2
Thoroughly clean and sanitize the unit, particularly the body acrylic and the head rest.
Clean the 4 lamp acrylics and the body acrylic.
Clean the Control Panel.
EVERY 50 HOURS (WEAR PROTECTIVE GOGGLES) LOG UV OUTPUT
•
Measure and log the power output of each lamp at the maximum reading points along the horizontal
acrylics. Compare with the readings at installation.
•
Check that there are no broken or misaligned clear or cobalt blue filters. Replace immediately if any
are broken. Note that there is a micro switch on each filter to detect broken or misaligned filters. If
one of these micro switches is activated, the lamps will not ignite and a red warning LED (to the right
of each lamp assembly will light up)
7.3
EVERY 200 HOURS – CLEANING THE UV FILTERS
•
Carefully remove each horizontal acrylic by removing the two plastic end caps on each lamp
assembly (secured by one screw each). Slide the acrylic to the left or right if you have room, or bend
each acrylic, and remove it from the front of each lamp assembly.
•
The filter housings in each assembly are secured with one screw. Simply loosen this screw and
push the individual filter assembly to the right and pull each assembly forward. Each filter assembly
slots into two holes so by mowing the assembly to the right you allow the filter assembly to be
released.
•
Slide out the clear filter first and then the blue filter from their spring loaded slots. Gently clean both
with an alcohol moistened soft cloth and replace in the housing.
•
Take this opportunity to clean each reflector and lamp with a soft brush or alcohol moistened soft
cloth. Do not touch the glass of the lamps. Remove any accidental finger prints from the lamps with
the alcohol moistened soft cloth.
Distributed exclusively in North America by Sun Italia, Inc.
2020 Elkhart Road. Goshen. IN. 46526
www.sunitalia.com
Page 13 of 30
Revised February 10, 2005
•
Replace the filter housing by engaging the slots at the back of the filter housing and moving the
whole assembly to the left. Tighten down on the previously loosened screw.
•
Replace acrylics carefully and replace the plastic end caps. Wear protective goggles before starting
the unit to check ignition on all lamps and the integrity of all filters.
7.4
REPLACEMENT OF THE LAMP ACRYLICS
•
Carefully remove the horizontal acrylic by removing the two plastic end caps on the lamp assembly
(secured by one screw each). Slide the acrylic to the left or right if you have room, or bend each, and
remove it from the front of the lamp assembly.
•
Replace the new acrylic carefully and replace the plastic end caps. Wear protective goggles before
starting the unit to check ignition on all lamps and the integrity of all filters.
7.5
REPLACEMENT OF THE UV FILTERS
•
Carefully remove the appropriate horizontal acrylic by removing the two plastic end caps on the lamp
assembly (secured by one screw each). Slide the acrylic to the left or right if you have room, or bend
the acrylic, and remove it from the front of each lamp assembly.
•
The filter housings in each assembly are secured with one screw. Simply loosen this screw and push
the individual filter assembly to the right and pull each assembly forward. Each filter assembly slots
into two holes so by mowing the assembly to the right you allow the filter assembly to be released.
•
Remove the filter to be replaced. Gently clean both with an alcohol moistened soft cloth and insert
the replacement filter.
•
Replace the filter housing by engaging the slots at the back of the filter housing and moving the
whole assembly to the left. Tighten down on the previously loosened screw
•
Replace the acrylic carefully and replace the plastic end caps. Wear protective goggles before
starting the unit to check ignition on all lamps and the integrity of all filters.
7.6
LAMP REPLACEMENT
•
Remove the appropriate filter assembly as in 7.5
•
Remove the two screws securing the lamp and reflector. Note that the reflector is positioned INSIDE
the housing.
•
Unscrew the two terminal screws securing the two lamp wires to the white ceramic block.
•
Insert the new lamp in the reflector clips, and secure the wires to the ceramic block.
•
Replace the reflector and lamp assembly inside the housing and secure with the two screws.
•
Replace the filter assembly and the lamp acrylic. Secure the two end caps.
Distributed exclusively in North America by Sun Italia, Inc.
2020 Elkhart Road. Goshen. IN. 46526
www.sunitalia.com
Page 14 of 30
7.7
Revised February 10, 2005
CERTIFIED ULTRAVIOLET LAMPS
During the Federal Guidelines conformance process, the tanning device Manufacturer completed an
exhaustive and precise evaluation of radiation safety using the UV lamps and UV filters designed for use
with your particular tanning device.
The only way to ensure an equivalent lamp (and to protect your clients) is to compare that lamp with the
original, by accurately plotting radiation output against wavelength. This comparison is the responsibility of
the alternate lamp manufacturer and the FDA, and certification of the new lamp is provided only if the lamp is
a true equivalent.
Use of non equivalent lamps is a safety hazard to your Clients, and it is the Tanning Salon owner’s
responsibility to ensure that only original equipment lamps are used, or true FDA certified equivalents.
The surest way to ensure the safety of your customers is to request the lamp manufacturer to provide the
FDA conformance number, and for the Manufacturer or Importer of the tanning device to confirm equivalent
lamps in writing.
This is probably the most important aspect of tanning safety in your salon, as the wrong lamps (or filters)
could change completely the tanning pattern of your device – maximum exposure times and recommended
initial exposure times etc. Please take the time to make an informed decision when your lamps need
replacing.
Distributed exclusively in North America by Sun Italia, Inc.
2020 Elkhart Road. Goshen. IN. 46526
www.sunitalia.com
Page 15 of 30
7.8
Revised February 10, 2005
MAINTENANCE LOG SHEETS
1) Date:
Maintenance Category (description):
Measure U.V. Radiation
Check lamp cooling fans
Check external timer
Check UV Filters
Lubrication of moving parts
hours operation:_________________________
Check air filters
Exhaust system
Push-button Emergency
Clips connection
Timer emergency
Replace lamps
Replace filters U.V.
Replace acrylics
Replace Igniters
Replace reflectors
Technician
Manager
____________________________________
_____________________________________
Distributed exclusively in North America by Sun Italia, Inc.
2020 Elkhart Road. Goshen. IN. 46526
www.sunitalia.com
Page 16 of 30
Revised February 10, 2005
9.0
TECHNICAL SPECIFICATIONS
Model Number
KING 4 US
Dimensions
Length :
Width :
Height :
Tanning Surface
77 inches by 39 inches
Minimum Room Dimensions
9ft by 9ft (Recommend 12’ by 12’)
Total Power
23 KWatts (23 KVA)
UV Lamps
16 x 1,200W B.L.V. MHL 1200 23110602.
4 x 600W BLV MHL 600
Power Supply
208 - 240 VAC, 3 Phase plus Ground, 50 – 60 Hz
Load
60 Amps per phase at 208V, 50 Amps at 240V
Approximately 39 Amps per phase at 380V on the secondary side of the
transformer.
External Transformer
208/240 to 380V 3 Phase Transformer. 24” x 14” x 24” 250lbs
Make up air required
3,000 cubic ft/min
UV Filter (blue)
EuroeleKtrica 240 x 270 mm. Tonianticato 3mm
UV Filter (clear)
EuroeleKtrica 240 x 270 mm. Tempered glass 3mm
Maximum exposure time
12 minutes
Exhaust
Two flexible tubes, diameter 12 inches (300 mm). Max 16 ft each
Features:
4 levels of body cooling
Easy access component trays
Temperature sensors
Diagnostic display
360° tanning experience
87 inches
65 inches
91 inches
Distributed exclusively in North America by Sun Italia, Inc.
2020 Elkhart Road. Goshen. IN. 46526
www.sunitalia.com
Page 17 of 30
10.1
Revised February 10, 2005
To adjust the Upper Limit Switch
This adjustment will allow you to control how far the canopy is raised between sessions. It is checked
during installation and, normally, no subsequent adjustment is required. However, if the canopy is
lifting too high, or not high enough, here is the step by step adjustment procedure:
i.
ii.
iii.
iv.
v.
vi.
Switch off all power to the machine and disconnect one lead of the battery inside of the right
hand component drawer. Note that to access the battery, the drawer must be opened about
two thirds of the way. Make sure the cables are disconnected from the main control board,
otherwise the cables will be damaged as the drawer is opened this far.
Remove the 2 screws and washers securing the rear metal flaps (2) to the iron bar hinge.
On the left side, remove the two screws securing the upper limit micro switches. Remove the
micro switch assembly for easy access.
Adjust the 2 micro switches equally, back or forward to adjust the height to which the canopy
is raised during sessions. Positioning the micro switches forward (away from the rear of the
machine) will reduce the height to which the canopy is raised. The micro switches are
secured by a nut and a lock nut.
Replace the micro switch assembly, connect up the battery and replace the cables on the
main printed circuit board. Turn on power to the bed.
Check the lift operation. Secure the rear metal flaps when working correctly. Close right hand
drawer.
Distributed exclusively in North America by Sun Italia, Inc.
2020 Elkhart Road. Goshen. IN. 46526
www.sunitalia.com
Page 18 of 30
Revised February 10, 2005
ELECTRICAL DIAGRAMS
Control Circuits
Distributed exclusively in North America by Sun Italia, Inc.
2020 Elkhart Road. Goshen. IN. 46526
www.sunitalia.com
Page 19 of 30
Revised February 10, 2005
LAMP CIRCUITS
Distributed exclusively in North America by Sun Italia, Inc.
2020 Elkhart Road. Goshen. IN. 46526
www.sunitalia.com
Page 20 of 30
Revised February 10, 2005
PRINTED CIRCUIT BOARD CONTROLS
Distributed exclusively in North America by Sun Italia, Inc.
2020 Elkhart Road. Goshen. IN. 46526
www.sunitalia.com
Page 21 of 30
Revised February 10, 2005
LAMP LAYOUT AND FUSES
Distributed exclusively in North America by Sun Italia, Inc.
2020 Elkhart Road. Goshen. IN. 46526
www.sunitalia.com
Page 22 of 30
Revised February 10, 2005
COMPONENT LAYOUT BASE FRONT AND REAR TRAYS
Distributed exclusively in North America by Sun Italia, Inc.
2020 Elkhart Road. Goshen. IN. 46526
www.sunitalia.com
Page 23 of 30
Revised February 10, 2005
BASE LAYOUT
Distributed exclusively in North America by Sun Italia, Inc.
2020 Elkhart Road. Goshen. IN. 46526
www.sunitalia.com
Page 24 of 30
Revised February 10, 2005
BASE LAYOUT CENTER
Distributed exclusively in North America by Sun Italia, Inc.
2020 Elkhart Road. Goshen. IN. 46526
www.sunitalia.com
Page 25 of 30
Revised February 10, 2005
CANOPY LAYOUT
Distributed exclusively in North America by Sun Italia, Inc.
2020 Elkhart Road. Goshen. IN. 46526
www.sunitalia.com
Page 26 of 30
Revised February 10, 2005
KING PRINTED CIRCUIT BOARD FRONT VIEW
Distributed exclusively in North America by Sun Italia, Inc.
2020 Elkhart Road. Goshen. IN. 46526
www.sunitalia.com
Page 27 of 30
Revised February 10, 2005
KING PRINTED CIRCUIT BOARD BACK VIEW
Distributed exclusively in North America by Sun Italia, Inc.
2020 Elkhart Road. Goshen. IN. 46526
www.sunitalia.com
Page 28 of 30
Revised February 10, 2005
KING PRINTED CIRCUIT BOARD EXTERNAL TIMER CONNECTION
Connect the T3A directly to the blue and green wires (ignore the relay)
Remove the plastic button to disable START from the control panel
Distributed exclusively in North America by Sun Italia, Inc.
2020 Elkhart Road. Goshen. IN. 46526
www.sunitalia.com
Page 29 of 30
Revised February 10, 2005
Distributed exclusively in North America by Sun Italia, Inc.
2020 Elkhart Road. Goshen. IN. 46526
www.sunitalia.com
Page 30 of 30
Revised February 10, 2005
SAMPLE CUSTOMER CARD
Name:
N°
Date
Skin Type:_
Tanning Equipment Used
Exposure time in minutes
1
2
3
4
5
6
7
8
9
10
11
12
13
14
15
16
17
18
19
20
21
22
23
24
25
Distributed exclusively in North America by Sun Italia, Inc.
2020 Elkhart Road. Goshen. IN. 46526
www.sunitalia.com
___
Comments