1
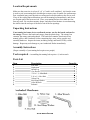
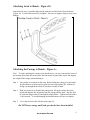
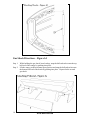
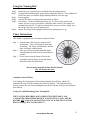
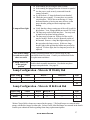
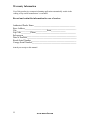
18 LAMP MERCOLA BED
LIGHT SYSTEM
USER MANUAL
Warranty
Tanning systems are warranted to be free from defects in
workmanship as follows:
(5) Years on all metal structural components
(1) Year on gas shocks and electrical components
(90) Days on acrylics, plastics and lamps
Dealer’s obligation under this warranty is limited to the repair and/or replacement of any
defective part without charge for that part, at the manufacturer’s discretion, with the following
limitations:
•
•
•
•
•
•
This warranty is extended only to the original purchaser appearing on the sales
receipt and is non-transferable.
This product is designed for use by one person at a time.
Only original parts may be used.
All major repairs must be completed by an authorized service representative.
This warranty does not cover transportation charges on the parts.
Labor costs are not reimbursable for repair or replacement of items.
Dealer disclaims any responsibility for transportation. Dealer further disclaims any
responsibility for injury resulting from the failure of equipment or parts due to incorrect
installation or operation.
Dealer shall not be liable for loss or damages caused either directly or indirectly from the use of
its products. This limited warranty does not extend to any products which have been damaged as
a result of accident, misuse, abuse, or as a result of service or modification by anyone other than
an authorized service representative.
This warranty does not apply to any failure of parts or products due to alterations, modifications,
misuse, abuse, accidents, improper maintenance, or failure to follow the specified electrical
requirements. Such occurrences immediately VOID this warranty. THIS WARRANTY IS
EXPRESSLY IN LIEU OF ALL OTHER WARRANTIES, EXPRESSED OR IMPLIED,
INCLUDING THE WARRANTIES OF MERCHANTABILITY. No person, firm, or
corporation is authorized to assume for us any other liability in connection with the sale of these
goods
USE OF THIS PRODUCT IN A COMMERCIAL TANNING FACILITY OR
FOR PROFESSIONAL AND MEDICAL SERVICES AUTOMATICALLY
RESULTS IN THE VOIDING OF ANY AND ALL MANUFACTURER’S
WARRANTIES!
THIS PRODUCT IS IN CONFORMITY WITH PERFORMANCE
STANDARDS FOR SUN LAMP PRODUCTS UNDER U.S. FDA SECTION
21 CFR PART 1040.20.
2
www.mercola.com
Congratulations
Thank you for choosing our laydown tanning system for your tanning pleasure. This
tanning system is designed to give you many years of dependable, trouble-free enjoyment
in the comfort of your own home.
Table of Contents
Warranty
2
Safety Information
4
Specifications/Info
4
Electrical Requirements
5
Set Up and Assembly Instructions
7-11
Pre-Tanning Guidelines
12
Recommended Exposure Times
12
Using The Tanning Bed
13
Timer Instructions
13
Caring For and Maintaining Your Tanning Bed
13
Preventive Maintenance Matrix
14
Cleaning and Acrylic Maintenance
14
Acrylic Removal and Re-installation
15
Lamp Removal
15
Lamp Cleaning and Replacement
16
How to Obtain Service
16
Helpful Service Hints
17
Lamp Configuration
17
Frequently Asked Questions
18
Photosensitivity
19
Pregnancy
20
Record Your Warranty Information
22
General Specifications/Size Chart
23
Warning Label Information
24
Please read entire manual before attempting
to operate this tanning unit!
www.mercola.com
3
Safety Information
Label Notice: The United States FDA (Food & Drug Administration) requires that a
warning label is provided to inform the user of possible dangers as stated in 21 CFR
(Code of Federal Regulation), part 1040.20. Review the information on this label located
on the front of your tanning bed.
Tan smart and avoid overexposure. If you do not tan in the sun, you will not tan
from this product. As with natural sunlight, overexposure can cause eye and skin injury
and allergic reactions. Allow 48 hours between sessions. To ensure optimum smart
tanning, please refer to the recommended exposure time chart. (Refer to Table of Contents.)
Use of certain medications or cosmetics may increase your sensitivity to
the ultraviolet radiation. Consult your physician before using any tanning bed if
you are using medications or have a history of skin problems or believe you are sensitive
to sunlight. See “Photosensitivity” (Refer to Table of Contents.)
Recommended eyewear: One pair of protective eyewear, approved by the FDA, is
furnished with this equipment. Protective eyewear should be worn by all persons in the
room when lamps are on. Failure to wear protective eyewear during each tanning session
may result in severe burns or long-term injury to the eyes.
Only the following lamps may be used in this tanning system. Use of
any other lamps will void your warranty.
• Solara Classic (PN 533000)
• Solara Classic ReNew (PN 532008)
• Solara Classic Infra Red (PN 532007)
• Solara Classic ReFresh (PN 532010)
Disconnect power cord before attempting to clean, re-lamp, or
engage in the maintenance of this product. This equipment
must be earth grounded.
DO NOT operate the tanning bed while wet or near water.
Tanning Bed Specifications/Info
Size
Weight Voltage Amps
HxWxL”
(lbs.)
(Volts)
(Rated)
28x32x76
170
120
13
Dedicated
NEMA
Breaker
Receptacle
Amps
15
5-15R
Fans Timer*
3
Mechanical
This tanning system comes equipped with an internal backup timer. Refer to Table of
Contents for more information on timers.
4
www.mercola.com
Pre-Installation Planning - Before you begin to assemble your tanning bed,
please read the following.
Electrical Requirements
A qualified electrician may be needed to assist in fulfilling these requirements.
VERY IMPORTANT!
MUST READ!
EVERY Tanning System REQUIRES a DEDICATED
Circuit Breaker.
This means that your tanning system is the ONLY
electrical device operating on that circuit breaker.
This tanning system requires a NEMA 5-15R Receptacle and a DEDICATED 15 Amp
Circuit Breaker.
NEMA 5-15R
Proper voltage is ONLY between 100 and 130 Volts.
ALL IMPROPER VOLTAGES MUST BE RECTIFIED WITH THE CORRECT
BUCK BOOSTER TRANSFORMER!
Buck Boosters are available through your Tanning Bed Dealer.
Additionally a very easy way of protecting your tanning bed from
potential electrical damage due to power surges or spikes is to
UNPLUG the unit when NOT in use.
See power cord label to determine voltage and receptacle requirements
Failure to comply with these electrical requirements will VOID
ALL WARRANTIES and will damage electrical components!
WARNING: HIGH LEAKAGE CURRENT – ENSURE PROPER GROUNDING.
WARNING: GROUNDING CIRCUIT CONTINUITY IS VITAL FOR SAFE OPERATION OF
EQUIPMENT. NEVER OPERATE WITH GROUNDING CONDUCTOR DISCONNECTED.
www.mercola.com
5
FOR ADDITIONAL ASSISTANCE:
PLEASE REVIEW THE HELPFUL
SERVICE AND MAINTENANCE HINTS IN
THIS USERS MANUAL… IF YOU
HAVE ADDITIONAL QUESTIONS…
REQUIRE TECHNICAL SUPPORT…
INTERESTED IN PURCHASING TANNING
ACCESSORIES…OR FUTURE
UPGRADES FOR NEW LAMPS… DO
NOT HESITATE TO CONTACT THE
AUTHORIZED DEALER WHERE YOU
PURCHASED YOUR TANNING BED.
6
www.mercola.com
Location Requirements
Make sure the room size is at least 8’ x 8’ x 8’ and is well ventilated. Air from the room
is used to cool your tanning bed, which helps to ensure years of trouble free performance.
Poor ventilation may cause the unit to overheat and cause discomfort to the user as well.
If any of the cooling fans malfunction, turn off the tanning bed immediately, and do not
use it again until it has been serviced. Place your tanning bed no closer than one foot
from any wall. Be sure that curtains, drapes, and other room furniture is not obstructing
the airflow into the end caps of the bed or out of the fan openings.
Unpacking Instructions
Your tanning bed comes in two cardboard cartons, one for the bench, and one for
the canopy. Remove the bench and canopy from the plastic bags. The canopy box
contains: the canopy unit and pedestal. The bench box contains: bench unit, users
manual, pillow, and a hardware kit box containing legs, arms, safety goggles and
assembly hardware. Inspect the items, including canopy and bench, for any visible
damage. Report any such damage to your Authorized Dealer immediately.
Assembly Instructions
(Proper assembly of your tanning bed requires two people.)
Tools required – Assembling the tanning bed requires a ½ inch wrench
Parts List
Item
Description
A
B
C
D
E
F
G
H
I
K
Left Arm
Right Arm
Bench Leg
Gas Shocks
5/16 x 1 ½ Allen Bolt
5/16 x 1 ½ Hex Bolt
Nylon Cap
Steel Ring/Washer
Allen Wrench
Pedestal
www.mercola.com
Quantity
1
1
2
2
2
2
2
2
1
3
7
Attaching Legs to Bench – Figure 1a
Step 1. Lay the bench upside down on a soft material (i.e. carpet) (Figure 1a). Attach
the legs using the washers and the allen bolts which are already in the bottom of
the tanning bed. Use the allen wrench (I) to tighten.
Step 2. Turn bench right side up on floor. Place so that the power cord connection is
facing your wall outlet.
8
www.mercola.com
Attaching Arms to Bench – Figure 1b
Attach the left arm (A) and the right arm (B) with the two allen bolts (E) to the bench
(Figure 1b). Use the allen wrench (I) to tighten. Do not over tighten, doing so may cause
damage.
Attaching the Canopy to Bench – Figure 1c
Note: To make attaching the canopy to the bench easier, you may want to place some of
the packing foam from the carton across the bench rails to protect the acrylic and support
the weight of the canopy when attaching it.
Step 1. Two people are required for this step. Before lifting the canopy over the bench
for placement, it is much easier to place the steel ring/washer (H), with the lip
facing out, through the hex bolt (F) and have it ready in hand.
Step 2. With one person at each end of the canopy unit, lift up the canopy above the
bench and align the hex bolt holes from the canopy and the arms. Slip hex bolt
(F) and steel ring/washer (H) through the aligned holes. Tighten hex bolt with a
½ inch wrench. To avoid damaging the threaded inserts, do not over tighten.
Step 3.
Cover the two hex bolts with the nylon caps (G).
Do NOT lower canopy until both gas shocks have been installed
www.mercola.com
9
Gas Shock Directions – Figure 1d
Step 1. While holding the gas shock, barrel end up, snap the ball end socket onto the top
ball end of the canopy by pushing into place.
Step 2. Lift the canopy to the maximum open position and snap the ball end socket onto
the bottom ball end of the bench by pushing into place. Repeat for the second
gas shock.
10
www.mercola.com
Assembling Pedestal
The pedestal is designed to cover the underside area and legs of the tanning bed. The
pedestal comes in three pieces (2 sides, 1 front), with Velcro affixed to the sides. Begin
by placing the smaller sections (sides) of the pedestal next to the legs with the Velcro
towards the front. Remove the Velcro film. Place the front pedestal over the fronts of
the pedestal sides and affix to the Velcro.
Making the Electrical Connections – see electrical requirements.
(Refer to table of contents.)
WARNING! Be sure electrical power is disconnected before connecting the
canopy to bench cables.
Step 1. Connect the canopy to the bench power cord located on the back of the unit.
Step 2. Plug the three-prong 120VAC power cord into a 15 Amp dedicated outlet.
NOTE: IT IS BEST TO UNPLUG THE TANNING BED WHILE
NOT IN USE.
DO NOT CONVERT THE POWER CORD TO A TWO PRONG
CORD OR USE ANY EXTENSION CORD.
AS RECOMMENDED FOR ALL ELECTRICAL APPLIANCES,
THIS TANNING BED SHOULD NEVER BE OPERATED NEAR
WATER OR WHILE YOU ARE WET.
www.mercola.com
11
Pre-Tanning Guidelines
This tanning bed is designed for use by one person at a time, not weighing more than 300
lbs.
Your Skin
Before tanning, be sure your skin is free of any tanning oils or lotions (except those
approved for indoor tanning use), body lotions or cosmetics. Cosmetics or medications
applied to your skin may increase your sensitivity to ultraviolet light. If you are taking
any medication, or if you are especially sensitive to sunlight, we recommend that you
consult a physician before using this or any tanning equipment. It is also recommended
that you not bathe immediately before using this tanning bed as it removes natural body
oils which protect your skin.
Your Eyes
FDA approved eye goggles are provided with this tanning bed and must be worn
whenever the tanning bed is operating. Regular sunglasses do not adequately protect
your eyes from ultraviolet light.
FDA approved eye shields should be worn while tanning and by everyone
in the room while the tanning bed is in operation.
Your Hair
Your hair should be free of any gels, mousses, sprays, or other hair products prior to
tanning. These products can cause damage to the tanning bed acrylic. We suggest you
wear either a shower cap or place a towel or pillow under your head.
Exposure Schedule
Determine the correct exposure time according to your skin type.
Recommended Exposure Times – Shown in Minutes
Week 1
Skin Type:
I. Sensitive skin: burns easily and severely, does not tan
Week 2
Week 3
Week 4
Not recommended for tanning!
II. Light: burns easily and severely, tans minimally
4
6
8
10
III. Normal: burns moderately, tans average
6
8
11
15
IV. Dark: burns minimally, tans easily and above average
8
11
15
20
MAXIMUM EXPOSURE TIME IS 20 MINUTES
ALLOW 48 HOURS BETWEEN ALL TANNING SESSIONS!
12
www.mercola.com
Using the Tanning Bed
Step 1. Determine your exposure time as outlined in the preceding section.
Step 2. If using indoor tanning lotion, apply before getting into the bed. Your Authorized
Dealer can assist you with the proper tanning lotion for your skin type.
Step 3. Put on goggles.
Step 4. Activate the timer according to the instructions to follow.
Step 5. Lift canopy. Lie down on the bench (face up). For best results, position the
canopy as close to you as unit allows. When the timer reaches 0, the lamps will
automatically shut off. To end the session before your pre-set time, simply raise
the canopy and step out of the tanning bed.
Step 6. Return the canopy to the upright position before attempting to sit up.
Timer Instructions
This model is equipped with a 20 minute mechanical timer.
Step 1. Turn the timer dial clockwise to the desired
session time. Timer will not allow more than
20 minutes. The lamps will illuminate, and the
timer will begin counting down.
Step 2. Once your time session has ended the lamps
will automatically turn off at the end of the preset time.
Step 3. If you want to turn the lamps off before the
session has ended, simply get out and unplug
the bed from the electrical outlet.
Do not turn a mechanical timer dial backwards.
This will damage the timer.
Automatic Shut-off Timer
Your tanning bed is equipped with an internal backup shut-off timer which will
automatically turn off your tanning system after 20 minutes. This important safety
feature prevents the user from resetting the timer before the end of the pre-set maximum
time interval.
Caring For and Maintaining Your Tanning Bed
THE TANNING BED SHOULD BE COMPLETELY SHUT DOWN AND
UNPLUGGED FROM POWER SOURCE AT LEAST TWO (2) FULL HOURS
BEFORE ANY CLEANING OR MAINTENANCE TO ALLOW THE TANNING
BED TO ADEQUATELY COOL DOWN!!!!
www.mercola.com
13
Preventive Maintenance for Your Tanning Bed
Recommended Care
After Each Session
Clean acrylic surface
x
Clean pillow
x
Clean goggles
x
Inspect/clean vents
Weekly Monthly
6 Months
Every 1000 hours
x
x
Clean exterior of bed
Inspect/clean reflectors
x
Inspect/clean lamps
Inspect/clean
underside of acrylics
Replace acrylics
x
x
x
x
Replace lamps
Cleaning and Acrylic Maintenance
IT IS NECESSARY TO THOROUGHLY CLEAN AND SANITIZE YOUR
ACRYLIC AFTER EVERY USE TO ENSURE CAREFREE OPERATION AND
TO MAXIMIZE ITS TANNING EFFICIENCY. THE ACRYLIC SHOULD BE
CLEANED WITH A NON-ABRASIVE DISINFECTANT THAT DOES NOT
CONTAIN AMMONIA AND/OR ALCOHOL. DO NOT USE COMMERCIAL
CLEANERS SUCH AS WINDEX8 OR 4098.
USE OF AMMONIA AND/OR ALCOHOL ON YOUR ACRYLICS
WILL VOID THE WARRANTY!
Only use tanning bed cleaner, available at your authorized dealer. Spray the acrylic
lightly, and wipe with a soft cloth.
Take the following steps to maintain your acrylic:
•
•
•
14
When cleaning the tanning bed, use a cotton towel which is much less abrasive than
a paper towel. Never wipe with a dry cloth, as this will generate a slight static,
which attracts dust.
Do not use oils of any kind or lotions when tanning, except those approved
specifically for indoor tanning use, such as Electric Beach TM, available at your
authorized dealer. Products not approved for indoor use will break down the
acrylic.
In order to keep the acrylic from being scratched, jewelry should not be worn while
tanning.
www.mercola.com
Acrylic Removal
Canopy and Bench Acrylic Removal
Warning! Disconnect bed from electrical power before servicing!
Step 1. Stand in front of bed. Using a small, flathead screwdriver, insert the flat head
into either end of the black acrylic trim strip. Pry up slowly to grasp edge of
strip and continue to pull away from unit until it is completely removed. Repeat
procedure for second strip of acrylic trim.
Step 2. It may be necessary to slightly loosen the end cap screws to help remove the
acrylic. NEVER REMOVE END CAP SCREWS!
Step 3. With the flathead screwdriver, pry the acrylic up and over the lip in the bed rail.
It is recommended you have two people to remove acrylics. Begin by grasping
the long edges of the acrylic which are now exposed.
Step 4. Standing in front of the bed, grasp the long exposed edge of the acrylic and
carefully slide it toward you until it is removed. BE CAREFUL – the edges of
the acrylic may be sharp.
Acrylic Re-installation
Step 1. Place acrylic back on bed. Tighten end cap screws.
Step 2. Take one end of the black acrylic trim and press firmly onto the aluminum
frame pushing into the opening. The longer flat edge of the trim must be
against the top of the acrylic.
Step 3. Place the palm of your hand on the trim, and apply pressure along the edge until
the trim is firmly in place.
Lamp Removal & Re-installation
The tanning lamps are rated up to 1000 hours of use. You may elect to change lamps
sooner.
Step 1. After removing acrylics, grasp a lamp at one end and at middle. Turn the lamp
a quarter turn. The lamp may then be gently removed from its holder.
Step 2. Hold lamp with brand name label facing toward the acrylic and to the left side
of the bed. To install the lamp, insert the pins located on the ends of the lamp
into the slots on top of the lamp holder and turn the lamp a quarter turn to hold
in place.
For lamp replacement, refer to “Lamp Cleaning” section to follow. Lamps used longer
than 1000 hours have lost their tanning power even though they will continue to light.
www.mercola.com
15
The following lamp types have been certified by the United
States FDA for use in your tanning system:
• Solara Classic (PN 533000)
• Solara Classic ReNew (PN 532008)
• Solara Classic Infra Red (PN 532007)
• Solara Classic ReFresh (PN 532010)
You may purchase tanning lamps from your authorized dealer.
Do not use lamps other than those specified. To do so will void
your warranty and FDA certification.
Lamp Cleaning & Replacement
Depending on the amount of usage, it is recommended that you clean your lamps every
six months. To remove the acrylic, see Table of Contents. After all the lamps have been
removed, use a soft cloth and a non-abrasive cleaner to wipe down the aluminum
reflectors. Take care not to scratch them because scratched or damaged reflectors will
reduce the tanning capability of the tanning unit. Gently wipe the entire length of the
lamp with a damp cloth to remove any film buildup. Vacuum reflector area using a soft
brush attachment.
How to Obtain Service
1.
Review the “Helpful Service Hints” to follow.
2.
If you require additional assistance, contact the Customer Service Department at the
Authorized Dealer where the bed was purchased. If it becomes necessary to replace
a warranty part, proof of purchase is required to obtain warranty service. It is
important to keep your store receipt.
3.
For non-warranty parts replacement or for routine maintenance, contact your
Authorized Dealer.
16
www.mercola.com
Lamps will not light
..
.
..
.
.
.
Helpful Service Hints
Is the tanning bed on using the timer system?
Is the tanning bed plugged into the electrical receptacle?
Are the power cords securely connected from the
canopy to bench?
Is your bed on a 15 Amp dedicated circuit breaker?
Check the power supply. You may have to reset the
circuit breaker. This is due to not having a 15 Amp
dedicated breaker or having too many devices on the
proper breaker pulling too much amperage while
tanning.
Verify that the voltage coming out of the wall is safe for
this product. Your voltage should not exceed 130 Volts.
The lamp may not be locked into place. You may need
to hand twist back into locking position
The lamp may be burnt out. Removal of the acrylic
may be needed. Refer to Acrylic Removal section of
this manual. Remove a lamp that lights and place it in
the spot where the lamp was out. If this new lamp
doesn’t light in this position the ballast may need to be
replaced. If it does light, the first lamp may need to be
replaced.
Two or three lamps
located next to each
other are not lit
Possibly a ballast problem due to a power surge in your
household electrical system. Contact your Authorized Dealer
for replacement assistance.
Canopy fails to stay
in the upright
position
Double check assembly instructions. Gas shocks may have
been put on upside down. See page 10.
Lamp Configuration - Mercola 18 Vitality Bed
Solara Lamp
Canopy
Classic
6
Bench
6
ReNew *
4
0
Infra Red
0
Total
10
2
8
18
Lamp Configuration - Mercola 18 ReFresh Bed
Solara Lamp
Canopy
Classic
6
ReNew
2
Bench
6
0
ReFresh **
2
0
Infra Red
0
Total
10
2
8
18
*Solara Classic ReNew lamps are centered in the canopy. **Refresh Lamps are centered in the
canopy with ReNew lamps on either side. Solara Classic Infra Red lamps are centered in the bench.
Contact your authorized dealer regarding future lamp replacement/options.
www.mercola.com
17
Frequently Asked Indoor Tanning Questions?
Is there a safety reset switch?
No. If the bed will not turn on, verify the outlet has power. If the timer will not respond,
the bed needs to be serviced. Unplug it and call the dealer the bed was purchased from.
Do tanning lotions really make you tan faster?
Yes. Depending on your skin type, when you use the appropriate accelerator, you will
achieve a darker tan in less time than if using no accelerator.
How many times do I have to use the bed before I get a tan?
That depends on your skin type and how fast you tan. It will probably take you
approximately 16 sessions to achieve the results you want. (See recommended exposure
time chart.)
Do I have to take my contact lenses out before I tan?
No, if you wear protective FDA approved eyewear.
Do I really have to wear Goggles?
Yes. If you use a tanning bed without eye protection, your eyes may be damaged by the
UV rays. FDA approved goggles that you wear are very important. Your eyelids alone
offer almost no protection against ultraviolet light, which may cause damage to the eye.
Not using proper eye protection may also result in short term effects such as tired, itchy
eyes, headaches and loss of night vision.
Nude Tanning
Parts of the body that have never been exposed to the sun before will turn pink or even
red. They might even break out with a rash. This is caused by an over-exposure to the
ultraviolet rays. It takes these parts longer to start the tanning process.
Rashes
Heat rashes, or “tanner’s itch” indicate that the light and heat generated by tanning bulbs
or the sun have dried your skin. Itching can also result from a reduced rate of melanin
production in a particular area of your body. Melanin is the protective skin pigment
found in varying amounts in everyone’s skin. If you begin tanning in the nude, you may
find that previously unexposed areas develop an itch. This is natural so don’t be alarmed;
just discontinue tanning for a few days, and then slowly build up time allowing melanin
production to increase. Heat rashes may also have a slight redness and itching, which
occurs from getting too many UV rays. It’s dryness to the skin or reactions to cosmetics,
medications or foods that may contribute to this. If a medication, irritation, cosmetic or
food is causing the rash, you should stop tanning until the rash disappears.
18
www.mercola.com
Photosensitivity
A photosensitivity reaction does not depend on the presence or absence of a suntan or
sunburn, although it often accompanies them. Photosensitivity reactions are
immunological or toxicity reactions and result from the presence of photosensitizing
agents and UV light. Photosensitivity reactions are characterized by reddish skin with
elevated poison ivy-like bumps and can occur in areas that were not exposed to the sun.
They frequently produce little or no discomfort. On the other hand, phototoxic reactions,
another type of photosensitivity reaction, are usually accompanied by symptoms similar
to that of sunburn. Once a person gets a photosensitivity reaction, they are more likely to
have a recurrence under the same conditions in the future. (Mayo Clinic 1993)
Symptoms of Photosensitivity
Usually severe burning
Often occurs in patches and in small areas of the body.
Blotch formation
This could be a result of heat as well as light.
Rash (Photodermis)
Redness induced by light. May be the cause of itching and may appear all over the body.
Uneven pigmentation
Could be the result of light exposure combined with medication, or it might be the result
of non-light related factors such as genetic factors, pressure points or a fungus
Common diseases which react unfavorably with UV light (are exacerbated by UV):
•
Herpes Simplex
•
Lupus Erythematosoyus (swelling of the nerve endings)
•
Porphyria-severe (extreme sensitivity to any source of light)
•
Vitiligo (irregularly shaped patches of skin with no pigmentation and dark
borders)
•
Skin cancers (Basal, Squamous, and Melanoma)
www.mercola.com
19
Photosensitivity reactions may be triggered by medicines included in, but not limited to
the following general list. (This means you might turn red or burn when taking them
with exposure to the sun or a tanning bed):
If you are taking any medication, you should consult with your doctor before tanning.
Antibiotics in the Tetracycline Family
Anticancer Drugs
Anticonvulsants
Antidepressants
Antidiabetics
Antihistamines
Antihypertensive Medications
Antiseptic Creams
Birth Control Pills
Retin-A
Sulfonamides (often for urinary tract infections)
Tranquilizers
Water Pills
Medications to avoid when tanning
Acne medications
Antibacterial Drugs
Antibiotics
Anticancer Drugs
Antidepressants
Antihistamines
Anti-inflammatory Drugs
Antiparasitic Drugs
Birth Control Pills
Diabetes Drugs
Diuretics
Psoralen Drugs (topical or oral)
Tranquilizers/Antipsychotic Drugs
For more information on photosensitivity, please see the following websites:
http://www.fda.gov
http://www.emedicine.com
http://www.intelihealth.com
http://www.lupus.org
http://www.photosensitivity.org
Pregnancy
You should consult with your doctor before tanning while pregnant.
20
www.mercola.com
FOR ADDITIONAL ASSISTANCE:
PLEASE REVIEW THE HELPFUL
SERVICE AND MAINTENANCE HINTS IN
THIS USERS MANUAL… IF YOU
HAVE ADDITIONAL QUESTIONS…
REQUIRE TECHNICAL SUPPORT…
INTERESTED IN PURCHASING TANNING
ACCESSORIES…OR FUTURE
UPGRADES FOR NEW LAMPS… DO
NOT HESITATE TO CONTACT THE
AUTHORIZED DEALER WHERE YOU
PURCHASED YOUR TANNING BED.
www.mercola.com
21
Warranty Information
Use of this product in a commercial tanning application automatically results in the
voiding of any and all manufacturer’s warranties!
Record and retain this information for ease of service:
Authorized Dealer Name ________________________________________
Store Address__________________________________________________
City _____________________________State______________
Zip Code _________Phone_______________________________________
Salesperson____________________________________________________
Date of Purchase________________________________________________
Bench Serial Number____________________________________________
Canopy Serial Number___________________________________________
Attach your receipt to this manual.
22
www.mercola.com
Tanning Bed General Specifications
Required Receptacle*
Receptacle Voltage*
Minimum Room Size
Maximum Ambient Room Temperature
Lamp Hours
*Refer to Electrical Requirements. (See Table of Contents.)
NEMA 5-15R
120V 60Hz
8’ x 8’ x 8’
80oF
1000
Size Chart
Height
Open
“H1”
Height
Closed
“H2”
Width
“W”
Length
“L”
46
28
32
76
www.mercola.com
23
Warning Label Information
DANGER! Ultraviolet radiation! Follow instructions. Avoid overexposure. As with
natural sunlight, overexposure can cause eye and skin injury and allergic reactions.
Repeated exposure may cause premature aging of the skin and skin cancer. FAILURE
TO WEAR PROTECTIVE EYEWEAR MAY RESULT IN SEVERE
BURNS OR LONG-TERM INJURY TO THE EYES.
WARNING: Read the instruction booklet before using this sunlamp product. All
persons in the room should wear protective eyewear when lamps are on. Recommended
eyewear: Provided eye shields or equivalent eyewear as defined under 21CFR 1040.20.
Other types of eyewear may not provide adequate protection. If discomfort develops,
discontinue use and consult a physician.
Medications or cosmetics may increase your sensitivity to the ultraviolet radiation.
Consult physician before using sunlamp if you are using medications or have a history of
skin problems or think you are especially sensitive to sunlight. If you do not tan in the
sun, you are unlikely to tan from the use of this product. Children, the elderly, or fair
skinned people who always burn easily and either never tan or tan minimally, should not
use this equipment.
To use, lie down on bench and pull canopy down as far as adjustment will allow
maintaining at least 2 inches (5.1 centimeters) between your body and canopy, to avoid
overexposure.
This product is in conformity with performance standards for sun lamp products under
21 CFR Part 1040.20 and ANSI/UL Standard 482.
Never tan more than once a day and allow 48 hours between tanning sessions. Tanning
normally appears after the first few sessions and maximizes after approximately four
weeks. Tan once or twice per week thereafter to maintain desired appearance.
ONLY THE FOLLOWING LAMPS HAVE BEEN CERTIFIED FOR USE IN THIS
EQUIPMENT:
Solara Classic (PN 533000)
Solara Classic ReNew (PN 532008)
Solara Classic Infra Red (PN 532007)
Solara Classic ReFresh (PN 532010)
RECOMMENDED EXPOSURE TIMES – IN MINUTES
MAXIMUM EXPOSURE TIME IS 20 MINUTES
SKIN TYPE
WEEK:
1
2
3
1
2
3
4
4
Sensitive Skin (Burns easily and severely and does not tan) NOT RECOMMENDED FOR TANNING
Light (Burns easily and severely and tans minimally.)
4
6
8
10
Normal (Burns Moderately and tans average.)
6
8
11
15
Dark (Burns minimally, tans easily and above average.)
8
11
15
20
Disconnect power cord before attempting to clean, re-lamp, or engage in the
maintenance of this product.
Copyright 2010
Made in the USA
www.mercola.com
02/12/10
Item #660017 rev.E