1
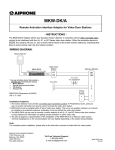
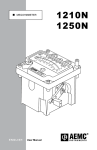
CONTENTS
GB USA
IMPORTANT
GB USA
WEIGHING
1. Use in location where there is little vibration.
2. If the change in temperature exceeds 5¡C (10¡F), wait at least 30 minutes before use.
3. Use on a hard flat surface.
4. Keep the cover closed when weighing.
5. Do not dismantle.
6. Clean using mild detergent. Chemicals should not be used.
*Before measuring, we recommend you to carry out a calibration. (→ see
"CALIBRATING")
1. Press the lock release button to open the cover (Fig.3).
2. Press the ON/OFF button to turn on the scale. The display will flash,
and when the display shows "0." and Stable mark, the scale is ready for
use.
3. Place the object to be weighed on the tray.
(Fig. 3)
*If using the gem cup, remove the tray.
4. The object’s weight will be displayed.
5. In order to subtract the weight of the vessel or container, press the TARE button. "0." will
appear on the display, and when an object is placed on the scale, the weight of that object
only will be displayed.
6. In order to change the units of measurement, press the MODE button.
The units will change in the following order: g → ct → ozt → grain
7. When you have finished weighing, press the ON/OFF button to turn off. The scale will turn
off automatically after ten minutes of inactivity.
8. When not in use, close the cover and push back until it locks.
*If you used the gem cup, remove it and put the weighing tray back in place.
max
. 100c
t・d
=0.0
1ct
0.64
ozt・
d=0.
0001
ozt
308g
r・d
=0.0
5gr
20g・
d=0.
MOD
EL
1210
002g
N
MO
DE
CAL
TAR
NAMES OF PARTS
①
②
⑦
⑧
⑫
⑯ ⑮ ⑭ ⑬
③
⑨
MODEL 1210N
MODE
CAL
TARE
ON/OFF
ma
x.
100
ct・
d=0
⑩
.01
ct
0.6
4oz
t・d
=0.
000
1oz
t 308
gr・
d=0
.05
gr
20g
・d
=0.
002
MOD
EL
g
1210
N
⑪
MO
DE
CA
L
TAR
E
ON
/OF
F
⑥
④
⑰
⑤
⑦ Gem cup
⑧ Lo battery mark
⑨ Stable mark
⑩ Minus sign
⑪ Calibration mark
⑫ Weighing modes
⑬ ON/OFF button
⑭ TARE button
⑮ CALIBRATION button
⑯ MODE button
⑰ AC adaptor inlet
CALIBRATING
1. Turn on the scale, and press the CAL button.
2. The display shows CALIb and then will flash CALIb .
3. Place the included test weight on the weighing tray. The scale will calibrate automatically.
4. The following messages will appear one after another;
CALIb → End → 20.000g
5. Calibration is completed. Remove the test weight.
BEFORE USE
(Fig.1)
Push
(Fig.2)
※Calibration is not completed when showing Err . Repeat calibration procedure.
PROGRAMMING AUTO POWER OFF
. 100
ct・
d=0
.01c
t 0.64
ozt・
d=0
.000
1oz
t 308
gr・
max
d=0
.05g
r 20g
. 100
ct・
・d
=0.0
MOD
d=0
.01c
02g
EL
1210
t 0.64
ozt・
d=0
N
MO
DE
CAL
TAR
E
MOD
ON
/OF
F
Push
ON/
OFF
※"EEEEE" :Over Load. The object being weighed exceeds the maximum weight.
① Cover
② Weighing tray
③ LCD display
④ Key buttons
⑤ Test weight
⑥ Lock release button
max
E
EL
1210
.000
1oz
t 308
gr・
d=0
.05g
r 20g
・d
+
=0.0
02g
−
N
−
MO
DE
CAL
TAR
E
ON
/OF
F
Open
+
◆ When using with batteries.
1. Press the lock release button (Fig.1).
2. Remove the battery cover and insert 4 size AAA (LR03) batteries as shown in Fig.2.
3. Replace the battery cover.
◆ When using with AC adaptor.
1. Do not use any AC adaptor except those with the following specification.
*Only use an AC adaptor with a CE marking.
◆ Default setting is 10 minutes.
◆The auto power off time can be programmed between 0 (=no auto power off) to 60
minutes by 10 minutes according to preference.
◆Press MODE button and ON/OFF button simultaneously when the unit is turned off.
The unit will then show the current setting.
1. Press TARE button to increase the length (the figure goes up by 10 minutes) and press
CAL button to decrease.
2. Press MODE button to set.
TECHNICAL SPECIFICATIONS
Test weight
Capacity
Graduation
Power
2. To use AC adaptor, put the DC jack into the inlet as in the ⑰ above.
Power Consumption
*Not legal for trade.
20g
20g / 100ct / 0.64ozt / 308gr
0.002g / 0.01ct / 0.0001ozt / 0.05gr
DC6V AAA(LR03) × 4 (included)
AC adaptor (DC6V 200m A) (When using with AC adaptor.)
12mA (max.)