1
Website User Guide
Updated September 18, 2013
A Product of doForms Inc.
Table of Contents
Legal Notice .......................................................................................................................................7
Contact Support .................................................................................................................................7
Video Tutorials ..................................................................................................................................7
Requirements ....................................................................................................................................7
Overview ...........................................................................................................................................8
Mobile Data Collection App .................................................................................................................. 8
doForms Website .................................................................................................................................. 9
doForms Dispatch ................................................................................................................................. 9
Security for Paid Accounts .................................................................................................................. 10
This Guide............................................................................................................................................ 11
Accessing the doForms Website ....................................................................................................... 12
Requirements ...................................................................................................................................... 12
doForms Website URL ......................................................................................................................... 12
Website Privileges ............................................................................................................................... 12
Request Website Access ..................................................................................................................... 13
Sign in .................................................................................................................................................. 14
Sign out ............................................................................................................................................... 14
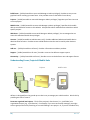
Website Home ................................................................................................................................. 15
Header Tabs ........................................................................................................................................ 15
Understanding Forms, Projects & Mobile Units ................................................................................. 16
Deploying Forms to Mobile Units ....................................................................................................... 17
Viewing Data ....................................................................................................................................... 18
Sending Dispatches and Work Orders................................................................................................. 18
Important Notices ............................................................................................................................... 18
Getting Started .................................................................................................................................... 18
Custom Branding (Paid Accounts Only) .............................................................................................. 18
View Data ........................................................................................................................................ 19
Selecting Projects and Forms .............................................................................................................. 19
Deleting Projects and Forms ............................................................................................................... 19
Deleting Data Records......................................................................................................................... 20
File Menu ............................................................................................................................................ 20
2|
Table of Contents
Options Menu ..................................................................................................................................... 21
Data Menu........................................................................................................................................... 22
View Menu .......................................................................................................................................... 22
Viewing Media Files ............................................................................................................................ 22
Sorting and Filtering Data ................................................................................................................... 22
Current Query ..................................................................................................................................... 23
Map View ............................................................................................................................................ 23
Row Menu ........................................................................................................................................... 24
Workflow Approvals............................................................................................................................ 25
Viewer Control .................................................................................................................................... 25
Retrieve Function (Dispatch accounts only) ....................................................................................... 25
Dispatch [Dispatch accounts only] .................................................................................................... 27
Selecting Projects and Forms .............................................................................................................. 27
Viewing and Deleting Dispatch Records ............................................................................................. 28
Creating a New Dispatch Record......................................................................................................... 28
Status Indicators.................................................................................................................................. 29
File Menu ............................................................................................................................................ 29
Options Menu ..................................................................................................................................... 29
Data Menu........................................................................................................................................... 30
View Menu .......................................................................................................................................... 30
Sorting and Filtering Data ................................................................................................................... 30
Row Menu ........................................................................................................................................... 30
Bulk Dispatch ....................................................................................................................................... 31
Workflow Approvals............................................................................................................................ 32
Tracking Map....................................................................................................................................... 32
Duration......................................................................................................................................................33
Track Colors ................................................................................................................................................33
Build Forms ..................................................................................................................................... 34
Layout .................................................................................................................................................. 34
Creating a Form ................................................................................................................................... 34
Opening a Form ................................................................................................................................... 35
Saving a Form ...................................................................................................................................... 35
Open Special........................................................................................................................................ 35
Insert Form .......................................................................................................................................... 36
Table of Contents
|3
Deleting a Form ................................................................................................................................... 36
Options Menu ..................................................................................................................................... 37
Resources Menu.................................................................................................................................. 38
Manage Lookup Tables ...............................................................................................................................38
Manage Custom Report Templates ............................................................................................................43
Adding, Moving, Duplicating & Deleting Questions ............................................................................ 45
Questions, Containers, Properties, Metadata .................................................................................... 46
Question Widget Types ....................................................................................................................... 46
Container Types .................................................................................................................................. 49
Basic Properties................................................................................................................................... 49
Advanced Properties (Paid Account Only) .......................................................................................... 55
Adding Skip Logic ........................................................................................................................................55
Adding Relevance Logic ..............................................................................................................................55
Compound Logic .........................................................................................................................................57
Using Page Breaks ............................................................................................................................... 59
Using Repeatable Sections (Paid Account Only) ................................................................................. 60
Using Calculations (Paid Account Only) .............................................................................................. 61
Sum and Count Operators ..........................................................................................................................62
Parenthesis ( ) Group ..................................................................................................................................63
Use of Hidden Fields for Variables..............................................................................................................63
Date:Time Calculations ...............................................................................................................................64
Using Scores (Paid Account Only) ....................................................................................................... 64
Using Questionnaires (Paid Account Only) ......................................................................................... 66
Using Action Buttons (Paid Account Only) .......................................................................................... 68
Using Lookups (Paid Account Only) .................................................................................................... 71
Using Tables (Paid Accounts Only) ...................................................................................................... 75
Using Grids (Paid Accounts Only) ........................................................................................................ 77
Emailing PDF and Excel Reports (Paid Accounts Only)........................................................................ 79
Information Pages ............................................................................................................................... 79
Previewing a Form............................................................................................................................... 79
Deploy Forms to Mobile Units ............................................................................................................ 80
Updating Forms ................................................................................................................................... 80
Public Forms Library ............................................................................................................................ 81
Using a Public Form ....................................................................................................................................81
Contributing a Public Form .........................................................................................................................82
4|
Table of Contents
Creating Reports .............................................................................................................................. 83
Overview ............................................................................................................................................. 83
Reports vs. Exports .....................................................................................................................................83
Standard Custom Report Template vs. Custom Report Template .............................................................84
PDF vs. Excel Output ...................................................................................................................................84
Report Settings .................................................................................................................................... 84
When Emailing Report from Mobile App ...................................................................................................86
When Creating PDF File Use: ......................................................................................................................86
When Creating Excel File Use: ....................................................................................................................86
Standard Report Template Settings ...........................................................................................................86
Custom Report Template Settings ..............................................................................................................87
General Report Settings (PDF & Excel Reports) ..........................................................................................87
Creating a Custom Report Template ................................................................................................... 87
{data_name} Tags .......................................................................................................................................88
Creating a Template File .............................................................................................................................89
Multiple Projects/Forms .............................................................................................................................90
Uploading the Template .............................................................................................................................91
Creating PDF Output ........................................................................................................................... 92
Creating Excel Output ......................................................................................................................... 93
Emailing Reports from the Mobile App (Paid Account Only) .............................................................. 95
Projects ........................................................................................................................................... 96
Layout .................................................................................................................................................. 96
Main Project ........................................................................................................................................ 96
Search .................................................................................................................................................. 97
Column Menu...................................................................................................................................... 97
Row Menu ........................................................................................................................................... 97
Mobile Units .................................................................................................................................... 99
Layout .................................................................................................................................................. 99
Mobile Number and PIN ................................................................................................................... 100
Website Setup Wizard....................................................................................................................... 100
Search ................................................................................................................................................ 100
Columns............................................................................................................................................. 100
Row Menu ......................................................................................................................................... 101
Table of Contents
|5
Web Users ..................................................................................................................................... 102
Layout ................................................................................................................................................ 102
Website Setup Wizard....................................................................................................................... 102
Adding Users ..................................................................................................................................... 102
Changing User Information ............................................................................................................... 103
View Restrictions............................................................................................................................... 103
Search ................................................................................................................................................ 103
Account ......................................................................................................................................... 104
Manage Your Account ....................................................................................................................... 104
Manage Your Website ....................................................................................................................... 105
Manage Your Mobiles ....................................................................................................................... 106
Contact doForms Support............................................................................................................... 108
Custom Development Services ....................................................................................................... 108
6|
Table of Contents
Legal Notice
Your use of doForms, including online and offline components, is governed by the Terms of Use as
specified at http://www.doforms.com/terms-of-use.
Copyright © 2011-2013 doForms Inc.
All Rights Reserved.
Contact Support
Email: [email protected]
Website: www.doforms.com/support
Video Tutorials
http://www.doforms.com/support#2
Requirements
Notices
Firefox Version 4 or greater, or
Chrome Version 4 or greater, or
Safari Version 4 or greater, or
Internet Explorer Version 9 or greater
|7
Overview
doForms provides “smart-forms” for Android-powered smartphones and tablets - everything you need
in a turn-key, all-in-one, reliable, secure, and fully hosted mobile data collection solution. Supported
data types include:
Section labels
Textual data
Numeric data
Calculations
Date:time
Single choice answers
Multiple choice answers
Category scores
Lookup tables
Action buttons
Barcode scanning
NFC scanning
Signatures
Sketches
Pictures
Video recording
Audio notes
GPS locations
Approvals
Email reports
These data entry widgets can be displayed individually, or formatted using the following “containers”:
Page
Table
Grid
Questionnaire
Repeatable Section
Mobile Data Collection App
doForms mobile data collection software works with a wide selection of popular iOS and Android
smartphones and tablets. Unlike all browser-based forms, our mobile data collection software, or
"mobile forms app", enables your workers to operate in both connected and disconnected
environments. This is critical for workers in rural areas or urban settings with cellular dead spots.
Imagine using your mobile data collection software to instantly take a picture, then sketch on top of it to
illustrate something of interest; or to scan the barcodes of materials being delivered to a job site.
Imagine recording audio notes and video clips and embedding them right in your electronic mobile data
8|
Notice
collection forms; or using the GPS to precisely record a location. Think about the increased speed and
accuracy of reporting.
doForms provides a flexible, fast, and easy solution to deploying mobile data collection forms to your
workers - anywhere in the world. And the mobile forms on your workers' smartphone and tablet
devices are automatically synchronized and remotely kept up-to-date. Control who gets which mobile
data collection forms. Remotely control who can view or change the incoming data. doForms
centralizes this control on a website dashboard to save time and money.
For paid accounts, your doForms mobile app can be branded using your company name and graphics.
doForms Website
doForms provides a fully integrated website for aggregating, sorting, querying, viewing and managing
mobile forms data being collected by your workers. If GPS coordinates are included, your mobile forms
data can be viewed on top of an interactive map. The website keeps track of which workers collected
which mobile forms data. The website makes it easy to export mobile forms data to your other business
applications, and to integrate your mobile forms data in real time with other IT systems by using web
services.
Use our off-the-shelf mobile data collection forms library. Or create your own mobile forms using the
most powerful, yet easy-to-use form creation software available. Our form builder provides simple and
intuitive user interfaces for building mobile forms. You don't need to be a specialist to use our form
creation software. You just need to have an understanding of what you want your mobile data collection
software to do. With doForms, anyone with office software experience can create their own mobile data
collection forms for smartphones and tablets. With doForms, there is no need for software
programmers to build your mobile forms or IT support staff to deploy them.
doForms allows easy exporting of mobile forms information to other business applications such as
Microsoft Excel, Open Office, and Google Docs. Export options are also provided for CSV, HTML and PDF
file formats. Additionally, doForms also provides for direct integration of your mobile forms with CRM,
database and GIS systems, such as Salesforce.com, Oracle, SAP, and ArcGIS, through the use of industrystandard SOAP web services. These web services can be set up and deployed in a matter of minutes with
no software programmers involved.
For paid accounts, your doForms website and mobile app can be branded using your company name and
graphics.
doForms Dispatch
doForms Dispatch provides powerful dispatch forms and work order forms functionality. These special
purpose forms contain important information to tell mobile workers where to go (dispatch) and what to
do when they get there (work order). As your mobile workers complete their assigned tasks, doForms let
them fill out data fields in the form, take pictures, capture GPS locations, and collect signatures. The
completed data records are then sent back to you.
In addition to sending and receiving forms from your workers, doForms Dispatch also tracks their
current and past GPS locations, and these locations are plotted on an interactive map in the Dispatch
Overview
|9
tab. You can select which workers to view, as well as the time interval. The map also shows the locations
where forms were filled out.
Your doForms website account provides a specialized Dispatch tab where dispatch forms and work order
forms can be filled out, managed, scheduled and sent to your mobile workers. The data sent back from
your workers is also viewed in this tab, as well as the status of their assigned job. And your workers' past
and present locations are shown on a map in this tab.
Dispatch data can also be sent from your existing dispatch and work order system, and forwarded via
our Data Exchange Server to your doForms equipped mobile devices. Similarly, the competed forms can
be sent from the mobile devices, and forwarded to your existing dispatch and work order system. Our
Data Exchange Server makes this integration simple and quick.
Finally, Dispatch accounts provide the ability for mobile users to “Retrieve” previously sent data from
the website, work on it, then send it back to the website. Imagine a situation where you have one
mobile worker who fills out a form, and a different mobile worker who needs to approve the job record.
Or imagine a field medicine scenario where different specialists need to add information to a patient
record.
Security for Paid Accounts
The security of the doForms system is based on (i) data transmission encryption, and (ii) Google's App
Engine IT infrastructure security.
Data transmission between your mobile devices and the doForms website is encrypted using Secure
Socket Layers (SSL3). This protects your data while traveling over the airwaves or internet. Browsing of
data on your doForms website may also be encrypted using SSL/HTTPS. Please be sure to use the
encrypted SSL3 connection at https://mydoforms.appspot.com / followed by the name of your
doForms website account.
You can also have peace of mind knowing that your data and forms are hosted on top of Google's App
Engine IT infrastructure. Google App Engine has successfully undergone annual SAS 70 Type II audits
which have evolved into the SSAE 16 Type II attestation and its international counterpart, ISAE 3402
Type II. Google App Engine is one of the first major cloud providers to be certified for compliance to
these new audit standards.
Third party audits are only part of the security and compliance benefits of Google App Engine products.
Google protects our customers’ data by employing some of the foremost security experts, by executing
rigorous safety processes, and by implementing cutting-edge technology. These protections are
highlighted in the data center video tour. For more information visit the Google Apps Trust page.
Source: http://googleenterprise.blogspot.com/2011/08/security-first-google-apps-and-google.html
10 |
Overview
This Guide
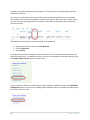
This guide explains how to use your doForms website and supplements the video tutorials. Availability
of videos for key topic is denoted with the symbol below
http://www.doforms.com/support#2
An electronic version of this guide is available in the Support section of the doForms website:
www.doforms.com/support .
Overview
| 11
Accessing the doForms Website
The doForms website is a secure web-based application. You must use your account name, email
address and password to access the website.
Requirements
You must have one of the following to access the doForms website:
Internet Explorer Version 9 or greater, or
Firefox Version 3 or greater, or
Chrome Version 4 or greater, or
Safari Version 4 or greater
Website performance will vary with the speed of your Internet connection.
doForms Website URL
Enter www.mydoforms.com/ followed by the name of your doForms website account and press Enter.
The name of your doForms website was specified at the time of the order. If you do not know it, please
see your organization’s doForms administrator.
For paid accounts, you can also access your website from a browser using an encrypted SSL3 connection
at https://mydoforms.appspot.com / followed by the name of your doForms website account.
Website Privileges
If you are the person who ordered the doForms account, then you are by default the “Administrator”.
Administrators have access to all website functions and features. Other privilege levels are as follows
Read – Access to the “View Data Tab” to view data only.
Edit – Access to the “View Data Tab” to view, add, edit, delete, and export data.
Manage – Full access to all doForms website Tabs and all their functionality, including building forms,
managing projects, connecting additional mobile devices, and setting up additional website users.
Administrators automatically have login access using the email and password that was specified at the
time the order was placed. All other website users must request an account as explained in the
following section.
12 |
Overview
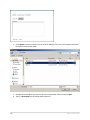
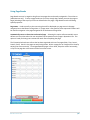
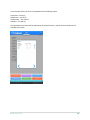
Request Website Access
Administrators automatically have login access using the email and password that was specified at the
time the doForms order was placed. All other website users must request a website account. To
request an account:
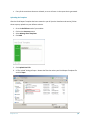
1. Click Request access at the bottom of the login page
2. Enter all of the information on the Request Account form and press Submit
A doForms Administrator will review your request and email you a confirmation if access is granted.
Accessing the Website
| 13
Sign in
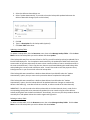
To login to your doForms website:
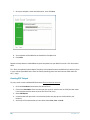
1.
2.
3.
4.
Enter the name of your doForms website
Enter your email address.
Enter your password.
Press Sign in.
Sign out
There are two ways to log out:
14 |
Click Sign out at the top right of the header
-ORClose the browser
Accessing the Website
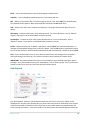
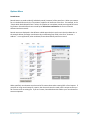
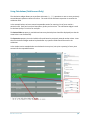
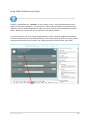
Website Home
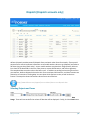
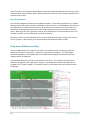
The doForms website has a consistent and easy-to-follow design as shown below. When you login, you
will see the website homepage. The number of tabs and menu items will vary depending on your
privileges.
Header Tabs
The header contains a light blue bar with links to the main sections of the website. Click those links to
navigate to that page. The header is always visible, regardless of what page you are viewing. The main
sections, from left to right, are:
Merchandising – [Merchandising Accounts only – visible / accessible to all users] Provides specialized
merchandising functionality, including the ability to manage retail account and product facings. NOTE –
This functionality is currently in “beta” and has not yet been released.
Dispatch – [Dispatch Accounts only – visible / accessible to all users] Provides the ability to dispatch
work and job orders to your mobile workers and track their progress.
View Data – [visible/accessible to all users] Provides access to data submitted by mobile units
connected to this doForms website, including query, sorting, viewing, mapping and exporting to other
business applications.
Home
| 15
Build Forms – [visible/accessible to users with Manage or Admin privileges] Provides an easy-to-use
graphical tool for creating your own forms. Also provides access to the Public Forms Library.
Projects – [visible/accessible to users with Manage or Admin privileges] Organizes your forms into one
or more projects.
Mobile Units – [visible/accessible to users with Manage or Admin privileges] Specifies which mobile
devices are allowed to connect to this website. Also specifies which mobile devices subscribe to which
specific projects.
Web Users – [visible/accessible to users with Manage or Admin privileges] Use to manage who can
access this website and with what privileges.
Account – [visible/accessible to Administrators only] Provides additional website and mobile device
administration functions. Provides access to SOAP web services that can be used by other business
systems.
Add-ons – [visible/accessible to All users] Provides information on add-on products.
Support – [visible/accessible to All users] Provides access to the doForms support system.
Community – [visible/accessible to All users] Provides access to the doForms user and support forums.
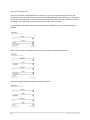
Understanding Forms, Projects & Mobile Units
Forms
Projects
Mobile Units
doForms is designed from the ground up to make it easy to manage your mobile workers. We do this by
providing two tiers of control:
Forms are organized into Projects – Think of the projects in literal terms (i.e., a job folder) or in
organizational terms (e.g., a job function). For example, if you are a construction manager, you might
want to group all the forms pertaining to a certain building in one project. Or, if you are a medical clinic,
16 |
Home
you might want to group all the forms used by your traveling nurses. Now here is the most important
part – any form can be assigned to more than one project! This allows you to maintain a set of
standardized forms that can be assigned to specific job folders or job functions. Projects are managed in
the Projects tab of your website.
Projects are subscribed out to the Mobile Units – Any project can be subscribed out to any number of
mobile units. And the mobile units do not need to subscribe to the same projects. Following through
with our examples above, the project pertaining to a certain building can be subscribed out to just those
workers at that job site. And the traveling nurse project can just be subscribed out to your traveling
nurses. This level of control allows you to control who gets which projects and which forms. The
subscriptions are managed in the Mobile Units tab of your website.
The “Main Project” – While the concepts above provide lots of flexibility they also require some effort.
So we added a way to simplify organizing and deploying forms for those of you in a hurry. Your
doForms account starts out with one “Main Project” which provides you with useful forms. When you
save a form as Published it is automatically assigned to the Main Project, and the Main Project is
automatically subscribed out to all mobile units. So if you create forms which you want to deploy to all
mobile units, using the Main Project is an easy way to do so (more on this in the Build Forms section).
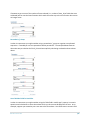
Deploying Forms to Mobile Units
There are a number of ways to deploy forms to your mobile devices:
From the Build Forms tab - The simplest and fastest way is from the Build Forms tab. Open the Draft
form that you wish to deploy, go to the File menu and Save as > Published. This will save the form in a
Published state and automatically add it to the Main Project. All of the mobile units that subscribe to
the Main Project will automatically receive your form. Note that all mobile units are subscribed to the
Main Project by default until you manually unsubscribe them in the Mobile Units tab.
From the Projects tab – The other way to deploy your form is to use the Projects tab. This method
provides you the greatest control over who gets which form. First, in the Build Forms tab go to the File
menu and Save as > Published (if you haven’t done so already). Next, go to the Projects tab and
manually select which projects the form is added to. Just those mobile units that subscribe to those
selected projects will receive the form. This allows you organize and deploy your forms by workfunction. For example, if you created a “Field Inspection” form, you can add it to a “Field Project”
which only your field workers are subscribed to. Use the Mobile Units tab to control which mobile units
subscribe to which project.
In either case, your Published form will automatically be pushed out to all mobile devices that subscribe
to the corresponding projects. And every time save the form as “Published”, those mobile devices will
automatically receive the updated form.
IMPORTANT: Once a form has been Published, please be sure to notify your mobile users that they
must “Update Forms and Notices” in their doForms mobile app. Otherwise, they will receive the
Published form until the next time they exit and restart the doForms mobile app (when the update
happened automatically).
Home
| 17
Viewing Data
See “View Data” section.
Sending Dispatches and Work Orders
See “Dispatch” section.
Important Notices
Important notices are messages that are posted by your organization’s doForms Administrator or by the
doForms System. These are managed in the Account tab.
Getting Started
Provides a link to the Website Introduction Videos
Custom Branding (Paid Accounts Only)
The branding for your doForms website and mobile app can be changed to reflect your organization’s
identity. This includes replacing the doForms logo graphic with your own. These branding options are
managed in the Account tab.
18 |
Home
View Data
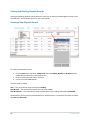
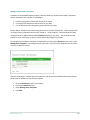
Selecting Projects and Forms
Your doForms database is organized by “Projects” which in turn contain the “Forms”. Note that the
forms contain and organize the data, and any form may be listed under multiple projects (See
Understanding Forms, Projects and Mobile Units).
To view data first Select a Project from the drop-down list. Next Select a Form. Next enter a Date
Range. These will narrow down the volume of data that will be displayed. Finally, click the View button.
The data corresponding to the selection will be displayed. You can control how many data rows are
displayed on a page using the controls at the top and bottom right side of the page.
Deleting Projects and Forms
In order to delete all the data corresponding to a form from your account, you must (1) delete the form
in the Build Forms tab, and (2) remove the form from any projects in your account.
See the Build Forms section for information on deleting forms from your account.
View Data
| 19
See the Projects section for information on removing forms from projects in your account.
Deleting Data Records
In order to delete any or all records from your doForms website:
1. Select a project/form in the View Data tab
2. Select the record that you wish to delete using the checkboxes on the left side of each record (or
check the box above all the records to “select all”)
3. Click the “Delete all selected” button
File Menu
The File menu provides the following functions:
Save Data As – Allows the currently displayed data to be exported onto your local hard drive in Excel,
CSV, HTML, Text, KML, OpenOffice or PDF formats. You can also export the data into your online Google
Docs account. Once it is exported into your Google Docs account, you can perform a variety of
spreadsheet, analysis and reporting functions on the data, as well as share it with other Google Docs
users. When selecting the Google Docs option, you will be prompted for your Google Docs username
and password, and you will also be asked to grant permission for doForms to connect with your Google
Docs account.
Print – Prints the currently displayed data. Be sure to select “Landscape” layout in your browser print
preferences. If you need additional formatting for your printouts, try one of the “Save as” options to get
the data into another program, like Google Docs or Excel, then do the additional formatting in that
program.
Import Data – The Import Data function allows you to import data from an external table into the
Dispatch tab. External files can be CSV or Excel 97-2003 format only and first row of the file must
contain field names for each column (no spaces or special characters). The corresponding data types
(number, text, date etc.) must match the data types in the View Data tab exactly. The Import Data
function will allow you the option of “mapping fields” in the event that the column names in the file and
the data_names in the View Data tab do not match. Note that the maximum file size that can be
imported is 5MB. If your file is larger, please break it up into smaller files and import them one at a
time.
IMPORTANT: Note that it is the currently displayed data (i.e., the Current Query) that is processed by
the options above (see “Sorting and Filtering Data” below).
20 |
View Data
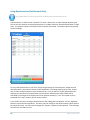
Options Menu
The Options menu provides the following functions to display how data is presented in the View Data
tab:
Display Settings – Use to specify which questions will be displayed as answer columns in the List View.
Use these setting to un-clutter the List View. You may also specify if the “caption” or “data_name”
property of the question widget will be displayed as the heading for the corresponding column. These
settings are “per user”. This means that each web user can change the setting for a specific
project/form without affecting other users.
Export Settings – Use to control how data will be exported with File > Save as options. “Column
Headings” specifies if the “caption” or “data_name” property of the question widget will be displayed as
the heading for the corresponding export column. “Choose-one questions” specifies how the answers
to these questions will be exported. “Select-multiple questions” specifies how the answers to selectmultiple questions will be exported. Options for choose-one and select-multiple include reporting
“underlying values” in one column, or as “0/1” values in multiple columns. These settings are “per
account”. This means that any changes to these settings for a particular project/form affect all website
users.
Report Settings – Use to control the format of PDF and Excel reports. These settings are “per account”.
This means that any changes to these settings for a particular project/form affect all website users.
Map Callout Settings – Use to specify which questions/answer fields will be included in the map callouts
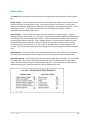
in the Map View. The “callouts” are small data summaries which are displayed when a map icon is
clicked. See the illustration below. These setting are “per user”. This means that each web user can
change the settings for a specific project/form without affecting other users.
View Data
| 21
Data Menu
The Data menu provides the following functions for managing data in the View Data tab:
Add Record – Adds a new blank record into the data table in Edit mode.
Show Data Filter – Displays the data filter options. See “Sorting and Filtering Data” below.
Delete All Selected – Deletes all selected (checked) records.
Unlock All Selected – Unlocks all selected (checked) records.
PDF Report All Selected – Creates PDF Reports for all selected (checked) records. For more information,
see the “Reports” chapter.
Excel Report All Selected – Creates Excel Reports for all selected (checked) records. For more
information, see the “Reports” chapter.
View Menu
The View menu provides the following functions:
View Map – Toggles from List View to Map View (See Map View section below.)
List View – Toggles from Map View to List View
Viewing Media Files
Media files are listed in the “Media” column. When clicked, the media file will open in a new browser
window.
IMPORTANT: Please make sure that your web browser is set to “Allow Pop-ups” from your doForms
website in order to view the media files.
Sorting and Filtering Data
You can sort data alphabetically or numerically by clicking the column headings (e.g., ”integer
question”).
To filter what data is displayed in the list view:
1. Click the Data menu and select “Show Data Filter”
2. Use search boxes, range boxes and drop down menus in most columns to define a “filter”
3. Click Apply to apply the filter. The resulting list view will contain just those records that meet
the constraints of the filter (we refer to this subset of data records as the “Current Query”)
4. Click Clear if you wish to clear the filter and display all records
5. Click Hide to hide the filter
22 |
View Data
IMPORTANT: The doForms website has limited capability to do complicated filtering of large data sets.
When these limits are reached, a warning dialog will be displayed. In this case, please try selecting a
narrower “Date Range” at the top of the page, then repeat the steps above. If you exceed these limits
but still need to perform complicated filtering, then please contact [email protected] for
information about overcoming these limitations.
IMPORTANT: In addition to controlling which data records will be displayed in the list view, the
“Current Query” that results from the filter operation also controls which data records will be printed,
exported and mapped.
Current Query
The combined specifications of the Data Range and Filter result in a subset of form data being displayed.
This subset is referred to as the Current Query. Note that all the operations in the File menu are
performed on the Current Query. So, for example, if you use the File > Save as the option to export
data, it will be the data records in the Current Query that are exported. Similarly, if you use the View >
Map View option, it will be the data records in the Current Query that are mapped (see below).
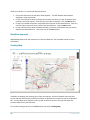
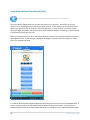
Map View
To display all the data records in the Current Query on a map, select View > View Map. A new browser
window will open with the selected data record icon displayed on the map (see below). Be sure that
your browser is not set to block pop-ups. Click on any of the icons to display the data values for the
record being mapped.
View Data
| 23
Row Menu
Each data row in the View Data tab contains a “Row Menu” (little boxes with down-arrow). The Row
Menus in the View Data tab provide the following functionality:
Map – Displays the data for this row on a map (will only be displayed if data row contains GPS map
coordinates). To display data in a row on a map, select Map from the Row Menu. A new browser
window will open with the selected data record icon displayed on the map (see below). Click on icon to
display the data values for the record being mapped.
Edit – Allows you to edit the data. To make changes to data in a row, select Edit from the Row Menu.
The selected row will expand. Make the desired edits and press the Submit when done. The changes
will be saved to your doForms website. Otherwise, press Cancel.
Add – Allows you to add a new data row below. To add a new row of data, select Add from the Row
Menu. The new empty data row will be added below. Fill in the data fields and press the Submit button
when done. The new row will be saved to your doForms website. Otherwise, press Cancel. Note that if
the form has a media question, you will be able to upload the corresponding media files from your local
hard drive if desired.
PDF Report – Produces a PDF report of the selected record. For more information, see the “Reports”
chapter. PDF reports can be downloaded, emailed or printed.
Excel Report – Produces an Excel report of the selected record. For more information, see the
“Reports” chapter. Excel reports can be downloaded, emailed or printed.
Delete – Deletes the data row. To delete a row of data, select Delete from the Row Action Menu. A
message will be displayed asking you to confirm the delete. Click the Ok button to permanently delete
the row of data from your doForms website. Otherwise, press Cancel.
Task – Use to send an email to one or more doForms website users instructing them to complete a
task(s) pertaining to the data row. The email will contain a direct link back to the data record.
IMPORTANT: Edit, Add and Delete functions are only available to users with Edit, Manage or Admin
privileges. Also, please make sure that your web browser is set to “Allow Pop-ups” from your doForms
website in order to use the Print, Email PDF and Task functions above.
24 |
View Data
Workflow Approvals
Workflow approvals are a special question type that can be inserted in one or more places within a form
in the Build Forms tab. These approvals are not displayed in the doForms mobile app, but they are
displayed in the View Data tab. The approval status can then be changed by the responsible Web User,
and the data record is “stamped” with that specific Web User’s login ID. This stamp cannot be edited
and serves as a digital approval signature.
If you are the individual that is responsible for approving form submissions:
1. Login into your doForms website
2. Select a project/form in the View Data tab
3. Navigate to the desired row and select Row Menu > Edit
4. Navigate to the Approval column
5. Click on the dropdown menu and select “pending”, “approved” or “rejected”. The
corresponding status will be stamped with your user ID.
Viewer Control
You can control “who sees what” in the View Data tab by using the View Restriction parameter in the
Web Users tab. This parameter allows you to restrict the viewing of records to those submitted by a
specific device Mobile Number. For example, if you have multiple sales people accessing the View Data
tab, you can specify that any particular salesperson can only view/edit the records which they
submitted, by specifying their Mobile Number as the View Restriction. Please see the Web Users section
for more information).
Retrieve Function (Dispatch accounts only)
http://www.doforms.com/support/how-to-videos/how-to-use-retrieve.htm
Dispatch accounts provide the ability for mobile users to “Retrieve” previously sent data from the
website, work on it, then send it back to the website. Imagine a situation where you have one mobile
worker who fills out a form, and a different mobile worker who needs to approve the job record. Or
imagine a field medicine scenario where different specialists need to add information to a patient
record.
Data records that have been “retrieved” by a mobile device are automatically “locked” on the website as
shown below. Locking prevents the record from being retrieved by a different mobile user. Locking also
View Data
| 25
prevents records from being edited on the website. This ensures that conflicting changes cannot be
made at the same time.
The records are “unlocked” when they have been sent back from the mobile device to the website.
Once unlocked, the can be retrieved again or edited on the website. Records are also “locked” during
the time when they are being edited on the website, and unlocked automatically when the editing
process has ended.
Individual data records can be manually unlocked on the website by:
1. Selecting the desired records in the View Data tab
2. Click the Data menu
3. Select Unlock
The website also provides an automatic “unlock” function for any records that have been locked over
specified period of time. The default is 24 hours, but this can be changed in the Account tab by clicking
the Change Unlock Timeout option as shown below.
Finally, the Retrieve function on mobile devices can be enabled or disabled centrally in the Main Menu
Configuration option in Account tab. Disabling hides the Retrieve button in the doForms mobile app so
the function cannot be used.
26 |
View Data
Dispatch [Dispatch accounts only]
doForms Dispatch provides powerful dispatch forms and work order forms functionality. These special
purpose forms contain important information to tell mobile workers where to go (dispatch) and what to
do when they get there (work order). As your mobile workers complete their assigned tasks, doForms
lets them fill out data fields in the form, take pictures, capture GPS locations, and collect signatures.
The completed data records are then sent back to you. In addition to sending and receiving forms from
your workers, doForms Dispatch also tracks their current and past GPS locations, and these locations are
plotted on an interactive Tracking Map. You can select which workers to view, as well as the time
interval. The map also shows the locations where forms were filled out.
http://www.doforms.com/support/how-to-videos/how-to-use-dispatch.htm
Selecting Projects and Forms
To view data first Select a Project from the drop-down list. Next Select a Form. Next enter a Date
Range. These will narrow down the volume of data that will be displayed. Finally, click the View button.
Dispatch
| 27
Viewing and Deleting Dispatch Records
Viewing and deleting dispatch records works the same way as viewing and deleting data records in the
View Data tab. See View Data section for more information.
Creating a New Dispatch Record
To create a new dispatch record:
1. Click the Data menu and select “Add Record”Select the Mobile_Number or Nickname of the
mobile device to which this record will be sent.
2. Fill out any other desired fields in the form.
3. Click on one of the Save options.
The Save options include:
Save – The record will be saved and listed as Pending.
Save & Send – The record will be saved, sent and listed as Sent.
Save & Schedule – The record will be saved, scheduled for future sending and listed as Scheduled.
Shown above is the form that was dispatched in the example after it is received by the doForms mobile
app (Sent and Received).
28 |
Dispatch
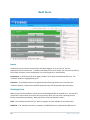
Status Indicators
The Dispatch tab provides to following status indicators for each dispatch record:
Pending – The dispatch record has not been sent to the mobile device.
Scheduled – The dispatch record has been scheduled for sending.
Sent – The dispatch record has been sent to the mobile device.
Received – The dispatch record has been received by the mobile device.
Viewed – The dispatch record has been viewed on the mobile device.
Rejected – The dispatch record has been rejected by the mobile user.
Completed – The dispatch record has been completed by the mobile user.
Note that you can change the colors of the various status indicators in the Options menu.
IMPORTANT:
1. Be sure that the dispatch interval on each mobile device is set to a non-zero value (Settings).
2. The dispatch receiving function on the mobile device will continue to receive dispatches when
doForms Dispatch is running in the background (e.g., you open another program without “exiting
doForms”).
3. The dispatch receiving function will be suspended if the mobile device goes to sleep (screen turns
off).
File Menu
The File menu provides the following functions:
Import Data – The Import Data function allows you to import data from an external table into the
Dispatch tab. External files can be CSV or Excel 97-2003 format only and the first row of the file must
contain field names for each column (no spaces or special characters). The corresponding data types
(number, text, date etc.) must match the data types in the Dispatch tab exactly. The Import Data
function will allow you the option of “mapping fields” in the event that the column names in the file and
the data_names in the Dispatch tab do not match.
Options Menu
The Options menu provides the following functions:
Display Settings – Use to specify which questions will be displayed as answer columns in the List View.
Use these setting to un-clutter the List View. You may also specify if the “caption” or “data_name”
property of the question widget will be displayed as the heading for the corresponding column. These
settings are “per user”. This means that each web user can change the setting for a specific
project/form without affecting other users.
Bulk Dispatch – Schedules all records that have a Pending status to be Sent at a future time (see “Bulk
Dispatch” below).
Schedule All Pending – Schedules all records that have a Pending status to be Sent at a future time.
Dispatch
| 29
Send All Pending – Immediately Sends all records that have a Pending status.
Status Colors – Allows you to change the colors of the various status indicators. These setting are “per
account”. This means that any changes to these settings for a particular project/form affect all website
users.
Report Settings – Use to control the format of PDF and Excel reports. These setting are “per account”.
This means that any changes to these settings for a particular project/form affect all website users.
Data Menu
The Data menu provides the following functions for managing data in the View Data tab:
Add Record – Adds a new blank record into the data table in Edit mode.
Show Data Filter – Displays the data filter options. See “Sorting and Filtering Data” below.
Delete All Selected – Deletes all selected (checked) records.
View Menu
The View menu provides the following functions:
Tracking Map – Toggles from List View to the Tracking Map (See Tracking Map View section below).
List View – Toggles from Tracking Map to List View.
Sorting and Filtering Data
Sorting and filtering dispatch records works the same way as in the View Data tab. See View Data
section for more information.
Row Menu
Each data row in the Dispatch tab contains a “Row Menu” (little boxes with down-arrow). The Row
Menus in the View Data tab provide the following functionality:
30 |
Dispatch
Send – Use to send the dispatch record to the designated mobile device.
Schedule – Use to schedule the Send function for a future date and time.
Edit – Allows you to edit the data. To make changes to data in a row, select Edit from the Row Menu.
The selected row will expand. Make the desired edits and press the Save when done.
Add – Allows you to add a new dispatch record (see the “Creating a New Dispatch Record” section
above).
PDF Report – Produces a PDF report of the selected record. For more information, see the “Reports”
chapter. PDF reports can be downloaded, emailed or printed.
Excel Report – Produces an Excel report of the selected record. For more information, see the
“Reports” chapter. Excel reports can be downloaded, emailed or printed.
Delete – Deletes the data row. To delete a row of data, select Delete from the Row Action Menu. A
message will be displayed asking you to confirm the delete. Click the Ok button to permanently delete
the row of data from your doForms website (Dispatch tab and View Data tab). Otherwise, press Cancel.
Task – Use to send an email to one or more doForms website users instructing them to complete a
task(s) pertaining to the data row. The email will contain a direct link back to the data record.
IMPORTANT: Edit, Add and Delete functions are only available to users with Edit, Manage or Admin
privileges. Also, please make sure that your web browser is set to “Allow Pop-ups” from your doForms
website in order to use the Print, Email PDF and Task functions above.
Bulk Dispatch
The “Bulk Dispatch” feature is used to dispatch more than one form at a time to a mobile worker.
Supposed your company uses separate forms for work orders and customer satisfaction forms and you
would like to be able to send both of these forms out to your mobile worker pre-populated with the
same customer information. If the forms reside in the same project then the bulk dispatch feature will
Dispatch
| 31
allow you to do this. To use the bulk dispatch feature:
1. Click on the Options menu and select “Bulk Dispatch”. The Bulk Dispatch wizard will be
displayed in a pop-up window.
2. In Step 1 of the wizard, select the project that contains the forms you wish to dispatch (they
must be in the same project). Select the forms you wish to dispatch. Click the Next button.
3. In Step 2, the wizard will present any fields that are common to the selected forms. Enter any
common values that you wish to pre-fill in the selected forms. Click the Next button.
4. In Step 3 of the wizard, select the mobile number or nickname of the device that you wish to
dispatch the selected form to. Then select one of the Save options.
Workflow Approvals
Workflow Approvals work the same way as in the View Data tab. See View Data section for more
information.
Tracking Map
In addition to sending and receiving forms from your workers, doForms Dispatch also tracks their
current and past GPS locations, and these locations are plotted on an interactive map in the Dispatch
tab. You can select which workers to view, as well as the time interval. The map also shows the
locations where forms were filled out.
To view the tracking map click on the View menu, then select Tracking Map.
32 |
Dispatch
IMPORTANT:
Be sure that the tracking interval on each mobile device is set to a non-zero interval.
The tracking function on the mobile device will continue to send GPS coordinates when doForms
Dispatch is running in the background (e.g., you open another program without “exiting doForms”).
The tracking function will be suspended if the mobile device goes to sleep (screen turns off).
Duration
Select a duration over which to display tracks. Locations are saved for up to 72 hours then
automatically deleted from the doForms website. The last reported location will always be displayed as
the largest circular icon for each mobile device.
Track Colors
Select a color scheme for each mobile device listed in the Tracking Map.
Dispatch
| 33
Build Forms
Layout
The Build Forms tab consists of two sections that work together as an easy-to-use, but very
sophisticated, form creation tool. In addition to building a form from scratch, you use our Forms Library.
Forms from the Library can be used directly or as a starting point for customization.
Form Canvas – The left hand side of the page provides a form canvas that illustrates the form. The
“selected” question is highlighted in green.
Properties – The properties area on the right hand side of the page allows you to customize the
“selected” question. Note that the available properties vary with the question type (see below).
Creating a Form
When you start the form builder, a blank canvas will be displayed with an untitled form. You may also
use the File menu to select a form from the Forms Library which you can use as a starting point for
further customization (see below). Note that all forms have two possible “states”:
Draft – This indicates that the form is a “work in progress” and not available to any mobile units.
Published – This indicates that a form is complete. Published forms are automatically added to the
34 |
Build Forms
Main Project which is automatically subscribed to by all mobile units (see Deploying Forms section
below for more information).
Opening a Form
To open an existing form, go to the File menu and select Open. Next, select the desired form from the
list and click Open; otherwise click Cancel.
To open a form from the Forms Library, go to the File menu and click Open. The open dialog will be
displayed. At the bottom of this dialog, click on “Select a form from the doForms Public Library”. See
the Public Forms Library section below for more information.
Saving a Form
Always be sure to save changes to your form before navigating away from the Forms Tab.
To Save a Draft form under the same name, go to the File menu and select Save.
To Save a Draft form under a different name, go to the File menu and select Save Form As > Draft.
To Publish a Draft form, go to the File menu and select Save Form As > Published. When published, the
form will automatically be added to the Main Project, and will be available to all mobile devices that
subscribe to this project.
IMPORTANT: Once a form has been published under a certain name (say “Timesheet”), then that name
cannot be used again in your doForms account (even after “Timesheet” has been deleted). This
restriction is in place to prevent confusion about which data came from which version of a form.
Therefore when publishing an update to a form you will need to use a different name (we recommend
appending a letter or number to the form name, e.g., Timesheet-2 or Timesheet-B). The only exception
to this rule is the File >Open Special option described below.
IMPORTANT: Once a form has been published, please be sure to notify your mobile users that they
must “Update Forms and Notices” in their doForms mobile app. Otherwise, they will receive the
published form until the next time they exit and restart the doForms mobile app (when the update
happened automatically).
Open Special
As described above, if you use File > Open, make edits to a form, then use Save Form As > Published, a
new name will need to be assigned to the form. This is because every version of a form corresponds to
a specific data table structure. So, for example, if you add or delete questions, or change a Repeatable
Section, the underlying data table structure changes, and hence a new data table needs to be set up in
which to store the data.
However, there are instances where very “light edits” can be made to a form without affecting the data
table structure. This may be done using the File > Open Special option , from where light edits may be
performed, and from where you can File > Save with the same form name. In these cases the collected
Build Forms
| 35
data will continue to be stored in the same data structure and same data table.
Light edits are defined as:
Changes to the “Caption Text” property
Changes to the “Hint” property
Changes to the “Default” property
Changes to the “Read Only” property
Changes to the “Required” property
Changes to the “Length or Range” property
Changes to the “Auto-Stamp” property
Changes to the number or names of the “Answer options” property in Choose-One, SelectMultiple and Score question types
Changes to the “Data Source” or “Lookup Field” property in lookup table question type
Changes to the “Skip” or “Relevance” properties
Changes to the “Record Name” (see Options menu section below)
IMPORTANT: If you open a previously published form with the File > Open Special option , then be sure
to use the File > Save option to save the changes using the same form name and same data table (do
not use File > Save as …).
Insert Form
The build forms tab allows you to insert an already existing form into a form that you are working on.
This is very handy if you have form elements which you use over and over in your forms. To Insert a
form:
1. Go to the File menu and select Insert Form. A list of available forms will be displayed.
2. Select the form that you wish to insert, and click Insert.
3. The selected form will be inserted at the bottom of the form that you were working on. From
here you can drag and drop the questions to rearrange them as desired.
IMPORTANT: After inserting a form, you may need to edit the “Data Name” property of some of the
questions to ensure that there are no duplicates. If you do so, you will also need to review and possibly
edit any relevance and skip conditions which use these data names - likewise any affected destination
fields in Lookup questions.
Deleting a Form
To Delete a form, first open it under the Build Forms tab, then go to the File menu and select Delete
Form.
IMPORTANT: Note that the “data table” corresponding to the form will not be deleted by simply
deleting the form from the Build Forms tab. To delete the corresponding data table and its data, you
must also remove the form from any project in your account. See the Projects section for information
on removing forms from projects in your account.
36 |
Build Forms
Options Menu
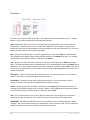
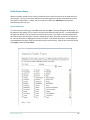
Record Name
Record Names are used to identify individual records (instances) of the same form. When you create a
form in the Build Forms tab, the “Form Name” applies to all instances of the form. For example, in the
“Simple Work Order Dispatch Form” below, all complete or incomplete records are assigned this same
Form Name. Record Names that are made up of data values contained in the form are used to
differentiate these records.
Record names are displayed in the doForms mobile app and also in each row in the View Data tab. In
the example below, we assign record names by concatenating four fields in the form “Customer +
Address”. In our application, when combined, these values identify each form record.
When specified, record names are also used as file-name values when creating PDF or Excel reports. If
you plan on using record names for reports, then be sure that each record name is unique so that you
do not over-write an existing file. If you are unsure, then add a date:time field to your record name to
ensure uniqueness.
Build Forms
| 37
By default, the record name consists of “Form Name + Date:Time” when the record was created. To
customize the Record name:
While the form is open in the Build Forms tab, click on the Options menu and select Record Names.
Next, move the fields which you wish to use in the Record Name from left to right. Click Save when
done. The Record Names dialog will close. Note that when you are done editing your form you will also
need to publish the form using the File > Save as Published command for the record names to be
applied (in other words, there are two “saves” that need to be done). .
If your form has previously been saved as “Published”, you may use the File > Open Special option to
open it, then change the Record Name. Click Save when done. The Record Names dialog will close.
Again, note that when you are done editing your form you will also need to save the form using the File
> Save command for the record names to be applied (in other words, there are two “saves” that need to
be done).
In the example below, the form name will consist of “Customer + Address + Phone”.
Resources Menu
The resources menu allows you to manage resources that can be used with one or more forms in your
doforms account. This includes “Lookup Tables” and “Excel Report Templates”.
Manage Lookup Tables
http://www.doforms.com/support/how-to-videos/how-to-manage-lookup-data.htm
Lookup tables allow you to search and select an answer from an external data table. Also, if a lookup
table row contains answers for other questions in your form, you can use the table to automatically
answer these questions as well. For example, if your form contains questions for entering “Customer
Name”, “Customer Number” and “Customer Address”, and if you have a lookup table which also
contains these columns, then you can set up “Customer Name” as the lookup table, and when the
38 |
Build Forms
mobile user searches and selects a Customer Name, the corresponding Customer Number and Number
Address will be automatically filled out in the form.
See the “Using Lookup Tables” section below for more information about working with lookup tables.
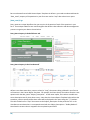
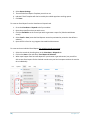
To manage your lookup tables, click the Resources menu, then select Manage Lookup Tables. The
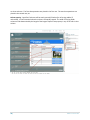
dialog below will open with a list of all lookup tables that have been set up in the Build Forms tab. In the
example below, three lookup tables have been set up.
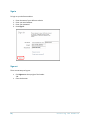
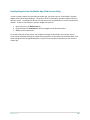
Adding a New Lookup Table from an External CSV or Excel 97-2003 File.
1. Click Add to create a new lookup table.
Build Forms
| 39
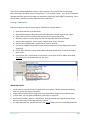
2. Click Upload to select an external CSV or Excel 97-2003 file from your local computer which will
be loaded into the lookup table.
3. Navigate to the file which you wish to use as the lookup table, select it and click Open.
4. Type in a Description for this lookup table (optional).
40 |
Build Forms
5. To append a file, click Append another file and repeat the steps above. Appended files must
contain exactly the same column names and data types.
6. Click Save Table when done.
TIP: When you upload a lookup table, this table becomes available for use with any form in your
account. So a single lookup table can be used by any number of forms, and in different ways. For
instructions for setting up a form to use the lookup table, please refer to the “Using Lookup Tables”
section below.
IMPORTANT: External files can be CSV or Excel 97-2003 format only. The first row of the file must
contain field names for each column (no spaces or special characters). Each file must be less than 4 MB
in size (see below how to append multiple files to overcome this limitation). Also, external files that are
uploaded into a lookup table must be less than 4 MB. However, you can append multiple files to
overcome this limit. Each file must contain exactly the same number of columns and column names.
Adding a New Lookup Table from an Internal doForms Data Table
A lookup table can also be generated from an internal doForms data table in the View Data tab. In other
words, data collected by doForms in one form can also be used to generate lookup tables that other
forms will use. To create a new lookup table from an internal doForms data table:
1. Click Add to create a new lookup table.
2. Click Use Form
Build Forms
| 41
3. Select the doForms data table to use
4. Select “Update Automatically” if you wish to have the lookup table updated whenever the
doForms data table changes (more on this below).
5. Click Ok
6. Type in a Description for this lookup table (optional).
7. Click Save Table when done.
Updating a Lookup Table
To update a lookup table, click the Resources menu, then select Manage Lookup Tables. Click the Row
Menu next to the lookup table you wish to delete and select Update.
If the lookup table was from an external Excel or CSV file, you will be asked to upload an updated CSV or
Excel 97-2003 lookup file. For the update to work seamlessly, the updated files MUST have exactly the
same number of columns and exactly the same column names (number of rows or actual data values in
the rows can be different). If this is not the case, then we recommend deleting the saved lookup table
and uploading the new one under a different name. You will also need to reset the properties of any
lookup questions in your forms which utilize this lookup table.
If the lookup table was created from a doForms data table and you did NOT select the “Update
Automatically” option, then you must use the procedure above to update the lookup table.
If the lookup table was created from a doForms data table and you DID select the “Update
Automatically” option, then the lookup table will be updated whenever changes are made to the
doForms data table (e.g. new data records are received, or edits are made in the View Data tab).
IMPORTANT: If an edit is made to the doForms data table in the View Data tab, then in order for the
corresponding lookup table to be automatically updated, the user needs to log out of the doForms
website and log back into the doForms Website. Alternatively, the user may use the procedure above to
manually force and update without the need to logout and log back in.
Deleting a Lookup Table
To delete a lookup table, click the Resources menu, then select Manage Lookup Tables. Click the Row
Menu next to the lookup table you wish to delete and select Delete.
42 |
Build Forms
Manage Custom Report Templates
In addition to the Standard Report Template, doForms allows you create Custom Report Templates.
Custom templates have a number of advantages:
Provide much greater control over format of the report
Can apply Excel calculations and functions to your data
Can include Excel charts and graphs generated from your data
Custom Report Templates are created using the notion of an Excel Template file. These template files
are simply Excel worksheets that have been “Saved as … Excel Template”. Note that doForms ONLY
recognizes Excel 97-2003 and Excel 2010 Template formats (xlt, xltx, xltm).. See the View Data tab
section for more information on how to create and use Excel Report Templates.
To manage your Excel Report Template, in the Build Forms tab click the Resources menu, then select
Manage Excel Template. The dialog below will open with a list of all report templates that have been
set up in the Build Forms tab.
After the Excel Report Template has been created on your PC (see the View Data tab section), follow
these steps up upload it to your doforms website:
1.
2.
3.
4.
Go to the Build Forms tab of your website
Click on the Resources menu
Select Manage Excel Templates
Click Add
Build Forms
| 43
5. Click Upload Excel File
6. A “File Upload” dialog will open. Browse the files then select your Excel Report Template file
and click Open
7. Give your template a name and description, then click Save.
44 |
Build Forms
8. Your template will be added to the Saved Excel Templates list
9. Click Close
Repeat the steps above to load additional report templates into your Build Forms tab. Click Close when
done.
See the View Data tab section for more information on how to create and use Excel Report Templates.
TIP: When you upload a report template, this template becomes available for use with any form in your
account provided that the data names are exactly matching.
Adding, Moving, Duplicating & Deleting Questions
Adding a Question – There are two ways to add a question to the canvas: (i) click the desired question
type at the bottom of the page and it will be appended to the form, or (ii) use a “drag and drop” motion
to place the question anywhere on the canvas..
Moving a Question – To move the position of a question, use a “drag and drop” motion to place the
question anywhere on the canvas.
Duplicating a Question – To duplicate a question, click on the duplicate icon in the upper right corner of
the question canvas. This is very handy when creating a form with a list of similar questions.
Deleting a Question – To delete a question, click on the delete icon (trash can) in the upper right corner
of the question canvas. You will be asked to confirm the delete.
Build Forms
| 45
IMPORTANT: The “drag and drop” motion is only supported by the newest versions of most popular
web browsers. Please make sure your browser is up-to-date for the best experience in the Build Forms
tab.
Questions, Containers, Properties, Metadata
doForms provides dozens of question widget types which can be used sequentially, looped using a
repeatable section, or connected using sophisticated skip and relevance logic. They can be used directly
or placed into formatting “Containers”. To add a question widget to your form, just “drag and drop” it
onto the question canvas. A full list of available question widgets is provided below.
Formatting containers are used to control the layout of question widgets when they are rendered in the
mobile app. In general, a container is dragged onto the question canvas, and question widgets are
dragged into the container. If a specific question widget is not supported, then you will not be able to
drag it into the container. A full list of available format containers is provided below.
All question widgets and containers have properties, which are simply widget-specific settings that allow
you to customize the way they look and the way they work. A full list of available properties is provided
below.
In addition to questions and containers that you add to your form, each form is automatically stamped
with metadata containing date:time and device ID whenever the form data is saved on the mobile
device. It is also stamped with the date:time when it is received by the website or edited on the
website.
Question Widget Types
Action Button – [paid accounts only – tablet UI only] The Action Button widget allows you to make your
forms more “app like”. You can use a standard button format or upload your own customized button
images. Action buttons can be used to jump to questions or pages, so you can build your own form/app
menus. Action buttons can also be used to open web pages, play videos, launch other apps, or send
customized dispatch status flags.
Approval – [paid accounts only] A special question type that can be inserted into one or more places
within a form. These approvals are not displayed in the doForms mobile app, but they are displayed in
the View Data tab. The approval status can then be changed by the responsible Web User, and the data
record is “stamped” with that specific Web User’s login ID. This stamp cannot be edited and serves as a
digital signature.
Audio – [paid accounts only] Allows the collection of audio input in the form using the device’s audio
recorder. The format of audio files will depend on the mobile device.
Barcode – [paid accounts only] Allows the collection of barcode input using the device’s camera.
Supported barcode formats include UPC-A and UPC-E; EAN-8 and EAN-13; Code 39, 93, 128; QR Code;
ITF; Codabar, RSS-14 all variants; Data Matrix; PDF 417 alpha quality; Aztec alpha quality.
Calculation – [paid accounts only] The calculation widget allows you to perform arithmetic (= + - / * %
46 |
Build Forms
Sum) operations on one or more previously entered numeric question values in the form. The
calculation widget can also be used with date:time values (subtract one date:time from another to
produce a decimal-hours difference; or add/subtract decimal-hours from a date:time to produce a new
date:time). The result of a date:time calculation will always be stored as a decimal-hour value. See the
“Using Calculations” section below for more information about creating calculations.
Choose-one – Allows the selection of one answer from a multiple choice list. Note that choose-one
questions can be used inside a Questionnaire container to organize the questions in a tabular format.
Date:Time – Allows the selection of a date, time or date:time. You may use the “today” keyword when
setting the “default” property for dates. When displayed in the mobile app, the date:time control also
provides a Now button.
Email Report – [paid accounts only] Emails the competed form as a PDF report to one or more
recipients in addition to sending it to your doForms website. The email is sent automatically when the
completed form is sent and received by your doForms website. You can use the “Default” property to
pre-populate email addresses. Use commas to separate multiple email addresses. See the “Emailing
PDF Reports” section below for more detailed information.
Image – [paid accounts only] Allows the collection of still images in the form, using the device camera.
Previously taken images can also be selected and included in the form. The mobile app also allows the
user to sketch atop the image to point out items of interest. Image files will be saved as JPEG format.
There is no technical upper limit on the number of image files that can be inserted into a single form,
however there is an upper limit of 35MB total for all the pictures in a form. Past this limit, the doForms
application will begin running very slowly and may freeze. You can avoid this by restricting the number
of pictures in a single form, and/or training your users to use a lower camera resolution when taking
pictures. Camera resolution options vary by device, so please refer to your device user manual.
Label – Allows the entry of a section or heading label to help organize your form. Use the Caption text
to provide a title or heading. Use the Hint property to provide additional information (e.g., instructions,
warnings, etc.). Labels may also contain uploaded images. You can use this feature to “brand” a form
with a logo, or to provide your mobile users with reference images. Also, in the "properties" for this
widget you can control whether or not the label will be displayed in mobile app and/or PDF reports. You
can force line breaks in the "Hints" section of a Label question by inserting a <br> tag
Location – Allows the collection of GPS map coordinates at the current location. The data will include
latitude and longitude, and may include altitude and accuracy (depending on the mobile device).
Lookup – [paid accounts only] Lookup tables allow you to search on and select an answer from an
external data table (Excel 2003 and CSV files only). Additionally, if a lookup table row contains answers
for other questions in your form, you can use the table to automatically answer these questions as well.
For example, if your form contains questions for entering “Customer Name”, “Customer Number” and
“Customer Address”, and if you have a lookup table that also contains these columns, then you can set
up “Customer Name” as the Lookup Table, and when the mobile user searched on and selects a
Customer Name, the corresponding Customer Number and Number Address will be automatically filled
out in the form. See the “Using Lookup Tables” section below for more information about working with
lookup tables.
Build Forms
| 47
NFC – [paid accounts only] Allows the collection of Near Field Computing (NFC) tag values. Note that
the type of tags supported is a function of the NFC sensor in the mobile device hardware (if any).
Numeric – Allows the entry of numbers only. You can specify Integer or Decimal in the properties. We
recommend using numeric integer input for telephone numbers. On most mobile devices doForms will
display a number pad for entering numeric values.
Score – [paid accounts only] Use for organizing choose-one questions into "score categories". For
example, you may have one category of question that relate to the “appearance” of an item, and a
second category related to the “smell” of an item, and a third category related to “taste”. This question
type also automatically calculates and summarizes the total possible score for each category, total given
score, and percent of given divided by possible. These summaries are displayed in the mobile app when
the form is completed. They are also automatically added to the View Data tab. Note that score
questions can be used inside a Questionnaire container to organize the questions in a tabular format.
Select Multiple – Allows the selection of multiple answers from a multiple choice list. Note that select
multiple questions can be used inside a Questionnaire container to organize the questions in a tabular
format.
Signature – Allows the collection of a signature using the touch-screen. Signatures are saved as raster
images (JPEG). Note that signature questions will be ignored on non-touch screen devices, however,
each submitted form is stamped with the Mobile Device number “system field”. Depending on your
specific need this stamp may serve as “digital signature”.
Sketch – Allows the collection of touch-screen drawing input. Sketches are saved as raster images
(JPEG). Note that sketch questions will be ignored on non-touch screen devices.
Text – Allows the entry of alpha numeric information into a text entry box. The box will expand in size
as more text is entered. Text boxes are the most generic data entry format. On most mobile devices
doForms will display a keyboard for entering text.
Video – [paid accounts only] Allows the collection of video w/audio input in the form. Note that video
clips have a 5 second limit. The format of video files will depend on the mobile device.
IMPORTANT: Note that if a mobile device’s hardware does not support a question type, then the
question will be automatically skipped by the doForm mobile app. For example, if the device does not
have GPS (or the GPS is not enabled) all Location questions will be automatically skipped. In these cases
the value “no_gps” will be coded as the answer to the questions. Other possibilities include “no_media”
in the case that a camera or microphone are not present, “no_draw” in the case that there is no touchscreen drawing surface, and “no-barcode” in the case that there is no camera or barcode driver. When
designing your form, consider providing alternate input methods for these cases by using “relevance”
logic. For example, if the value returned is “no_gps”, then use relevance logic to trigger a text question
that asks the user to enter an address or description of the location.
48 |
Build Forms
Container Types
Page Break – Inserts a page break. These page breaks affect the “Form View” on tablet devices only.
Within a page you can navigate Form View by swiping the screen vertically. Pages can contain any
question widget or container. To navigate between pages in Form View, tap on the page bar at the
bottom of the Form View screen.
Grid – [paid accounts only] A grid is a “container” for label, text, lookup, numeric and image question
types. A fixed number of columns must be specified in the properties area. Questions placed inside the
container are placed in the grid in a zig-zag pattern with each new line starting after the specified
number of columns. See the “Using Grids” section below for more detailed information. Grids are
similar to Tables except that in a Table the contents of each row are repeated (the columns differ).
Whereas, the contents of cells in a grid can be completely random.
Questionnaire - [paid accounts only] A Questionnaire is a grid format “container” for score, choose-one,
or select multiple question types (but you cannot mix question types in a questionnaire container). The
answer options MUST be the same for all of the score, choose-one, or select multiple questions dragged
into the questionnaire container. Questionnaire grids can have up to 10 columns, but an unlimited
number of rows. The questions are listed in the first column of the grid. The answer values comprise
the column headings.
Repeatable Section – [paid accounts only] A repeatable section is a “container” for one or more of any
of the questions above. A repeatable section loops through the questions it contains. A maximum
number of loops can be specified in the properties area. Note that mobile users will be prompted
before each loop if they wish to continue. See the “Using Repeatable Sections” section below for more
detailed information.
Table – [paid accounts only] A table is a spreadsheet like “container” for text, lookup, numeric,
date:time, and calculation question types. Tables can have up to 10 columns. A fixed number of rows
must be specified in the properties area. Tables are similar to Grids except that in a Table the contents
of each row are repeated (the columns differ). Whereas, the contents of cells in a grid can be
completely random. See the “Using Tables” section below for more detailed information.
Basic Properties
Action – [action button] Allows you to select the type of action that will take place when the action
button is pressed. Action options are (1) jump to question, (2) jump to pages, (3) open web page, (4)
play video, (5) launch another app, (6) send customized dispatch status flag, or (7) save and send the
form.
Action button text – [action button] Allows you specify the text that will be displayed in a standard
button format. If you use an image instead of the standard button format, the image will need to
contain any desired text.
Allow image to be selected – [image] Allows a previously taken image to be selected and included in
the form.
Build Forms
| 49
Android app name – [action button] Used when the Action property is set to “Launch Program” to
specify the name of the Android app that will be launched when the action button is pressed. For
Android devices the “app name” must be spelled exactly as listed in the device Settings > Manage
Applications page.
Append comment field – [questionnaire] Check if you wish to append a special text comment field as
the last column in a Questionnaire container.
Automatically return to form view at the end of page – [page] If selected this option will automatically
return doForms to Form View when the user completes the last question on the page in Question View.
This option is handy for letting users review their work after completing the page.
Auto-stamp – [location, date:time] Use this property for automatically inserting GPS or data:time
stamps inside a form. For example, you can insert Date:Time auto-stamps at the beginning and end of a
form to calculate how long it takes to complete the form. When using the Location Auto-stamp, be sure
to choose your GPS minimum error and maximum error “Range” values carefully. In most cases these
should be set to 50 meters and 300 meters respectively to ensure that the auto-stamp function can
occur quickly with minimum delay for the mobile user.
Caption/label text – [all question types] The question caption as presented to the user. Think of this as
the title for the question. It should be self descriptive. We recommend no more than three words for
optimal display on mobile devices. Note that for repeatable sections this is called a Section Label. We
suggest experimenting on your mobile device with section labels in context with “loop” prompts in
repeatable sections. The maximum number of characters is 500, including spaces.
Category – [score] Specifies the score category that the answer to a score question will be assigned.
Score questions automatically calculate and summarize the total possible score for each category, the
total given score, and the percent of given divided by possible.
Choose-one destination field – [lookup] Check if you would like to compare the lookup table value with
the “underlying_value” property for choose-one “destination questions”. Otherwise the lookup table
value will be compared with the “Answer as displayed to the user” choose-one property of the chooseone “destination questions” When the values are the same, that answer option in the choose-one
answer option will be selected. For example, supposed your form has a choose-one question with the
following answer options:
Answer as displayed to the user
YES
NO
Underlying_value
1
0
In this case if your lookup table had YES/NO answers you would NOT check the “Choose One Destination
Fields” option. But if your lookup table had 1/0 answers you WOULD check the “Choose One
Destination Fields” option.
Column spacing – [table, questionnaire] Specifies if columns will be evenly spaced (if checked) or
variable width (if unchecked). The width or variable width columns will be determined by the length of
their Caption property.
50 |
Build Forms
Currency symbol – [numeric, calculation] Places a currency symbol in front of the value. Note that
these symbols are for display and PDF report purposes only. The currency symbol is not exported to
Excel, CSV or other “Save as” formats. The currency also is not exported via web services or Sync &
Save.
Data name – [all question types] The name of the data that will be displayed in column headings. This
property is automatically filled in based on the Caption Text but may be modified in the properties area.
We recommend one or two word data names to keep column headings short. The maximum number of
characters is 30. Spaces are not permitted in the Data Name field. Note that for Repeatable Sections or
Tables, the data name in each repeat or row will be followed by “(#)”. So for example, if the data name
of a question is “price” then the data names of the corresponding repeats or table rows will be price(1),
price (2), price(3) etc. In nested repeatable sections the format will be “data_name(#,#)”. Note that the
value “data” is reserved by the system and cannot be used as a data_name in your forms.
Data source – [lookup] Selects the lookup table to be used. In the example below we are using the
“Customer List” lookup table.
Decimal place – [calculation] Number of decimal places displayed for the value of a calculation.
Default value – [text, numeric, date, choose-one, select multiple, location, barcode] The value of the
field first presented to the user when they see the question. Unless the question is marked as “Read
Only” the mobile user will be able to change the value. This is very useful where the answer to a
question is likely to repeat itself over and over. Setting a default value minimizes the work for mobile
users. Note that repeating values can also be set on the mobile app using the “Remember Answer”
option.
Destination fields – [lookup] Provides a “mapping” of any additional lookup table fields that will be used
to populate other question fields in your form. In the example below, we are going to use the “Name
Last” field in the lookup table to populate the “Last_Name” field in the form, “Name First” field in the
lookup table to populate the “First_Name” field in the form, “Address” field in the lookup table to
populate the “Address” field in the form.
Destination page – [action button] Used with the “Jump to page” action to specify the form page to
jump to when the action button is pressed. The “Execute auto stamp …” option determines whether or
not to execute any date:time or location autostamp questions located between the action button and
the destination page.
Destination question – [action button] Used with the “Jump to question” action to specify the question
to jump to when the action button is pressed. The “Execute auto stamp …” option determines whether
or not to execute any date:time or location autostamp questions located between the action button and
the destination question.
Display the capture barcode button – [lookup] If checked the mobile app will include a Barcode
scanning control in the question widget. This is handy if your “Lookup Field” is a barcode.
Display time values as hh:mm – [calculations] If checked the mobile app will display the results of
date:time calculations in hh:mm format. Note however, that the actual values will be saved in decimalhour format.
Build Forms
| 51
Equally spaced columns – [table, grid] Causes the width of columns to be equally spaced. If not
checked, the widths of the individual columns will be based on the length of the caption text.
Expression – [calculation] A arithmetic expression made of “Operators” and “Fields”. Operators include
= + - * / . Fields are the data_name of a numeric field, or the Sum or Count of a numeric field inside a
preceding repeatable section.
Evaluate blank (null) condition values – [lookup] Causes lookup conditions to evaluate null (blank)
condition values. Otherwise, null (blank) condition values will be ignored. Use this if one or more steps
in a set of sequential lookup conditions need to be evaluated as being “null” rather than just skipped if
left blank. This option is important in optimizing the performance of the lookup widget when null values
are a possibility.
Hide field in website – [text, numeric, date:time, calculation, label, location] Controls whether the value
generated by the widget will be displayed in the website. Allows you to store data in a field but not
display the field in the website. Commonly used to trigger relevance or skip logic conditions and also
used in calculations.
Hide field in mobile app – [text, numeric, date:time, calculation, location] Controls whether the widget
will be displayed in the mobile app. Allows you to store data in a field but not display the field in the
mobile app. Commonly used to trigger relevance or skip logic conditions and also used in calculations.
Hide in reports – [label] Controls whether the value generated by the widget will be displayed in
reports. The property is handy for storing temporary values that will be used by other widgets.
Hide rows – [table] This option is used in conjunction with the “Used Checklist” option. Use this option
to hide rows that contain a specified alpha-numeric value. When checked an entry box will be displayed
where you can enter an alpha-numeric “hide_flag” or leave blank if you want a blank/null value to be
the hide_flag.
Hint – [all question types except repeatable section] Additional help for the question will be displayed..
Short clear sentences work best. Use 80 characters or less for optimal display on mobile devices. The
maximum number of characters is 500, including spaces. The following HTML formatting tags are
currently recognized:
Android: <br>, <i>, <b>, <u>, <font color="xxx">, <H1>, <H2>, <H3>, <H4>, <H5>, <P>, <a>, <div>
iOS: <br>
PDF reports: <br>, <font color="xxx">
Image justification – [label, action button] Controls the justification of the button (left, center, right).
iOS app URL scheme – [action button] Used when the Action property is set to “Launch Program” to
specify the ID of the iOS app that will be launched when the action button is pressed. iOS app URL
scheme forms in most apps can be found at http://handleopenurl.com (see the Using Action Buttons
section below for more information).
Kind – [date:time, lookup, calculation] Specifies the type of value used in the date:time widget, lookup
widget or calculation widget. For date:tme widget the kind of field can be date, time, or date:time. For
52 |
Build Forms
lookup widget the kind of value can be Number or Text. For calculation widget the kind of value can be
Number or Date:Time.
Length – [text, numeric, barcode, NFC] Validates the character length of the user input in terms of a
minimum and a maximum number of permitted characters (spaces are counted).
Limit to list – [lookup] Limits the entry of data to a lookup table selection only. If the lookup has any
destination questions, the answers to these questions will also be limited to the corresponding values in
the lookup table.
Lookup conditions – [lookup] Specifies if any prior lookup selection (from the same lookup table) will be
used to filter the lookup field. For example, if you have a lookup table with state and city columns, you
could setup one lookup question to select the state, and a second lookup question to select the city. A
lookup condition can also be specified as the answer value to a prior text, numeric or choose-one
question.
Lookup field – [lookup] Select the field in the lookup table that will be used in the lookup search/list. In
the example below we are using the “Customer Number” field in the lookup table.
Max repeats – [repeatable section] This is the maximum number of loops for the repeatable section.
Default value is 10. The maximum number that can be entered is 20. Note that mobile users will be
prompted before each loop if they wish to continue (see Repeat Transition Text property). Therefore,
the actual number of loops performed will be controlled by the mobile user.
Military time – [date:time] If checked, the time portion of a date:time will be in 24-hour military time.
Otherwise it will be 12 hour time with an AM/PM option.
Number columns – [grid] Specifies the number of columns in the Grid container.
Number rows – [table] Specifies the number of rows in the Table container.
Number type – [numeric] Integer or Decimal. Specifies whether the input number may contain a
decimal point.
Options – [select multiple, choose-one, score] Specifies the values of the multiple choice answers. Each
option includes an “answer name as presented to the user” and an “underlying value”. Underlying
values can be descriptive or alpha-numeric codes of your choosing. Although spaces are permitted, its
best to use underscores. The maximum number of characters for “answer name” is 500, including
spaces. The maximum number of characters for “underlying value” is 500. Spaces are not permitted in
the “underlying value” field.
Page name – [page] Used to specify a short text string that will be displayed as a page name in the page
navigation bar at the bottom of Page View. If a page name is not specified, then sequential numbers
will be used for navigation in the page navigation bar at the bottom of Page View.
Range – [numeric, date:time, location] Validates the input data in terms of a minimum and a maximum
value. For location questions, the minimum error is the GPS accuracy at which the GPS widget stops
trying to refine the accuracy; and the maximum is the largest permitted GPS error.
Build Forms
| 53
Read only – [text, numeric, date, choose one, select multiple, location, media, draw, barcode, NFC]
Determines whether or not this field can be edited.. This is used in combination with a Default Value.
Repeat transition text – [repeatable section] Transition text that will be displayed at the end of each
repeatable section loop to instruct the mobile user what to do next (300 characters maximum).
Required – [text, numeric, date, choose one, select multiple, location, media, draw, barcode, NFC]
Determines whether or not this field must be filled-in before continuing to the next question. On the
mobile device, a form with an empty required field may be saved as “incomplete” but not as “complete”
and hence cannot be sent to your website.
Sort lookup list alpha-numerically – [lookup] Check this if you want to sort your lookup field alphanumerically. Numbers are sorted first, followed by letters. If you wish to avoid sorting results like 1, 2, 3
…..8, 9 then pad number values with leading zeros 01, 02, 03 … 08, 09, 10, 11.
Status text – [action button] Used with the “Send Status” action to specify the text string that will be
sent to the Dispatch tab as a status message. Note that an internet connection is required for sending a
status message.
Underlying value – [score] Specifies the numeric score value that will be assigned to the “answer name
as presented to the user” property. So for example, the answer “good” may have an underlying value
of “5”. Only numeric (integer and decimal) underlying values are counted in the score summary
arithmetic. Non-number underlying values (e.g., “na” or “not_applicable”) are NOT counted the score
arithmetic and summaries.
Upload image – [label] Allows you to upload an image to be displayed. There is no restriction on the
size of the image. Accepted image formats are JPG and PNG.
URL of video – [action button] Used with the “Play Video” action to specify the website URL of the
video to be played. Note that an internet connection is required for playing videos.
URL of web page – [action button] Used with the “Open Web Page” action to specify the website URL
of the web page to be opened. Note that an internet connection is required for opening a web page.
Use as input for conditional lookups only – [lookup] Check this if option to improve speed in this
widget is being used only to support conditional lookups later in your form. Uncheck if you want full
lookup functionality
Use checklist – [table] Use this option if the first question in the Table is a Lookup and you wish to
display all the rows in a checklist format. Be sure the "Number Rows" value above equals or exceeds the
number of rows in the Lookup table.
Use image – [action button] Allows you to upload a custom button image to be used as a button (as an
alternative to a standard doForms button shape). There is no restriction on the size of the image. If you
want your custom buttons to have text, then this text needs to be embedded in the image prior to
upload. Accepted image formats are JPG and PNG.
54 |
Build Forms
Use lookup in website Dispatch tab only – [lookup] Use the display the lookup in the website Dispatch
tab only. This property is used when you wish to use a lookup to pre-populate a dispatched record on
the website prior to sending, but do not wish to send the lookup table to the mobile devices.
Advanced Properties (Paid Account Only)
The “advanced” area provides “skip” and “relevance” options which can be used for applying very
sophisticated logic to the behavior of your doForm.
Adding Skip Logic
You can apply skip logic to jump from one question to any other question below it (or to the end of the
form). This is done by evaluating the answer to the original question based on a condition and then
jumping to the destination question if that condition is met.
In the example below, the skip condition can be interpreted as “skip to the end of the form if the answer
to the current question is A”.
You may also use “compound” skip logic to evaluate two or more skip conditions using AND / OR logical
operators (see section below).
Note that you cannot use skip logic to create loops. Use Repeatable Sections for looping.
IMPORTANT: Skip logic is automatically cleared whenever the properties of any of the questions
involved are altered. For this reason, we recommend adding skip logic last and always checking it prior
to saving a form as Published.
Adding Relevance Logic
You can apply relevance logic to ignore a question based on the answer to any question above it. This is
done by evaluating the answer to the prior question based on a condition and ignoring the current
question if that condition is not met.
In the example below, the relevance condition can be interpreted as “if the answer to the media image
capture question above was ‘no_media’ then display the current sketch question.” Otherwise the
current sketch question would be ignored.
Build Forms
| 55
The example below also illustrates how relevance logic can be used to make robust forms that contain
alternative questions when a certain type of hardware input is not available. In this example, if the
mobile device does not possess a camera, the previous image capture question would have been
skipped over automatically, and the value “no_media” assigned to that image capture question would
have been used to trigger the current sketch question as an alternative.
Another useful tactic is to use the “not equal” operator with a “blank” answer value. The example
below would cause the relevance logic to trigger if any one of the answers to the select multiple
question is checked. The alternative for achieving this result would be to use the “equal” operator in
multiple compound logic statements (see next section).
You may also use “compound” relevance logic to evaluate two or more relevance conditions using AND /
OR logical operators (see section below).
IMPORTANT: Relevance logic is automatically cleared whenever the properties of any of the questions
involved are altered. For this reason, we recommend adding relevance logic last and always checking it
prior to saving a form as Published.
56 |
Build Forms
Compound Logic
Both the Skip Logic and Relevance Logic features provide the ability to use multiple logical conditions.
As an example, supposed you have building inspection form with the following Select Multiple question:
Furthermore, in a situation where both Basement and Crawlspace are selected you would like Numeric
Question to be displayed where you can enter the percent that is basement.
Then you might use the compound relevance logic below to specify that the Percent Basement question
will only be displayed if Basement and Crawlspace are checked above:
Applying compound logic can be a little bit tricky. Logical operators are evaluated from left to right, and
in the following order:
1.
2.
3.
4.
Evaluate all “less than” and “greater than”, next
Evaluate all “equals to”, next
Evaluate all logical “AND”, next
Evaluate all logical “OR”, next
Build Forms
| 57
Below are a few examples which illustrate how certain compound conditions will be interpreted in the
doForms mobile app:
Compound Condition:
Under_Structure is equal “Basement” AND Under_Structure is equal “Crawlspace”.
Result:
If Under_Structure = “Basement” only => Percent_Basement is not displayed
If Under_Structure = “Basement” & “Crawlspace” => Percent_Basement is displayed
If Under_Structure = “Basement” & “Crawlspace” & “Slab” => Percent_Basement is displayed
If Under_Structure = “Basement” & “Crawlspace” & “Slab” & “Hillside” => Percent_Basement is
displayed
If Under_Structure = “Basement” & “Slab” => Percent_Basement is not displayed
If Under_Structure = “Basement” & “Hillside” => Percent_Basement is not displayed
Compound Condition:
Under_Structure is equal “Basement” AND Under_Structure is equal “Crawlspace” OR
Under_Structure is equal “Slab”
Result:
If Under_Structure = “Basement” only => Percent_Basement is not displayed
If Under_Structure = “Basement” & “Crawlspace” => Percent_Basement is displayed
If Under_Structure = “Slab” => Percent_Basement is displayed
If Under_Structure = “Basement” & “Slab” => Percent_Basement is displayed
If Under_Structure = “Basement” & “Hillside” => Percent_Basement is not displayed
If Under_Structure = “Basement” & “Slab” & “Hillside” => Percent_Basement is displayed.
Compound Condition:
Under_Structure is equal “Basement” AND Under_Structure is equal “Crawlspace” OR
Under_Structure is equal “Slab” OR Under_Structure is equal “Hillside”
Result:
If Under_Structure = “Basement” only => Percent_Basement is not displayed
If Under_Structure = “Basement” & “Crawlspace” => Percent_Basement is displayed
If Under_Structure = “Basement” & “Slab” => Percent_Basement is displayed
If Under_Structure = “Basement” & “Hillside” => Percent_Basement is displayed
If Under_Structure = “Slab” => Percent_Basement is displayed
If Under_Structure = “Hillside” => Percent_Basement is displayed
If Under_Structure = “Slab” & “Hillside” => Percent_Basement is displayed
Tips:
Consider using the “Hide field in mobile app” property in special text, numeric, date:time and calculation
questions to store data values that can be used to trigger relevance or skip logic conditions.
58 |
Build Forms
Using Page Breaks
Page Breaks are used to organize long forms into pages that can be easily navigated in “Form View on
[tablet devices only]. To insert a page break into your form simply drag it where you want the page to
begin (including at the top of your form to delineate the first page). Page Breaks have the following
special properties:
Page name – Used to specify a short text string that will be displayed as a page name in the page
navigation bar at the bottom of Page View. If a page name is not specified, then sequential numbers will
be used for navigation in the page navigation bar at the bottom of Page View.
Automatically return to form view at the end of page – Selecting this option will automatically return
doForms to Form View when the user completes the last question on the page in Question View. This
option is handy for letting users review their work after completing the page.
The illustration below shows a form that has been organized with into five pages (Main, Time, Score1,
Score2, Email). Score2 is the page currently being shown. Within a page you can navigate Form View by
swiping the screen vertically. To navigate between pages in Form View, swipe the screen horizontally,
or tap on the page bar at the bottom of the Form View screen.
Build Forms
| 59
Using Repeatable Sections (Paid Account Only)
A repeatable section is a “container” for one or more of any doForms questions widgets. A repeatable
section loops through the questions it contains. A maximum number of loops can be specified in the
properties area (default is 10). In the doForms mobile app, users will be prompted before each loop if
they wish to continue. Therefore, the actual number of loops performed will be controlled by the
mobile user.
Note that repeatable sections can be “nested” within one another. Nested repeatable sections provide
a very efficient way to enter long lists of information; for example, an inventory of part numbers (inner
loop) located on a particular shelving unit in a warehouse which contains multiple shelving units (outer
loop).
To create a repeatable section, drag and drop the Repeatable Section question widget on the Form
Canvas. Next, drag and drop the desired question widgets into the repeatable section. Be sure to
specify the Max Repeats property.
We strongly suggest experimenting with the Section Label property in context with the “loop” prompts
on the mobile device. A clever choice of words can result in a very smooth user interface. But the only
way to preview and test this is on a mobile device.
Additionally, Repeatable Section widgets have a special “Repeat Transition Text” property. You can use
this property to specify which transition text will be displayed at the end of each repeatable section
loop to instruct the mobile user what to do next (300 characters maximum).
In the example below, we’ve created a repeatable section for entering a list of parts and calculating
Quantity x Unit Price subtotals.
60 |
Build Forms
Using Calculations (Paid Account Only)
The calculation widget allows you to perform arithmetic (= + - / * ) operations on one or more previously
entered Numeric question values in the form. The result of the arithmetic expression is stored in the
calculation field.
In the example below, we have created a repeatable section for entering a list of parts used in a
particular task. Each part has a Part Description, Quality and Unit Price. The calculation widget is used
to calculate Quality x Unit Price for each part.
The Decimal Place property is used indicate how many decimal places should be displayed (not that the
actual value is not rounded off).
The Expression property is used to build the formula based on previously entered number values. Note
that the calculation widget needs to be placed after any question fields that will be used in the
calculation.
In the simple invoice example below we calculate the item price (=unit price x quantity) of every item
entered into the repeatable section.
Build Forms
| 61
Sum and Count Operators
If your form contains a Repeatable Section container, you can use Sum and Count functions in your
calculations to sum up all the values entered into a preceding repeated numeric field (e.g., to calculate a
total or to count the number of times data was entered into a field for division of the total to calculate
an average). Sum and Count operators can also be used with Table containers.
As an example, in the invoice above we can Sum the value of all the Item_Price calculations to get a
subtotal.
We can then multiple the subtotal times a tax rate (a constant) to calculate the sales tax
And finally add the Subtotal and Sales tax to get a Total Price
62 |
Build Forms
If we want to get a count of the number of items ordered (i.e., number of Item_Price fields that were
calculated) we can use the Count function which works the same way as the Sum function but returns
an integer count.
Parenthesis ( ) Group
In other circumstances you might consider using a parenthesis ( ) group to organize a complicated
expression. If needed you can nest parenthesis within parenthesis. The example below shows an
alternative way to calculate the Total_Price without explicitly calculating a subtotal and tax as done
above.
Use of Hidden Fields for Variables
In other circumstances you might consider using the “Hide field in mobile app” property in numeric
questions and calculations to store data values which you do not want displayed to the user. As an
example, suppose you wanted to pass a tax rate to the form above. You could create a numeric field
Build Forms
| 63
called “Tax_Rate”. By making the field hidden it would not be explicitly displayed in the form, but could
still be used in the tax calculation above. Hidden fields are also handy for very complex calculations that
you want to do in parts.
Date:Time Calculations
The calculation widget can also be used with date:time values. The possible operations are (1) subtract
date:time1 from date:time2 to produce a difference in decimal-hours; or (2) add/subtract decimal-hours
from date:time1 to produce a new date:time2. Be sure that you correctly set the “Kind” property to
date:time if performing calculations that involve a date:time (even when the result will be a numeric
value). When using the “Sum” operator to sum up a list of differences in decimal-hours be sure to set
the Kind to number, as these differences are stored as numbers.
Display time values can be formatted as hh:mm in the mobile app by using the “Display time values as
hh:mm” property. Note however, that the actual values will be saved as decimal-hours.
Using Scores (Paid Account Only)
The score widget allows you to perform calculate scores based on numeric underlying values for a
special type of choose one question. Questions are grouped into categories. The score widget
calculates and displays score possible total, score actual total, and percent actual of total for each
category and for all categories.
In the example below there are four score questions in the form. The cleanliness and orderliness
question are assigned to the “appearance” category. The temperature and humidity questions are
assigned to the “climate” category. The numeric values for each answer choice are used in the score
calculations.
64 |
Build Forms
In the example below, the form is completed with the following values:
Cleanliness = Clean (5)
Orderliness = Just ok (3)
Temperature = Too cold (3)
Humidity = Too wet (3)
The calculated score values will be displayed at the end of the form, and will also be included in the
View Data tab results.
Build Forms
| 65
Using Questionnaires (Paid Account Only)
http://www.doforms.com/support/how-to-videos/how-to-questionnaire.htm
A Questionnaire is a table format “container” for score, choose-one, or select multiple question types.
You can use this container to display the questions in a tabular format as illustrated below when in Page
View. The question captions are listed in the first column of the table. The answer values comprise the
column headings.
To set up the Questionnaire in your form, simply drag and drop the “Questionnaire” widget into the
desired location in the question canvas as illustrated below. Then drag and drop up to score, chooseone, or select multiple questions into the Questionnaire. You can use the “Equally Spaced Columns”
property to make columns an equal width as shown above. Otherwise the column width will be
controlled by the length of the caption text of the question answers (i.e., the “The answer name as
presented to the user” property of each answer option”.
A very useful trick when creating a Questionnaire is after adding the first question, use the “Duplicate”
button to create the other questions. This saves you from having to redo all the answers (which have to
be exactly the same). You only need to change the “Caption” property of each question. This technique
will save time and reduce errors.
66 |
Build Forms
.
IMPORTANT:
You may NOT mix question types in a questionnaire container. The questions need to be all of the
same type (score, choose-one, or select multiple) .
The answer options MUST be exactly the same for all the questions. This includes the “The answer
name as presented to the user” and “Underlying value” properties.
Questionnaires can have up to 10 columns but an unlimited number of rows.
Build Forms
| 67
Using Action Buttons (Paid Account Only)
http://www.doforms.com/support/how-to-videos/how-to-action-buttons.htm
The Action Button widget allows you to make your forms more “app like”. You do this by creating
“buttons” then assigning actions to the buttons when pressed. Action buttons can be used to jump to
questions or pages, so you can build your own form/app menus. Action buttons can also be used to
open web pages, play videos, launch other apps, send customized dispatch status flags, or save and send
a completed form with just one click.
Below is an example of a form which uses Action Buttons to create a menu that the mobile user can use
to navigate the form. In this example, the Page break widget is used to create a first page in the form
which only contains the menu.
To create an Action Button drag the widget onto the question canvas of your form (illustrated below). If
you are creating a menu, you will need one Action Button for each menu button. You can use our
standard doForms buttons (as shown above and below), or upload your own customized button images
68 |
Build Forms
for a more polished look. To upload your own customized button, just check the “Use image” property.
If you want your custom buttons to have text, then this text needs to be embedded in the image prior to
upload (while this is in a Label widget – the HVAC graphic above and below is an example of an uploaded
image)..
The Acton Button widget has the following special properties that you use to control its look and
behavior:
Use image – Allows you to upload a custom button image to be used as a button (as an alternative to a
standard doForms button shape). There is no restriction on the size of the image. If you want your
custom buttons to have text, then this text needs to be embedded in the image prior to upload.
Accepted image formats are JPG and PNG.
Image justification – Controls the justification of the button (left, center, right).
Action button text – Allows you specify the text that will be displayed in a standard button format. If
you use an image instead of the standard button format, the image will need to contain any desired
text.
Action – Allows you to select the type of action that will take place when the action button is pressed.
Action options are (1) jump to question, (2) jump to pages, (3) open web page, (4) play video, (5) launch
another app, (6) send customized dispatch status flag, or (7) save and send the form.
Destination page – Used with the “Jump to page” action to specify the form page to jump to when the
Build Forms
| 69
action button is pressed. The “Execute auto stamp …” option determines whether or not to execute any
date:time or location autostamp questions located between the action button and the destination page.
Destination question – Used with the “Jump to question” action to specify the question to jump to
when the action button is pressed. The “Execute auto stamp …” option determines whether or not to
execute any date:time or location autostamp questions located between the action button and the
destination question.
URL of video – Used with the “Play Video” action to specify the website URL of the video to be played.
Note that an internet connection is required for playing videos.
URL of web page – Used with the “Open Web Page” action to specify the website URL of the web page
to be opened. Note that an internet connection is required for opening a web page.
Status text – Used with the “Send Status” action to specify the text string that will be sent to the
Dispatch tab as a status message. Note that an internet connection is required for sending a status
message.
Android app name – Used with the “Launch Program” action to specify the name of the Android app
that will be launched when the action button is pressed. For Android devices the “app name” must be
spelled exactly as listed in the device Settings > Manage Applications page.
iOS app URL scheme – [action button] Used when the Action property is set to “Launch Program” to
specify the ID of the iOS app that will be launched when the action button is pressed. iOS app URL
scheme forms in most apps can be found at http://handleopenurl.com. Below is a lookup result for
Google Maps. The app URL scheme is “comgooglemaps” which is the value you would enter in the
Action Button property.
Additional Action Button Videos can be found at the following web page:
http://www.doforms.com/support#2
70 |
How to Use Action Buttons to "Jump to a Page"
How to Use Action Buttons to "Jump to a Question"
How to Use Action Buttons to "Launch an External Application"
How to Use Action Buttons to "Open a Web Page"
Build Forms
How to Use Action Buttons to "Play a Video"
How to Use Action Buttons to "Send a Dispatch Status Message"
How to Use Action Buttons to "Save and Send a Form in One-click"
Using Lookups (Paid Account Only)
http://www.doforms.com/support/how-to-videos/how-to-create-a-simple-lookup.htm
Lookup tables allow you to search on and select an answer from an external data table. Additionally, if a
lookup table row contains answers for other questions in your form, you can use the table to
automatically answer these questions as well. For example, if your form contains questions for entering
“Customer Number”, “Customer Name” and “Customer Address”, and if you have a lookup table that
also contains these columns, then you can set up “Customer Number” as the Lookup Value, and when
the mobile user searches on and selects a Customer Number, the corresponding Customer Name and
Customer Address will be automatically filled out in the form.
The illustration below shows a simple lookup table CSV file.
The Option Menu section above provides instruction on uploading lookup table files into the Build
Forms tab. Once a lookup file is uploaded, it may be used in one or more forms as described below.
External files must be CSV or Excel 2003 format, and the first row of the file must contain field names for
each column (no spaces or special characters).
To see which lookup tables are available in your account, click the Options menu, and select Manage
Lookup Tables. In the illustration below, the lookup table name “Customer List” contains the data
above.
Build Forms
| 71
After you have confirmed that the desired lookup table has been uploaded, you are ready to set up a
“lookup” question in your form.
To set up the lookup table in your form, simply drag and drop the “Lookup” question widget into the
desired location in the question canvas as illustrated below.
The Lookup question widgets include the following special properties:
Evaluate blank (null) condition values – [lookup] Causes lookup conditions to evaluate null (blank)
condition values. Otherwise, null (blank) condition values will be ignored. Use this if one or more steps
in a set of sequential lookup conditions need to be evaluated as being “null” rather than just skipped if
left blank. . This option is important in optimizing the performance of the lookup widget when null
72 |
Build Forms
values are a possibility.
Limit to list – Limits the entry of data to a lookup table selection only. If the lookup has any destination
questions, the answers to these questions will also be limited to the corresponding values in the lookup
table.
Sort lookup list alpha-numerically – [lookup] Check this if you want to sort your lookup field alphanumerically. Numbers are sorted first, followed by letters. If you wish to avoid sorting results like 1, 2, 3
…..8, 9 then pad number values with leading zeros 01, 02, 03 … 08, 09, 10, 11.
Display the capture barcode button – If checked, the mobile app will include a Barcode scanning control
in the question widget. This is handy if your “Lookup Field” is a barcode.
Choose-one destination fields – Check if you would like to compare the lookup table value with the
“underlying_value” property for choose-one “destination questions”. Otherwise the lookup table value
will be compared with the “Answer as displayed to the user” choose-one property of the choose-one
“destination questions” When the values are the same, that answer option in the choose-one answer
option will be selected.
For example, suppose your form has a choose-one question with the following answer options:
Answer as displayed to the user
YES
NO
Underlying_value
1
0
In this case if your lookup table had YES/NO answers you would NOT check the “Choose One Destination
Fields” option. But if your lookup table had 1/0 answers you WOULD check the “Choose One
Destination Fields” option.
Use lookup in website Dispatch tab only – Use the display the lookup in the website Dispatch tab only.
This property is used when you wish to use a lookup to pre-populate a dispatched record on the website
prior to sending, but do not wish the send the lookup table to the mobile devices.
Use as input for conditional lookups only – Check this option to improve speed if this widget is only
being used to support conditional lookups later in your form. Uncheck if you want full lookup
functionality
Kind – Specifies the type of value used in the lookup field - Number or Text.
Data source – Selects the lookup table to be used. In the example below we are using the “Customer
List” lookup table. Use the “Refresh” option if you have recently added a new lookup table as a
Resource and do not see it in the list of available data sources.
Lookup field – Selects the field in the lookup table that will be used in the lookup search/list. In the
example below we are using the “CustomerNumber” field in the lookup table.
Lookup conditions – Specifies if any prior lookup selection from the same lookup table will be used to
filter the lookup field. For example, if you have lookup table with state and city columns, you could
Build Forms
| 73
setup a lookup question to select the state, and a second lookup question to select the city. In the
second lookup question you could make the lookup condition “State” so that only the cities in the
selected state are displayed. Lookup conditions can also be specified as the answer values to a prior
text, numeric or choose one question in the form. Use the “Add field” option to add a new condition.
Destination fields – Provides a “mapping” of any additional lookup table fields that will be used to
populate other question fields in your form. In the example below, we are going to search on the
lookup field “CustomerNumber”, then use the “NameLast” field in the lookup table to populate the
“Last_Name” field in the form, the “NameFirst” field in the lookup table to populate the “First_Name”
field in the form, and “Address” field in the lookup table to populate the “Address” field in the form. Use
the “Add field” option to add a new destination field.
74 |
Build Forms
Using Tables (Paid Accounts Only)
http://www.doforms.com/support/how-to-videos/how-to-create-a-simple-invoice.htm
A table is a spreadsheet-like “container” for text, lookup, numeric, and calculation question types.
Tables can have up to 10 columns. A fixed number of rows must be specified in the properties area.
Tables are similar to Grids except that in a Table the contents of each row are repeated (the columns
differ). Whereas, the contents of cells in a grid can be completely random.
.
To set up the table in your form, simply drag and drop the “Table” container widget into the desired
location in the question canvas as illustrated below. Then drag and drop up to 10 text, lookup, numeric,
and calculation questions into the table. Each of these questions will be a column in the Table.
Build Forms
| 75
When rendered on the tablet mobile device in Form View, the table will look like this:
The Table container has several special properties:
Number rows – Specifies the number of rows in the table.
Use checklist – Use this option if the first question in the Table is a Lookup and you wish to display all
the rows in a checklist format. Be sure the "Number Rows" value above equals or exceeds the number of
rows in the Lookup table. See the following illustration of how the table above is rendered when the
“Use checklist” option is selected.
Hide rows – This option is used in conjunction with the “Use Checklist” option. Use this option to hide
rows that contain a specified alpha-numeric value. When checked an entry box will be displayed where
you can enter an alpha-numeric “hide_flag” or leave blank if you want a blank/null value to be the
hide_flag.
Column spacing – Specifies if columns will be evenly spaced (if checked) or variable width (if
unchecked). The width of variable width columns will be determined by the length of their Caption Text
property.
76 |
Build Forms
When rendered on the tablet mobile device in Form View, the “checklist” table will look like this:
Using Grids (Paid Accounts Only)
A grid is a “container” for label, text, lookup, numeric and image question types. A fixed number of
columns must be specified in the properties area. Grids are similar to Tables except that in a Table the
contents of each row are repeated (the columns differ). Whereas, the contents of cells in a grid can be
completely random.
To set up the grid in your form, simply drag and drop the “Grid” container widget into the desired
location in the question canvas as illustrated below. Then drag and drop label, text, lookup, numeric
and image questions into the Grid. Each of these questions will be a cell in the Grid. Questions placed
inside the container are placed in the grid in a zig-zag pattern with each new line starting after the
specified number of columns as illustrated below.
The Grid containers have several special properties:
Number columns – Specifies the number of columns in the Grid. This value will determine how many
questions are placed in a row before a new row is started. For example, in the illustration below there
Build Forms
| 77
are three columns. The first three questions are placed in the first row. The next three questions are
placed in the second row, etc.
Column spacing – Specifies if columns will be evenly spaced (if checked) or of varying widths (if
unchecked). In the illustration below the columns are equally spaced. The width of varying width
columns will be determined by the length of the longest Caption Text property in any of the cells in that
column.
78 |
Build Forms
Emailing PDF and Excel Reports (Paid Accounts Only)
This feature allows you to email the completed form as a PDF or Excel report to one or more recipients
in addition to sending it to your doForms website. The email is sent automatically when the completed
form is sent and received by your doForms website. You can use the “Default” property to pre-populate
email addresses. Use commas to separate multiple addresses.
In order to email a report from the doForms mobile app, you must insert an “Email Report” question
widget into the form when building it. The position of the “Email Report” question widget in the form
does not matter. The report will be sent at the same time the completed form is sent to your doForms
website. To add an “Email Report” question widget into the form:
1. Open the form in the Build Forms tab.
2. Drag and drop the “Email Report” question widget into the desired location.
3. Save your form when done.
To control the format of the PDF and Excel files, use the Options > Report Settings as described in the
View Data section. If you change the report settings for a particular project/form in View Data, then
those settings will also be applied whenever a report for this particular project/form is sent from the
mobile app.
For more information see Creating PDF Reports and Creating Excel Reports in the Reports chapter of this
guide.
Information Pages
You can create and insert an “Information” page anywhere in a form by using a Section Label question.
Use the Caption text to provide a title or heading. Use the Hint property to provide additional
information (e.g., instruction, warnings, etc.). In addition to textual information, these pages may
contain images, logos and illustrations.
Previewing a Form
If you are building a complex form, we strongly recommend testing it on your mobile devices before
deploying it to a large group of mobile users. The best way to do this is to set up a “Test Project” in the
Projects tab and add your published form to this project. You will also need to remove it from the Main
Project so that it is not deployed to your other mobile users. See the Projects section for how to do this.
Then under the Mobile Units tab, assign the Test Project to just those mobile units that you wish to use
for testing. See the Mobile Units section for how to do this.
Build Forms
| 79
Deploy Forms to Mobile Units
There are a number of ways to deploy your form to your mobile devices:
Publish to the Main Project - The simplest and fastest way is to go to the File menu and Save Form As >
Published. This will save the form in a Published state and automatically add it to the Main Project. All
of the mobile units that subscribe to the Main Project will automatically receive your form. Note that all
mobile units are subscribed to the Main Project by default until you manually unsubscribe them in the
Mobile Units tab.
Deploy Using the Projects tab – The other way to deploy your form is to use the Projects tab. This
method provides you the greatest control over who gets which form. First, under the Build Forms tab
go to the File menu and Save Form As > Published (if you haven’t done so already). Next, go to the
Projects tab and manually select which projects the form is added to (see Projects section). Just those
mobile units that subscribe to those selected projects will receive the form. This allows you to organize
and deploy your forms by work-function; for example, if you created a “Field Inspection” form, you can
add it to a “Field Project” which only your field workers are subscribed to. Use the Mobile Units tab to
control which mobile units subscribe to which project.
In either case, your form will automatically be pushed out to all mobile devices that subscribe to the
corresponding projects. This will occur the next time the mobile user starts the doForms mobile app, or
when he or she uses the “Update Forms and Notices” function.
Updating Forms
If a form is Published and assigned to a Project (see above), future updates to that form can also be
pushed out to the mobile devices that subscribe to that Project. For example, consider a case where
you have a form named “Timesheet” that has been published. Later you decide to make changes to the
Timesheet form and publish the updated form.
When you are done making changes, you will need to publish the updated Timesheet/Draft form. To
publish the updated form go to the File menu and Save Form As > Draft or Save Form As > Published.
As described above, if you use File > Open, make edits to a form, then use Save Form As > Published, a
new name will need to be assigned to the form. This is because every version of a form corresponds to
a specific data table structure. So, for example, if you add or delete questions, or change a Repeatable
Section, the underlying data table structure changes, and hence a new data table needs to be set up in
which to store the data. Therefore when publishing an update to a form you will need to use a different
name (we recommend appending a letter or number to the form name, e.g., Timesheet-2 or TimesheetB).
However, there are instances where very “light edits” can be made to a form without affecting the data
table structure. This may be done using the File > Open Special option , from where light edits may be
performed, and from where you can File > Save with the same form name. In these cases the collected
data will continue to be stored in the same data structure and same data table.
80 |
Build Forms
Public Forms Library
doForms provides a public Forms Library from which you can select forms that can be used directly in
your projects. Or you can use these public forms as starting points for further customization to meet
your specific requirements. To date, the Forms Library contains over 300 forms that have been
contributed by users like you.
Using a Public Form
To access the Forms Library, go to the File menu and click Open. The open dialog will be displayed. At
the bottom of this dialog, click on “Select a form from the doForms Public Library”. A second dialog box
will open (see below). You can use this to enter the form name, if you know it. Or select keywords to
describe what you are looking for. The more keywords you select, the more restrictive your search will
be. You may also select a language to narrow your search. Click Search when done. A new dialog box
will be displayed listing any public forms that meet your search criteria. Select a form from the list and
press Open, otherwise press Cancel.
Build Forms
| 81
Contributing a Public Form
You may also contribute a form to the Public Forms Library. To do this, open the Published form that
you wish to contribute in the Build Forms tab. Next, from the File menu select Make Form Public. A
new dialog box will be displayed where you will be asked to enter descriptive information and select
keywords that will help other users find the form. When done click Save, otherwise click Cancel.
Note that all forms submitted for inclusion in the Public Forms Library must first be reviewed and
approved by the doForms editorial staff. They will reject your form if it contains content they deem
inappropriate. They may reject your form if they feel it is too narrow in scope or purpose. Or they may
decide to make some changes to your form.
82 |
Build Forms
Creating Reports
Overview
Reports vs. Exports
This chapter describes how to create and distribute reports generated from the form data submitted to
your website. But first it’s important to distinguish between “reports” and “exports”. Exports are a
simple conversion of some or all data records for a particular form to another file format. Data are
exported to your desktop computer or to a cloud account such as Google Docs/Drive. Exports are
always in a spreadsheet-like format (with the exception of KML which is a mapping format). Exports are
done from the File menu in either the View Data or Dispatch tabs.
Reports, which are described in this chapter, are highly formatted Excel or PDF files which can include
embedded images, signatures and maps. Reports generally involve one completed form data record
(i.e., one filled out form), but can also be used to aggregate data from several different but related
forms. Reports can be generated from the Row or Data menus in either the View Data or Dispatch tabs.
Reports can also be emailed from a mobile device by including an Email Report widget in your forms
when you construct them in the Build Forms tab..
Reports
| 83
Standard Report Template vs. Custom Report Template
Reports can be generated using either a Standard Report Template or Custom Report Template. A
“template” is simply a format definition for how the report will look (i.e., the placement of graphics, font
type and size, border styles, etc.) The Standard Report Template is an “off-the-shelf” doForms format
that you can use for your reports. As described in more detail below, even though it is “standard” it still
provides numerous settings to help you control the content and appearance of standard reports.
In comparison, Custom Report Templates provide you FULL control over the content and appearance of
your reports. Custom Report Templates are created by YOU, using Microsoft Exce,l and uploaded to
your website. If you know how to format your Excel documents, then you are already an expert at
building Custom Report Templates, which can include almost any formatting, calculation and charting
function of Excel.
PDF vs. Excel Output
Once you have created or selected a Report Template, you can also specify whether the resulting report
will be produced in Excel or PDF file format. You can create either PDF or Excel output from a Custom
Report Template. Currently you can only produce PDF output from a Standard Report Template. The
process for controlling reports is as illustrated below:
Standard
Report
Template
PDF
Output
Select
Format
PDF
Output
Custom
Report
Template
Excel
Output
Report Settings
Report Settings are used to control the process above. These settings are applied on a project-byproject and form-by-form basis. This means that you can set different templates and output type for
different forms. It also means that you can set different templates and output type for the same form
but in different projects.
84 |
Reports
To access the Report Settings:
1. Go to the View Data or Dispatch tab
2. Select a project and form
3. Click on the Options menu
4. Select Report Settings
5. The following page will appear
6. After making any desired changes, click Save.
Reports
| 85
When Emailing Report from Mobile App:
Specify if reports that are emailed from the mobile app will be sent as PDF or Excel files.
When Creating PDF File Use:
Specify if PDF files will be created using the Standard Report Template or the Custom Report Template
(see below for how to specify which custom template to use).
When Creating Excel File Use:
Specify if Excel files will be created using the Standard Report Template or the Custom Report Template
(currently, only the Custom Report Template option is available).
Standard Report Template Settings
Font – Specifies the font to be used. The “System Default” font should be used for most latin-based
alphabets. Specialty fonts should be selected for other alphabets (e.g., Cyrillic for Greek or Russian)
2 column format – The default layout is single-column. Selecting this option will format the report in
two columns.
Hide empty fields – Hides any questions that have not been answered.
Shade headings – Shade the “caption” property of Label question widgets in the form..
Display data_names – The default is to display the “caption” property of question widgets. Selecting
this option will display the “data_name” property instead.
Display hints – Display the “hint” property of the question widgets in the form.
Display record_name – Display the system generated “record_name”.
Display date_created – Display the system generated “date_created”.
Display mobile_unit – Display the mobile number of the device that submitted this form.
Display Logo – Display a custom logo if one has been uploaded to your doForms website (see Admin tab
section). (Paid Account Only)
Display page numbers – Include page numbers at the footer of the PDF.
Display GPS coordinates on map – Display GPS coordinates (if any) on a location map which will be
appended to the report. Use the “Auto-scale” option to let doForms select the best map scale that fits
all the GPS points. Use the “Enter scale” option to manually specify a scale. 0 is lowest detail. 20 is
highest detail. Highest detail maps may not be available for all locations.
Page widget starts a new page – Creates a page break in the PDF report wherever a Page widget is
inserted into a form.
Each loop in a Repeatable Section starts a new page – Creates a page break at the beginning .
86 |
Reports
Custom Report Template Settings
Select an Custom Report Template – Specifies the template file that will be used as the Custom Report
Template (see the Creating a Custom Report Template section below).
General Report Settings (PDF & Excel Reports)
Always populate defaults – Checking this option causes default values to be displayed in reports.
Resize images - Allows you to specify a reduced image size as a percentage of the original – 100%, 66%,
50%, 33% and 25%. This option allows you to better control the format of your reports, and it also
allows you to reduce the size of the resulting PDF or Excel files.
Creating a Custom Report Template
The examples on the following page show a Custom Report Template and the corresponding report
generated by doForms. Although the example shows an Excel file result, the Custom Report Template
can be used to generate either Excel or PDF files.
Custom Report Template:
Excel Format Report:
Custom Report Templates are created using Excel. These template files are simply Excel worksheets
that have been “Saved as … Excel Template”. If you know how to format your Excel documents, then
you are already an expert at building Custom Report Templates, which can include almost any
formatting, calculation and charting function of Excel.
Reports
| 87
But to understand how to build Custom Report Templates in doForms, you need to understand how the
“data_name” property of the questions in your forms are used to “map” data values into a report.
{data_name} Tags
Data_names are unique identifiers that you set up in the Properties of each of the questions in your
form. These unique identifiers are used throughout the doForms data collection and data management
process to organize your data as shown below.
Data_Name Property in the Build Forms tab:
Data_Name Property in the View Data tab”
doForms uses these same data_names to relate (or “map”) the answers being collected in your form to
cell locations in the Custom Report Template. For example, the Photo Survey form above contains a text
question with the data_name “Subject_Description”. As the name implies, this is where a mobile user
enters description text for their photo survey. Note how the Custom Report Template below utilizes the
same data_name to specify where these values will be displayed in the report using the “{ }” brackets.
This tells the doForms to “map” the answers to the Subject_Description to that particular cell. In the
View Data screen above there is a competed record with the Subject_Description = “Dudley Gardens”.
Note how this answer value is mapped to the completed report below.
88 |
Reports
If your form includes Repeatable section or Table containers, the format of the corresponding
data_name tags is as follows: {data_name(i)} where “i” is the repeat number. So in the Excel Template
example above the captions and images are specified as {Caption(i)} and {Image(i)} respectively. This is
also the data_name format used to reference data in grid tables.
Creating a Template File
Follow these steps to create a Custom Report Template for use with doForms:
1.
2.
3.
4.
5.
6.
7.
Open Excel and start a new document
Add tabs/worksheets as desired into the Excel document to better organize your report
Specify which cells will contain which answers with the {Data_Name} tags
Add titles, captions, and any other text into their own cells and format as desired
Add any desired graphics, such as logos, using the Excel “Insert” functions.
Add any desired page breaks using the Excel “Layout” functions
You can use merged cells to better control the size and position of any images (pictures and
signatures).
8. If your report includes numeric values, add any desired calculations or charts which employ
these values
9. Use the Excel File > Save function to save the file in one of the Excel 97-2003 or Excel 2010
Template formats as shown below (xlt, xltx, xltm).
IMPORTANT NOTES:
Certain features of Excel will not be supported in the template. These include shape drawings,
smart-art, certain chart types, and others.
Images will be scaled to fit the merged cell so be careful about using the correct aspect ration
In most cases, you may place multiple data_name tags in a single cell
If you specify the data_name for a GPS location, both the latitude and longitude values will be
written into the same cell but separated by a comma.
For audio and video files, doForms will insert the http:// address of the corresponding media files.
Reports
| 89
Multiple Projects/Forms
Custom Report Templates can also be created and used to aggregate data from different forms into a
single report. Note that this is for different forms, NOT for different data records of the same form. The
format is as follows:
{"project"="Project_Name","form"="Form_Name","common-field"="Data_Name","field"="Data_Name"}
Where:
Project_Name is the name of the project that contains the data
Form_Name is the name of the form that contains the data
Data_Name is as previously described
Common-field is the Data_Name value of the common field
So for example, assume that I have two forms in a project named “Insurance” for which I want to
aggregate the data from two different forms. The first form is named “Car” which contains data about a
customer’s car. The second form is named “House” which contains data about a customer’s house.
Both forms contain the common-field called “Customer_ID” which is a unique numeric number to
identify each customer. If we wish to create {…} tags in the aggregate report to display the customer’s
{car_make} and {house_contsruction} we would use:
{"project"="Insurance","form"="Car","common-field"="Customer_ID","field"="car_make"}
{"project"="Insurance","form"="House","common-field"="Customer_ID","field"="house_construction"}
Note that you only need to use the long format of the {…} tag above if data is being read from a form
that is different from the form that the report is being generated for. So for example, if we were
generating reports for the House form, we could simply use the tag {house_construction}. But if we
want to include data from the Car form in the report for the House form then we would need to use the
long format of the {…} tag. Similarly, if you wanted to use the same Excel Report Template for
generating the same report for both the Car form and the House form, then you would need to use the
long form of the {…} tags.
Common-Field Restrictions:
90 |
All values inside the {…} tag are case-sensitive and cannot contain any special characters,
including \ / : * ? " > < | = { }.
Common-field fields are restricted to text, numeric-integer, lookup and barcode question types
Common-fields must be unique. So in the example above, no two customers can have the same
”Customer_ID”
No single form can contain more than one data record that has the same value of the commonfield. So in the example above, the Car form and the House form can NOT contain more than
one record each with the same value for the “Customer_ID” field.
Reports
If any of the restrictions above are violated, an error will occur in the report that is generated.
Uploading the Template
After the Excel Report Template has been created on your PC (see the View Data tab section), follow
these steps up upload it to your doforms website:
1.
2.
3.
4.
Go to the Build Forms tab of your website
Click on the Resources menu
Select Manage Excel Templates
Click Add
5. Click Upload Excel File
6. A “File Upload” dialog will open. Browse the files then select your Excel Report Template file
and click Open
Reports
| 91
7. Give your template a name and description, then click Save.
8. Your template will be added to the Saved Excel Templates list
9. Click Close
Repeat the steps above to load additional report templates into your Build Forms tab. Click Close when
done.
TIP: After you upload a Custom Report Template, this template becomes available for use with any form
in your account provided that the form has exactly matching data name and common-field values for
the {…} tags.
Creating PDF Output
To print, email or save individual PDF documents for one record at one time:
1. Go to the View Data tab and select the desired form.
2. Click on the Row Menu of the row that you wish to print, email or save as a PDF (the Row menu
is the little box with the down arrow at the left of each row).
3. Select PDF Report.
4. A new window will open with a Print Preview (make sure pup-ups are not blocked in your
browser).
5. At the top of the new window you can select either Print, Save or Email.
92 |
Reports
To create and save individual PDF documents for multiple records at one time:
1. Select the records by checking them in the View Data tab.
2. Click on the Data menu and select “PDF Report all Selected”
3. What steps happen from here will depend on your browser type and version, but you will be
able to save PDF reports for the checked records onto your local computer without the need to
do so individually.
IMPORTANT: Please make sure that your web browser is set to “Allow Pop-ups” from your doForms
website in order to view the Print Preview.
IMPORTANT: The current upper limit on the size of a single PDF file is 35MB. If you exceed this limit,
doForms may replace inserted picture with http links to the picture in order to reduce file size.
Creating Excel Output
After the Excel Report Template has been uploaded to your website, follow these steps to specify how it
will be used in generating reports:
1. Go to the View Data tab of your website
2. Open the project/form that you wish to use the template with
3. Click the Options menu
Reports
| 93
4.
5.
6.
7.
Select Report Settings
The select the Excel Report Template you wish to use
Indicate if Excel Template will also be used by the mobile app when emailing reports
Click Save
To create an Excel Report from the View Data or Dispatch tab:
1. Go to the View Data or Dispatch tab of your website
2. Open the project/form that you wish to use
3. Click the Row Menu on the record your wish to generate a report for (little box with down
arrow)
4. Select Email or Save (note that Excel Reports cannot be previewed or printed on the doForms
website)
5. Open the file in Excel or any program that reads Excel documents.
To create and save individual Excel Reports for multiple records at one time:
1. Select the records by checking them in the View Data or Dispatch tab.
2. Click on the Data menu and select “Excel Report all Selected”
3. What steps happen from here will depend on your browser type and version, but you will be
able to save Excel reports for the checked records onto your local computer without the need to
do so individually.
94 |
Reports
Emailing Reports from the Mobile App (Paid Account Only)
In order to email a report from the doForms mobile app, you must insert an “Email Report” question
widget into the form when building it. The position of the “Email Report” question widget in the form
does not matter. The PDF will be sent at the same time as the completed form is sent to your doForms
website. To add an “Email Report” question widget into the form:
1. Open the form in the Build Forms tab.
2. Drag and drop the “Email Report” question widget into the desired location.
3. Save your form when done.
To control the format of the reports, use the Report Settings as described in the previous section.
If you change the Report Settings for a particular project/form on the website as described above, then
those settings will also be applied whenever a report for this particular project/form is sent from the
mobile app.
Reports
| 95
Projects
IMPORTANT: The Project tab is available to doForms users with Manage and Admin privileges only. Be
sure to click Save at the bottom of the page to save any changes.
http://www.doforms.com/support/how-to-videos/how-to-manage-devices-and-projects.htm
Layout
The Projects tab is the place where you manage projects and forms. Your doForms database is
organized by “Projects” which in turn contain the “Forms”. Note that the forms contain and organize
the data, and any form may be listed under multiple projects (See Understanding Forms, Projects and
Mobile Units).
The rows in the Projects tab represent the forms. The first column provides the form name (you can
sort the table alphabetically by clicking this column heading). The remaining columns represent the
projects, starting with the “Main Project”.
Main Project
Your doForms account starts out with one “Main Project” which provides you with useful forms. The
Main Project is a little bit different than all other projects in that it is subscribed out to all mobile units.
So if you create forms which you want to deploy to all mobile units, adding them to the Main Project in
96 |
Projects
the Projects tab is an easy way to do so. Other projects that you create must be explicitly subscribed out
to mobile units using the Mobile Units tab. Don’t worry, we will explain all this in the Mobile Units
section. For now let’s learn more about the Projects tab.
Search
Displays a filter function that allows you to search for specific form names.
Column Menu
Let’s start with learning how to manage projects using the Column Menu. A close cousin of the Row
Menu, it provides the following options :
Add project – To add a new project column, select Add project from the Column Menu. A new empty
column will added. The new project will be titled “Project 1, 2, 3 etc”. You can change this name as
described below.
Rename – To rename a project column, select Rename from the Column Menu. Type a new project
name over the old one. Press Submit when done. Otherwise, press Cancel. Note that this function may
not be applied to the Main Project.
Delete – To delete a project column, select Delete from the Column Menu. A message will be displayed
asking you to confirm the delete. Click the OK button to permanently delete the project column.
Otherwise, press Cancel. Note that this function may not be applied to the Main Project.
Select all forms – Use Select all forms from the Column Menu to select all forms for inclusion in the
project column. If all the forms are selected, this Column Menu option changes to Deselect all forms
which can be used accordingly.
IMPORTANT: Be sure to click Save to save any changes.
Row Menu
Next, let’s learn how to manage forms using the Row Menu. When you author a form in the Form
Builder and “Save as … Published”, the published form resides in your doForms account. But it is not
“deployed” until you add it to a project. At that point it is automatically deployed to the mobile units
that subscribe to that project. We will show you how to assign projects to your mobile units in the next
section. First, we need to show you how to add the form to a project.
Add form – To add a new form row, select Add form in the Row Menu. Then select a form from the list
of Published forms in your account (see below). Then click Add form. Otherwise, press Cancel.
Projects
| 97
Remove – To remove a form, select Remove in the Row Menu. A message will be displayed asking you
to confirm the remove. Click the OK. Otherwise, press Cancel. Note that removing a form from the
Projects tab does not delete it from your doForms account. You can always add it back later (see the
Build Forms section for instructions on how to permanently delete forms from your doForms account)
Select all projects – Use Select all projects in the Row Menu to include this form in all project columns.
If all the projects are selected, this Row Menu option changes to Deselect all projects which can be used
accordingly.
IMPORTANT: If a form is listed and the project is not checked AND if the data table contains data, then it
will be listed in the View Data and Dispatch tabs. This will allow you to see/use the data on the website
without mobile users seeing the form in the project. If a form is listed and the project is checked, then
the form will always be listed in the View Data and Dispatch tabs – whether or not there is data in the
table.
IMPORTANT: Be sure to click Save to save any changes.
98 |
Projects
Mobile Units
IMPORTANT: The Mobile Units tab is available to doForms users with Manage and Admin privileges
only. Be sure to click Save at the bottom of the page to save any changes.
http://www.doforms.com/support/how-to-videos/how-to-manage-devices-and-projects.htm
Layout
The Mobile Units tab is the place where you manage which mobile units will be connected to your
doForms account, as well as which projects (and their respective forms) will be available on which
mobile units.
The rows in the Mobile tab represent each mobile unit. The number of rows displayed will match the
number of mobile units supported by your account. Free doForms account supports just one mobile
unit, so you will see just one row. A doForms-20 account supports twenty mobile units so you will see 20
rows. A doForms-100 account supports one-hundred mobile units so you will see 100 rows, etc. Your
doForms Administrator can add rows for additional mobile units at any time by upgrading your current
plan using the Account tab.
Mobile Units
| 99
Mobile Number and PIN
The first and second columns provide the “Mobile Number” and “PIN”. Both MUST be entered into the
Mobile Units tab in order for those mobile devices to be “connected” to you doForms website. Each
time the doForms application is stated on a mobile device, it connects to the Internet and checks the
information in the Mobile Units tab to see if it is still allowed to “connect” to your doForms website, and
if so, which projects it needs to synchronize with. If it cannot find its Mobile Number and PIN in this list
it will not connect to the website. So the information entered here must also be provided to the user of
the corresponding mobile unit. They will be asked to enter this exact same Mobile Number and PIN
when setting up doForms on their mobile unit.
IMPORTANT: The mobile numbers and PINs must match those entered into corresponding mobile
devices.
Website Setup Wizard
When your doForms website starts for the first time, the Website Setup Wizard will appear. Website
setup consists of two parts (i) telling the website which mobile devices are allowed to connect to it, and
(ii) establishing login credentials for any website users other than you (see the Web Users section). If
you use the Website Setup Wizard, the rows in the Mobile Units tab will be filled in through this process.
But you can always change this information, or add mobile devices by following the steps below.
Search
Displays a filter function that allows you to search for specific mobile units.
Columns
Mobile Number – The mobile number will most likely be the 10-digit telephone number of the mobile
device. If the device is a PC or tablet with no phone, the mobile number may be any 10-digit number.
PIN – The PIN can be any 4-digit number. We recommend using a different PIN for each mobile number.
The number of mobile devices that you will be able to setup will correspond to your account level.
Nickname – Provides a “Nickname” for the mobile unit. You may use the mobile user’s name, or a
company device ID, etc. Nicknames may be up to 20 characters. This is most useful when working in
the Dispatch tab where it may be difficult to remember which mobile number corresponds to which
mobile worker.
Work Group (optional) – Provides a way to classify your mobile units. The work group field is
searchable with the Search button function.
Email (optional) – Provides an optional email address for the user of the mobile device.
MobileApp – Provides the version number of the mobile application installed on the corresponding
mobile device. This will automatically be filled in when doForms is set up on the mobile device. You do
not need to enter this information. The presence of this information will tell you that doForms has been
100 |
Mobile Units
successfully set up on the corresponding mobile device.
MobileOS – Provides the Operating System information of the corresponding mobile device. This will
automatically be filled in when doForms is set up on the mobile device. You do not need to enter this
information. The presence of this information will tell you what type of device this is and what its OS
version is. This is very useful for technical support purposes.
Projects – See Projects section.
You can sort the table alphabetically by clicking on any of the underlined column headings. This is useful
if, for example, you wish to see which mobile units use a particular MobileApp or MobileOS.
IMPORTANT: Be sure to click Save to save any changes.
Row Menu
The Row Menu provides the following functions:
Edit – To assign a Mobile Number, PIN and contact email to an available row, or to change an already
assigned value, click Edit in the Row Menu. The row will expand allowing you to change certain fields.
Click Change when done. Otherwise, press Cancel.
Delete – To delete a Mobile Number and PIN from a row, click Delete in the Row Menu. A message
will be displayed asking you to confirm the delete. Click OK. Otherwise, press Cancel.
Send Email – Sends and email to the mobile user containing their Mobile Number and PIN settings.
Select all projects – Use Select all projects from the Row Menu to subscribe all projects to this mobile
unit. If all the projects are selected, this Row Menu option changes to Deselect all projects which can be
used accordingly.
Be sure to click Save at the bottom of the page to save any changes.
IMPORTANT: Note that when a new project is added, it will NOT be automatically assigned to any of the
mobile units. You must explicitly do so either by clicking the checkboxes individually or by using the
Column Menu to Select all mobiles. If all the projects are selected, this Column Action Menu option
changes to Deselect all mobiles which can be used accordingly. Also remember that the “Main Project”
is automatically added to all mobile units.
IMPORTANT: If a Mobile Number is deleted but the mobile device still has unsent forms, these forms
will become “orphaned” on the device and will not be able to be sent to the website.
IMPORTANT: Be sure to click Save to save any changes.
Mobile Units
| 101
Web Users
IMPORTANT: The Web Users tab is available to doForms users with Manage and Admin privileges only.
http://www.doforms.com/support/how-to-videos/how-to-manage-web-users.htm
Layout
The Web Users tab is the place where you manage who can access your doForms website and what
privileges they will have. The rows represent the website users. The columns represent their privileges
and attributes.
Website Setup Wizard
When your doForms website starts for the first time, the Website Setup Wizard will appear. Website
setup consists of two parts: (i) telling the website which mobile devices are allowed to connect to it (see
the Mobile Units section), and (ii) establishing login credentials for any website users other than you. If
you use the Website Setup Wizard, the rows in the Web Users tab will be filled in through this process.
But you can always change this information, or add web users by following the steps below.
Adding Users
When a new user requests access to your doForms website (see the Accessing the doForms Website
section) their request will be displayed as a row marked as “Pending”. This request must be “accepted”
by an existing web user with Manage and Admin privileges.
102 |
Web Users
Accept – To accept a Pending request, click the Row Menu, and select one of the privilege levels under
Accept. An email will automatically be sent to the user confirming that access has been granted. The
privilege levels are as follows:
Read – Access to the “View Data Tab” to view data only.
Edit – Access to the “View Data Tab” to view, add, edit, delete, and export data.
Manage – Full access to all doForms website Tabs and all their functionality, including building
forms, managing projects, connecting additional mobile devices, and setting up additional
website users.
Deny – To deny a Pending request click Deny.
Changing User Information
Edit – Use to edit an existing Web User’s privileges, email (username), password or contact information.
Click Edit in the Row Menu. The row will expand allowing you to change certain fields. Click Save when
done. Otherwise, press Cancel.
Send Email – Use to send an email to the Web User after changing their account information. The email
will contain the user’s new email (username), password and privilege level.
Delete – Use to delete a Web User. A message will be displayed asking you to confirm the delete. Click
OK. Otherwise, press Cancel.
Add User – Use to a new Web User from the Web Users tab. A form will be displayed for you to enter
the user’s information. Click Save when done. Otherwise, press Cancel.
Work Group (optional) – Provides a way to classify your web users. The work group field is searchable
with the Search button function.
View Restrictions
You can control “who sees what” in the View Data tab by using the View Restriction parameter in the
Web Users tab. This parameter allows you to restrict the viewing of records to those submitted by a
specific device Mobile Number. For example, if you have multiple sales people accessing the View Data
tab, you can specify that any particular salesperson can only view/edit the records which they submitted
by specifying their Mobile Number as the View Restriction. You may specify multiple Mobile Numbers
by separating them with spaces.
Search
Displays a filter function that allows you to search for specific mobile units.
Web Users
| 103
Account
IMPORTANT: The Account tab is available to doForms users with Admin privileges only.
Manage Your Account
Update Contact Information – Use this to update the Administrator contact information for your
doForms account. Note that these changes may take up to 72 hours.
Update Billing Information – Use this to update the credit card billing address information for your
doForms account. Note that these changes may take up to 72 hours.
Upgrade Account (only visible in free account) – Use this to upgrade from a free Standard account to a
paid Professional or Dispatch. Note that these changes may take up to 72 hours.
Change Account Type – Use this to change between Standard, Professional and Dispatch account types.
Note that these changes may take up to 72 hours.
Add Mobile Units – Use this to increase the number of mobile units supported by your account. Note
that these changes may take up to 72 hours.
Subtract Mobile Units – Use this to decrease the number of mobile units supported by your account.
Note that these changes may take up to 72 hours.
104 |
Account
Cancel Account – Use this to update cancel your doForms account. Please note that this can take up to
72 hours. You will receive a confirmation email when it is complete. Note that you will still be able to
access your account at no-cost for 30 days after cancellation. Please be sure that you export any data
that you wish to save within that time period. Your data will be deleted from our servers after 30 days.
If you wish to cancel your cancellation, you may do so within this 30 day period by contacting us at
[email protected].
Manage Your Website
Web Services – The Web Services tab is the place where you manage web services which expose the
data in your doForms account for use with other IT systems. doForms Web Services can be accessed
using any program that supports SOAP web services. doForms web services are organized on a perform basis. When a form is added to the Web Services tab, DoForms assigns a [WSID] and a [password]
for accessing the form data. Please see the doForms Integration Guide for further information on
using the Web Services. This guide can be found at: http://www.doforms.com/support/integrationguide.pdf
http://www.doforms.com/support/how-to-videos/how-to-create-company-notices.htm
Company Notices – Use this to create and publish text notices which will be visible to website users and
users of mobile devices. These notices are very useful for pushing out important information or urgent
warnings. The on/off control at the top determine if website or mobile notices are to be displayed. Be
sure to click the Save button when making a change to the top section. To add a new notice, click the
Add button beneath the existing notices. Type your notice. Designate if it’s to be displayed on the
website and/or mobile units. Enter an Expiry Date. Be sure to click the Save button when done.
Savings Calculations – Use this FREE tool to calculate money savings and to calculate carbon savings by
using mobile data forms instead of paper forms. The results of these calculations are displayed at the
bottom of your doForms website for all your users to see. Use this option to fine-tune your dollar
savings calculations by adjusting your labor costs, overhead percentages and other parameters. Refine
the way you calculate CO2 savings by adjusting carbon lifecycle parameters. Methodologies vary, so
please feel free to contact us and suggest additional ways by which to calculate carbon savings, that you
would like to see us implement. Be sure to click the Save button when done. You may also reset the
“form count” that the calculations are based on. Resetting the form count will set all the cumulative
cash, CO2 and tree saving values to zero. The savings will then start accruing as new forms are received.
Website Setup Wizard – Use this to launch the Website Setup Wizard.
http://www.doforms.com/support/how-to-videos/how-to-manage-website-branding.htm
Change Website Branding – [paid accounts only] Use this to replace the doForms logo used in the
website with one of your choosing. The logo image must be in JPG, PNG or GIF format. Size should be
Account
| 105
320 px wide x 72 px tall. Use a transparent background or set the background color to Dark Blue #1B79F1 (RGB= 27, 121, 241). Other colors used throughout the website are Light Blue - #22B0F1 (RGB=
34, 176, 241) and Light Green - #36AA36 (RGB= 54, 170, 54).
Change Unlock Timeout – [Dispatch accounts only] Use this to change the period of time after which
form records in the View Data tab are unlocked by the Retrieve Function. Locked records will be
automatically unlocked after the specified time so that other mobile users can retrieve them. Note that
locked records are also unlocked whenever a mobile user sends the retrieved record back to the
website.
Time Zone Settings – [paid accounts only] Use this to set the time zone for your doForms website. All
time data will be displayed in the designated time zone to all users of the website. Use the “Daylight
Savings Time” option to further control the time zone. Be sure to click the Save button after making a
change. Note that these settings only affect the display and reporting of Date:Time information. The
underlying data is always stored in UTC/GMT.
Manage Your Mobiles
Change Mobile App Branding – [paid accounts only] Use this to replace the word “doForms” with your
own company name in the smartphone UI. Use this to replace the doForms logo used in the mobile app
tablet UI with one of your choosing. The logo image must be in JPG, PNG or GIF format. Size should be
320 px wide x 72 px tall. Use a transparent background or set the background color to Dark Blue #1B79F1 (RGB= 27, 121, 241). Other colors used throughout the website are Light Blue - #22B0F1 (RGB=
34, 176, 241) and Light Green - #36AA36 (RGB= 54, 170, 54). Be sure to click the Save button after
making a change.
Main Menu Configuration – [paid accounts only] Provides option that controls whether the Dispatch
and/or Retrieve menu buttons are displayed in the app Main Menu. You can use this to simplify this
menu for all your mobile users if one or both of these functions are not used. Be sure to click the Save
button after making a change.
Device Settings – [paid accounts only] Provides the ability to control your users’ doForms mobile app
settings remotely. See next page for full list of remotely controllable settings. Note that each section
provides an option to prevent mobile users from changing the corresponding settings on their mobile
device. Be sure to click the Save button after making a change.
106 |
Account
Mobile Device Settings:
Account
| 107
Contact doForms Support
Email: [email protected]
Website: www.doforms.com/support
Custom Development Services
Need programming services to help you with integrate doForms with an existing IT system?
Our software developers are experts at smartphone application development and related backends. If
you have used doForms, you know how good their applications are.. Now this expertise is at your
disposal for developing customized mobile business applications for your organization's specific needs.
Contact us for a free consultation
108 |
Support