1
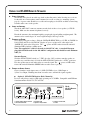
Turn on Power: Turn the rotary AUDIO LEVEL CONTROL (see FIG. B)
clockwise to turn the SLD 072 FM receiver ON (you will hear a ‘click’ when the
knob is turned from the OFF position). The “RF” LED indicator will illuminate
RED when an RF signal is present.
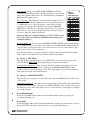
FIG. C:
FREQUENCY
SELECTION CHART
Select a Frequency: The R1600 has 16 pre-tuned channels available in the 72–76
MHz bandwidth. Most R1600’s ship from the factory set to switch position 1, or
72.1 MHz (channel A). To change the frequency on the R1600, refer to the
frequency selection chart on the right (FIG. C), then adjust the CHANNEL
SELECTOR (see FIG. B) to the corresponding switch setting. If you experience
FM interference, or if you need to match the transmitter’s frequency, it may be
necessary to change the channel on the R1600.
Important: Make sure your PPA Transmitter (i.e. T35, T27, T36) is on and
has an active audio source. Make sure the R1600 frequency matches your
transmitter frequency!
Adjust the Audio Level: First, make sure the MASTER VOLUME CONTROL on the front of the R1600
(see ¨ on page 5) is at least 1/4 from max volume. Then rotate the AUDIO LEVEL CONTROL (FIG. B)
clockwise until you can hear the broadcast clearly. If the audio level is too low, it will sound noisy. If the
audio level is too high, it will sound distorted.
Note: The R1600 will have a typical operating range of 1000 feet when used with a PPA T35 transmitter,
500 feet with a T27 transmitter, and 150 feet when used with a T36 transmitter.
Option 2: MIC INPUT
Plug in a dynamic microphone into the 1/4” “MIC INPUT” jack on the back of the speaker.
Note: The R1600 DOES NOT supply phantom power for Electret microphones.
þ
Adjust the Microphone Level: First, make sure the master volume control on the front of the
R1600 is at least 1/4 from max volume. Then rotate the MICROPHONE LEVEL control
clockwise until you hear the broadcast clearly. If the audio input is too low, it will sound noisy.
If the input is too high, it will sound distorted.
Option 3: LINE LEVEL INPUT
Plug in a CD player, tape player, or other audio source into the LINE IN RCA jack on the back
of the speaker.
þ
Adjust the Line In Level: First, make sure the master volume control on the front of the R1600 is
at least 1/4 from max volume. Then rotate the LINE IN LEVEL control clockwise until you hear
the broadcast clearly. If the audio input is too low, it will sound noisy. If the input is too high, it
will sound distorted.
þ
þ
ADJUST MASTER VOLUME
Rotate the VOLUME control on the front of the R1600 until the audio is projecting at a
comfortable listening level.
ADJUST TONE
Rotate the TONE control on the front of the R1600 fully clockwise for a flat frequency response.
Rotate the TONE control fully counterclockwise to cut off the high frequencies.
7