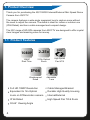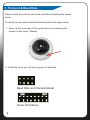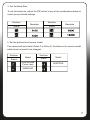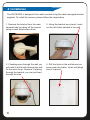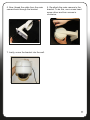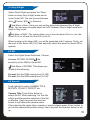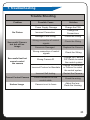
1
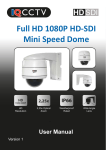
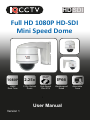
HD SDI
Full HD 1080P HD-SDI
Mini Speed Dome
HD SDI
HD SDI
HD SDI
1080P
2.25x
1080P
Real Time
2.25x Optical
Zoom
360°
High Speed
Pan & Tilt
IP66
Weatherproof
Rated
User Manual
Version 1
Adjustable
Lens
Contents
1. Product Overview ................................................................
1.1. Product Features ...........................................
4
4
2. Product Contents ................................................................
5
3. Protocol & Baud Rate ........................................................
6
4. Installation ...........................................................................
10
5. Camera Operation ..............................................................
5.1. Set Preset Position .......................................
5.2. Set Cruise Tracks, Transfer & Delete ...........
5.3. Set Auto Scanning, Transfer & Stop .............
12
12
13
14
6. OSD Menu .........................................................................
6.1. Lens Setup ...................................................
6.2. Exposure ......................................................
6.3. White Balance ..............................................
6.4. Day & Night ..................................................
6.5. NR ................................................................
6.6. Special .........................................................
6.7. Adjust ............................................................
6.8. Reset ............................................................
17
17
17
18
19
19
19
21
22
6. Troubleshooting .................................................................
23
Warning
Warning: To reduce the risk of
electric shock, non-professional
personnel should not remove the
cover.
Caution: To prevent electric
shock and fire hazards, please
don’t use a power supply not
listed in the manual.
This symbol alerts the user to operate and maintain the
product according to the manual.
This symbol alerts the user to be careful as the product may
lead to serious shock hazard.
Caution: Any changes or modifications in construction of the
product that are not approved by our company,may affect the
functionality of the camera.
Precautions
Install and use the camera in an environment where
temperatures DO NOT exceed -20°C ~ +50°C and maintain good
ventilation.
Do not use the camera in a high pressure or highly corrosive
environment.
Do not install the camera in a place where lighting conditions are
not stable.
3
1. Product Overview
Thank you for purchasing the IQC1920S2 Internal/External Mini Speed Dome
Camera from IQCCTV.
The camera features a wide-angle megapixel lens to capture more without
the need to adjust the camera. The dome is ideal for indoor or outdoor use
(IP66 Rated) and has a cable managed and compact design.
The IQC range of HD-SDI cameras from IQCCTV are designed to offer crystal
clear images and amazing value for money.
1.1 Product Features
1080P
2.25x
1080P
Real Time
2.25x Optical
Zoom
360°
High Speed
Pan & Tilt
IP66
Weatherproof
Rated
Adjustable
Lens
Full HD 1080P Resolution
Cable Managed Bracket
Equivalent to 12x Optical
Durable High Quality Housing
zoom on D1Resolution camerara Internal/External
IP 66 Rated
30-64° Viewing Angle
4
High Speed Pan Tilt & Zoom
2. Product Contents
Before installing this product, please ensure that it contains the following;
Contents
1x IQC1920S2
Speed Dome Camera
HD SDI
HD
Full HD 1080P HD-SDI
Mini Speed Dome
1x User Manual
1920x1080P
2x
IP66
HD
Resolution
2x Optical
Zoom
Weatherproof
Rated
Wide Angle
Lens
User Manual
Version 1
1x 12 DC 500mA
Power Supply
4x Screws
4x Wall Plugs
5
3. Protocol & Baud Rate
Please check the protocol and baud rate before installing the speed
dome.
To match up the switcher identities please follow the steps below;
1. Open up the inner case of the speed dome by loosening the
screws on the cover. (Below)
2. Inside the cover you will see 2 groups of switches.
Baud Rate and Camera Model
Dome IP Address
6
3. Set the Baud Rate
To set the baud rate, adjust the DIP switch to any of the combinations below to
match your preferred settings.
Switcher
Status
Switcher
Baudrate
Status
Baudrate
4. Set the protocol and camera model
The camera will auto detect Pelco P or Pelco D, the below is for camera model
which does not need to be changed.
Switcher
Status
Model
Synchronized
Focus Lens
Switcher
Status
Model
MINTRON
SAMSUNG
7
5. Set the Dome IP Address
The table below shows how to adjust the DIP switch to set the camera’s ID.
Address
8
Switcher
Address
Switcher
Address
Switcher
Address
Switcher
Address
Switcher
Address
Switcher
Please Note: The factory default ID is 1 and the Baud Rate is 2400
9
4. Installation
The IQC1920S2 is designed to be wall mounted using the cable managed bracket
supplied. To install the camera, please follow the steps below.
1. Remove the bracket from the main
camera body by taking off the screws
using a cross head screw driver.
2. Using the bracket as a stencil, mark
out the drill holes needed in the wall.
3. If feeding wires through the wall you
will need to drill a hole through the wall
for the wires to go. However, if placing
through the bracket, you can just feed
through the side.
4. Drill the holes in the wall where you
have made the marks. Insert wall plugs
here if required.
10
5. Now, thread the cable from the main
camera back through the bracket.
6. Re-attach the main camera to the
bracket. To do this, use a cross head
screw driver and turn screws in
clockwise.
7. Lastly, screw the bracket into the wall.
11
5. Camera Operation
The Speed Dome camera will be controlled through the DVR using the arrow keys
etc. However, it is advised to use an external Speed Dome controller, for more
control over the camera.
5.1 Set Preset Position
Set the pan/tilt rotation range through the DVR and store the numbers in the
Dome Camera. The user can also transfer preset positions (refer to part 2
below)
1. Set the Preset Position
Move the Dome camera to the position that you want it to face using the joystick
or DVR. To set the preset position, input the position number. The user can add
128 preset positions.
For example, to preset position 1, move the dome to the desired position. Then
input 1 and press ‘SET’.
Please Note: This method will change depending on hardware used to control
and access the camera.
2. Transfer Preset Position
To jump or transfer from one preset position to another, simply input the prest
number into the DVR or external keyboard and press the “Call’ button.
For example, to transfer to preset position 1, press 1 and then press the ‘Call’
button.
3. Clear Preset Position
To clear a preset position, input the preset number and then press ‘Clear’.
12
5.2 Set Cruise Tracks, Transfer & Delete
The Speed Dome camera allows the user to set a preset cruise so that the
camera will pan through these presets without having to adjust the camera
manually.
The camera has 5 lines of auto cruise tracks and each line can store a minimm
of 16 presets up to a maximum of 64.
1. Transfer Cruising Tracks
To switch between different cruising tracks (for example, switch from preset
position 81 to 82), simply input ‘82’ into the DVR or keyboard and press the ‘Call’
button.
Please Note: If the preset position is unclear, the preset position cannot be
cruised.
2. Setting Preset Stay Time
This option allows the user set the amount of time that the camera stays in each
preset position. Each camera can be in each position for 1-240 seconds.
For example, to set the time of preset 78 to 10 seconds;
A) Input 78
B) Press ‘Call’
C) Input 10
D) Press ‘Set’
If there is no time set, the default time is 3 seconds.
3. Inter Cruising Track Transfer
Use preset position 89 to set inter cruising track transfer that contains 8 cruising
points. The stay time for each of these points will be 3 seconds.
4. Stop the Cruise Tracks
Use the set position 86 or stop the cruise tracks.
13
5.3. Set Auto Scanning, Transfer & Stop
The camera revolves on a 360° angle and can automatically scan in certain preset
positions using the DVR or Speed Dome Controller.
1) Set Auto Scanning
A) Move the dome to the left limit using the joystick.
B) Press 62
C) Press ‘Set’
D) Move the dome to the right limit using the joystick
E) Input 63
F) Press ‘Set’
2) Set the Scanning Speed
To set up the scanning speed, use the DVR or Speed Dome controller. To set a
speed of 5°, simply input 5 into the keyboard.
For example, to set a scanning speed of 15° on preset 77;
A) Input 77
B) Press ‘Call’
C) Input 15
D) Press ‘Set’
3) Carry Out Auto Scanning
To set auto scanning, use the transfer preset position 84. Before doing this, please
set the left and right limit points.
14
For example, set up the auto scanning function using the keyboard by inputting
‘84’ and pressing the ‘Call’ button.
4) Stop Auto Scanning
Set the Preset position to 86 or move the joystick to stop auto scanning.
For example, to stop scanning using the keyboard;
A) Input 86
B) Press ‘Call’
5) Tracking Function
No.
Preset Position
Auto Scanning Function
1
81 (Transfer)
First (0-16 Preset Position)
2
82 (Transfer)
Second (17-32 Preset Position)
3
83 (Transfer)
Third (33-48 Preset Position)
4
84 (Transfer)
62-63 Scanning
5
85 (Transfer)
60-61 Scanning
6
87 (Transfer)
Fourth (49-64 Preset Position)
7
88 (Transfer)
Fifth (01-64 Preset Position)
8
89 (Transfer)
Inner Tracking
15
6) 360° Auto Scanning
To begin auto scanning, press Auto. The set the scanning speed, please refer
to section 5.3 on page 14.
7) Back to Preset Position
The camera can set the preset position back to 1, even if nobody operates the
camera. For example, to set the camera back to preset 1 after 75 minutes,
transfer No.76 and input 75 to represent 75 minutes. After you have inputted
the number, press 74 and then 75.
By doing this, the cruise track will stop on the 74th minute, and then go back to
preset 1 on the 75th minute.
Please Note: The time can be set between 1~240 minute and the factory
default setting is 1 minute.
16
6. OSD Menu
The OSD menu allows the user alter the
settings on the camera such as lens, Day &
Night mode,RS485 settings and reset the
camera to the factory default.
To enter into the menu, press the ‘Open’ or
‘IRIS+’ on the Speed Dome controller.
6.1 Lens Setup
Select the lens type. The camera supports,
manual IRIS and DC Lens. Once in DC
Lens, the user can set the mode of the
DC lens.
6.2 Exposure
Exposure setup includes: Shutter, AGC,
Sens-up, Brightness, Defog and Backlight.
Shutter: Set between 1/30 ~ 1/50,000.
AGC: When there is insufficient light, push
left/right to set the Automatic Gain Control.
Sens-up: Extends the exposure time of camera.
The higher the time, the lower the frame will be.
However the shadow created will be longer in dark conditions. Please select OFF
or Auto.
Brightness: Push left/right to setup the value of brightness.
ACCE: Turn the ACCE on or off.
Defog: In foggy weather, you can setup this function to see the object behind fog
clearly. There are four options: low, middle, high, off.
Backlight: You can select OFF, BLC or HSBLC by pushing left/right. If OFF is
selected, the system will not compensate the image. If BLC is selected, it will
enhance the brightness of image to satisfy the monitor effect.
9
17
To enter into the submenu of BLC, press ‘Menu’ button. Here, you can setup:
GAIN: Set the Backlight area, High, Middle or Low
AREA: Select the BLC area and the compensation area size after entering the
‘Area’ menu.
DEFAULT: Choose to go back to the default setting.
Sub-menu of HSBLC. Here, you can select the following;
Select: Select the Backlight Compensation area. 4 areas are selectable
Display: Choose to display the selected area or not.
Level: Set the sensivity level of the compensation area
Mode: Set to Super Backlight Compensation, available only at night or all day.
Black Mask: Turn the black mask on or off. This function blacks out the lightest
images to give a clearer picture in varying light conditions.
Return: Select Return and press Enter button to return to previous interface.
6.3 White Balance
Select WHITE BAL and push left or right
to choose White balance mode including
ATW, AWC SET, Indoor, outdoor and
manual.
ATW: In this mode, the camera will
constantly monitor the colour temperature.
In order to keep the best picture, the
camera will automatically adjust the white balance.
AWC SET: Select it and press the ‘Menu’ button to go into the lock mode of
white balance. Now the camera locks the reference value of red and blue under
the current colour temperature and stops monitoring colour temperature.
Indoor: Indoor white balance mode.
Outdoor: Outdoor white balance mode.
Manual: This option allows the user to manually set the White Balance Mode.
Select this mode and press the ‘Menu’ button to setup. User can adjust the level
of the blue and red by pushing left or right button to adjust the blue or red gain.
The gains are adjustable between (0-100).
18
10
6.4 Day & Night
Select Day & Night and press the ‘Menu’
button to setup Day & Night mode and to
setup Smart NR. You can choose between
Auto
, Colour, B/W
or External.
Sub-Menu of Auto. Here you can set the delay time between Day & Night
mode. You can also manually adjust the AGC between Day to Night mode and
Night to Day mode.
Sub-Menu of B/W. This option allows you to turn the burst off or on, turn the
Smart IR on or off and turn the LED on or off.
When turning on the Smart NR, you will be presented with 2 options. Firstly, set
the level of the Smart NR (0-15) and secondly select the areas for Smart NR to
operate.
6.5 NR
Select the Digital Noise Reduction. Choose
between 2D DNR, 3D DNR , the
sensitivity of the DNR or Smart NR.
Sub-Menu of 3D DNR. This allows you
to adjust the following;
S-Level: Set the DNR starting level (0-100)
E-Level: Set the DNR ending level (0-100)
6.6 Special
Push right/left to setup CAMERA TITLE,
MOTION, PRIVACY, DEFECT etc.
Camera Title: Press Enter button to
select On/Off. When selecting ‘On’ the title
edition and the position selection of the title
is effective. User can press the direction
button to self-define the camera name.
After selecting the single letter, number or symbol please press ‘Enter’ button to
go into the camera title position setup. User can push the direction button to set
up.
19
D-Effect: Setting of digital functions. Press the ‘Menu’ button to enter into the
sub-menu.
Sub-Menu of D-Effect. This allows you to set the following functions.
Freeze: Set the freeze function to on or off.
Mirror: Set the mirror function mirror, V-flip or rotate.
D-Zoom: Set the digital zoom function. You can set to x2 - x64 or on/off. If you
select on, you will be presented with anohter sub-menu allowing you to set the
PIP, adjust the digital zoom (x2 - x64), Pan/Tilt or return to default
Negative Image: Turn the negative image function on or off.
Motion: Set the motion detection functon on or off. If you turn the motion
detection function on, you will be presented with a sub-menu.
Sub-menu of Motion Detection. Here, you can select the following;
Select: Select between 3 areas or all 3.
Display: Turn the motion detection on or off on selected areas.
Sensitivity: Adjust the sensitivity of the motion detection (0-60).
Motion View: Set a prompt for when moving objects are detected.
Default: Return to factory default settings.
Privacy: This option allows you to set the private protection area. When turning
the function on, you will enter into a sub-menu to select privact areas. Up to 8
areas are selectable.
Sub-Menu of the Privacy menu, adjust the following;
Display: Turn on the display (Position, Size) or turn off the privacy function.
Colour: Set the Colour of the privacy protection (1-16 colours).
Default: Return to factory default settings.
Language: Select your desired language. (English, Japanese, Traditional
Chinese and Simplified Chinese).
20
Defect: Turn this function off to correct any dead pixels. When this is turned on
you will enter into a sub-menu.
Sub-Menu of Defect will allow you to set the following:
Live DPC: Live dead pixel correction, turn this function on or off.
Level: Set the sensitivity level of the live correction function (0-60)
Static DPC: Static dead pixel correction function, turn this function on or off.
Level: Set the sensitivity level of the static correction function (0-60)
Sens-up: Extends the exposure time of camera.
RS485: This option allows the user to set the CAM ID, ID Display and set the
Baudrate.
Version: View the version details of the camera.
6.7 Adjust
Sharpness: Set the sharpness on or off.
When turned on, you will presented with
a sub-menu.
Sub-Menu of the adjust option allows
you to adjust:
Level: Adjust the level of sharpness from 0-100
Resolution: Turn the resolution on or off.
Monitor: Select the monitor display image (LCD or CRT). When choosing any
of these options, you will be presented with a sub-menu.
Sub-Menu of LCD. Here you can adjust the following:
Gamma: Set the Gamma characteristics (Auto, User 1, User 2, 0.45-1)
Blue Gain: Adjust the blue gain (0-100)
Red Gain: Adjust the red gain (0-100)
Sub-Menu of CRT. Here you can adjust the following:
Black Level: Set the black level (0-100)
Blue Gain: Adjust the blue gain (0-100)
Red Gain: Adjust the red gain (0-100)
21
OSD: Set the OSD menu characteristics.
Sub-Menu of OSD allows you to adjust the following:
Text Colour: Adjust the OSD menu text colour. 8 colours are selectable
Outline: Set the character outline, either on or off.
LSC: Turn the lens edge correction function on or off.
NTSC/PAL: Set the signal system setting either NTSC or PAL.
6.8 Reset
Select Reset and press Enter button to go into its setup interface. Then Select
Factory settings to reset the camera to factory default.
22
7. Troubleshooting
Trouble Shooting
Problem
No Picture
Successful Camera
test but still no
image
Successful test but
cannot control
the camera
Possible Cause
Solution
Power Supply Damage
Change the PSU
Incorrect Connection
Change the
Connections
Damage to the Wiring
Check the Wiring
Wrong connection of control
signals
Check the Wiring
Camera is Damaged
Replace the Camera
Wrong connection of control
signals
Check the Wiring
Wrong Camera ID
Change the Camera
DIP Switch to match
the control system
Incorrect Protocol or Baudrate
Change the Baudrate
or Protocol to match
the control system
Incorrect Self-testing
Restart the Camera
Cannot Control Camera
Loose connection on the
control cable
Check the wiring
Unclear Image
Camera is not in focus
Adjust the lens
Clean the Housing
23
Manufactured for:
TECHNICAL SUPPORT
For technical support, please contact your local distributor.
Alternatively, call 0871 222 1430
LIMITED WARRANTY
This product is supplied with a 12 month warranty. The warranty excludes products
that have been misused (including accidental damage) and damage caused by
normal wear and tear. In the unlikely event that you encounter a problem with this
product, it should be returned to the place of purchase.
IQCCTV, Unit 2 Valley Point, Beddington Farm Road, Croydon, Surrey CR0 4WP
www.iqcctv.co.uk