1
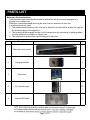
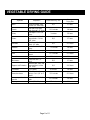
Assembly Instructions and User’s Manual
26 sq ft. Professional Dehydrator
Style #FSGWCO5009
Please keep this instruction manual for future reference
Customer Service: (888)815-4252, 9:00 am to 4:00 pm, Monday thru Friday,
Central Standard Time or (888) 922-2336, 8:00 am to 10:00 pm,
Monday thru Saturday, 9:00 am to 8:00 pm, Sunday, Central Standard Time
or email [email protected]
(Made in China)
This unit operates most effectively when it is at least 2/3 full.
TABLE OF CONTENTS
Warnings......................................................................................................2
Parts List......................................................................................................3
How to use your new dehydrator..................................................................4
Fruit Drying Guide........................................................................................8
Vegetable Drying Guide...............................................................................9
Cleaning and Maintenance.........................................................................10
Warranty Information..................................................................................11
Page 1 of 11
WARNINGS
IMPORTANT SAFEGUARDS
When using any electrical appliance basic safety precautions
should always be observed including the following.
• READ ALL INSTRUCTIONS.
To protect against risk of electrical shock, do not put appliance in water or other liquid.
•
•
Do not touch hot surfaces. Use handles, knobs or oven mitts.
• Close supervision is necessary when any appliance is used by or near children. This appliance is
not recommended for use by children.
• Unplug from outlet when not in use, before putting on or taking off parts, and before
cleaning.
• Allow to cool before putting on or taking off parts.
• Avoid contact with moving parts.
• Never put the unit near a hot burner or in an oven.
• Do not operate the appliance or any other electrical equipment with a damaged cord or plug or
after the appliance malfunctions, is dropped or damaged in any manner. Return unit to the nearest
authorized service center for examination, repair, or adjustment.
• Do not use outdoors.
• Do not use appliance for other than intended use.
• Do not let cord hang over edge of table or counter, contact sharp edges, or touch hot surfaces.
• Do not pull on the power cord to disconnect.
• Never plug in the appliance where water may flood the area.
• Place the appliance on a firm and stable surface.
• Ensure that the appliance is not placed close to the edge of the table, worktop, etc. where it can
be pushed off or fall.
• The use of attachments not recommended or sold by the manufacturer may cause fire, electric
shock or injury.
• Never use abrasive cleaning agents or abrasive cloths when cleaning the unit.
• Only use the unit when completely assembled.
• Do not leave the appliance unattended while it is running.
• Before using for the first time, remove all packaging and wash parts.
• Prior to unplugging unit, turn power off.
• Do not place on or near hot gas, electric burner or in a heated oven.
• Extreme caution must be used when moving an appliance containing hot oil or other hot liquids.
• To disconnect, turn any control to “off”, then remove plug from wall outlet.
• CAUTION: Turn unit on and off using timer or On/Off button only.
Page 2 of 11
PARTS LIST
Extension Cord Instructions:
• A short power supply cord should be used to reduce the risk of becoming entangled in or
tripping over a longer cord.
• Extension cords are available and may be used if care is exercised in their use.
• If an extension cord is used:
1. The marked electrical rating of the cord set or extension cord should be at least as great as
the electrical rating of the appliance.
2. The cord should be arranged so that it will not drape over the countertop or tabletop where
it can be pulled on by children or tripped over.
3. The extension cord should be a grounding type 3 wire cord.
Part #
Description
Image
Qty
1
Glass top touch control
2
Carrying handles
3
Glass door
1
4
12 non-stick trays
12
5
Internal LED lights
2
1
Page 3 of 11
2
HOW TO USE YOUR NEW DEHYDRATOR
Assembly Instructions:
CAUTION: BEFORE ASSEMBLING OR CLEANING THE DEHYDRATOR MAKE SURE POWER
SWITCH IS TURNED OFF AND UNIT IS UNPLUGGED FROM ANY POWER SOURCE
Assembly is a simple process.
1. Remove the drying racks and any loose items from the unit, then close the door.
2. Carefully place the dehydrator on its left side on top of a soft cloth or surface to prevent any
scratches. NOTE: DO NOT PLACE ON THE RIGHT SIDE WHICH MAY CAUSE THE DOOR
TO OPEN AND BECOME DAMAGED. DO NOT PLACE ON ITS FRONT OR BACK SIDE TO
AVOID DAMAGING COMPONENTS.
3. Work on the front feet of the unit first. Locate the short feet bolts and the feet that attach to
them.Insert the short feet bolts into the holes of the front feet of the dehydrator until they
extend enough for you to attach the feet.
4. Tighten the short feet bolts with a screwdriver.
5. Insert the long feet bolts into the hole at the bottom of the unit they extend enough to attach
the feet.
6. Tighten the long feet bolts with a screwdriver.
7. Carefully stand the unit to its proper upright position, making sure to hold the door closed to
avoid damaging it.
Operating Instructions:
1.
2.
3.
4.
5.
6.
Make sure to remove all packaging.
Wash and dry all parts prior to use.
Plug in unit. Exercise caution if using an extension cord.
Turn the power on by pushing the touch screen button located furthest right at the top panel.
Remove racks and place food items to be dried onto the racks.
Load the racks into the dehydrator. NOTE: The top three racks have a notch on the back to
prevent the racks from touching the temperature sensor.
7. Make sure door is firmly closed.
8. NOTE: THE BUTTON AT THE FURTHEST LEFT IS AN INTERNAL LIGHT FOR YOUR
CONVENIENCE. Begin programming the unit by pressing the clock button located second
from the furthest left of the panel. Use the UP “^” and DOWN “v” buttons on the right side of
the panel to set hours of operation (24 Hour Maximum). Press the clock button a second time
to set minutes if desired (1 minute increments).
9. To set the temperature, press the button located to the right of the clock button. Use the
UP and DOWN buttons to set the temperature (160 degree max, 50 degree min, 5 degree
increments).
10.The dehydrator will automatically start after a short delay. You will hear 8 beeps at startup and
then again when the temperature inside reaches the preset level.
11.If you have to pause during programming, the unit may start after a delay. This is normal, just
continue finishing your programming as soon as possible.
Page 4 of 11
HOW TO USE YOUR NEW DEHYDRATOR
12.The unit automatically stops when time set has been reached, but the power to the unit
remains on.
13.Push the on/off button to turn unit off and unplug when not in use.
Other Functions:
This unit will automatically cycle through a display on the panel showing SET TIME, then TIME
REMAINING for your drying, followed by the PRESET TEMPERATURE and then the ACTUAL
TEMPERATURE inside the unit.
Before Your First Use
Dehydrating is the process of removing moisture from food to create a food with increased
longevity and stability.
How to Use:
1. It is important to dry at the correct temperature for the item you are dehydrating because
vitamins within food can react negatively to high temperatures. Thus, pay careful attention to
your temperature settings when drying fruits, vegetables and meats.
2. To ensure consistent results always dry similar thickness items.
3. Use food that is ripe, but not over ripe.
4. Drying times will vary based on type and thickness of food being dried as well as the relative
humidity of the environment you are drying in.
5. Your dehydrator has a clear front for easy observation of drying progress so avoid opening the
dehydrator excessively during use. Doing so will add time to the drying process.
6. Once your food is dried to the desired level, store it in a sealed container in a cool, dry place
so that it does not reabsorb moisture. The dehydrated food will naturally have less moisture in
it than the air around it and will absorb moisture if left out for an extended period. Note: storing
dried food in a freezer is acceptable and will prolong the life of the food.
Drying Fruit:
1. You can dehydrate any fruit that you enjoy. Let your own taste buds determine what you
choose to dry.
2. It is important to wash fruits thoroughly to make sure all dirt is removed.
3. You can halve, chop or slice your fruit. It is up to you whether you want to peel your fruit.
4. You may want to pretreat your fruit before drying it. Doing so will help prevent it from
discoloring due to natural oxidation. To pretreat, simply use lemon or pineapple juice and mix
with water at a 1:1 ratio. Let fruit sit in mixture for a minimum of 15 minutes. Then remove
the fruit and let dry for at least one hour prior to drying. There are commercial products also
available for pretreating.
5. Place fruit on the dehydrator trays in a single layer making sure that the fruit is not touching or
overlapping.
6. Please reference the fruit drying guidelines chart on page 10 for recommended drying times.
7. Once the fruit is dried to your liking, let sit for at least 30 minutes to cool. Store in a covered or
sealed container in a cool, dry place away from direct light.
Page 5 of 11
HOW TO USE YOUR NEW DEHYDRATOR
Drying Jerky:
Jerky is the most popular food to make in dehydrators. Making it yourself can save you money
and allow you to create your own recipes. Use any lean meat you prefer such as beef, venison or
fish.
Safety Information:
1. Sanitation and a clean working area are essential. Wash hands thoroughly with warm soapy
water prior to making jerky.
2. Meat should be frozen or refrigerated up until it’s ready to be used.
3. Do not allow raw meat to come in contact with the finished product.
4. Use a sanitizing solution or diluted bleach to clean all surfaces when done.
5. If marinating meat for whole meat jerky, always marinate in the refrigerator.
6. We recommend that you purchase a pre-packaged jerky spice and cure kit. Follow the
instructions for proper seasoning and curing.
Preparing Natural Jerky:
1. Natural jerky is sliced from bigger pieces of meat. Make sure meat is in the freezer until it is
slightly hard to the touch but NOT frozen. This will help it slice more evenly. For best results
slice meat ¼” thick.
2. While there are many recipes for making your own jerky, we recommend using a prepackaged jerky spice and cure kit. Follow the directions provided with the kit.
3. Place the meat on the drying racks making sure that they are not touching or overlapping.
Jerky typically takes 4-8 hours to dry properly.
4. When done drying, remove jerky from the trays and let cool for at least 30 minutes.
5. Use paper towels to remove any excess oil and fat that may be on the jerky.
6. Store in a covered or sealed container in a cool, dry place away from direct light.
7. If you would like to store your jerky for more than 1 month it is recommended that you store in
a refrigerator or freezer.
Preparing Quick Jerky:
1. Quick jerky is made from ground meat. Use pre-packaged jerky spice and cure kit prior to
drying and follow their instructions.
2. Once the mix is ready, place meat into jerky gun and carefully extrude the formed jerky strips
making sure that the meat is not touching or overlapping. Jerky typically takes 4-8 hours to
dry properly.
3. When the jerky is removed from the trays pat any excess oil or fat from the meat. Allow to cool
for 30 minutes.
4. Store in a covered or sealed container in a cool, dry place away from direct light.
5. If you would like to store your jerky for more than 1 month it is recommended that you store in
a refrigerator or freezer.
Page 6 of 11
HOW TO USE YOUR NEW DEHYDRATOR
Drying Vegetables:
Unlike other food, vegetables lose a lot of moisture towards the end of the process. Therefore,
they must be checked constantly near the end of the drying process.
Preparing Vegetables:
1. Thoroughly wash your vegetables to remove any dirt. Peel the vegetable and slice it into even
sizes so that they dry at the same rate.
2. Pretreatment is necessary for all vegetables in order to neutralize their natural enzymes.
Specifically, steam blanching is the preferred method.
3. Bring a large pot that is filled 75% with water to a boil. Place your vegetables in a colander or
basket and place carefully in the pot ensuring that there is a small gap for the steam to enter
and cover with a lid. See vegetable drying guidelines chart on page 11.
4. When you are done blanching, place the vegetables in cold water to cool them off.
5. Remove the vegetables from the water and dry them.
6. Place them in a single layer on the dehydrator trays making sure that they are neither touching
or overlapping.
7. To determine if your vegetables are done drying, take out a few pieces from different trays in
the dehydrator. If you cannot break the vegetable in half with little effort, place them back on
the dehydrator for more time. Repeat the process until finished.
8. Once the vegetables are dried to your liking allow to cool for 30 minutes.
9. Store in a covered or sealed container in a cool, dry place away from direct light.
Drying Herbs:
1. Drying your own herbs is an excellent way to save money and ensure you have a plentiful
supply year round.
2. Once you select which herbs you want to dry, wash them in cool water to remove any dirt.
3. Lightly dry them off and place them on the dehydrator trays.
4. Drying time for herbs is 30-90 minutes. Therefore, make sure to constantly check herbs for
dryness every fifteen minutes at a minimum. They are considered dry when you can easily
crumble them in your fingers.
5. Once herbs are dried to your liking allow to cool for 30 minutes.
6. Store in a covered or sealed container in a cool, dry place away from direct light.
Page 7 of 11
FRUIT DRYING GUIDE
Fruit
Kiwi
Pears
Pineapple
Strawberries
Apples
Rhubarb
Peaches
Cherries
Grapes
Prunes/Plums
Nectarines
Apricots
Blueberries
Cranberries
Bananas
Figs
Preparation
*Pretreatment
Necessary
Average Drying time
No
2-6 hours
Yes
No
5-13 hours
4-12 hours
No
4-12 hours
Yes
2-9 hours
No
4-9 hours
Yes
4-10 hours (slices)
8-16 hours (halves or
quarters)
No
15-23 hours
No
13-21 hours
No
8-15 hours
Yes
5-10 hours (slices)
8-16 hours (halves or
quarters)
Yes
8-16 hours
No
9-17 hours
No
10-18 hours
Yes
6-8 hours
No
8-15 hours
Peel and cut into 1/4" to
1/2" thick slices
Peel, core and slice 1/8"
Peel, core and slice 3/8"
Remove top. Slice 3/8"
thick
Peel, if needed. Core,
cut into slices, 1/8" to
1/4" thick
Trim and throw away
leaves. Cut into 1/8"
slices
Peel if needed. Cut and
remove pit. Quarter or
3/8"
Remove pit and stem.
Cut, chop or leave whole
Cut in half or leave
whole. Dry. Put in boiling water for 40 to 60
seconds. Put in ice water
for skin to crack
Quarter or halve and
discard pit
Cut and remove pit.
Quarter or slice 3/8"
thick
Slice in half, remove pit,
and cut in 3/8" slices
Remove stem. Put in
boiling water for 40 to
60 seconds. Put in ice
water for skin to crack
Remove stem. Put in
boiling water for 40 to
60 seconds. Put in ice
water for skin to crack
Peel and cut into 1/4" to
3/8" slices
Remove stem. Halve or
quarter. Put whole figs
in boiling water for 40 to
60 seconds. Put in ice
water for skin to crack
*Pretreatment - Use ascorbic acid mixture or lemon juice.
Page 8 of 11
VEGETABLE DRYING GUIDE
Vegetable
Beets
Carrots
Celery
Onions
Tomatoes
Potatoes
Peas
Corn
Broccoli
Mushrooms
Peppers and Pimientos
Cauliflower
Green/wax beans
Summer squash and
zucchini
Asparagus
Preparation
Cook until tender, peel,
cut into 1/4" thick strips
Peel and cut off each
end, dice into 1/4" slices
Trim edges. Cut in 3/8"
slices
Peel outer skin. Cut off
top and ends. Cut into
3/8" slices
Peel, if needed. Cut into
slices 1/2" wide
Peel and cut into 1/8"
slices
Shell
Cut corn from cob and
blanch
Cut in pieces
Clean and slice 1/2"
thick
Remove core, stem, and
inner partitions cut into
1/8" strips
Cut in pieces
Take off ends and
strings. Cut in 3/4" to 1"
pieces
Cut ends. Cut into 3/8"
wide
Cut in 3/4" to 1" pieces
Steam Blanching Time
Average
Drying time
N/A
2-7 hours
2-2½ minutes
2-8 hours
3 minutes
3-5 hours
N/A
3-7 hours
N/A
4-11 hours
5-9 minutes
2-8 hours
4 minutes
3-9 hours
1-1½ minutes
5-11 hours
2-2½ minutes
2-8 hours
N/A
3-7 hours
N/A
4-10 hours
3-6 minutes
3-8 hours
3-3½ minutes
4-11 hours
3½-4 minutes
2-6 hours
3-5 minutes
4-8 hours
Page 9 of 11
CLEANING AND MAINTENANCE
Cleaning and Maintenance:
1. Before cleaning check if the dehydrator is unplugged and cooled down.
2. Thoroughly wash trays with warm soapy water and dry completely. Do not submerse base in
water. Do not let water get in fan.
3. Do not use metal brushes or abrasive cleaners when cleaning the dehydrator, because it can
damage the surface.
Page 10 of 11
WARRANTY INFORMATION
ONE-YEAR LIMITED WARRANTY
Your product is warrantied for one year from date of purchase against all defects in material and
workmanship. Should your product prove defective within one year from date of purchase or receipt,
return the unit, freight prepaid, along with an explanation of the claim. Please package your product
carefully in its original box and packing material to avoid damage in transit. We are not responsible
for any damage caused to the product in return shipment. Under this warranty, we undertake to
repair or replace any parts found to be defective.
This warranty is only valid if the product is used solely for household purposes in accordance with
the instructions. This warranty is invalid if the unit is connected to an unsuitable electrical supply, or
dismantled or interfered with in any way or damaged through misuse.
We ask that you kindly fill in the details on your warranty card and return it within one week from date
of purchase. Send warranty card to:
Game Winner Dehydrator
C/O CI
PO Box 444
Two Rivers, WI 54241-0444
Page 10 of 11