1
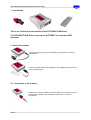
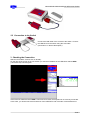
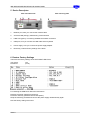
Pictomat
Embedded Machine Vision
PICTOMAT - USB-Driver
IBN INGENIEURBÜRO
BERND NEUMANN GMBH
Eichendorffstraße 23
D-47626 Kevelaer
Tel. +49(0) 28 32 / 97 95 62
Fax +49(0) 28 32 / 97 95 63
Internet: http://www.IBN-GmbH.de
Email: [email protected]
Liability Exclusion
This documentation was created very conscientiously. No liability is
assumed for possible errors or misleading descriptions. The
information contained in this documentation is informative and in no
way guarantees the characteristics of the product. The right is reserved
to make technical changes dictated by the state of the art.
Copyright © IBN Ingenieurbüro Bernd Neumann GmbH 2009
Subject to change without prior notice.
You can obtain the PICTOMAT USB Driver only from IBN GmbH or its
resellers. Products of other manufacturers with a similar functionality
must not be used together with the PICTOMAT.
CONTACT
IBN Ingenieurbüro Bernd Neumann GmbH
Eichendorffstraße 23
47626 Kevelaer
GERMANY
Tel.: +49 (0) 28 32 / 97 95 62
Fax.: +49 (0) 28 32 / 97 95 63
Mob.: +49 (0) 170 / 813 84 87
Email: [email protected]
Internet: http://www.IBN-GmbH.de
IBN INGENIEURBÜRO BERND NEUMANN GMBH
Table of Contents
1 Introduction
2
2 Device Connection
2
2.1 Connection to the Camera
2
2.2 Connection to the Switch
3
3 Checking the Connection
3
4 Settings for Experts
4
4.1 PICTOMAT Camera Settings
4
4.2 PICTOMAT USB Driver Settings
4
4.2.1 Configure General
5
4.2.2 Configure TCP/IP
6
4.2.3 Configure Keyboard
7
4.2.4 Display Status
7
4.2.5 Exit
7
5 Device Descripton
8
6 Restore Factory Settings
8
7 Security and Usage
9
Seite 1
IBN INGENIEURBÜRO BERND NEUMANN GMBH
1 Introduction
This is the technical documentation of the PICTOMAT USB Driver.
The PICTOMAT USB Driver connects the PICTOMAT to a standard USB
keyboard.
2 Device Connection
Connect the power supply to the USB Driver (Connection 5 in Device
Description).
Connect the USB cable of the keyboard to the USB Driver (Connection 4
in Device Description).
2.1 Connection to the Camera
Connect the crossover module to the LAN cable of the camera. Connect
the crossover module to the USB Driver (Connection 1 in Device
Description).
Seite 2
IBN INGENIEURBÜRO BERND NEUMANN GMBH
2.2 Connection to the Switch
Connect the LAN cable of the camera to the switch. Connect
the USB Driver to the switch using the LAN cable
(Connection 1 in Device Description).
3 Checking the Connection
Start the PICTOMAT if it does not run already.
On the right of the screen in the info section you see the IP-address of the USB Driver behind KBD
(192.168.0.100) coloured green:
If the shown IP-address behind KBD is coloured red or black, the keyboard is not correctly connected.
In this case, you should check all connections of the USB Driver and of all other connected devices.
Seite 3
IBN INGENIEURBÜRO BERND NEUMANN GMBH
4 Settings for Experts
The following chapters show the settings of the PICTOMAT camera and the PICTOMAT USB Driver.
4.1 PICTOMAT Camera Settings
You must change the PICTOMAT settings for using the USB Driver together with the PICTOMAT. The
PICTOMAT settings are saved in the file "Pictomat.001" and are loaded during the boot process.
The "Pictomat.001" is stored in the directory "md:/PICTOMAT/PRIVATE/" on the camera.
If this directoy is empty, you can find this file also in the directory "md:/PICTOMAT/INI/".
Download this file via FTP and open it with an ASCII editor, e.g. Notepad.
The file is separated in several sections. The section "Pictomat" contains the following lines:
# IP Adresse und Port einer externer USB-Tastatur
# default
#KBD_IP_Adr = 192.168.0.100
#KBD_Port = 4001
Remove the characther "#" in line 3 and 4, so that it looks like this:
# IP Adresse und Port einer externer USB-Tastatur
# default
KBD_IP_Adr = 192.168.0.100
KBD_Port = 4001
After changing the settings you must save and upload the file into the camera directory "md:/
PICTOMAT/PRIVATE/".
Then you must reboot the PICTOMAT (hot key <STRG>+<U>).
If you switch IP / port settings of the USB driver, you will have to edit these settings in the
"Pictomat.001" as well !
4.2 PICTOMAT USB Driver Settings
Only network experts - e.g. administrators - should change the settings
explained here. If you do not know anything about the used items, then do not
make any changes !
You can establish a Telnet connection to the USB Driver in order to configure it. The standard IP
address of the driver is 192.168.0.100. After connecting to the driver you see this menu:
Type "root" and press <RETURN>. The driver asks for a password. Press <RETURN> without typing
a password. Then you see the configuration menu of the driver:
Seite 4
IBN INGENIEURBÜRO BERND NEUMANN GMBH
Type a number in order to go into a submenu (Column No.). There you see more menu items, which
you select by typing the respective number again.
Menu Nr. Name
1: Configure General
2: Configure TCP/IP
Description
General settings
TCP / IP settings (e.g. adress)
10: Configure Keyboard
Keyboard settings
96: Display Status
Display of the current state
97: Reset Settings to
Defaults
98: Restart Device Server
Restore standard settings
99: Exit
Close configuration; only after changing some settings, an
additional menu will appear for saving or not saving
Restart the USB Driver
With options "97: Reset Settings to Defaults" and "98: Restart Device Driver" you get the possibility to
save or abort without saving.
Here you edit common settings:
Menu Function
Nr.
1: Change root
password
2: LAN Interface
99: Back to prior
menu
Description
Notes
Changes password of
the administrator
After calling this function you type in the new
password and confirm with <RETURN>.
Configures the LAN
interface
AUTO: driver configures itself automatically,
recommended setting
The values are speed values, i.e. 10 Mbit/s and
100 Mbit/s, full or half, depending on the connected
network
Back to the Main Menu
Behind "Value" you see always the current state of the respective setting.
Seite 5
IBN INGENIEURBÜRO BERND NEUMANN GMBH
Configures network settings:
Menu Function
Nr.
1: DHCP/BOOTP
Description
With ENABLE, DHCP is switched on, i.e. the driver receives the IP
address from the DHCP server in the network.
DISABLE switches off DHCP.
2: IP-Address
After selecting this menu item you type in the new IP address and
confirm with <RETURN>. DHCP /BOOTP should then be switched off
(DISABLE).
3: Subnet Mask
After selecting this menu item you type in the new subnet mask and
confirm with <RETURN>. DHCP /BOOTP should then be switched off
(DISABLE).
4: Default Gateway
After selecting this menu item you type in the new gateway and
confirm with <RETURN>. DHCP /BOOTP should then be switched off
(DISABLE).
5: IP Filter
Configuration
Here you can either block or permit max three IP address ranges;
limitation of IP addresses that gain access to the USB Driver.
6: Network PnP
Activates (ENABLE) or deactivates (DISABLE) the network plug&play.
7: Host Name
Define a hostname for the USB Driver
8: WINS
Here you can configure a primary and secondary WINS-Server and
define a NetBIOS Scope ID.
9: mDNS
Activates (ENABLE) or deactivates (DISABLE) the mDNS-Protokolls
10: mDNS Service
Here you can define the identifyer of the USB Driver for mDNS
Name
99: Back to prior menu Back to the Main Menu
Behind "Value" you see always the current state of the respective setting.
If you change the IP address of the USB Driver, you must also change the respective Settings
in the file "PICTOMAT.001" !
Seite 6
IBN INGENIEURBÜRO BERND NEUMANN GMBH
Here you change keyboard settings:
Menu Nr.
1:
2:
99:
Function
Keyboard Mode Port No.
Key Type
Back to prior menu
Description
Port number of the keyboard
Must always be OFF
Back to the Main Menu
Behind "Value" you see always the current state of the respective setting.
If you change the port of the USB Driver, you must also change the respective Settings in the
file "PICTOMAT.001" !
Shows the state of the USB interfaces and of the system:
Only option "5" is available here, showing the current settings of the USB Driver and the connection
status of the USB interface. This can e.g. look like this:
The first row shows the driver model and the firmware version.
Terminates the configuration providing the following options:
Seite 7
IBN INGENIEURBÜRO BERND NEUMANN GMBH
5 Device Descripton
side view short side
side view long side
1
Network port, here you connect the network cable
2
STATUS LED (orange), blinks during communication
3
LINK LED (green), is on during established network connection
4
USB port, here you connect the USB cable of the keyboard
5
Power supply, here you connect the power supply adapter
6
Reset key, restores factory settings of the driver
6 Restore Factory Settings
These are the factory settings of the PICTOMAT USB Driver:
user name:
Password:
root
(none)
For resetting the USB Driver follow the instructions:
Remove the power supply from the driver.
Press the reset key (see also Device Description).
Keep the reset key pressed and connect the power supply simultaneously again.
Now the factory settings are active.
Seite 8
IBN INGENIEURBÜRO BERND NEUMANN GMBH
7 Security and Usage
Please regard the following notes for the use of the USB
Driver:
In the following situations remove immediately all cables from the driver including the power supply:
- housing is damaged and / or open
- the USB Driver is hot
- the driver smells burnt and or / smoke escapes from the driver
- foreign objects or liquids got inside the driver
Danger of fire or electrical shock. Contact IBN.
Keep the driver and the cable away from children. They can strangle themselves or get an electrical
shock.
You must not open or modify the driver and the power supply adapter.
If you pull a plug, then you do not pull the cable but only the plug itself. Danger of cable break.
When you move the driver, disconnect the cables before. Danger of electrical shock.
Only use the power supply adapter shipped together with the driver. Other adapters could possibly
damage the driver.
Before you turn on the driver, check the connections of the cables.
When you do not use the driver for a long time, remove the power supply.
Do not use or store the driver under the following environment conditions:
- Strong vibrations
- Leaning or unstable underground
- Direct sunlight
- Humid or dusty environment
- Humidor
- Hot environment
- Big temperature fluctuation
- Strong electromagnetic radiation (e.g. a WLAN Access Point)
Seite 9