1
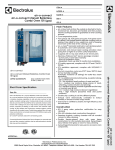
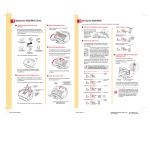
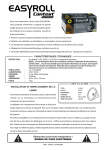
User Manual Updated: 06/20/2011 ©2011 Shelby Systems, Inc. All Rights Reserved Other brand and product names are trademarks or registered trademarks of the respective holders. EasyScan Fingerprint Scanner User Manual The EasyScan fingerprint scanner is an electronic peripheral designed to facilitate Check-In. It eliminates the need for printing ID badges (and re-printing ones that are lost) or for time-consuming manual searches for phone number or name to be checked in or out. By eliminating the need to look up the phone numbers on the screen, fingerprint scanning protects confidential information and makes checking in easier for the staff and for the members. Because fingerprints are unique to each individual, there is no way for someone to check in under another person’s name. Enrolling a new fingerprint in the system takes less than ten seconds, and identity verification at check-in takes less than five seconds. The EasyScan fingerprint scanner can speed up your check-in process and make it easier and more secure at the same time. Page 2 The EasyScan fingerprint scanner has a documented accuracy rate of 99.9%. Auto-on feature means the scanner is always ready for the next scan. Accurately scan the fingerprints of even small children. The scanner works well even with dry, wet, aged, scarred, and other problematic fingerprints. The fingerprint server can process up to 20,000 fingerprints scans per second. The initial fingerprint registration process only takes about 10 seconds per person. During registration, the fingerprint displays for visual confirmation of a good scan. The fingerprint database stores only key comparison point information, not the complete fingerprint. ll data is encrypted using 128-bit algorithms, ensuring absolute security. The fingerprint database is completely isolated to your local network, with no exposure to the World Wide Web. EasyScan Fingerprint Scanner User Manual 512 MB RAM 200 MB available hard drive space 1 GHz Pentium processor (or equivalent) Windows 2000 or later TCP/IP Port 1200 communication open through any firewalls 256 MB RAM 30 MB available hard drive space 500 MHz Pentium processor (or equivalent) Windows 98SE or later EasyScan Fingerprint Scanner USB/Proprietary Connection Cable ScanTastic! fingertip moistener Installation CD Shelby v.5 Activation Code Page 3 EasyScan Fingerprint Scanner User Manual The installation is a four-step process. First, install the Fingerprint Server software on your Shelby v.5 database server. Second, activate the Fingerprint Server with a License ID that will be provided by Shelby Systems. Third, install the client software on the check-in station. Fourth, connect the scanner device to the check-in computer with the USB cable provided. Be aware that the Fingerprint Server software must be activated by a License ID that can be provided to you only after you have completed the first step of the process. 1. Insert the Install CD into your Shelby v.5 database server’s CD-ROM drive. The installer software should load automatically. If it does not, browse the CD for the Install_M2SYS.exe file and double-click it. 2. Click the Server Install option. 3. If you have not yet installed Shelby v.5 version 5.9.6000 or later, you will be reminded that it is necessary to do so before the fingerprint scanner software can function properly. 4. If you are not installing on the Shelby v.5 database server, you will be reminded that the fingerprint server must be installed on the server. 5. You will see the Bio-PlugIn splash screen. Page 4 EasyScan Fingerprint Scanner User Manual 6. Click Next twice to proceed through the first two dialog screens. 7. Read and accept the License Agreement. 8. Enter your user information. 9. Accept the default installation folder (recommended), or change it if desired. 10. Review the installation settings and click Install. 11. Click Finish to conclude the install process. 12. Click Yes to reboot the server. After installation, the server must be rebooted to activate the Fingerprint Server service. 13. After rebooting, confirm the installation by looking for the new M2SYS Service Assistant. The Assistant appears in the system tray as a traffic light icon, showing the status of the Fingerprint Server. It also allows you to stop and start the service. NOTE: The Fingerprint Server communicates with the client scanner software using TCP/IP Port 1200. Be sure this port is open through any firewall you may have active for the server. Page 5 EasyScan Fingerprint Scanner User Manual 1. Open the Windows Control Panel. 2. Locate and open the M2SYS BioPlugin Server item. It may be easier to find in the classic view of the Control Panel. In 64-bit environments, you will need to go to Additional Options and click to View 32bit Control Panel Items. 3. Change to the License tab. Page 6 EasyScan Fingerprint Scanner User Manual 4. Send an e-mail to [email protected] with the subject line of Fingerprint Scanning Installation and containing the Installation ID code in the body of the message. Please include your customer number. 5. You will receive a reply message with your License ID number. 6. Enter the License ID provided to you from Shelby Systems, Inc. 7. Click OK and then Yes to confirm the License ID in the server. 8. Right-click the M2SYS Service Assistant stoplight icon and choose Stop Fingerprint Server. 9. After the service stops (the stoplight will turn red) , right-click the M2SYS Service Assitant again and choose Start Fingerprint Server. 10. Once the stoplight turns green, the server installation is complete. 1. Insert the Install CD into your Check In workstation’s CD-ROM drive. The installer software should load automatically. If it does not, browse the CD for the Install_M2SYS.exe file and double-click it. 2. Click the Client Install option. 3. If you have not yet installed Shelby v.5 version 5.9.6000 or later, you will be reminded that it is necessary to do so before the fingerprint scanner software can function properly. 4. You will see the Bio-PlugIn splash screen. Page 7 EasyScan Fingerprint Scanner User Manual 5. Click Next twice to proceed through the first two dialog screens. 6. Read and accept the License Agreement. 7. Enter your User Information. 8. Accept the default installation folder (recommended), or change it if desired. 9. Review the installation settings and click Install. 10. Click Finish to conclude the install process. Connect the EasyScan fingerprint scanner to the check-in computer using the proprietary USB cable provided with the scanner. Windows will recognize the device as new hardware. When you purchase the fingerprint scanning system, you are issued a new Activation Key for the Shelby v.5 Software. This new Activation Key must be applied to your software before you will be able to configure Check In to use the scanner. 1. Log in to Shelby v.5 with a user account with permission to run the Utilities module under the General suite of modules. 2. Open the Utilities Home Base. 3. Click the ShelbyTOOLS link. 4. Click the Change Activation Key utility item, and then click Run. Page 8 EasyScan Fingerprint Scanner User Manual 5. 6. 7. 8. Click Yes to confirm that you wish to run the utility. Enter the new Activation Key into the prompt, and then click OK. Click OK to acknowledge that the Activation Key was changed. Click Close to return to the Utilities Home Base, and then press F3 to return to the Dashboard. 1. 2. 3. 4. Go to the check-in computer that will be used with the fingerprint scanner. Open the Check-In Home Base. Choose Utility > Preferences. Check the option to Use BioPlugin fingerprint scanner. 5. Click OK to confirm the change. (The first time you set up a workstation to use a fingerprint scanner, the system may hesitate for a short time while it prepares the database to collect the fingerprint data. This will not happen for any later workstation configuration.) 6. Repeat these steps for every check-in computer that will use a fingerprint scanner. Page 9 EasyScan Fingerprint Scanner User Manual 1. 2. 3. 4. Open the Check-In Home Base. Click the Check In Procedure link. Ask the individual to place his or her finger firmly on the fingerprint scanner. When the fingerprint cannot be matched, the GlobaFILE name list will open. Find the name of the individual on the list and double-click it. 5. Click on the hand diagram to indicate which finger the individual will use. 6. Click the box to the right of the hand diagram to start the scanning process. 7. Once again, ask the individual to place his or her finger on the scanner. Page 10 EasyScan Fingerprint Scanner User Manual 8. A window will open to show the fingerprint scan. Follow the directions, asking the individual to place the finger on the scanner as prompted. The registration process requires three scans that are rated at least “Good” by the system. (For tips on successful fingerprint scanning, refer to the Fingerprint Scanning Tips section later in this document.) 9. Once you have three good scans, you will return to the main Fingerprint Enrollment window. 10. Click Register to add the fingerprint to the system. 11. Repeat steps 3 through 10 for each new fingerprint registration. Page 11 EasyScan Fingerprint Scanner User Manual Set up the Check-In Procedure screen in manned or unmanned operation as you normally do. As each person puts his or her finger on the scanner, the system will scan the fingerprint and look for a match. If a match is found for the fingerprint, the person will be checked in or will have whatever check-in options have been configured under the Preferences utility (such as family check in or multi-organization check in). If no match is found, the individual must go to a manual check-in station to have the fingerprint registered with the system. In unmanned touch mode, the person checking in must touch the Check In screen button to finish the checkin process. Page 12 Plan for growth and purchase a license accordingly. Once the fingerprint database reaches the maximum allowed by your license, no additional prints may be registered and fingerprint scanning will be disabled until the license has been upgraded. Encourage individuals to press firmly on the scanner, pressing the finger flat against the scanning surface. Capture a full and centered fingerprint image during the registration. Hold the finger on the scanner for one full second for each scan. Use the middle finger for people over five years of age. Use the thumb for children five or under. When possible, avoid registering fingerprints on very cold days. Extreme cold tends to dry the skin, which can adversely affect the scanning process. Clean the reader periodically with a cotton swab and rubbing alcohol. Use the ScanTastic! fingerprint moistener product. A quick tap of the finger on the ScanTastic! pad can improve scanning success, especially for dry or damaged fingers. If there are problems using the initially registered fingerprint, ask the person to scan a different finger. This will trigger a new registration process, allowing the new finger to be used instead of the original one. Watch the video at http://www.m2sys.com/training/Presentation_Files/index.html, which gives live examples of the best practices for fingerprint scanning. EasyScan Fingerprint Scanner User Manual We want to hear from you! Sales (800) 877-0222 [email protected] Support (888) My-Shelby [email protected] Customer Service (901) 757-2372 [email protected] Training (800) 654-1605 [email protected] Workshops (800) 654-1605 [email protected] Page 13