1
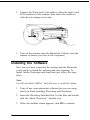
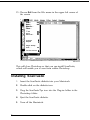
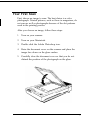
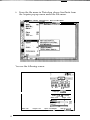
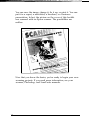
Introduction
This package contains all you need for professional quality
color scanning:
Cl
An Epson ES-600C™ color scanner
U
Adobe® Photoshop™ 2.5 LE, a powerful image-editing
program
Cl
ScanTastic,™ a plug-in that enables you to scan images into
Photoshop
Q a SCSI system cable.
This booklet tells you how to set up your scanner, install the
two software programs, and scan a picture. If you need
detailed information after you begin scanning, you can consult
the individual manuals for the ES-600C Scanner, Adobe
Photoshop, and ScanTastic.
Setting Up the Scanner
1.
Take the scanner out of the box.
2.
Place the scanner on a flat, stable surface with its rear panel
facing you.
3.
Locate the round screw knob in the middle of the rear panel
under the word CLAMP.
4.
Turn the screw counterclockwise and remove it.
5.
Push the screw into the storage hole on the right under the
word STOCK. Just push it in; it does not screw in. This keeps
it handy in case you ever want to ship your scanner.
6.
Connect the power cable to the power inlet on the rear of the
scanner and the other end into an appropriately grounded
outlet as shown below.
If the scanner comes on when you plug it in, turn it off by
pressing the OPERATE button.
Connecting the Scanner to Your
Macintosh®
Warning:
Be sure that your Macintosh, scanner, and any other SCSI
devices are turned off before you unplug or plug in any cables.
You connect the scanner to your Macintosh with the SCSI cable
included in the box. This cable has a 25-pin connector on one
end and a 50-pin connector on the other.
1.
Plug the 25-pin connector into the SCSI port on the Mac.
This port has a e icon above it.
Note:
If you are already using the SCSI port on your Macintosh for
another SCSI device, such as an external hard disk, you will need
a SCSI cable with 50-pin connectors on both ends. You can then
connect the scanner to your other SCSI device, following the
instructions in Chapter 2 of your ES-600C User’s Guide.
2.
Connect the 50-pin end of the cable to either the right or left
SCSI connector of the scanner; then fasten the connector
with the wire clamps on its side.
3.
Turn on the scanner, then the Macintosh. (Always turn the
scanner on before you turn on the computer.)
lnstalling the Software
Now that you have connected the scanner and the Macintosh,
you’re ready to install the software and start scanning. To
install Adobe Photoshop and ScanTastic just follow the steps
below.
Note:
You will need about 10MB of hard disk space to install the software.
4
1.
Turn off any virus-protection software that you are using
until you finish installing Photoshop and ScanTastic.
2.
Insert the Photoshop Installer Disk 1 in the Mac and double
click the Adobe Photoshop’” Installer icon.
3.
When the installer screen appears, click OK to continue.
4.
A dialog box appears. Click the Install button to install the
entire program from the diskettes to your hard disk. Follow
the instructions on the screen that tell you when to insert
different diskettes.
5.
When a message appears telling you that the installation
was successful, click Quit to exit the installer.
6.
Eject the installer diskette.
Note:
If you have SuperMatch,™ NEC® AccuColor,™ or another monitor
calibration utility installed, skip to step 8.
7.
Open the Adobe Photoshop™ LE folder. Then drag the
Gamma Control Device icon into your System folder. If you
see a message asking if you want to put “Gamma” in the
Control Panels folder, click OK.
8. Restart your Macintosh.
9.
Open the Adobe Photoshop folder if it is not already open,
and double click the Adobe Photoshop program icon.
10. Type your name in the box. If you wish, also type the name
of your organization.
11. Type the serial number of the Photoshop program. You can
find it on the Photoshop registration card and on the very
first page of the Adobe Photoshop User Guide & Tutorial.
12. Click OK.
5
13. Choose Quit from the File menu in the upper left corner of
the screen.
Close
xu
Save
Save As...
XS
Acquire
Export
b
b
Page Setup...
Print . . .
XP
Preferences b
::: :.:.:.: .: : : ,: : : :,:,: :.:.:.: : .i :.: :.j:>: :.i:/ .:.,.:.: :/:yy:;,//: :.::: i i i i i, i, , , , :,‘:.’, :
This will close Photoshop so that you can install ScanTastic,
which will enable you to scan from within Photoshop.
lnstalling ScanTastic
1.
Insert the ScanTastic diskette into your Macintosh.
2.
Double-click on the diskette icon.
3.
Drag the ScanTastic™ps icon into the Plug-ins folder in the
Photoshop folder.
4.
Eject the ScanTastic diskette.
5. Turn off the Macintosh.
6
Your First Scan
First, choose an image to scan. The best choice is a color
photograph. Printed pictures, such as those in magazines, do
not scan as well as photographs because of the dot patterns
used in the printing process.
After you choose an image, follow these steps:
1.
Turn on your scanner.
2.
Turn on your Macintosh.
3. Double click the Adobe Photoshop icon.
4.
Raise the document cover on the scanner and place the
image face down on the glass surface.
5.
Carefully close the document cover so that you do not
disturb the position of the photograph on the glass.
7
6.
From the file menu in Photoshop choose ScanTastic from
the Acquire pop-up menu under the File menu.
E d i t M o d e I m a g eF i l t e r S e l e c t W i n d o w
““‘i”=!d-l (AGEI, l:l)
You see the following screen:
Output Device
q
Manual
Image Type
Res
HT
0 Hardware
I[
58 [18,909]
Width: 8.42”
Height: 11.67”
Brightness:
Width: 8.42”
8
Height: 11.67”
Space: 4.90 MBytes
-rrc)r ~~~~
Units. I[
Click the Preview button.
A preview of your image appears on the screen. Use your
mouse to click and drag a rectangle to select the area you want
to scan.
-
Output Device
Res
HT
Image Type : m
.:
S c a l e 1100% [18,9091
Width: 6.06”
Height: 7.47”
Brightness.
Width: 6.06”
Height: 7.47”
Space: 2.26 MBytes
Units : mlnchps
To change your selected area, move the pointer to the edge of
the selection rectangle and click and drag the edge of the
rectangle to a new location.
When you have defined the portion of the image on the screen
that you want to scan, click the Scan button. In a few moments
the scanned image appears on your screen.
9
You can save the image, change it, fix it up, or print it. You can
put it in a report, a newsletter, a brochure, or a business
presentation. In fact, the picture on the cover of this booklet
was scanned with an Epson scanner. The possibilities are
endless.
Now that you know the basics, you’re ready to begin your own
scanning projects. If you need more information, see your
scanner, Photoshop, and ScanTastic manuals.
10
Tips for using ScanTastic
If your image is going to appear only on your screen and will
not be printed, click manual in the ScanTastic screen and enter
72 in the resolution box, as shown below. This resolution gives
you a high-quality screen image and a small file size. See your
ES-600C Scanner User’s Guide for more information on
resolution.
q
Manual
0 Hardware
Image Type : EColar)
48 [34,1666]
Width: 8.44”
Hight: 11.69”
Brightness
Width : 8.44”
Height: 11.69”
Space: 1.46 M Bytes
umts : pzq
Click the hardware box to access other scanner features. See
your ScanTastic manual for further information.
If you get a message that there is not enough memory to run
ScanTastic, close the Photoshop program and then re-open it
and scan your image.
If you want to shorten the time it takes to preview an image,
press % and period (.) when you can see all of the area you
want.
11
ES-6OOC is a trademark of Epson America, Inc.
Epson is a registered trademark of Seiko Epson Corporation
General notice: Other product names used herein are for identification purposes only and
may be trademarks of their respective companies.
Copyright 0 1993 by Epson America, Inc.
Torrance, California
12