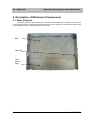
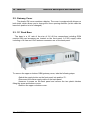
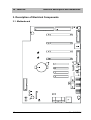
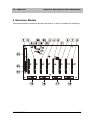
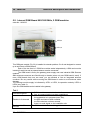
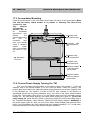
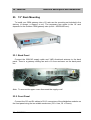
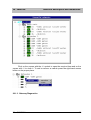
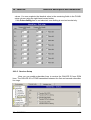
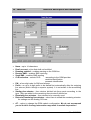
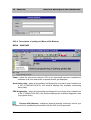
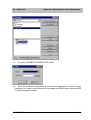
1
2N - OMIKRON
User Manual
Version: 1.9
2N - OMIKRON
Technical description and installation
Dear customer,
We congratulate you on the purchase of the 2N - OMIKRON. This new product was
developed and produced with view to maximum usage value, quality and reliability.
Our wish is your full and long-term satisfaction with the 2N® - OMIKRON.
• The producer simultaneously improves the software contained in the
product (so-called firmware). The used technology enables to us to
record at any time the newest version of the control programme by
means of common computer. The most up-to-date version of the
firmware may be loaded from www.2n.cz. Necessary instructions
are given in chap. 26.8 of the manual. We recommend you to use
the most up-to-date version of the firmware.
• On www.2n.cz, there is also the newest version of the user
documentation.
• Before installation of the product, check the completeness of the
delivery according to attached packing list and make acquainted
with the instructions stated in the manual. The producer is not
responsible for losses caused by improper use of the product
contrary to instructions given in the user manual. The guarantee
terms do not apply to the damage of the product by rough handling,
improper storage of exceeding of the given technical parameters.
2
2N - OMIKRON
2N - OMIKRON
Technical description and installation
CONTENTS
1. Basic Module ..................................................................................................... 7
2. Description of Mechanical Components ......................................................... 8
2.1. Base (Chassis)................................................................................................................................. 8
2.2. Gateway Cover ................................................................................................................................ 9
2.3. 19“ Rack Base.................................................................................................................................. 9
3. Description of Electrical Components........................................................... 10
3.1.
3.2.
3.3.
3.4.
3.5.
3.6.
3.7.
Motherboard................................................................................................................................... 10
Power Supply - Mains Part and Transformer................................................................................. 15
Power Supply Mains Part............................................................................................................... 15
Mains Transformer......................................................................................................................... 15
Power Supply with Battery Back-Up (Main Power Supply Board)................................................. 15
Display............................................................................................................................................ 17
19“ Rack Display ............................................................................................................................ 17
4. Extension Module............................................................................................ 19
5. Interface Modules ............................................................................................ 21
5.1.
5.2.
5.3.
5.4.
5.5.
5.6.
5.7.
6.
7.
8.
9.
10.
11.
Subscriber Line Module, 2 lines..................................................................................................... 21
Subscriber Line Module, 2 lines – polarity reversal........................................................................ 22
CO Line Module - DATA, 2 CO lines ............................................................................................. 22
CO Line Module - DATA, 2 CO lines – polarity reversal ................................................................ 22
Internal GSM Board 900/1800 MHz, 2 GSM modules................................................................... 23
900/1800/1900 MHz GSM Module/GPRS Module for 2 GSM ...................................................... 24
Antenna Combiner ......................................................................................................................... 25
Remote Supervision Modem Module............................................................. 25
Distribution Modules....................................................................................... 26
Outer Battery Cover ........................................................................................ 27
Gateway Location............................................................................................ 28
Packing Out and Check of Components ....................................................... 28
Opposite-Side Cover Opening (Optional)...................................................... 28
11.1. Lock Assembly............................................................................................................................... 29
12. Installation of Extension Modules.................................................................. 30
13. Installation of Modules.................................................................................... 32
13.1. Distribution Module Lay-Out Rules ................................................................................................ 32
13.2. Interface Module Lay-Out Rules .................................................................................................... 33
13.3. Module Installation Instructions...................................................................................................... 34
13.4. Remote Supervision Modem Installation ....................................................................................... 34
13.5. GSM Board 900/1800MHz Installation........................................................................................... 35
13.5.1.
GSM Board Mounting............................................................................................. 35
13.5.2.
SIM Card Installation .............................................................................................. 35
13.6. GSM Board GSM 900/1800/1900 MHz Installation ....................................................................... 36
13.6.1.
GSM Board Mounting............................................................................................. 36
13.6.2.
SIM Card Installation .............................................................................................. 37
13.7. External Antenna Mounting............................................................................................................ 37
14. Gateway Wall Mounting .................................................................................. 38
2N - OMIKRON
3
2N - OMIKRON
Technical description and installation
15. GW Grounding ................................................................................................. 38
16. Connection to Mains ....................................................................................... 39
17. Assembly and Battery Connection ................................................................ 39
17.1. Battery Cover Location................................................................................................................... 39
17.2. Interconnection............................................................................................................................... 39
17.3. Accumulator Mounting ................................................................................................................... 41
17.4. Correct Power Supply Turning On / Off ......................................................................................... 41
17.5. Accumulator Check and Service Life............................................................................................. 42
18. Cabling ............................................................................................................. 42
19. Small Servicing Operations............................................................................ 42
19.1. Lithium Battery Replacement......................................................................................................... 42
20.
21.
22.
23.
Gateway Expansion......................................................................................... 43
Damaged Overvoltage Protector - Distribution Module Replacement........ 43
Serially Pre-Connected Overvoltage Protector Installation......................... 44
19“ Rack Mounting .......................................................................................... 45
23.1. Back Panel ..................................................................................................................................... 45
23.2. Front Panel..................................................................................................................................... 45
24. 2N - OMIKRON Technical Parameters............................................................ 47
25. Universal config tool for OMIKRON and MOBILITY Extension ................... 50
25.1. Data................................................................................................................................................ 50
25.2. Windows......................................................................................................................................... 52
25.3. Settings .......................................................................................................................................... 52
25.3.1.
Local Connection ................................................................................................... 53
25.3.2.
Modem................................................................................................................... 53
25.3.3.
Confirmation........................................................................................................... 54
25.3.4.
Language Selection................................................................................................ 55
25.4. Help ................................................................................................................................................ 55
26. 2N - OMIKRON GW Programming Charts ...................................................... 56
26.1. Global Data .................................................................................................................................... 57
26.1.1.
Information............................................................................................................. 57
26.1.2.
Hardware ............................................................................................................... 58
26.1.3.
Gateway Diagnostics.............................................................................................. 59
26.1.4.
Passwords ............................................................................................................. 60
26.1.5.
CO Lines................................................................................................................ 62
26.1.6.
Subscriber Lines .................................................................................................... 64
26.1.7.
Accounting ............................................................................................................. 64
26.1.8.
Tones..................................................................................................................... 65
26.2. Subscriber Lines............................................................................................................................. 66
26.2.1.
Signalling ............................................................................................................... 67
26.2.2.
Global Data............................................................................................................ 68
26.2.3.
Departments .......................................................................................................... 68
26.2.4.
FLASH and Dialling Type Setting............................................................................ 68
26.2.5.
Services Setup....................................................................................................... 69
26.3. CO Lines ........................................................................................................................................ 70
26.3.1.
Line Types ............................................................................................................. 70
26.3.2.
Types of Digital Lines ............................................................................................. 73
26.3.3.
Trunks.................................................................................................................... 75
26.3.4.
Global Data............................................................................................................ 75
4
2N - OMIKRON
2N - OMIKRON
Technical description and installation
26.4. Incoming Calls................................................................................................................................ 76
26.4.1.
Ringing................................................................................................................... 76
26.4.2.
Ringing Charts ....................................................................................................... 76
26.5. Automatic Cost-Saving Machine (LCR) ......................................................................................... 79
26.5.1.
Number Standardisation......................................................................................... 79
26.5.2.
Destination............................................................................................................. 79
26.5.3.
Tracks.................................................................................................................... 83
26.5.4.
Tariffs..................................................................................................................... 84
26.5.5.
Time Tables ........................................................................................................... 84
26.5.6.
Condition................................................................................................................ 85
26.5.7.
Providers................................................................................................................ 85
26.5.8.
Bank Holidays ........................................................................................................ 86
26.6. REMOTE SUPERVISION.............................................................................................................. 87
26.6.1.
This is what remote supervision makes possible:.................................................... 87
26.6.2.
What you need....................................................................................................... 87
26.6.3.
Modem Module (OMOD) Setting............................................................................. 87
26.6.4.
Description of config tool Menu a Bar Buttons......................................................... 88
26.6.5.
Establishing Connection ......................................................................................... 90
26.6.6.
Loading Data.......................................................................................................... 95
26.6.7.
Panel ..................................................................................................................... 95
26.6.8.
Remote Supervision Logistics................................................................................. 95
26.6.9.
Interrupting Connection .......................................................................................... 95
26.6.10.
Cancelling Connection ....................................................................................... 95
26.7. Accounting and Diagnostic DATA Downloading............................................................................ 96
26.7.1.
Using Universal config tool for OMIKRON and MOBILITY Extension....................... 97
26.7.2.
Using XAPI Server ................................................................................................. 97
26.8. Upgrade of firmware to the 2N® - OMIKRON................................................................................. 97
26.9. License ........................................................................................................................................... 98
26.9.1.
License Storing ...................................................................................................... 98
2N - OMIKRON
5
2N - OMIKRON
6
Technical description and installation
2N - OMIKRON
2N - OMIKRON
Technical description and installation
1. Basic Module
Every assembled basic module consists of the following components:
•
•
•
•
•
•
•
chassis (metal case);
plastic cover including display;
motherboard;
universal serial port;
power supply
combined distribution module
necessary power supply and serial module cabling.
The following components are added:
•
•
•
•
•
wall-mounting element, packaged, including dowels and screws for GW wall mounting;
mains cord;
connecting cable for one extension module
flat cable for distribution module
clamp tapes for cabling;
Moreover, the following accessories are included:
•
•
•
•
•
•
serial cable with RJ-12 terminals and one gender changer for DB-9 connector
lock key
spare fuses
Installation Manual
Declaration of conformity
CD with programming software and documentation
2N - OMIKRON
7
2N - OMIKRON
Technical description and installation
2. Description of Mechanical Components
2.1. Base (Chassis)
The base carries the GW components. Its bottom carries distribution modules. There is a lock
on the right-hand side of the base that prevents the cover from opening. On the left-hand side, there
is a pre-pressed hole for transferring the lock to the left.
Base
Little lock
Fixed
beam of
plugs
8
2N - OMIKRON
2N - OMIKRON
Technical description and installation
2.2. Gateway Cover
The plastic GW cover contains a display. The cover is equipped with hinges on
both sides, which allows you to change the cover opening direction (in this case the
base lock position is to be changed).
2.3. 19“ Rack Base
The base is a 19“ rack of the size of 2U. All line connections including GSM
module SIM card accesses are located on the front panel. A 230V supply cable
including a 1A fuse and YAGI antenna connector are on the back panel.
To remove the upper or bottom GSM gateway cover, take the following steps:
-Switch the supply button on the front panel into position "0“.
-Disconnect the mains supply cable on the back panel.
-Unscrew 4 screws on the back panel and remove the two plastic latches
fitting the upper and bottom covers.
-Remove the upper or bottom cover.
2N - OMIKRON
9
2N - OMIKRON
Technical description and installation
3. Description of Electrical Components
3.1. Motherboard
10
2N - OMIKRON
2N - OMIKRON
Technical description and installation
B1 - Lithium battery holder. We recommend you to replace the battery if the voltage drops
below 2.5 V, or once in three years at least. You are recommended to replace the battery
with your GW off. You are recommended to save the GW program and accounting data in
your PC before replacement. After replacement, check and, if incorrect, reset the date, time
and program of the GW. You can also replace the battery carefully with your GW on. In that
case make sure that no call is being made.
WARNING! Use a tool made of some insulating material for replacement only!!!
J1 - Display connector
J2 - External serial FLASH memory connector
J3 - Extension module connector
J9 – J10- Voice module
J8 -Modem module connector
J12 - Company’s servicing testing connector
J14 - Power supply connector – see Fig. 4
J15 - RJ12 connector with galvanic isolation for PC connection (OMEGA AGENT, OMEGA
PROGRAM, OMEGA PANEL), for wiring see Fig. 7 and Note
J16 - 3 TTL BIN inputs (not used so far)
J17 – J20 - Line module connectors (CO lines, subscriber lines, system lines, etc.) – see
Fig. 3
J21 - Internal music source connector (tune selection), see Fig. 8
J22 - Line output (CINCH – AUX OUT) for broadcast unit, paging system, recorder/player
connection
J23 - Line input (CINCH – AUX IN) for external music source connection (CD, broadcast,
e.g.)
J24 - RJ-12 service connector. Leads to interface A of the second module from the left (J18). It is
designed for temporary connection of subscriber lines, CO lines, or system telephones for
servicing purposes only.
WARNING! Do not use for permanent connection. The input is not equipped with any
overvoltage protector!
J29 - Distribution module connector – A/B line interface conductors – see Fig. 5
J30 - Distribution module connector – C/D line interface conductors (for system telephone,
E+M interface connection) – see Fig. 6
J31, J32 - BIN 0 - TTL logical input (J31 – GND, J32 – BIN 0), here a TTL signal or
switching contact against the ground can be connected.
J33, J34 - BIN 1 - TTL logical input (J34 – GND, J33 – BIN 1), here a TTL signal or
switching contact against the ground can be connected.
J35, J36, J37 - Universal switch 1 (relay) contacts. Connection and connecting/disconnecting
contact selection are the same as with switch 2.
J35, J36 – Universal relay disconnecting contacts
J36, J37 – Universal relay connecting contacts
J38, J39, J40 – Universal switch 2 (relay) contacts. Connection and connecting/disconnecting
contact selection are the same as with switch 1.
J38, J39 – Universal relay disconnecting contacts
J39, J40 – Universal relay connecting contacts
JP1 - Shorting jumper – always disconnected – record in internal FLASH memory enabled
- connected – record in internal FLASH memory disabled
JP2 - Shorting jumper – always connected (WATCH DOG activation)
JP3 - Shorting jumper – always disconnected (for testing purposes only – GND and PGND
interconnection)
2N - OMIKRON
11
2N - OMIKRON
Technical description and installation
JP4 - Shorting jumper for music source switching (external, internal, or internal from the
voice module)
K1, K2
- Universal relays
P3 - Internal and external music source control (AUX IN)
SW1 - Auxiliary Reset button – refer to the Reset chapter
SW2 - Reset button – refer to the Reset chapter
TP1
- Servicing
12
2N - OMIKRON
1
6
1 - RTS
2 - TXD
3 - GND
4 - GND
5 - RXD
6 - CTS
OFFREL + 12 V
+5 V
1
GND
GND
+12 V
Fig. 3:
Main
Distribution
Module
Connector
-12 V
black
GND
blue
white
-24 V
RINGV
Fig. 2:
J14 Power Supply
Connector Pinning
1
Fig.1:
Connectors for
Modules with
Lines
PWRPFI
Fig. 5:
RJ-12
Connector
Wiring
Fig. 4:
Auxiliary
Distribution
Module
Connector
PGND
BD
BC
PGND
AD
AC
PWRIO
M0LAC
M0LBC
M1LAC
M1LBC
M2LAC
M2LBC
M3LAC
M3LBC
BB
BA
PGND
AB
AA
PGND
brown
OFFREL + 12 V
red
black
yellow
M0LAB
M0LBB
M1LAB
M1LBB
M2LAB
M2LBB
M3LAB
M3LBB
black
M0LAA
M0LBA
M1LAA
M1LBA
M2LAA
M2LBA
M3LAA
M3LBA
grey
orange
M0LAD
M0LBD
M1LAD
M1LBD
M2LAD
M2LBD
M3LAD
M3LBD
Technical description and installation
2N - OMIKRON
Fig. 8:
Internal Music
Source Connector
Note:
J15 – connector for PC connection. It helps to program the gateway using the Universal config
tool for OMIKRON and MOBILITY Extension software. The serial port includes an insulating
DC/DC converter of its own and, by optical signal transmission, provides the galvanic
isolation of the serial port from the GW with a guaranteed insulation strength of 2000 V.
This solution has the following advantages:
•
•
•
•
helps transmit data over long distances;
improves data transmission reliability (EMI resistance);
enables communication with a PC powered from a different power supply section (from a
different phase or the central UPS, e.g.);
improves overvoltage resistance of the input.
An ordinary (i.e. cross-over!!!) four-wire telephone cord with RJ-12 terminals is normally
used for PC connection instead of a special serial cable, over long distances in particular.
2N - OMIKRON
13
2N - OMIKRON
Technical description and installation
In addition to connectors, sockets, and jumpers described in the lay-out, the motherboard
contains the following important circuits:
• ATMEL AT89C52 processor with clock frequency of 24 MHz
• static CMOS RAM 4 Mb (for proprietary software, billing data, etc.) with battery back-up
• serial FLASH EPROM 4Mb (for firmware, GW setup, etc. back-up)
• RTC circuit with a very precisely adjusted crystal oscillator
• MAXIM MAX691 data protection circuit for RAM and program run watch-dog
• circuits separating the processor part - reduce rf power radiation significantly
• 4 DTMF (tone dialling) receivers
• 4 CPT (425 Hz tone) receivers
• 2 DTMF (tone dialling) transmitters
• impedance matching termination circuits for 12 speech buses
• cross-point switch circuit to transmit tones, music and voice messages to all of the 12
speech buses
• 12 x 8 cross-point switch for 8 interfaces
14
2N - OMIKRON
Technical description and installation
2N - OMIKRON
3.2. Power Supply - Mains Part and Transformer
WARNING!
Disconnect from
mains before handling!
WARNING! These parts are connected with the power supply network
and work with danger voltage. All repairs and replacements of these
parts are made at the manufacturer’s only! The following operations
are allowed only:
• fuse replacement;
• mains cord connection and disconnection.
WARNING! Always make the above mentioned operations with
your GW off and disconnected from the mains!!!
3.3. Power Supply Mains Part
This part is the same for power supplies
without and with battery back-up. It includes a
well-tried three-wire overvoltage protector and
a low-pass LC filter. The mains cord is
disconnectable (the so-called EURO socket).
This allows you to extend the cord smartly
using the EURO extension cable (used for PC /
monitor connection, e.g.), or use a longer cord
with a different terminal (to be exported).
The mains part also includes a cover,
which prevents you from touching live parts
under voltage and covers primary transformer
terminals too.
3.4. Mains Transformer
The transformer winding consists of two chambers (i.e. has an increased insulation
strength).
3.5. Power Supply with Battery Back-Up (Main Power Supply
Board)
The power supply with battery back-up is designed to provide a combined power
supply to the gateway: from the mains and a back-up 24 V lead accumulator (there are
usually two serially connected 12 V accumulators). For safety reasons, the accumulators are
located in a plastic case outside the GW, refer to the Outer Battery Cover chapter. The
recommended minimum capacity of the accumulator is 6 Ah. For the maximum load and
operation time refer to the Technical Parameters chapter. The power supply also provides
correct accumulator charging using a method prescribed for maintenance-free lead-acid
accumulators. This power supply can also be used for supplying the GW from the central 24
V battery with arbitrary polarity against the ground (includes galvanic isolation) or (using a
special converter) from the central 48 to 60 V battery. Moreover, the power supply features
a high mains voltage fluctuation and short-time power outage tolerance (works as an on-line
UPS). The main board contains a single-acting forward converter, which generates the four
2N - OMIKRON
15
Technical description and installation
2N - OMIKRON
Power OK
LED +5V,+12V
LED –24V
Battery +24V
required voltage levels: +12 V, + 5 V, -12 V, and -24 V,
extension module filters and accumulator-charging circuits.
The SW1 button is used for turning the power supply off
while batteries are connected and disconnected. For how to
use the button as well as connect and disconnect the
batteries properly refer to the Installation Details Manual
(chapter 18).
black
GND
red
black
yellow
+5 V
GND
brown
black
blue
white
+12 V
Fig. 7:
Power
Connector
JP6 Pin Map
-12 V
GND
-24 V
RINGV
NOTE: If back up batteries are to be connected, it is necessary to enhance the power
supply with a ringer module. This module is ordered separately.
16
2N - OMIKRON
2N - OMIKRON
Technical description and installation
3.6. Display
The display printed-circuit board (PCB) is mounted inside the GW plastic cover and is
connected to the motherboard using a flat cable.
The LEDs indicate the following CO/GSM interface statuses:
-no light
-permanent green light
-flashing green light
-permanent red light
-flashing red light
-rest status of all CO/GSM lines
-analog CO line is busy
-analog CO line is defective
-GSM line is busy
-GSM line is defective
3.7. 19“ Rack Display
The display for the 19“ rack OMIKRON version differs from the standard
OMIKRON display in that, in addition to standard LEDs 1-8, it contains:
-two "seven-segment" displays– firmware version display (after RESET);
- date and time displays (the time display is
interrupted by a date display every minute);
- an RS232-COM serial link output;
- an accounting buffer status LED indicator (green 0-50%, orange 50-75%, red 75100%).
2N - OMIKRON
17
2N - OMIKRON
18
Technical description and installation
2N - OMIKRON
2N - OMIKRON
Technical description and installation
4. Extension Module
This module allows to extend the gateway with another 16 lines (8 modules with interfaces).
2N - OMIKRON
19
Technical description and installation
2N - OMIKRON
1 - 8.
Fig. 8:
Interface
Module
Connectors
Connectors J4-J11 for modules with line interfaces
(CO lines, subscriber lines, GSM modules).
J4, J5, J6, J7 – These connectors are reserved for GSM
boards.
J8, J10 - These connectors are reserved for CO Line
Modules.
J9, J11 - These connectors are reserved for Subscriber
Line Modules.
BB
BA
PGND
AB
AA
BD
BC
PGND
AD
AC
9. JP1 - Jumper – all open (not used).
10. JP2 – Extension module address jumper
CAUTION! This jumper must always be connected in agreement with jumpers JP3 – JP6!!!
11. JP3 – JP6 – Jumpers for connection of DTMF circuits to buses. There are four DTMF
circuits on the extension module that are connected according to the Fig. 10
12. J1 – Motherboard connector (using a ribbon cable).
13. J2 – Supply connector. Here you can check supply voltage values.
Common measuring tips can be inserted in the terminal body 1.
Fig. 09: JP2 –
chambers (see Fig. 23).
14. J3 - Jumper – always open (intended for burn-in testing – GND Extension Module
Address Setting
and PGND connection).
15. J12 – Primary distribution module connector – wires A and B of
interfaces in connectors (1)…(4) (see Fig. 24).
16. J13 – Auxiliary distribution module connector – wires C and D of
1.
interfaces in connectors (1)…(4), (see Fig. 13).
Obr.
10: DTMF
17. J14=J12
Receiver – Bus
18. J15=J13
Connection in
Dependence on
19. TP2-Test pin
Extension Module
20. TP3 – Test pin
Address
In addition to connectors, sockets, and jumpers described
in the geography above, the extension modules contains
the following important circuits:
•
•
20
+12 V
-12 V
GND
-24 V
+12 V
GND
1
M0AB
M0BB
M1AB
M1BB
M2AB
M2BB
M3AB
M3BB
Fig. 13: Auxiliary
Distribution
Module
Connector
+5 V
GND
Fig. 11:
Supply
Connector
Wiring
RINGV
M0AA
M0BA
M1AA
M1BA
M2AA
M2BA
M3AA
M3BA
+12 V
GND
1
M0AD
M0BD
M1AD
M1BD
M2AD
M2BD
M3AD
M3BD
M0AC
M0BC
M1AC
M1BC
M2AC
M2BC
M3AC
M3BC
4 DTMF receivers (tone dialling)
12 x 16 cross-point switch matrix for 16 interfaces
GND
černý
červený
černý
žlutý
hnědý
černý
modrý
bílý
Fig. 12:
Primary
Distribution
Module
Connector
2N - OMIKRON
Technical description and installation
2N - OMIKRON
5. Interface Modules
Tab. 1 - Available
Order No.
Module Name
1832210
1832211
2 subscriber line module
2 reverse subscriber line module
1832220
2 CO line module – DATA
1832221
1832232
2 CO line module – DATA, reverse
2 GSM 900/1800 MHz module
General Features
Every module contains two lines. The modules are equipped with the 2nd stage
overvoltage protection that assumes that the module is connected via an extension module
that is provided with the 1st stage overvoltage protection (rough protection). All modules are
equipped with an identification system that allows the gateway software to identify the
particular configuration upon power up. All module connectors contain two pairs of
blank/pre-pressed holes (without contacts) to avoid incorrect insertion of the modules.
5.1. Subscriber Line Module, 2 lines
order No. 1832210
The subscriber line interface works with 24 V line supply voltage and approx. 30 mA
line current. It is symmetric, which provides good tolerance against line cross-talk in the
cable. The nominal impedance is 600 Ω.
2N - OMIKRON
21
2N - OMIKRON
Technical description and installation
5.2. Subscriber Line Module, 2 lines – polarity reversal
order No. 1832211
This module has the same features as module No. 1832210 with additional
answer supervision using polarity reversal.
5.3. CO Line Module - DATA, 2 CO lines
order No. 1832220
CO line interface with data transmission support for up to 56 kB/s.
5.4. CO Line Module - DATA, 2 CO lines – polarity reversal
order No. 1832221
CO line interface with data transmission support for up to 56 kB/s and with answer
supervision using polarity reversal.
Tab. 2: Overview – Interface Module LED Signalling:
Module Type
Subscriber line
CO line
22
No light
LED on
LED flashes
hung-up
line seized
pulse dialling
No signalling. Any CO line seizure / hung-up status signalling is on
the gateway display.
2N - OMIKRON
2N - OMIKRON
Technical description and installation
5.5. Internal GSM Board 900/1800 MHz, 2 GSM modules
order No. 1832232
LED3,4
LED1,2
This GSM gate module (Fig. 32) is installed in extender positions 5 to 8 and designed to connect
up to two lines to a GSM network.
Each of the two lines in 2 GSM line modules works independently. A SIM card must be
inserted for each line and an external antenna must be connected.
The GSM board is fed by the gateway power supply and uses industrial GSM Siemens
modules.
SMA antenna connectors are fitted directly to chassis (when only one GSM board is used). If
more GSM boards than one are used, you are advised to use an integrated antenna
combiner. Be very careful while mounting the GSM board in order to avoid antenna cable
damage.
The Siemens module supply is indicated by LED1 or LED2, its operation mode by LED3 or
LED4 (see Table 3).
Up to four GSM boards can be installed in the gateway.
Tab.3
Permanent light on
Flashes in 2s intervals
Flashes with 100ms
intervals
2N - OMIKRON
No GSM board is connected to the interface,
or, if so, no communication has been established.
The GSM board is functional but not logged in because:
•
the registration is in progress (max. 20s),
•
the SIM card has not been installed,
•
the PIN code has not been entered,
•
there is a weak signal on the installation site.
The GSM module is functional, logged in.
23
2N - OMIKRON
Technical description and installation
5.6. 900/1800/1900 MHz GSM Module/GPRS Module for 2 GSM
Order No. 1832233
A GSM module designed for the 19" rack 2N – OMIKRON version.
The GSM module is mounted into positions 9 to 12 (J8-J11) on the extending
module and connects up to two lines to the GSM network.
The two GSM lines work independently. A SIM card must be inserted for each
of them.
The GSM module is fed from the gateway power supply. The core of this
GSM module is an industrial dual GPRS GSM module SIEMENS MC45.
The module supply status is indicated by LED1 or LED2, the module
operation mode by LED3 or LED4 (see Table 3).
Always use a 2/1 or 4/1 antenna combiner respectively for YAGI GSM
antenna connection, depending on the number of GSM modules employed.
Up to four GSM modules can be installed in the gateway.
24
2N - OMIKRON
Technical description and installation
2N - OMIKRON
5.7. Antenna Combiner
With this module it is possible to connect 1 (2/1 order No. 183252) or 2 (4/1
order No. 183254) GSM boards to one GSM antenna.
GSM modules
SMA antenna
6. Remote Supervision Modem Module
order No. 1832280
The module is to be mounted into the 2N OMIKRON GW and is designed for remote
supervision of the gateway.
2N - OMIKRON
25
2N - OMIKRON
Technical description and installation
7. Distribution Modules
Distribution modules are an inseparable part of the 2N®-OMIKRON GW. They are
used for physical connection of all internal and external conductors, and system lines to
the GW. Moreover, they contain overvoltage protection circuits for all lines. They are
mounted inside the gateway in space reserved for cabling and these modules only. It is
possible to connect up to 8 lines to one module (4 subscriber lines, 4 CO lines).
All inputs of distribution (connecting) modules are equipped with
overvoltage protectors. In other words: it is impossible to connect any subscriber
or CO line or a key telephone set to the 2N®-OMIKRON GW without overvoltage
protection. This strict requirement is supported by experience that shows that almost
all defects are caused by overvoltage. Hence, overvoltage protection is the basic
prerequisite for a high operational reliability of the 2N®-OMIKRON GW. Moreover,
accumulating a large number of overvoltage protectors and their integration into
distribution modules result in a substantially lower price than you would have to pay
for separately available overvoltage protectors. Due to separation of the protectors
from PCBs and high-quality grounding, the potential of protecting elements is fully
utilised and the risk of hardware damage (even in case of overvoltage protector
destruction) is minimised.
Other general features:
• The modules use advanced protecting elements such as new-generation varistors
(3300 A current rating already with the disk diameter of 10 mm!).
• The modules are connected to the GW board with a flat cable, which is highly
flexible and allows for an easy board replacement.
• Distribution module with RJ-12 connectors, 4 relays, 2 wires, 8 lines
order No.1832241
It is a two-wire distribution module with 4 outage relays (in the case of power loss,
connectors 1-2, 3-4, 5-6, 7-8 are directly interconnected). Connectors 1,3,5,7 connected to
outage relays (CO line connection) are protected with enhanced, two stage overvoltage
protection using the latest protection components (three-output lightning arrester,
SIDACTOR type switch).
26
2N - OMIKRON
2N - OMIKRON
Technical description and installation
8. Outer Battery Cover
A plastic box of the size of approx. 20 x 25 x 10 cm (width, height, depth) for two
maintenance-free 12 V / 6.5 Ah accumulators of standard dimensions of 150 x 65 x 95 mm.
Its transparent cover allows you to check the battery status visually. The high degree of
coverage protects the surrounding environment from pollution caused by battery damage.
There is a switch breaker, a fuse holder, and a fuse-breaking indicator under the cover. You
cannot handle the equipment until you screw the cover off. The box can be installed on the
ground or mounted on the wall.
2N - OMIKRON
27
2N - OMIKRON
Technical description and installation
9. Gateway Location
The following aspects have to be taken into account when the suitable gateway location is
looked for:
• Good visibility and accessibility (the gateway displays its status during operation).
• Moisture and extreme temperature protection: never locate your gateway near heat
sources (above heat radiators) or places exposed to direct sun radiation. Avoid damp
places (such as bathrooms, cellars), locations with abrupt temperature changes (close
to doors, windows, air conditioners), high-dust locations (workshops, etc.), places
exposed to aggressive gas (battery room, boiler room), and places suffering from high
vibrations and shocks (compressors, heavy machines). The gateway's operating
position is vertical.
• Make sure that there is a good GSM signal for your GSM antenna installed in the given
radius around the selected gateway location.
• An option to connect the gateway directly using modules equipped with RJ-12 connectors.
• Cover opening: there should be 10 cm at least of free space to the right and left of the
GW.
10. Packing Out and Check of Components
Check the delivery for completeness unless you have already done so. The basic module
packaging is also used for transporting other, separately bought GW components (modules,
etc.). Check the components using the delivery order and order numbers included in all
components. The remaining components in the upper part of the box are basic module
accessories. Remove the basic module from the bottom part of the package. Open it and check
all items using the packing list that an independent enclosure to the documentation (at the
beginning of the file). Check the components for mechanical damage caused during transport.
There is a reinforcement structure at the bottom of the box that is printed and should be used as
a GW wall-mounting hole pattern. Keep the packaging (extension module packing above all).
11. Opposite-Side Cover Opening (Optional)
The GW cover is opened to the left by default. The lock is on the right. If you have
chosen a location for your GW that has little space on the right (in a corner, close to
furniture, etc.), you can change the opening direction as follows:
1. Remove the cover from hinges: Open the cover to form the right angle and slide it
carefully about 2 cm up to the upper part of the GW to make it loose. Disconnect the
cable from the display if necessary.
2. Lock dismantling: Loosen the lock screw and remove the lever, washer and fixing ring.
Loosen the nut and remove the lock with its distance ring.
3. Breaking of a hole for the lock on the left-hand side: An oval opening of the same size as
on the right-hand side of the GW is pre-pressed here. Break the hole with a flat screw
driver.
28
2N - OMIKRON
Technical description and installation
2N - OMIKRON
11.1. Lock Assembly
lock body
fixing ring
lever
distance ring
nut
spring washer
screw
Fig. 1: Lock Assembly
Fig. 2: Lock Lever Position
4. Mount the lock to the opening on the left side as shown in Fig.1. Put the lock with the
distance ring in the hole. Put on and tighten the nut. Replace the fixing ring, lock lever
and spring washer and screw them into position from the inside. Tighten the screw.
Mount the lock lever with its bent section towards the base edge and up when the lock
key is turned to the right (locked position).
5. Plastic cover mounting on right-hand hinges: the procedure is reverse when compared
with cover removal. Put the open cover at the right angle about 2 cm above the correct
position and fit it.
Notes:
• To open the GW cover, you have to make sure that there is 10 cm space at least on both
sides.
• The above described procedure can be used for already installed gateways (you have
bought a new box and want to locate it to the right of the GW). In that case you should
remove interface modules first, or dismount extension modules 2 and 3. You are
recommended to write down all module positions.
• The cover can be re-mounted of course in the same way to open to the left again.
2N - OMIKRON
29
2N - OMIKRON
Technical description and installation
12. Installation of Extension Modules
The extension module is to be mounted to the right of the motherboard.
Power supply
cable to the motherboard
and extension module
Short extension module motherboard connection
cable
1. Supply cables: Connect the power supply cables to extension module
connectors.
2. Flat cable: Use this cable to connect an extension module to the motherboard.
3. Set the jumpers on the extension module according to the figure.
30
2N - OMIKRON
2N - OMIKRON
Technical description and installation
Fig. 17: Extension Module Jumper Setting
2N - OMIKRON
31
2N - OMIKRON
Technical description and installation
13. Installation of Modules
Note: All modules can be installed when the GW has been wall-mounted. But it is more
comfortable to install the modules "on the desk“ before wall mounting.
13.1. Distribution Module Lay-Out Rules
•
32
The position of extension modules and antenna combiners is pre-designed and
cannot be changed. For interconnection with the motherboard or extension
module a short flat cable is used, which is available with every extension module.
2N - OMIKRON
2N - OMIKRON
Technical description and installation
13.2. Interface Module Lay-Out Rules
•
•
•
•
Positions 1, 3, 9 and 11 are reserved for CO line modules. Always occupy the positions from
the lowest to the higher positions according to the HW configuration.
Positions 2, 4, 10 and 12 are reserved for subscriber modules. Always occupy the positions
from the lowest to the higher positions according to the HW configuration.
Positions 5, 6, 7 and 8 are reserved for GSM boards. Always occupy the positions from the
lowest to the higher positions according to the HW configuration.
GSM boards have no connection to extension modules needed. Only the antenna cables
need to be connected according to the figure below.
5
Distribution Module
Connector for Interface
A,B Wires of CO and
Subscriber Lines
6
7
8
9
10
11 12
Distribution
Module
Connector for Interface
A,B Wires of CO and
Subscriber Lines
Fig. 18: Numbering of Positions for Interfaces and Assignment to Distribution Module
Connectors
2N - OMIKRON
33
2N - OMIKRON
Technical description and installation
•
13.3. Module Installation Instructions
1. Mount the CO and subscriber line distribution modules and connect them to the
motherboard and extension module.
2. Install the antenna connectors and combiners according to the HW configuration
3. Plug-in the line modules to the motherboard and extension module.
4. Connect the antenna cables from GSM modules to antenna connectors at the antenna
combiners.
5. Check all modules for proper placement.
Recommendation
• WARNING! Distribution modules contain overvoltage protectors that can work well if the
GW chassis (see later) is properly grounded and modules are correctly connected
conductively with the chassis. Therefore, tighten both the fitting bolts properly! In a nongrounded module, overvoltage spreads from one line to another causing considerable
losses.
13.4. Remote Supervision Modem Installation
Insert the module in connector J8 (the components to the left) on the motherboard.
There may be just one module of this type in the GW. Make sure before installation
that the modem has been inserted tight in all socket terminals of the carrier board
34
2N - OMIKRON
2N - OMIKRON
Technical description and installation
13.5. GSM Board 900/1800MHz Installation
13.5.1. GSM Board Mounting
Plug the board into position 5, 6, 7, and 8 on the extension module. It is possible to
install up to 4 GSM boards (each with 2 GSM modules) in the gateway.
13.5.2. SIM Card Installation
To log a GSM device into a mobile network, you need a GSM provider’s SIM card.
2N - OMIKRON works with any “small” SIM card with 3V logic levels of a 900/1800 GSM
provider. At present, all commonly available SIM cards can be used. You have to use one or
two SIM cards for the GSM module depending on the gateway type. The GSM gateway
works both with a SIM card that requires the PIN code and a SIM card with PIN code
entering disabled. The PIN entering mode must be pre-programmed in the SIM card before
installation. To do this, use any GSM telephone. If your SIM card requires the PIN, it is
protected against misappropriation and you have to program the respective PIN into the GW
using the configuration software (Universal config tool for OMIKRON and MOBILITY
Extension).
To install the SIM card, press the yellow holder button with a suitable object to make
the drawer slide out. Remove the drawer, insert the SIM card, and replace the drawer.
Remove and insert the SIM card with your GSM gateway off to avoid
module damage.
2N - OMIKRON
35
Technical description and installation
2N - OMIKRON
GSM2
GSM1
13.6. GSM Board GSM 900/1800/1900 MHz Installation
13.6.1. GSM Board Mounting
Insert the module in positions 9, 10, 11 and 12 on the extending board. You
can install up to four modules with 2 GSM lines each into the gateway.
To mount the module properly, insert the GSM module first and then fit the
GSM module front panel. Remove the SIM card drawers before mounting the front
panel.
36
2N - OMIKRON
2N - OMIKRON
Technical description and installation
13.6.2. SIM Card Installation
To install the SIM card, press the yellow holder button with a suitable object to make
the drawer slide out. Remove the drawer, insert the SIM card, and replace the drawer.
Remove and insert the SIM card with your GSM gateway off to avoid
module damage.
13.7. External Antenna Mounting
The external antenna is connected through an SMA connector to the
antenna combiner (2/1, 4/1). The antenna should be placed 2m away from the
gateway at least, at a place with a very good GSM signal. One antenna is
recommended for 1-2 GSM boards.
It is possible to connect the antenna combiners to a directional YAGI antenna
at places with a poor GSM signal.
2N - OMIKRON
37
2N - OMIKRON
Technical description and installation
14. Gateway Wall Mounting
Using a drilling pattern (1:1 scale) at the box bottom, mark four holes on the wall (for
location requirements see the GW Location chapter above). Drill the holes using a drill of the
diameter of 8 mm and press dowels into the holes. Screw the GW wall-mounting element to
the upper holes using two bolts. Hang the GW upon the wall-mounting element. There are
holes for further two bolts in the chassis bottom. By screwing them, secure the GW against
unhinging from the wall-mounting element. These two bolts also hold the distribution part of
the chassis in case you dismantle the remaining part. For the whole procedure see the drilling
pattern.
15. GW Grounding
As already mentioned, reliable grounding of the GW chassis is very important for
good work of overvoltage protectors in distribution modules. Of course, the GW is also
grounded through the power supply network (thanks to the protective conductor) if it is
connected to the socket. However, this is not enough - partly due to the risk that the GW
may be disconnected from the network easily (overvoltage from any line would then spread
to the GW chassis and then to all the other lines!), and partly due to the principle that
grounding should be as good as possible. Therefore, a yellow-green copper wire of the
cross section of 4 mm2 at least, leading from the grounding bar in the main switchboard, is
the ideal solution. In emergency, you can bring (in a non-disconnectable way) the "ground“
from the nearest mains socket using this wire (and verify that the socket is properly
connected). Insert the wire to the GW grounding clip hole (at the bottom, in the centre,
marked with a grounding symbol) and tighten it well. We recommend you to connect the
grounding system before connecting cables.!!!
38
2N - OMIKRON
2N - OMIKRON
16.
Technical description and installation
Connection to Mains
A detachable EURO cord is used for connecting the GW to any common socket. This cord can
be extended smartly, if necessary, with an extension EURO cord (used for the PC - CRT
monitor connection, e.g.). This extension goes in the installation bar of 4 x 4 cm, e.g. with
other cables.
Note: The GW is equipped with an extension module filter combined with (3rd degree)
overvoltage protection.
17. Assembly and Battery Connection
The power supply is designed for a lead-acid maintenance-free 24 V accumulator (usually
two serially connected 12 V accumulators) of the capacity of approx. 6.5 Ah (12
V accumulators of standard dimensions of 65 x 95 x 150 mm from different manufacturers
feature the capacity of 6 to 7.5 Ah - these differences are irrelevant). For safety reasons, the
accumulators are located outside the GW in a plastic case - outer battery cover, order no.
1802861.
motherboard
ringer
module
cooler
17.1. Battery Cover Location
You can put the cover on the wall or on the ground. Keep the maximum distance of 3
m from the GW. To mount the cover on the wall, use the dowels and bolts included in the
delivery. To install it on the ground, select a safe place and stick the attached feet to the
cover base. The working position is vertical in either case!
17.2. Interconnection
In any case, you have to use a special cable of the length of 3 m, which is packed
with the battery and cover. No cable extension is allowed. If you use another cable, the
2N - OMIKRON
39
2N - OMIKRON
Technical description and installation
manufacturer does not guarantee conformity with electromagnetic compatibility (EMC)
standards! To carry the cable along the surface, use the bushing in the pre-drilled hole in the
upper wall of the cover. To carry the cable under the plaster, drill a hole in the back wall of
the battery cover - the best place is in the right-hand upper corner (there is enough space).
Screw out the bushing in the upper wall and blank the hole with a self-adhesive label.
Connect the cable terminal to the back-up power supply connector on the GW side.
40
2N - OMIKRON
2N - OMIKRON
Technical description and installation
17.3. Accumulator Mounting
Insert the accumulators in the cover and connect them as shown in the figure below. Make
sure that the battery switch breaker is in position ‘0’. Warning! The short-circuit
current of a new,
fully
charged
accumulator
exceeds 500 A!
An
accidental
short-circuit may
destroy
the
Conductor with
accumulator and a
blue-marked end
hot
tool
or
conductor
may
burn your hands!
Conductor with
Insert a distance
red-marked end
red
washer
under
each accumulator
as shown in Fig.
23.
Fig. 23: Battery
Connection
Conductor with
blue-marked end
Conductor with
red-marked end
Distance washer
under the upper
accumulator
Distance washer
under the bottom
accumulator
17.4. Correct Power Supply Turning On / Off
First turn the battery switch breaker (in the battery cover) into position 1. (If the red
indicator next to the switch breaker is on, the fuse has blown. Check the polarity - the
positive pole has to lead to the right-hand power supply connector pin and the negative pole
to the left-hand pin. Use spare 5 A fuses of the GT type included in the delivery or
equivalents thereof with low inner resistance only.) Then turn on the mains switch breaker
on the GW. Three green LEDs will go on on the display. Now try to turn the battery switch
breaker off - the GW keeps working, the mains power supply LED goes off. To turn the
power supply off, press the SW1 button in the power supply (for buttons and LEDs refer to
the Technical Description - Basic Module - Back-Up Power Supply chapter). WARNING! If
the power supply "goes on“ after you turn off the mains switch breaker and press the SW1
button, the accumulators are fully charged and their voltage exceeds 27.4 V. In that case,
keep pressing the SW1 button while disconnecting the batteries.
2N - OMIKRON
41
2N - OMIKRON
Technical description and installation
17.5. Accumulator Check and Service Life
Hardly anybody knows that the service life of maintenance-free lead accumulators depends
greatly on the operation mode - that their capacity drops by several (up to 10!) per cent with
every so-called deep-discharge (i.e. when the accumulator is fully or partly discharged and
recharged). This event results from the production technology and happens to all
maintenance-free lead-acid accumulators from any manufacturer and of any price. This
means that your battery can work many years if treated properly, or only several months if
exposed to frequent power failures. To avoid a sudden failure of your accumulators, you
should check them four to two times a year by discharging them incompletely for a typical
power outage period (30 minutes, e.g.). Where power outages are frequent or a battery-only
operation is intended, other types of batteries - nickel-cadmium, steel-nickel, etc. - are more
suitable. Their price is many times higher but they outlast 500 and more cycles of total
discharge and charge. The disposal of batteries with exhausted service life should meet
applicable legal regulations.
18. Cabling
The connection of all cables to the gateway is the most time-consuming part of the
installation process. For CO and subscriber lines connection, distribution modules with RJ12 connectors are used and only the 2 wires in the middle are employed.
For a schematical wiring see the figure below.
19. Small Servicing Operations
19.1. Lithium Battery Replacement
Replace the battery whenever the voltage drops below 2.5 V. However, we recommend you
to replace it once in three years at least even if the voltage is OK We recommend you to
replace the battery with your GW off. Before doing so, you are advised to store your GW
software and call cost billing data into your PC. Having replaced the battery, check the date,
time and program of your GW and re-set the data if incorrect. You are advised to put down
the replacement date on the battery.
WARNING! Use only tools made of some insulating material for replacement!!!
CAUTION!
A wrong battery replacement involves a risk of explosion. The battery can only be
replaced with an equal or equivalent type as recommended by the manufacturer.
Dispose of the used batteries as specified by the manufacturer .
42
2N - OMIKRON
2N - OMIKRON
Technical description and installation
20. Gateway Expansion
You can upgrade your GW with further modules up to the maximum
configuration (8 GSM, 8 CO, 8 subscriber lines). But note that every upgrade is an
intervention into installations that, if unprofessional, may endanger the function of the
whole GW. In other words, you need the same knowledge for upgrading as for
complete installation.
Obey the following instructions while upgrading the GW:
1. Make a back-up copy of the GW program and cost billing data before starting.
2. Check the function of all lines before starting.
3. Respect the warranty conditions.
4. Use new or tested modules only.
5. Mount all modules and flat cables.
6. Check the lay-out for conformity with rules again.
7. Install the remaining cables.
8. Check the function of all lines - new and original ones - after the installation.
9. Re-configure the system.
10. Check all re-configured functions.
11. Make the back-up copy of the GW program again.
1.
Carry all changes into the documentation (module lay-out scheme, cabling,
plan of distribution systems in the building, etc.).
21. Damaged Overvoltage Protector - Distribution Module
Replacement
Although the overvoltage protection parameters (refer to Technical Data) used are
sufficient with reserve under normal conditions, overvoltage protectors may get
damaged in such extreme cases as:
1. short-circuit with 230 V for EURO and 115 V for other countries,
2. a protection pulse parameter excess as a result of a direct stroke of lightning into
the line;
3. exceptionally, a long-time exposure to a high number of overvoltage pulses
(varistor ageing).
Damage types 1 and 2 are usually visible at first sight. To detect the failure:
1. Replace the distribution module with a new one or disconnect the flat cable
connecting the distribution module and the GW motherboard immediately.
Examine all distribution modules carefully. Check the function of all interfaces too.
2. Never repair the module. Pass it to the manufacturer to identify the cause of
damage and deliver you a working module according to the warranty conditions
(damaged modules are not repaired on principle). By passing your damaged
module to the manufacturer you allow the manufacturer to gather experience and
thus improve the module quality.
2N - OMIKRON
43
2N - OMIKRON
Technical description and installation
3. If the damage occurs in a period other than thunderstorm, repeatedly or soon after
the GW installation, investigate the case very carefully and consider other
measures (removal of the cause, if found, installation of serially pre-connected
protectors, or an opinion of a company specialised in overvoltage protection).
Recommendation: Take the selected measures as quickly as possible, in the
period of frequent thunderstorms in particular! If you incur a damage repeatedly
without having taken any measures, the manufacturer may regard it as a breach of
warranty conditions or the insurance company may refuse to cover the loss.
22. Serially Pre-Connected Overvoltage Protector
Installation
If you have decided to install a serially pre-connected overvoltage protector, we
recommend you to:
• Consider carefully which lines to protect (aerial lines, CO lines, or all lines).
• Use a protector with significantly improved parameters such as:
− 2N®-SAFE 3+, order no. 803024, with resistance against short-circuit with 230
V mains distribution;
− 2N®-ANTIBLESK (ANTI-LIGHTNING) II module A+, order no. 8030011 - 2 x
20 kA bypass current.
• Locate the serially pre-connected protector on the line input in the building to
reach an additional effect - limit overvoltage induction into other distribution
systems in the building.
• In extreme conditions use a more easily replaceable protector (2N®-SAFE family).
In extreme conditions, use a low modularity protector (replacement of a damaged
protector of one line instead of a replacement of the whole module for, e.g., 8 lines,
which cuts costs).
44
2N - OMIKRON
2N - OMIKRON
Technical description and installation
23. 19“ Rack Mounting
To install your GSM gateway into a 19“ rack use the mounting set included in the
delivery (4 screws, a support, a nut). The necessary free space in the 19“ rack
depends on the Omikron GSM gateway size (w/h/d – 450/90/430 mm).
23.1. Back Panel
Connect the 230V/AC supply cable and YAGI directional antenna to the back
panel. There is a gateway cooling fan and a 1A fuse enclosure on the back panel
too.
Note: To remove the upper cover disconnect the supply cord!
23.2. Front Panel
Connect the CO and SL cables to RJ-12 connectors of the distribution modules on
the front panel using the two middle conductors (CO = Line, SL = Phone).
2N - OMIKRON
45
2N - OMIKRON
Technical description and installation
The GSM module SIM card drawers are located in the right-hand part of the
front panel. To remove a SIM card follow the instructions mentioned in Section
15.7.2 SIM Card Installation.
To enable the PC-GSM gateway serial communication use the RS232-COM
cable included and connect it to the COM connector on the front panel.
46
2N - OMIKRON
2N - OMIKRON
Technical description and installation
24. 2N - OMIKRON Technical Parameters
Tab. 4
Czech Republic & EURO other countries
230 V
115 V
± 10%
50 Hz
60 Hz
max. 110 VA
T1A
T2A
lead, maintenance-free, 24 V (2x12 V), 6-12 Ah
20-27.4 V (may not exceeded even if the battery is
charged externally)
Battery discharge current
max. 4 A
Minimum full-charged battery operation min. 1 hour (maximum configuration, maximum
time
operational load)
Typical full-charged battery operation 2 to 16 hours depending on configuration and
time
operational load
Full battery charging time
46 hours for 6 Ah capacity
Climatic Conditions
Temperature range
+5 … +45°C
Relative air moisture
max. 85% (40°C)
Environment classification – main characteristics normal
Operational position
vertical
GW dimensions (low)
442 x 353 x 104 mm
GW 19” dimensions
2U 90 x 450 x430 mm
Weight
max. 6.3 kg
Outer Battery Cover
Outer battery cover dimensions
245 x 196 x 97 mm (h x w x d)
Required battery dimensions
95 x 150 x 65 mm (h x w x d)
Fuse
GT 5A
Subscriber Lines
Analog input impedance
600 Ω ± 20%
Ringing voltage
45 Vrms AC / 50 Hz
Line supply voltage
24 V
Line current
approx. 25 mA
Subscriber Telephone Set Line Parameters
Single wire resistance
max. 800 Ω
A-B conductor capacitance
max. 0.5 µF
Leakage current between conductors
min. 20 kΩ
Mains nominal voltage
Supply voltage tolerance
Nominal frequency
Power input
Fuse
Recommended accumulator
External battery voltage
2N - OMIKRON
47
2N - OMIKRON
Technical description and installation
CO Lines
Analog input impedance
DC voltage at loop closure with current I = 30 mA
Maximum loop current
Pulse dialling: DC resistance during pulse (mark)
Pulse dialling: DC resistance during space
Leakage current at on-hook status
Ringing impedance
Ringing voltage detection
GSM Board
Standard
Voice transmission
Receiver sensitivity
Transmitter power output
SMS support
SIM card
Antenna connector
600 Ω ± 20%
4 V (typ.)
65 mA
min. 1 MΩ
max. 320 Ω
max. 100 µA
2 to 10 kΩ
10 to 25 V
GSM900/1800, phase II
EFR, FR (enhanced full rate, full rate)
-104 dBm
2 W during pulse
MO, MT (reception and transmission)
small, 3 V
SMA
DTMF Dialling Receive Parameters
Minimum level for evaluation of lower or higher -27 dB
frequency
Maximum level for evaluation of lower or higher -3 dB
frequency
DTMF Dialling Send Parameters
Frequencies
Send level of lower frequency group
Send level of higher frequency group
according to Q23 ± 1.8%
-10 dB to -6 dB
-8 dB to -4 dB
Pulse Dialling Send Parameters
Pulse duration
Pause duration
60 ms
40 ms
Pulse Dialling Receive Parameters
Pulse duration
Pause duration
30 ms to 70 ms
30 ms to 70 ms
FLASH send parameters
FLASH receive parameters
* Pre-set values can be changed.
48
100 ms*
90 ms ... 150 ms*
2N - OMIKRON
Technical description and installation
2N - OMIKRON
Modem detection parameters
Fax detection parameters
Dialling tone frequency
Dialling tone level
min. -24 dB at 1300 Hz
min. -24 dB at 1100 Hz
f = 425 ± 20 Hz
-5 dB
Nominal Transmission Attenuation
Internal connection
External connection
-1 ... +8 dB
-0.5 ... +1.5 dB
Basic RS232C Interface
Signals
Transmission rate
Insulation strength against ground
RXD, TXD, RTS, CTS
9600 bps - 57 600 bps
500 V
Universal Switches
Relay 1
Relay 2
GW Inputs
two binary inputs in TTL levels
Order No.
Distribution Module
Description
1832241
with RJ-12 connectors, 4
relays, 2-wire, 8 lines
2/1 antenna combiner
4/1 antenna combiner
GSM OMIKRON YAGI
antenna combiner
1832252
1832254
1832258
1 closing or opening contact
DC/AC max. 48 v / 1 A
1 closing or opening contact
DC/AC max. 48 v / 1 A
2N - OMIKRON
Max. Leakage Current, 1 Pulse
8/20 µs, Each Input Conductor
Line 1,3,5,7 Inputs
Line 2,4,6,8 Inputs
10 kA
1500 A
49
2N - OMIKRON
Technical description and installation
25. Universal config tool for OMIKRON and MOBILITY
Extension
The Universal config tool for OMIKRON and MOBILITY Extension basic menu
contains the following items:
25.1. Data
• New
• Open…
• Close
• Save
Save as…
•
50
Create a new GW configuration file.
Open an existing configuration file.
Close an open window with the configuration file.
Save the configuration.
Save the configuration under another name.
Type
Select the OMIKRON / MOBILITY Extension type for your
new configuration. The type is checked during configuration uploading into the
gateway and a warning gets displayed if no match is found.
2N - OMIKRON
2N - OMIKRON
•
•
•
•
•
Technical description and installation
•
Firm values
Set default values.
From Gateway
Download configuration from the GW.
To Gateway
Save the configuration to the GW.
Gateway reset
Reset the GW (like upon turn off/on).
Time synchronisation
Time setting according to the PC with which the
GW is connected.
Upload Gateway software
Upload firmware to the Flash memory.
Reset and Boot Gateway from Flash
Reset the GW with the support of
firmware in the Flash and copy into the RAM.
Freeze Gateway
The GW passes into the service mode. All current
calls are waiting for termination and no other calls can be initiated. Then, you can
turn the GW off and execute service functions. To put the GW into the
operational mode, send the "Unfreeze Gateway" command, or power up the GW
with the mains switch if it is powered off.
Unfreeze gateway
Return to the operational mode.
•
•
•
•
Print actual window
Printing sets
Print setup
Exit program
•
•
•
2N - OMIKRON
Print the active window.
Print the selected printing set.
Set up the printer connected.
Terminate the config tool activities.
51
2N - OMIKRON
Technical description and installation
25.2. Windows
•
•
•
•
•
•
Cascade
Tile
Arrange icons
files are open.
Panel
Accounting data
Gateway diagnostics
Group windows in a cascade.
Group windows without overlapping.
Arrange icons (minimised windows) if more configuration
Displays line statuses.
Displays data on calls.
Displays log-system messages (error messages, ...).
25.3. Settings
Select communication device and confirmations
52
2N - OMIKRON
Technical description and installation
2N - OMIKRON
25.3.1. Local Connection
Used for setting of GW connection to the program.
•
Active device
•
•
•
•
COM
-COM port assignment to the PC to which the GW is connected
COM baud rate -set the communication rate with the GW
TCP/IP -set the IP address of the PC where the XAPI Server is running
Host
-name of the PC where the XAPI Server is running (need not be
completed if the correct IP address has been entered)
UDP/IP -set the IP address of the converter module connected to the GW serial
port
Port
-connection port
•
•
-COM –direct connection using an RS232 serial port
-TCP/IP –connection to logged-in XAPI Server
-UDP -connection using an RS232 - TCP/IP converter
25.3.2. Modem
Used for setting communication with the PC modem for remote GW
connection.
2N - OMIKRON
53
2N - OMIKRON
•
•
•
•
•
•
•
Technical description and installation
Port
–assign the serial interface to which the PC modem is connected
COM baud rate
-set the modem communication rate
Initialisation string
-set the modem
Use prefix
-use the defined prefix for dialling
Prefix
-characters to be dialled before the subscriber number (e.g. 0 for the
PSTN, ^ for Speakerphone, ...)
Tone
-tone dialling
Pulse
-pulse dialling
25.3.3. Confirmation
Enable the confirmation dialogue for loading configuration to/from the GW.
54
2N - OMIKRON
2N - OMIKRON
Technical description and installation
25.3.4. Language Selection
Set the program environment into the required language.
25.4. Help
•
•
•
•
Contents
contents of the help
Search…
words in the help
Help on help
general instructions for use of the OS WIN help
About application
information on the Program version
2N - OMIKRON
55
Technical description and installation
2N - OMIKRON
26. 2N - OMIKRON GW Programming Charts
The following sections describe programming parameters of the 2N - OMIKRON
gateway. The sequence of chapters corresponds precisely to the sequence of
menus in the Universal config tool for OMIKRON and MOBILITY Extension Topic
Index.
You have to know the password to access the GW programming mode. The
Universal config tool for OMIKRON and MOBILITY Extension enables two types of
users to change the GW configuration.
User Password of the Supervisor Type
A user with the Supervisor authorisation has access to all GW parameters and may
even change the User password.
User Password of the User Type
A user with the User authorisation may change some GW parameters only and
the User password.
This user may access all parameters for reading only.
List of parameters that may be changed by the User:
-
Subscriber lines
-assignment of SL to departments
-FLASH and dialling type for SL
-
CO lines
-
Digital CO lines
-
Incoming
-
Automatic cost-saving machine -bank holidays
-name and dialling type
-reloading of free minutes
-name
-CLIP option
-PIN
-AT commands
-prefix
-reloading of free minutes
-assign the Ringing Chart
Both the user passwords are 1111 by default.
Remember the password well because you cannot program the GW without
knowing it !
56
2N - OMIKRON
2N - OMIKRON
Technical description and installation
26.1. Global Data
Used for programming of GW global parameters.
26.1.1. Information
2N - OMIKRON
57
2N - OMIKRON
Technical description and installation
This item informs you of the GW configuration to be programmed.
You can find here:
-SW version and revision numbers
-serial number of the GW you are connected to
-GW CPU board number
-SW expiry date
-serial number of the most recent license
-time to the end of remote control access to the GW
-exact name of the GW firmware stored in the RAM and FLASH
(this name is identical with the name of the file used for firmware
upgrade)
-installation name and site (if completed)
-configuration (ports of modules used)
-list of enabled and disabled networks
-last data record for each user type
-information on remote access made
26.1.2. Hardware
Information on the physical configuration of the GW, including types of modules
mounted on all GW positions. You can add and remove modules here to change the
GW configuration. The easiest way, however, is to download the actual configuration
directly from the GW.
58
2N - OMIKRON
2N - OMIKRON
Technical description and installation
Click on the square with the /+/ symbol to open the required item and on the
square with /-/ to close it. To add or remove a module press the right-hand mouse
button on the proper place.
26.1.3. Gateway Diagnostics
2N - OMIKRON
59
2N - OMIKRON
Technical description and installation
Complete the GW installation site in the Installation section (for data see the
Information window).
In the Modem section:
Initialisation string
-set the remote control modem module here. The default
setting is made by the manufacturer and need not be changed.
26.1.4. Passwords
26.1.4.1. Supervisor Password
A table for changing the supervisor password.
A user with the Supervisor authorisation has access to all GW parameters and
may even change the User password.
26.1.4.2. User Password
A user with the User authorisation may change some GW parameters and the
User password only.
60
2N - OMIKRON
2N - OMIKRON
Technical description and installation
This user may access all parameters for reading only.
2N - OMIKRON
61
2N - OMIKRON
Technical description and installation
26.1.5. CO Lines
Global parameters of CO lines:
•
•
•
•
•
•
62
Minimum ringing time. Defines how long continuous ringing from a CO line
should be detected for the CO line to be declared as ringing.
Minimum quiet for ring end. It is a CO line ringing pause after which the CO
line ringing is considered terminated.
Pulse length for dial CO. Enters a pause between digits to be dialled. Used for
digits added in abbreviated dialling and for route detection.
FLASH length to CO. Sets the length of the FLASH signal generated by the
PBX into a CO interface.
Dial pulse to CO. Sets the length of the dialling pulse into a CO interface.
Dial gap to CO. Sets the length of the pulse dialling gap into a CO interface.
2N - OMIKRON
2N - OMIKRON
•
•
•
•
•
•
•
•
•
•
•
•
•
•
Technical description and installation
Inter-digit gap for pulse dialling. Sets the inter-digit gap for pulse dialling into a
CO interface.
DTMF dial length. Sets the length of the DTMF dialling into a CO interface. This
value also defines the DTMF dialling pause.
Waiting for CPT CO. Defines the maximum timeout during which the PBX
attempts to detect the CO dialtone indicating the CO interface function.
DTMF dial to CO translation. A gap in the dialling of a subscriber tone line into
a CO tone line after which the CO line dialling is cross-talked only.
CO test repetition. Repetition of a defective CO line testing.
CO Out relax. Minimum CO line hang-up timeout after an outgoing call.
CO In relax. Minimum CO line hang-up timeout after an incoming call.
End of waiting for DISA/FAX/modem. Timeout during which an incoming CO
call is waiting after CNG detection (fax message) or dial-in for subscriber's
release or answer for CO line hang-up, or continuation on another line of the
Ringing Chart.
First dial to CO time. Maximum timeout for dialling delay into a CO line. If no
dialling occurs during this timeout, the CO line is hung up.
Dial to CO time. Maximum timeout for delay in further dialling into a CO line. The
time control is recovered upon every digit received from the internal subscriber.
The dialling mode is changed into the calling mode after this timeout. If enabled
so, the timeout (dialling) end is announced by a short beep. Any further dialling
after this timeout is considered a service into the call.
Dial to GSM time. Maximum timeout for delay in further dialling into a GSM line.
The time control is recovered upon every digit received from the internal
subscriber. The dialling mode is activated after this timeout. If enabled so, the
timeout (dialling) end is announced by a short beep. Any further dialling after this
timeout is considered a service into the call.
Max. call time - interfaces with disconnection signalling. Maximum time call
for two CO lines equipped with disconnection signalling.
Max. call time - interfaces without disconnection signalling. Maximum time
call for two CO lines without disconnection signalling.
2N - OMIKRON
63
2N - OMIKRON
Technical description and installation
26.1.6. Subscriber Lines
Global parameters of subscriber lines:
•
•
•
•
•
First dial time. Defines the maximum timeout during which the first digit is
awaited from a subscriber line upon seizure. The line gets the busy tone after this
timeout.
Dial time. Defines the maximum timeout during which further digits from a
subscriber line are awaited. The line gets the busy tone and the preceding
dialling is cancelled after this timeout.
Crossing time to failure loop. Defines the time during which the busy tone is
transmitted after an unsuccessful dialling. Then the line passes into the failure
loop.
Bad dial key protection. Defines time during which digits dialled after the whole
subscriber number dialling are ignored. Used, for example, for elimination of
unintentional back ringing after unsuccessful dialling.
Increasing of DTMF resistance to call. Minimum length of the DTMF character
to be accepted.
26.1.7. Accounting
A form including types of calls recorded in the call memory.
64
2N - OMIKRON
2N - OMIKRON
Technical description and installation
By selecting the Write incoming numbers item you enable recording of
incoming numbers into the accounting line for interfaces that allow so.
With Write whole numbers of private calls you enable to record whole
numbers of private calls.
26.1.8. Tones
In this window you can change tone and ringing types for each status. This function
is intended for special applications above all.
Tone and ringing types:
Dialtone
• PSTN dialtone
Busy tone
• Busy
• Congestion
2N - OMIKRON
simulated tone for ARS, reverse modem, internal GSM,
ISDN in some cases
the called subscriber is busy, service cannot be executed
network congestion (from a CO line – defective line,
impassable network, wrong number, no credit; calling to a
65
Technical description and installation
2N - OMIKRON
•
Unauthorised
subscriber line – defective telephone, full queue, do not
disturb, cannot be forwarded, reject )
unauthorised dialling (barred service or line, lock, dialling
timeout, cannot be executed)
Ringing from a
• subscriber line
• CO line
Waiting tone
• SL
• CO
Ticking
• CO-CO end
calling from a subscriber line
calling from a CO line
a ticking tone follows the call end of two CO lines before
disconnection
A negative influence, if any, on the PBX traffic as a result of unprofessional tone
change, is signalled by a warning message on your screen before access.
26.2. Subscriber Lines
Used for setting of all subscriber line parameters.
66
2N - OMIKRON
Technical description and installation
2N - OMIKRON
26.2.1. Signalling
Here you can set the Remote access signalling and Hang up for subscriber
lines.
Select one of the available types:
-None/None
-no signalling
-None/Interrupt loop current
-hang-up signalling is made by interrupting the loop
current for a predefined period of time.
-Polarity reversal signalling is made by polarity reversal both for remote
connection and hang up.
2N - OMIKRON
67
2N - OMIKRON
Technical description and installation
26.2.2. Global Data
Refer to Global Data / Subscriber Lines.
26.2.3. Departments
These charts are used for the Ring to department service. Eight departments
are available altogether.
26.2.4. FLASH and Dialling Type Setting
The chart helps set the minimum and maximum FLASH lengths for analog
subscriber lines. FLASH detection is made in the so-called "interval window"
manner. A signal may be considered FLASH if the current is interrupted by a user
loop satisfying the time range between the minimum and maximum FLASH
68
2N - OMIKRON
2N - OMIKRON
Technical description and installation
values. You can complete the identical value in the remaining fields in the FLASH
setup column using the right-hand mouse button.
If the Pulse dialling item is not selected, tone dialling is received exclusively.
26.2.5. Services Setup
Here you can enable subscriber lines to receive the CALLER ID from GSM
lines. The CALLER ID is DTMF-transmitted between the first and second subscriber
line rings.
2N - OMIKRON
69
2N - OMIKRON
Technical description and installation
CALLER ID function:
enables to receive the CALLER ID
CLIP w/o clinking function:
enables to suppress the first ring when the
CALLER ID is not yet known. The CLIP function must be enabled at the same time.
To make the CALLER ID function work properly, complete the Wait command with
the parameter 1(s) into the first line of the ringing chart.
26.3. CO Lines
Used for setting of all CO line parameters.
26.3.1. Line Types
Set the properties of analog CO lines in this chart.
70
2N - OMIKRON
2N - OMIKRON
Technical description and installation
Analog CO line
• Name - up to 14 characters for an analog CO line name
• Don't account – a line that shall not be billed
• CPT test - checks the CO line dialtone
• Current test - tests the line current upon seizure (for selected CO lines only)
• Prefix - up to 4 digits to be dialled first automatically after the outgoing line
seizure (dial-in through a superior system). It is not written in the accounting line.
• Dial - sets the CO line dialling type.
•
•
•
•
•
Dialtone length - defines how long the CO dialtone has to be detected to
indicate that the line is functional. If a "0" is selected, the tone is never checked
and the line never reports an error.
Time to dial start - defines the minimum timeout after which dialling starts upon
CO dialtone detection.
Starting free minutes - free minutes divided into three parts according to the
type. They are added to the remaining free minutes if defined so.
Remaining free minutes – free minutes to be currently used.
Reload of remaining free minutes - select the way how to reload the remaining
minutes:
2N - OMIKRON
71
2N - OMIKRON
Technical description and installation
-Manual (to be reloaded in the program environment);
-Every certain day in a month (here enter the day in the month on which the
remaining free minutes are to be set according to the starting ones. By enabling the
Transfer of remaining minutes to the next period you add the remaining minutes from
the preceding period to the starting free minutes).
-Every certain day in a week.(here enter the day of the week on which the
remaining minutes are to be set according to the starting ones).
-Every working day (the remaining minutes shall be set according to the
starting ones on every working day (Monday-Friday)).
72
2N - OMIKRON
2N - OMIKRON
Technical description and installation
-Every day ((the remaining minutes shall be set according to the starting ones
on every day (Monday-Sunday)).
-Use free minutes from line (enable the use of free minutes from another line
where free minutes are set. Select a line from the List of external lines).
26.3.2. Types of Digital Lines
Set the GSM lines here.
2N - OMIKRON
73
2N - OMIKRON
•
•
•
•
•
•
•
•
•
•
•
•
74
Technical description and installation
Name - up to 14 characters
Don't account - a line that shall not be billed
Roaming enabled – enables roaming on the GSM line
Receive SMS – enables SMS receiving
Send SMS – enables SMS sending
CLIR selection – selects CLIR
–according to the GSM provider
-restricts identification
-presents identification
PIN - a four-digit code for SIM card access
Prefix - an up to 4-digit prefix to be dialled first automatically after the outgoing
line seizure (dial-in through a superior system). It is not written in the accounting
line.
Starting free minutes - free minutes divided into three parts according to the
type. They are added to the remaining free minutes if defined so.
Remaining free minutes – free minutes to be currently used.
Reload of remaining free minutes - select how to reload the remaining minutes:
for settings see the Analog CO lines.
AT – option to change the GSM module configuration. We do not recommend
you to do this! A wrong intervention may result in module inoperation!
2N - OMIKRON
2N - OMIKRON
•
Technical description and installation
SMS centre – enter the SMS centre. The GSM module reads data from the
available SIM card and so this item need not be selected.
Note:
It is necessary to reset the GSM module whose parameters have been
changed. If resetting is required, you are invited automatically to do so after the
configuration has been loaded into the gateway:
26.3.3. Trunks
The chart is used for assigning CO lines into trunks. The maximum count of CO
lines per trunk and the maximum count of trunks are 16. Every CO line may be in one or
more trunks at the same time.
26.3.4. Global Data
Refer to Global Data / CO Lines.
2N - OMIKRON
75
2N - OMIKRON
Technical description and installation
26.4. Incoming Calls
Define how the GSM gateway should process incoming calls.
26.4.1. Ringing
You can complete identical or different ringing charts for every CO line. The charts
are general and can be used for any CO line.
Select a chart from the list or click on New to create a new chart.
26.4.2. Ringing Charts
One of the following actions can be defined for each line:
76
2N - OMIKRON
Technical description and installation
2N - OMIKRON
Action
Parameter
Description
Ring to SL
SL port number
Ring to SL
without queue
SL port number
Rings to the specified SL
Rings to the specified SL. If the line is busy, no
queue is made. In case one line rings only, the
ringing continues.
Rings to the specified SL. If the line is busy, no
queue is made and the command on the second
line below is executed.
Rings to the specified SL and jumps two lines
down. If the line is busy, no queue is made and the
ringing chart is further obeyed.
Ring to SL
without queue
or jump
Ring to SL
without queue
or jump
Do not ring to
SL
Ring to dept.
linear
Ring to dept.
cyclic
Ring to whole
dept.
Ring to dept.
linear without
queue or jump
Ring to dept.
cyclic without
queue or jump
Ring to whole
dept. without
queue or jump
Do not ring
Wait
Chart
Activate
remote control
Hang up
CALLMOBILE
or WAIT
CLIP DISA
CHECK PASS
CALLBACK
TO PBX
2N - OMIKRON
SL port number
SL port number
SL port number
Terminates ringing to the specified SL.
Departments 1 to 8
Rings to the first free line in the dept.
Departments 1 to 8
Rings to another free line in the dept. cyclically.
Departments 1 to 8
Rings to the whole dept.
Rings to the first free line in the dept. If the
subscriber lines are busy, no queue is made and
Departments 1 to 8
the command on the second line below is
executed.
Rings to another free line in the dept. If the
subscriber lines are busy, no queue is made and
Departments 1 to 8
the command on the second line below is
executed.
Rings to the whole dept. If the subscriber lines are
Departments 1 to 8
busy, no queue is made and the command on the
second line below is executed.
None
Terminates all ringing.
Time range 1 to 999
Wait for the defined number of seconds, 0 = waits
without limitation or until incoming CO line ringing end.
[s]
Ringing chart number
Ringing charts can be chained.
Rings to the remote control modem in the GW. If
None
the module is not installed. the ringing chart is
further obeyed.
Hangs up the CO line and terminates all actions. It
None
is on the last line and cannot be deleted.
MOBILITY Extension function command
Time range 1 to 999
Waits for a predefined timeout (seconds), 0 = no
timeout, and then dials the defined GSM number in the
[s]
ME -out chart.
MOBILITY Extension function command
Checks the ME –in chart for the GSM number,
None
waits for a password if specified so in the ME –in
chart.
MOBILITY Extension function command
An overflow calling back to the PBX via the ISDN
Trunk 1-16
is made as defined in the ME –out chart.
77
2N - OMIKRON
Technical description and installation
Let us give you some examples for illustration.
Example 1: CO line 1 port should
ring during an incoming call until
the CO line ringing stops.
Action
Ring to SL
Wait
Hang up
Parameter
IL1
0
Tab. 1
Example 2: SL 1 port should start
ringing during an incoming call, SL
2 port should start ringing 10 [s]
later, this ringing should be
terminated and SL 3 port should
start ringing in another 10 [s] until
the CO line ringing stops.
Action
Ring to SL
Wait
Ring to SL
Wait
Do not ring
Ring to SL
Wait
Hang up
Parameter
IL1
10
IL2
10
IL3
0
Tab. 2
Example 3: Ring to dept. 1
cyclically during an incoming call
until the CO line ringing stops.
Action
Ring to dept., cyclic
Wait
Hang up
Parameter
Dept. 1
0
Tab. 3
78
2N - OMIKRON
2N - OMIKRON
Technical description and installation
26.5. Automatic Cost-Saving Machine (LCR)
Used for programming of automatic selection of the cheapest route. The GW selects
and establishes the optimum connection upon an analysis of numbers dialled.
26.5.1. Number Standardisation
Here set the conversion of numbers (if required). Enter the number to be
converted into the /Conversion from/ column and the target number into the
/Conversion to/ column.
Example:
There is a requirement that the local international code should not be
accepted (because it cannot be dialled into networks other than mobile ones) and
the /+/ character in other international codes should be replaced with two zeroes.
Enter /+44/ (England) into the /Conversion from/ and leave the /Conversion to/
column blank. Now enter /+/ into the /Conversion from/ column and /00/ into the
/Conversion to/ column.
26.5.2. Destination
This chart compares the CO number dialled with the number included therein. This
comparison excludes non-matching items and selects the route for connection of
outgoing call.
2N - OMIKRON
79
2N - OMIKRON
N.
Destination
Numbers
Number length
Technical description and installation
-Destination index number
-Destination name (call direction)
-numbers for comparison
-count of digits (1-20) expected for an outgoing call
-prefix of the number that is in numbers column
-Timeout after the last digit was received when a dialling is
ignored. Its value is set in the Global data – Extension lines – Dial to
CO time.
Routes
-selection of the route
Route settings can be done by a click on the (+) button, or a double click on
an empty route line. For modification, double click on the selected route line with the
right mouse button. To delete a route, select the route and click on the (-) button.
80
2N - OMIKRON
2N - OMIKRON
Technical description and installation
Route parameters are:
Track
-name of the track dedicated for call routing
Timetable
-name of a time range when the routing is active
Condition
-name of a condition for line selection in a track
Tariff
-name of method used for free minutes counting
Upon the first power up, an empty destination (Unassigned) is created as the starting
Destination, which accepts all numbers dialled and transfers them to a Route, which
consists of
-Track – default with the trunk 1 (all CO lines are read upon the
first GW power up)
-Timetable – default settings for all days including holidays
(i.e. 24/7)
-Condition – first free --> always the first free line from trunk 1 is
used.
-Tariff – default where the first 60s are counted down after the
line goes into the Call state and the next credit is counted down after each 1s.
track 1 where.???
To create another Destination, click on the right-hand mouse button in the
Destination environment.
Now you can:
-Add destination – adds a new destination at the end but
always before the starting destination;
-Insert destination – insert a new destination before the
destination from which the command has been entered;
-Remove destination – cancels the destination from
which you entered this command.
Note: The default destination cannot be removed.
Example:
There is a request to create an Eurotel destination for telephone
numbers starting with 601, 602, 606, 607, 72. As a rule, 9 digits are awaited for
2N - OMIKRON
81
2N - OMIKRON
Technical description and installation
dialling start and track following route should be used. Track – Eurotel, Timetabledefault, Condition- free minutes only and Tariff-default
-Press the right-hand mouse button in the destination environment and select
one of new destination creating options (Add, Insert destination).
-Enter the destination name and press /OK/ for confirmation.
-Enter:
- the characters 601, 602, 606, 607, 72 into the Numbers section
- 9 into the Number length section
-Routes section-enter the Track, Timetable, Condition and Tariff.
To insert a route, use button /+/ in the left bottom corner in the Routes section.
To delete the route, use /-/ button.
Choose the entered values from the list and confirm it by clicking OK.
82
2N - OMIKRON
2N - OMIKRON
Technical description and installation
Note: values in each section are shown only if previously created
-here the Destination creation is finished
Note: In section Routes you may use even more routes at the same time. Which
route will be accepted is determined by the internal route settings.
To enter the track use the /+/ button in the bottom left-hand corner of the
Track selection section. To remove a track use the /-/ key.
-Press /OK/ to confirm the track.
-Now the creation of the new destination is complete.
Note: You may use more tracks at the same time in the Track selection. To know
how the tracks shall be accepted refer to additional settings in the next chapter.
26.5.3. Tracks
Here assign CO line trunks to tracks for connection establishing purposes.
Track:
-track number
Name:
-track name
PSTN trunk: -a CO line trunk used for outgoing calls in the track
Remove:
-number of digits to be removed from the number to be dialled. The digits
are removed starting from the first digit to be dialled.
Add:
-digits to precede the number to be dialled. Define the digits to be added in
the Automatic Cost-Saving Machine/Providers section.
Note: if no name is filled, then such a track is not shown in the list
2N - OMIKRON
83
2N - OMIKRON
Technical description and installation
26.5.4. Tariffs
Here you can set the call tariffication method.
Tariff:
-index number of tariff
Name:
-name of a tariff
Free minutes counter:- counter of free minutes (settings can be done in the MenuExternal Lines/Line Types)
Free sec:
-minimum number of seconds counted down from a call
Reduction after:- a time period after which the next countdown is done
Note: If no name is filled, then such a tariff is not shown in the list.
26.5.5. Time Tables
Here you can specify time zones for usage of routes.
Number:
Name:
Mo-Ho:
From-To:
84
-time table index number
-time table name
-days in a week and defined holidays
-hour and minute for start and end of time table validity
2N - OMIKRON
2N - OMIKRON
Technical description and installation
Note: If no name is filled, then such a time table is not shown in the list of time tables.
26.5.6. Condition
Define the method of usage of lines in a trunk:
-first free
-the first free CO line in this trunk is used
-cyclic
-all CO lines in this trunk are used cyclically
-disabled
-no outgoing call is made via this trunk
-from free minutes only, 1-3
- CO lines with free minutes shall
be used gradually in the given trunk
-without free minutes only
- CO lines without free minutes
shall be used gradually in the trunk
26.5.7. Providers
Define the digits to precede the numbers to be dialled.
Click on the right-hand mouse button to create a line for the required number.
You can insert another character behind the number:
T
-transit to tone dialling
, (comma)
-insert a pause (corresponds to the global CO line parameter
Dial to CO pause length)
W
-wait for login as defined in the Wait item. If the login is not executed
within this timeout, the dialling is continued.
2N - OMIKRON
85
2N - OMIKRON
Technical description and installation
26.5.8. Bank Holidays
Specify days on which you want the GW to behave like on bank holidays (in the
Automatic Cost-Saving Machine/Tracks/SV section).
86
2N - OMIKRON
2N - OMIKRON
Technical description and installation
26.6. REMOTE SUPERVISION
26.6.1. This is what remote supervision makes possible:
• an instantaneous response to client needs;
®
• 2N - OMIKRON programming where such parameters are maintained as for a
serial link;
• firmware change;
• time RESET setting;
• GW port status monitoring;
• speech bus traffic monitoring;
• downloading of call accounting DATA;
• downloading of log-system DATA.
26.6.2. What you need
To establish remote connection via a modem you need:
an 2N® - OMIKRON;
an OMOD modem module in position J8 on the motherboard;
a PC with installed Universal config tool for OMIKRON and MOBILITY Extension
Version ;
• a modem (not a winmodem) connected to your PC;
• a file (YYMM-3XXXX.PBX (YearYearMonthMonth-3SerialNumber)) for access to
the 2N® - OMIKRON unit to be supervised.
•
•
•
26.6.3. Modem Module (OMOD) Setting
To configure the internal modem module (OMOD) use the Universal config tool
for OMIKRON and MOBILITY Extension. Use the AT command (unless necessary,
we do not recommend to change the default setting) and RESET the GW after every
change. The modem change shall be apparent 10 s after the RESET.
Silent operation is set for the modem by default (M0L0E1V1&W0).
2N - OMIKRON
87
2N - OMIKRON
Technical description and installation
26.6.4. Description of config tool Menu a Bar Buttons
MENU – WINDOWS
Panel - when the connection with the GW to be supervised has been established,
statuses of all lines and traffic on speech buses get displayed.
Accounting data - when all accounting and diagnostic lines have been loaded from
a file (YYMM-3XXXX.ACC), the window displays the available accounting
data (calls).
PBX diagnostics - when all accounting and diagnostic lines have been loaded from
a file (YYMM-3XXXX.DIA), the window displays the available diagnostic data
(log-system lines).
Connect with Gateway - displays a window showing a directory tree for you
to select a file for establishing connection with the GW to be supervised.
88
2N - OMIKRON
2N - OMIKRON
Technical description and installation
Interrupt modem connection - interrupts modem connection with the GW to
be supervised, maintaining necessary connections to the GW in the Universal config
tool for OMIKRON and MOBILITY Extension.
Recover modem connection - re-establishes connection with the GW when
the modem connection-interrupting button has been pressed.
Cancel modem connection with Gateway - cancels modem connection with
the GW to be supervised and all connections with the GW in the Universal config
tool for OMIKRON and MOBILITY Extension.
Communication setting - displays a window for communication and modem
settings.
Load accounting and diagnostic lines - downloads DATA for call billing and
log-system lines.
Download data from Gateway - downloads the configuration from the GW to
be supervised.
Save data to Gateway - saves the configuration to the GW to be supervised.
Upload license to Gateway – uploads the given licence to the gateway.
2N - OMIKRON
89
2N - OMIKRON
Technical description and installation
26.6.5. Establishing Connection
Setup of gateway to be supervised
This can be used in case that:
-there is a CO line reserved for remote control;
Example of ringing chart settings
Connect remote control
Ring to SL
Wait
Hang up
…
ILxy
0
…
Note: If no modem modules have been detected in the GW, the first ringing chart line
is ignored.
Creating and writing of a gateway remote access code
To enable remote control of Omikron, it is necessary to create an access code
and write it into the gateway.
1.
2.
90
Press the "Connect with gateway“
Press the "Create“ button.
button on the tray.
2N - OMIKRON
2N - OMIKRON
Technical description and installation
3.
4.
you must fill in the gateway number.
you must fill in a phone number, which will be used for the remote modem
connection.
5.
you may enter information about customer and dealer.
6.
click /OK/ for confirmation.
7.
choose the correct code from the offered codes and write it into the gateway
by pressing „Write Code“. While writing the code, it is necessary to be connected
to the gateway over serial interface.
8.
While writing a new code, you will be notified if a code already exists. By
pressing Ignore button, code will be overwritten.
2N - OMIKRON
91
2N - OMIKRON
Technical description and installation
Note:
Always create access codes matching an existing valid serial
number of gateway.
How to proceed
9.
Run the Universal config tool for OMIKRON and MOBILITY Extension.
button on the COMMUNICATION SETTING bar (symbol of
10.
Press the
tools) and check and set modem parameters as follows:
−
select the COM port connected to the modem;
−
set the communication rate (according to the modem type);
−
select the use of PREFIX (superior PBX, modem connection
tone transmission setting - the 'roof' (^) symbol (according to the modem
type);
−
select the CO dialling type;
−
confirm the settings by pressing OK.
11.
12.
92
Press the
button on the CONNECT WITH GATEWAY bar;
Select (with the mouse) the GW (YYMM-3XXXX.PBX file) to be supervised.
2N - OMIKRON
2N - OMIKRON
13.
Technical description and installation
Press the CONNECT MODEM AUTO button.
14.
Enter the technician responsible for your remote supervision, confirm the login
password (or create a new technician by pressing the NEW button) and press OK
to quit the dialogue window.
2N - OMIKRON
93
2N - OMIKRON
Technical description and installation
15.
Select the telephone number for your remote supervision and press the DIAL
button (if there is just one telephone number, this dialogue window is not
displayed).
16.
Now the connection is being established.
17.
If everything is OK, the following information windows get displayed:
− establishing connection;
− connection established;
− remote supervision password verified.
18.
The following data are available on the bottom bar (from left to right):
− connection type (MOD);
− time running on the GW under supervision (activity is indicated by a pulsating
target);
− serial number of the GW under supervision (YYMM/3XXXX connected).
19.
Now proceed as if you were connected via a serial link.
94
2N - OMIKRON
2N - OMIKRON
Technical description and installation
26.6.6. Loading Data
When the GW connection has been established successfully, you can
download DATA (accounting + system messages). To do this, press the
button
on the DOWNLOAD ACCOUTING AND DIAGNOSTIC DATA bar of the Universal
config tool for OMIKRON and MOBILITY Extension.
Both types of DATA are loaded together and the downloading procedure is
displayed graphically.
To display individual DATA press the WINDOW – ACCOUNTING DATA or
GW DIAGNOSTICS menu.
Once downloaded, the data are displayed from files (YYMM-3XXXX.ACC, or
YYMM-3XXXX.DIA). These files are created upon the first download from the GW in
the directory with the remote supervision file (RRMM-3XXXX.PBX) and extended by
further downloads.
26.6.7. Panel
When the GW connection has been established, you can press the WINDOW
– PANEL menu to display the port status panel of the GW under supervision
including speech bus traffic data. When the connection is active, bus 11 and call
status are always displayed for the line used for remote control.
26.6.8. Remote Supervision Logistics
A record is made on accomplished remote control operations in the YYMM3XXXX.LOG file, including date, name of responsible technician, way of connection
establishing, and whether or not the data download or configuration record was
made.
This file is saved together with the YYMM-3XXXX.PBX file.
26.6.9. Interrupting Connection
To interrupt modem connection (in order to cut connection costs) press
the
button on the INTERRUPT MODEM CONNECTION bar.
This action interrupts your connection but remembers the telephone
number used. This means that all you need to re-log in is to press the
button on the RECOVER MODEM CONNECTION bar, which results in
automatic dialling and connection establishing.
26.6.10.
Cancelling Connection
To cancel connection once established press the
button on the CANCEL
MODEM CONNECTION WITH GATEWAY bar. This cancels modem connection and
any relation to the respective GW in the programming tool.
2N - OMIKRON
95
Technical description and installation
2N - OMIKRON
26.7. Accounting and Diagnostic DATA Downloading
It is recommended to download accounting (billing) and diagnostic DATA in
order to keep control of calls and the system. Downloading can be made using:
- the Universal config tool for OMIKRON and MOBILITY Extension, or
- the XAPI Server.
The billing line starts with a ‘$’ and contains the following items, separated
with the ‘-’ character:
$051099-163032-AUT -G1-P01 -
-00011-00000-603444555-
•
•
• Call end date in the ddmmrr format, i.e. 6 characters;
• Call end time in the hhmmss format, i.e. 6 characters;
• Call type – 4 characters with the following meanings:
IN
… incoming answered call
INN
… incoming unanswered call
•
AUT
… automatic outgoing call
•
External line sequence - 2 chars
• 01-08
- 8 analog CO lines
• G1-G8
- 8 GSM lines
•
Subscriber line sequence - 4 chars
• P01 -P08
- 8 analog subscriber lines
•
•
Call duration in seconds, 5 chars (maximum 65535s)
Count of received tariff pulses, 5 chars (maximum 65535).
§ Replaced by the ringing time for incoming calls.
Dialled number or calling line identification, 16 chars.
•
The Service line starts with an ‘*’ (asterisk) followed by a system text
message.
The IMEI identification is displayed behind the GSM module firmware version
during the GSM module identification process.
96
2N - OMIKRON
2N - OMIKRON
Technical description and installation
26.7.1. Using Universal config tool for OMIKRON and MOBILITY Extension
Press the
button. All accounting and diagnostic data are read out from the
gateway and saved into two files in the Universal config tool for OMIKRON and
MOBILITY Extension main directory. The Data.acc file contains accounting data and
the Data.dia file includes diagnostic data.
This method is used for DATA that are saved in the background of the main
accounting data warehouse and so the DATa LED on the 19“version display does
not go off.
26.7.2. Using XAPI Server
When communication with the XAPI server has been established, the main
accounting data warehouse of the capacity of approximately 3,000 lines is read out
automatically. The data are saved into the OmikEG1-4.new file, which is created
automatically in the DBF. subdirectory in the XAPI server item. Here accounting
DATA are stored together with diagnostic data.
26.8. Upgrade of firmware to the 2N® - OMIKRON
Here is described proper procedure for upgrade of the firmware:
1. Read and save the initial settings of the central unit by the Universal config tool
for OMIKRON and MOBILITY Extension.
2. Read all accounting data (if they are further processed).
3. Terminate all open connections.
4. Start new Universal config tool for OMIKRON and MOBILITY Extension and
import the firmware in menu Data – Upload Gateway software and reset a boot
from flash (you will be automatically prompted by Universal config tool for
OMIKRON and MOBILITY Extension).
5. Press (3 – 4 sec) both reset buttons (SW1, SW2) on the central motherboard and
reset to the manufacturing values. No longer! (The central would have pass to
the service mode - then it is necessary to repeat the procedure).
6. Copy the initial data (name.cfg) to the folder of the new Universal config tool for
OMIKRON and MOBILITY Extension and read them by the Open command.
7. Check the setting of all parameters of the central.
8. Back-up the configuration to the hard disc.
9. Export data to the central unit.
2N - OMIKRON
97
2N - OMIKRON
Technical description and installation
26.9. License
Purpose of the license :
-SW function limitation (function validity term)
-identification of the Omikron / Mobility Extension type
26.9.1. License Storing
The license is a file in the "name.lic“ format.
To store the license:
1) press the
button on the bar;
2) select the licence file from the directory;
3) confirm your selection;
4) you are informed of the licence validity term upon storing;
5) RESET the gateway;
98
2N - OMIKRON
2N - OMIKRON
Technical description and installation
6) read back DATA for verification, find information on the licence in the Global
data/Information menu.
Warning: Any repeated attempt to store an identical license or a different CPU
board related license is rejected with the following warning:
2N - OMIKRON
99
2N - OMIKRON
100
Technical description and installation
2N - OMIKRON
2N - OMIKRON
Technical description and installation
Notes:
The manufacturer reserves the right to modify the product in order to improve its properties.
Use the product in accordance with the Instructions for Use and for the purpose it has
been designed and manufactured for.
When the service life of this product has been exhausted, dispose of the product in conformity with
applicable environmental regulations.
2N - OMIKRON
101