1
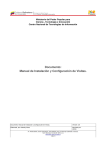
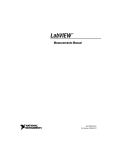
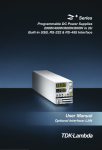
IVI
ViewCommander
Mobile
User’s Manual
Version 3.0
The information in this manual is subject to change without notice. Internet Video &
Imaging, Inc. assumes no responsibility or liability for any errors or inaccuracies that
may appear in this manual.
© 2003-2005 Internet Video & Imaging, Inc.
Part No. UMP-050401
ii
Table of Contents
Table of Contents.......................................................................................................iii
ViewCommander-Mobile Installation ........................................................................0
Software Installation ..................................................................................................0
Activation Code Installation .......................................................................................0
ViewCommander Mobile User Interface....................................................................2
Video Window ...........................................................................................................2
Camera Selection Box...............................................................................................2
Video Settings Controls.............................................................................................2
Menu Bar...................................................................................................................3
Tool Bar.....................................................................................................................3
Control Panel.............................................................................................................3
Video Server Setup and Configuration .....................................................................4
Add New Camera Server ..........................................................................................4
Camera Setup Panel .................................................................................................4
Select Camera .......................................................................................................5
Camera Model .......................................................................................................5
Hostname or IP......................................................................................................5
Port ........................................................................................................................5
Username ..............................................................................................................5
Password ...............................................................................................................6
Camera Name .......................................................................................................6
Advanced Camera Settings Panel.............................................................................6
Select Camera .......................................................................................................6
Image Size.............................................................................................................7
Image Quality.........................................................................................................7
Frames Per Second...............................................................................................7
Show Date/Time ....................................................................................................7
Save / Cancel Buttons ...........................................................................................7
System Settings ..........................................................................................................8
Archive Snapshot Directory.......................................................................................8
Sound Effects............................................................................................................8
Run in Background....................................................................................................8
Slow Connection Optimization...................................................................................9
Proxy Settings ...........................................................................................................9
View Modes ...............................................................................................................10
Control Panel...........................................................................................................10
Full Screen ..............................................................................................................10
Rotate......................................................................................................................10
Snap Picture............................................................................................................10
Display Stats ...........................................................................................................10
Control Panel ............................................................................................................11
Zoom Control...........................................................................................................11
Digital Zoom ............................................................................................................11
Brightness ...............................................................................................................11
Navigation Arrows ...................................................................................................11
iii
Point & Click Navigation ..........................................................................................12
Camera Selection....................................................................................................12
Preset Menu ............................................................................................................12
Zoom Menu .............................................................................................................12
Camera Menu..........................................................................................................12
Hardware Controls....................................................................................................13
Zoom Fully Out........................................................................................................13
Zoom Fully In...........................................................................................................13
Zoom Step Out ........................................................................................................13
Zoom Step In...........................................................................................................13
Up, Down, Left & Right............................................................................................13
iv
ViewCommander-Mobile Installation
ViewCommander-Mobile will run on most Windows CE devices, including Pocket PCs
and Smartphones.
This section describes how to install the ViewCommander Mobile software.
Software Installation
There are two ways the software can me installed:
1) Run the setup program on computer that connects to the Pocket PC. Follow
the on-screen instructions to complete installation. In most cases, use the
default settings the setup program selects.
Or
2) Download the CAB installation file directly to the Pocket PC or Smartphone and
run it.
The software will now be installed and will operate in “Demonstration” mode. The
software will become licensed and fully functional once the Activation Code is entered
(See next section for Activation Code Installation).
Activation Code Installation
After the software has been successfully installed, launch the ViewCommander Mobile
application on the Pocket PC and select “Info / About…” from the Options menu.
This screen will display the version number along with other information about the
version of ViewCommander Mobile installed on your Pocket PC. At the bottom of the
screen, there will be 10 digit User Code.
Provide the User Code to IVI, and IVI will provide an Activation Code to you. Enter the
Activation Code in the box labeled Activation Code and press the “OK” button. Your
software will now be licensed and fully functional.
ViewCommander Mobile User Interface
ViewCommander Mobile has an intuitive and easy-to-use interface that allows you to
view and control remote video and adjust various camera settings. This section
describes the different components that make up the user interface.
Many sections throughout this manual will reference terms listed here.
Video Window
The live video image is displayed in the main viewing area. Some camera systems
allow the camera to be centered by clicking on an object within the live video screen.
Camera Selection Box
The camera selection box is a dropdown box that contains all of the cameras
ViewCommander Mobile will access. Selecting a camera will switch the video and
control to the camera selected. For multi-camera systems such as the AXIS 2400, an
additional dropdown box with individual camera will be displayed.
Video Settings Controls
The video settings controls allow for the setting of the image brightness, as well as
digital zoom.
Menu Bar
The menu bar contains options that allow for the configuration of system settings, as
well as other features the system offers.
Tool Bar
The tool bar contains shortcuts to commonly used features.
Control Panel
The control panel allows you to control camera Pan-Tilt-Zoom (PTZ) functions for
supported cameras using arrow controls, as well as other navigation methods
depending on your PTZ model. Parts or all of the control panel may or may not be
visible depending on the model camera you are connecting to.
Video Server Setup and Configuration
ViewCommander Mobile allows you to add and configure multiple camera servers. A
camera server is a remote IP network camera or an IP network video server with one
or more cameras attached to it. Several servers can be added to the list, and your
license agreement will determine the number of servers that can be added to
ViewCommander Mobile.
Add New Camera Server
To add a new camera server, select the “Camera Setup…” item from “Options / Setup”
on the menu bar.
When the “Camera Setup…” option is selected, you will see the Camera Setup Panel
in the main viewing area. Add camera server information and settings here and press
the “Save” button to save your changes, or the “Cancel” to cancel your changes.
Camera Setup Panel
The Camera Setup Panel contains the necessary settings to connect to remote
network video servers. Each setting will be described below:
Select Camera
Choose a camera to setup. The program has support for multiple cameras. The
default name for a camera will be “Camera –n” until a new name is entered in the
CameraName field.
Camera Model
Select the model of the network video camera you will be connecting to. This example
shows that the IVI-WebCamServer model has been selected.
Hostname or IP
Enter the IP address or Host Name of the server you want to connect to. If unsure of
what to enter here, check with your company’s technical administrator.
Port
Enter the port that the camera server is sending video on (default port 80).
Username
Some systems require a username and password. If your camera server requires a
username and password, enter the username here.
Password
Some systems require a username and password. If your camera server requires a
username and password, enter the password here.
Camera Name
Add a name to the camera for easy reference. The camera name will be added to the
camera list box.
Advanced Camera Settings Panel
Access the Advanced Camera Settings Panel by pressing the “Advanced…” button in
the Camera Setup Panel.
Note: This feature may not be available for all camera server models.
Select Camera
If a camera server supports multiple cameras, select the camera from the “Select
Camera” pull down menu.
Image Size
Some camera servers allow video to be transmitted in different sizes. Select the
appropriate size for your needs. The lowest setting that is acceptable to you is
recommended. Lower settings allow for faster frame rates and faster processing.
Image Quality
Some camera servers allow you to set the video quality.
Lower quality settings will reduce quality image, but allow for a faster frame rate.
Higher quality settings produce a sharper image, however frame rate may be reduced.
Valid settings are from 10 to 80. Settings from 50 to 75 are recommended on most
systems.
Frames Per Second
Video frame rate can be limited to reduce network bandwidth traffic. Select the
maximum frame rate at which you want to receive video. Valid ranges are from 1 to 30
Frames per second.
Note: A setting of 0 will allow for the maximum frame rate the server is capable of
sending.
Note: Frame rate may be limited depending on your network’s capacity, the
capabilities of the camera server, or the Pocket PC processor speed. The frame rate
selected is a cap on how fast the camera server will send video.
Show Date/Time
Check this box to display the time and date (for supported cameras).
Save / Cancel Buttons
Click the “Save” button to save your changes, or the “Cancel” button if you don’t wish
to save your changes.
System Settings
System settings can be changed by selecting “System Setup…” from the “Options /
Setup” menu.
Archive Snapshot Directory
Enter the full path of the directory to store snapshots. The default save directory will
be automatically entered by default.
Sound Effects
Check this option to enable audible sounds from certain functions – such as the
camera snapshot.
Run in Background
Check this option to allow the application to run when another application on the
system is running in the foreground. When this option is unchecked, the application
will automatically close when another application is running in the foreground. It is
recommended that this be unchecked when the application is running on mobile
phone systems.
Slow Connection Optimization
Check this option to optimize video streaming for slow or low-bandwidth network
connections. If it appears that the video is lagging, or the pan-tilt controls takes a long
time to respond, this option should be checked.
It is recommended you first try to lower the frames per second in the Camera Setup’s
Advanced Options (if supported) before checking this option.
Proxy Settings
ViewCommander Mobile allows the access of cameras through a network proxy. Enter
the IP address and port of the proxy, as well a username and password if required.
Once set, the proxy settings will apply to all cameras.
View Modes
ViewCommander Mobile allows you to view and/or control video in several viewing
modes.
Control Panel
Select Control Panel from Options / View / Control Panel on the menu bar, or
click on the Control Panel icon in the toolbar to display the control panel.
Full Screen
Select Full Screen from Options / View / Full Screen on the menu bar, or click
on the Full Screen icon in the toolbar to display the video in full screen mode and
expand the video to fill the entire viewing area. The control panel will be covered,
however you can still click in the video to navigate the camera (for supported PTZ
cameras).
Rotate
Select Rotate Video from Options on the menu bar, or click on the Rotate
Video icon in the toolbar to rotate and expand the video to fill the entire viewing area.
The control panel will be covered, however you can still click in the video to navigate
the camera (for supported PTZ cameras).
Snap Picture
Click on the Snap Picture icon in the toolbar to save the current video frame to
disk. To view saved pictures, choose View Snapshots from the Options menu. The
location of the saved pictures can be changed in the System Setup page.
Display Stats
Select Display Stats from Options / View on the menu bar to show the Frames Per
Second (FPS) received and the FPS displayed in the title bar. FPS for frames
displayed may be lower than FPS received depending on the video processing power
on your specific Pocket PC unit.
Control Panel
The Control Panel is used to control the camera’s Pan Tilt Zoom (PTZ) functions.
Different controls may be displayed depending on the camera server model you are
connecting to. The image below shows one style of the control panel.
Zoom Control
This feature allows you to zoom the camera to the desired zoom level. Some cameras
allow discrete zoom levels, allowing you to choose a specific zoom setting, while
others allow only for relative control (allowing you to zoom in or out – not zoom to a
specific setting). The zoom control shown above has 10 discrete zoom levels.
Digital Zoom
A vertical slider control (labeled Z) can be used to digitally zoom in on the image. This
is useful if your camera does not support a zoom function. When in digital zoom mode
you can move the image by clicking in the live video. PTZ control will be temporarily
disabled when digital zoom is enabled.
Brightness
A vertical slider control (with the brightness icon) can be used to brighten or darken an
image.
Navigation Arrows
The Up, Down, Left, and Right arrows allow you to move the camera in a desired
direction.
Point & Click Navigation
You can also navigate the camera by clicking in the Live Video screen. Click on an
object in the live video, and the camera will center on its location (for supported PTZ
cameras).
Camera Selection
Select a camera from the Camera Selection pull down menu to switch to a different
camera on the server you are connected to. This example shows that the “Front Door”
camera is selected. If a camera server (such as the AXIS 2400) has multiple
cameras, each of the cameras will be displayed in an additional pull-down menu
adjacent to the camera selection pull-down menu.
Menu Bar / Tool Bar
Preset Menu
Select a preset from the Preset menu on the Navigate menu to go to a specific
preset. The preset names will be automatically entered for supported camera
systems.
Zoom Menu
Select a zoom setting from the Zoom menu on the Navigate menu to go to a specific
zoom level.
Camera Menu
Select a camera setting from the Camera menu on the Navigate menu to switch to a
specific camera.
Hardware Controls
ViewCommander Mobile allows you to control Pan Tilt Zoom (PTZ) cameras using the
hardware buttons on selected Pocket PCs.
Zoom Fully Out
Press this button to quickly zoom the camera to its widest field of view.
Zoom Fully In
Press this button to quickly zoom the camera to its maximum zoom level.
Zoom Step Out
Press this button to zoom out one step.
Zoom Step In
Press this button to zoom in one step.
Up, Down, Left & Right
Press one of these buttons to move the camera in the desired direction.
Copyright 2005 Internet Video & Imaging, Inc.
Part of this software is based in part on the work of the Independent JPEG Group.