1
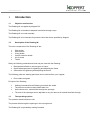
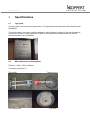
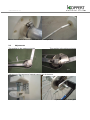
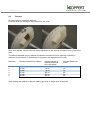
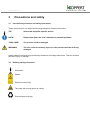
Rotabug-W Instructions for use User’s manual Koppert Biological Systems 2014 Instructions for use Foreword These instructions for use are intended for suitably-trained Rotabug-W users. They explain the construction and use of the machine. Make sure that these instructions for use are always available for reference purposes. Read the full contents of these instructions for use thoroughly before you use the Rotabug-W. Pay particular attention to the safety instructions. Contact your supplier if you have any questions about the operation or specific comments to make. Instructions for use 1 Introduction 1.1 Objective and function The Rotabug-W is supplied by Koppert B.V. The Rotabug-W is intended to disperse beneficials through crops. The Rotabug-W is moved manually. The Rotabug-W is not intended for products other than those specified by Koppert. 1.2 Description of the Rotabug-W The main components of the Rotabug-W are: Grip section Drive section 2 long shafts 2 short extension shafts 4 to 6 drums Toolkit Solely the following materials and tools may be used with the Rotabug: Biological beneficials in various types of carrier Open-ended spanners for tightening and adjusting the frame Screwdriver for tightening and adjusting the drums The following parts are wearing parts that can be ordered from your supplier: Drive chain and gears Principle of the Rotabug: Walking forwards with the Rotabug turns both the shafts. The drums mounted on these shafts also turn. As the drums turn, material falls through the openings. 1.3 The size of the openings can be adjusted to vary the amount of material that falls through. The operating options The operator stands behind the unit. The product falls through the openings in the turning drums. The Rotabug-W is operated by walking forwards . Instructions for use 2 Specifications 2.1 Type plate The type plate is mounted on the grip section. The type plate bears information that identifies each Rotabug-W. The serial number, the unique number assigned to each Rotabug, consists of the year followed by a sequential number. Please quote this number on all reports and correspondence so that the relevant machine can be identified. 2.2 Main dimensions and equipment Folded in: 1300 x 1000 x 1200 mm The delivery consists of: The handle The rotating axis The drive unit The drum Instructions for use 2.3 Installation Connect the handle with the drive unit. Connect the axis with the drive unit and fasten the bolts. Mount the drums on the axis and fasten the clip with the screwdriver. Fasten the bolts Instructions for use Mount the extension axis on the turn axis for 6 row operation. 2.4 Adjustments This position is the maximum height This position is the minimum height Adjustment of the amount of material coming out of the drum Adjustment of the chain gear Instructions for use 2.5 First use Fill up the drum to maximum 2000 ml. Close the drum by holding the flap and turning the drum. Make sure that the 4 drums have the same adjustment of the amount of material coming out of the drum. The table underneath can be used as an indicator to determine which opening is needed in reference to the amount of material that is required to be dispersed on the crop. Indication Distance between the clamps 1 2 3 4 5 6 10 mm 12 mm 14 mm 16 mm 18 mm 20 mm Average volume of material dispersed over 100 metres Almost closed 50 ml 80 ml 100 ml 130 ml 160 ml Average Spidex per metre 0 10 16 20 26 32 Start walking and make sure that the walking period is no longer than 45 minutes. Instructions for use 3 3.1 Precautions and safety Precautionary measures and safety instructions These instructions for use adopt the following categories of safety instructions: TIP! Advice that simplifies specific actions NOTE! Remark that draws the user's attention to potential problems TAKE CARE! The product could be damaged WARNING! The user could be seriously injured, or the product could be seriously damaged Always observe the following precautionary measures and safety instructions. This will minimize the risk of injury or damage. 3.2 Rotabug safety precautions Information Hazard Read instructions first Take care with turning gears (or rollers) Environmental recycling Instructions for use 3.3 Required training The user must be aware of the correct method of using the Rotabug. NOTE! The user MUST read the full contents of these instructions for use thoroughly and make sure that he/she understands them before using this machine for the first time. This will avoid unnecessary risks. Instructions for use 4 Commissioning 4.1 Delivery The Rotabug-W is delivered disassembled. Assembly: 4.2 Determine the working height. Fit the grip section to the drive section. Mount both arms. Fit both extension shafts, if necessary. Slide the requisite number of drums on the shafts and fix them in the required position. Transport and relocation When the arms are folded in then the machine can be moved backwards and forwards without the shafts turning. When the arms are folded out and fixed, the shafts will turn when the machine is moved forwards, but not when it is moved backwards. 4.3 Using the machine for the first time When the machine is used for the first time, it will be necessary to check the dosage settings and decide on a suitable working method. Instructions for use 5 Operation 5.1 General NOTE! 5.2 Read these instructions for use thoroughly before you use the Rotabug for the first time. Starting Fold the arms out, fix them in place, and fill the drums. The Rotabug-W is now ready for use. 5.3 Stopping Fold the arms in. The Rotabug-W can now be moved without the drums turning. 5.4 Filling Open the filling opening by holding the flap and turning the drum. Instructions for use 6 6.1 Maintenance by the customer Cleaning WARNING! Do NOT use high-pressure sprays to clean the machine. WARNING! Do NOT use corrosive cleaners or cleaning agents containing oil solvents. These will damage the aluminium and dissolve the grease. 6.2 Daily maintenance Check the following each day before use: The chain tension. The openings in the drums 6.3 Adjustment Tension the chain with the tensioners if the chain is too slack. The drums can be adjusted on the basis of the indications. 6.4 Periodic in-house maintenance Brush the drums clean. Lubricate the chain. Instructions for use 7 Maintenance Maintenance other than the maintenance referred to above must be carried out by qualified personnel. 7.1 Periodic maintenance 7.2 Annual maintenance Inspect the bearings, chain, and gears. 2.3 Parts list Instructions for use 8 Malfunctions and repairs 8.1 Troubleshooting This subsection refers solely to the most frequent problems. Contact your supplier if you cannot rectify the malfunction using this list. WARNING! Alert or Malfunction Drums are not turning Take care when the chain is turning Possible cause Solution Drive is broken Check gears and chain 8.2 Replacement parts 8.3 Malfunction report Instructions for use