1
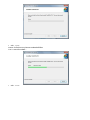
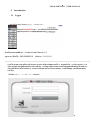
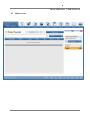
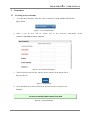
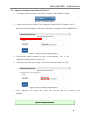
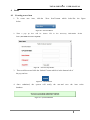
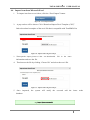
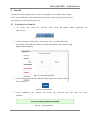
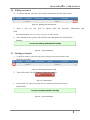
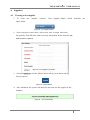
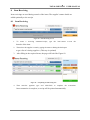
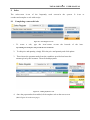
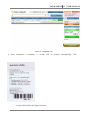
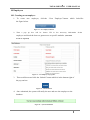
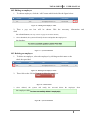
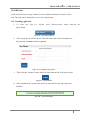
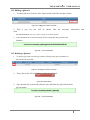
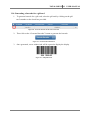
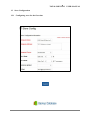
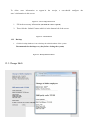
User Manual คูมือการใชงาน TotalSMEs Point Of Sale System (ระบบคาปลีก) Overseaonline Co., Ltd. 199/4 ถนนรัชดาภิเษก (ทาพระตากสิน) แขวงบุคคโล เขตธนบุรี กรุงเทพมหานคร 10600 Tel:0-2466-6742 Fax:0-2466-6744 Email: [email protected] www.totalsmes.com Overseaonline Co., Ltd. 199/4 ถนนรัชดาภิเษก (ทาพระตากสิน) แขวงบุคคโล เขตธนบุรี กรุงเทพมหานคร 10600 Tel:0-2466-6742 Fax:0-2466-6744 ระบบคาปลีก TotalSMEs POS System --- Overseaonline Co., Ltd. คํานํา Overseaonline Co., Ltd.., กอตั้งขึ้นในป 1999 ที่กรุงเทพฯ (เปนนักพัฒนาซอฟตแวรอิสระ)Overseaonline Co., Ltd. มีผูเชี่ยวชาญระดับสูงในการบริหารและทีมงานระดับมืออาชีพของวิศวกรซอฟตแวร 10 กวาปที่ผานมา Overseaonline Co., Ltd.. มีความมุงมัน ่ ในการพัฒนาซอฟแวรสําหรับระบบคาปลีก, การวิจัยและพัฒนาเทคโนโลยีสารสนเทศและการประยุกตใช, เปนหนึ่งในจํานวนเล็กนอยของซอฟแวรคาปลีกและการเงินที่พัฒนาโดยเทคโนโลยีใหมๆทางคอมพิวเตอร (Cloud Computering Technology) ให ใชในกลุมซูเปอรมารเก็ตหางสรรพสินคารานและอื่น ๆ ที่จะใหคําปรึกษา การดําเนินงานตามโครงการ การบํารุงรักษาระบบ การฝกอบรมอาชีพและบริการ และ การอัปเดตเต็มรูปแบบอื่น ๆ TotalSMEs ซอฟแวรระบบการคาปลีกและระบบการเงินรองรับหลายภาษา : ภาษาจีน -- ไทย – ภาษาอังกฤษ TotalSMEs ซอฟแวร จะยังคงทํางานรวมกันกับพันธมิตรเพื่อใหมีตนทุน ต่ําและแกปญหาอยางมีประสิทธิภาพ “TotalSMEs ซอฟแวรระบบคาปลีก” พัฒนาโดย Overseaonline Co., Ltd. ดวยประสบการณในอุตสาหกรรมจากการวิจัยและการพัฒนาซอฟตแวรการจัดการธุรกิจยุคใหม ทั้งระบบ แบงออกเปน 2 สวน คือ ระบบคาปลีก และระบบการบริหารเพื่อจัดการระบบคาปลีก ฟงกชั่นหลักรวมถึงการ จัดการระบบ, เกี่ยวกับแฟมขอมูลการจัดซื้อการจัดการการขาย, การจัดการคลังสินคา, คาปลีก, การวิเคราะห ทางสถิติ, ขอมูลและอื่น ๆ ไดเร็กทอรี : สวนแรกของการติดตั้งซอฟแวร (1 ถึง 5) สวนที่สองของซอฟตแวร - การลงทะเบียน (1) สวนที่สองของซอฟตแวร - การจัดการการดําเนินงาน (1-7) สวนแรกของการติดตั้งซอฟแวร แพลตฟอรมระบบ แพลตฟอรมระบบ เหมาะสําหรับทุกระบบปฏิบัติการ Windows! ฐานขอมูล ฐานขอมูลขนาดใหญของตนเอง - MySQL ความตองการของระบบ PC เครื่องคอมพิวเตอรที่รองรับ (PIII300 หรือมากกวา, Ram2G, HD 50G ขึ้นไป) อุปกรณ 1. 2. สแกนเนอรบารโคด, เครื่องพิมพบารโคด, ลิ้นชักเก็บเงิน(Cash Drawer) ไป http://www.TotalSMEs .com ดาวนโหลดระบบ คาปลีก -- TotalSMEs_POS.msi คลิกเพื่อติดตั้ง “TotalSMEs_POS.msi” คลิกเ “Next” ภาพ 1 2. คลิก “Next” ภาพ2 หมายเหตุ : ชื่อของโฟลเดอรไมสามารถเปลีย ่ นแปลงได แตสามารถเปลีย ่ นแปลงการจัดเก็บขอมูลลงฮารดดิสกได! 3. คลิก “Next” ภาพ3 4. คลิก “Install” ระบบจะแจงเกีย ่ วกับระบบการรักษาความปลอดภัยใหเลือก "Yes" ระบบจะเริ่มการติดตั้ง ... 5. คลิก “Finish” สวนที่สองของซอฟตแวร - การลงทะเบียน 1. กลับไปที่ Desktop ใหคลิก ภาพ Icon “TotalSMEs POS“ ALSMES POS USER MANUAL TOTALSMES POS USER MANUAL Table of Contents 2 3 4 Introduction to TotalSMEs POS ................................................................ 15 2.1 Logging in TotalSMEs POS for the first time ...................................... 15 2.2 Home screen of TotalSMEs POS ....................................................... 16 Customers ............................................................................................................ 18 3.1 Creating a new customer .............................................................................. 18 3.2 Editing a customer ......................................................................................... 19 3.3 Deleting a customer ...................................................................................... 19 3.4 Import customers from Microsoft Excel ......................................................... 20 Items .................................................................................................................... 22 4.1 Creating a new item ...................................................................................... 22 5 6 4.2 Editing an item ............................................................................................... 23 4.3 Deleting an item ............................................................................................ 23 4.4 Import item from Microsoft Excel ................................................................... 24 4.5 Generating a barcode for an item .................................................................. 25 Item kit ................................................................................................................. 27 5.1 Creating a new item kit .................................................................................. 27 5.2 Editing an item kit .......................................................................................... 28 5.3 Deleting an item kit ........................................................................................ 28 5.4 Generating a barcode for an item kit ............................................................. 29 Suppliers .............................................................................................................. 31 6.1 Creating a new supplier ................................................................................. 31 6.2 Editing a supplier ........................................................................................... 32 6.3 Deleting a supplier ......................................................................................... 32 TOTALSMES POS 7 8 Reports ................................................................................................................ 34 7.1 Graphical Reports ......................................................................................... 34 7.2 Summary Reports ......................................................................................... 35 7.3 Detailed Reports ............................................................................................ 36 Item Receiving ..................................................................................................... 39 8.1 9 11 Item Receiving ............................................................................................... 39 Sales .................................................................................................................... 41 9.1 10 USER MANUAL Completing a successful sale ........................................................................ 41 Employees ......................................................................................................... 44 10.1 Creating a new employee ............................................................................ 44 10.2 Editing a employee ...................................................................................... 45 10.3 Deleting an employee .................................................................................. 45 Gift Cards ........................................................................................................... 47 11.1 Creating a gift card ...................................................................................... 47 11.2 Editing a gift card ......................................................................................... 48 11.3 Deleting a gift card ...................................................................................... 48 11.4 Generating a barcode for a gift card ............................................................ 49 TOTALSMES POS USER MANUAL Table of Figures Figure 13 – Installing Database Step 2 ..................................................................... 10 Figure 14 – Installing Database Step 3 ..................................................................... 11 Figure 15 – Installing Database Step 4 .................................................................... 12 Figure 16 – Installing Database Step 5 ..................................................................... 12 Figure 20 – Login screen ........................................................................................... 15 Figure 21 – Home Overview ...................................................................................... 16 Figure 22 – New Customer Button ............................................................................ 18 Figure 23 – New Customer Pop Up Box ................................................................... 18 Figure 24 – Submit Button ......................................................................................... 18 Figure 25 – System Notification ................................................................................. 18 Figure 26 – Editting From Customer Table ............................................................... 19 Figure 27 – Sytem Notification .................................................................................. 19 Figure 28 – Deleting From Customer Table .............................................................. 19 Figure 29 – Delete Button .......................................................................................... 19 Figure 30 – System Notification ................................................................................. 19 Figure 31 – Excel Import Button ................................................................................ 20 Figure 32 – Import Customer Using Excel Step 1 ..................................................... 20 Figure 33 - Import Customer Using Excel Step 2 ...................................................... 20 Figure 34 – System Notification ................................................................................. 20 Figure 35 – New Item Button ..................................................................................... 22 Figure 36 – New Item Pop Out Box ........................................................................... 22 Figure 37 – Submit Button ......................................................................................... 22 Figure 38 – System notification ................................................................................. 22 Figure 39 – Editting From Item Table ........................................................................ 23 Figure 40 – System Notification ................................................................................. 23 Figure 41 – Deleting From Item Table ....................................................................... 23 Figure 42 – Delete Button .......................................................................................... 23 Figure 43 – System Notification ................................................................................. 23 Figure 44 – Excel Import Button ................................................................................ 24 Figure 45 - Import Item Using Excel Step 1 ............................................................... 24 Figure 46 - Import Item Using Excel Step 2 ............................................................... 24 Figure 47 – System Notification ................................................................................. 24 Figure 48 – Generate Barcode From Item Table ....................................................... 25 Figure 49 – Generate Barcode Button ....................................................................... 25 Figure 50 – Sample Barcode ..................................................................................... 25 Figure 51 – New Item Kit Button ................................................................................ 27 Figure 52 - New Item Pop Out Box ............................................................................ 27 Figure 53 – Submit Button ......................................................................................... 27 Figure 54 – System Notification ................................................................................. 27 Figure 55 – Editting From Item Kit Table ................................................................... 28 Figure 56 – System Notification ................................................................................. 28 Figure 57 – Deleting From Item Kit Table .................................................................. 28 Figure 58 – Delete Button .......................................................................................... 28 Figure 59 – System Notification ................................................................................. 28 Figure 60 - Generate Barcode From Item Kit Table .................................................. 29 Figure 61 – Generate Barcode Button ....................................................................... 29 Figure 62 – Sample Barcode ..................................................................................... 29 Figure 63 – New Supplier Button ............................................................................... 31 Figure 64 - New Supplier Pop Out Box ..................................................................... 31 Figure 65 – Submit Button ......................................................................................... 31 Figure 66 – System Notification ................................................................................. 31 Figure 67 – Editing From Supplier Table ................................................................... 32 Figure 68 – System Notification ................................................................................. 32 Figure 69 – Deleting From Supplier Table ................................................................. 32 Figure 70 – Delete Button .......................................................................................... 32 Figure 71 – System Notification ................................................................................. 32 Figure 72 – Graphical Report Button ......................................................................... 34 Figure 73 – Date Range ............................................................................................ 34 Figure 74 – Sample Graphical Report ....................................................................... 35 Figure 75 – Summary Report Button ......................................................................... 35 Figure 76 – Date Range ............................................................................................ 36 Figure 77 – Sample Summary Report ....................................................................... 36 Figure 78 – Detailed Report Button ........................................................................... 36 Figure 79 – Date Range ............................................................................................ 37 Figure 80 – Sample Detailed Report ......................................................................... 37 Figure 81 – Item Receiving Screen ........................................................................... 39 Figure 82 – Completing Item Receiving Sale ............................................................ 39 Figure 83 – Sales Register Screen ............................................................................ 41 Figure 84 – Adding Payment to sale ......................................................................... 41 Figure 85 – Completing a sale ................................................................................... 42 Figure 86 – Sample Sales Receipt ............................................................................ 42 Figure 87 – New Employee Button ............................................................................ 44 Figure 88 – New Employee Pop Up Box ................................................................... 44 Figure 89 – Submit Button ......................................................................................... 44 Figure 90 – System Notification ................................................................................. 44 Figure 91 – Editing From Employee Table ................................................................ 45 Figure 92 – System notification ................................................................................. 45 Figure 93 – Deleting From Employee Table .............................................................. 45 Figure 94 – Delete Button .......................................................................................... 45 Figure 95 – System Notification ................................................................................. 45 Figure 96 – New Giftcard Button ............................................................................... 47 Figure 97 - New Employee Pop Up Box .................................................................... 47 Figure 98 – Submit Button ......................................................................................... 47 Figure 99 – System Notification ................................................................................. 47 Figure 100 – Editing From Gift Card Table ................................................................ 48 Figure 101 – System Notification ............................................................................... 48 Figure 102 – Deleting From Gift Card Table ............................................................. 48 Figure 103 - Delete Button ........................................................................................ 48 Figure 104 – System Notification ............................................................................... 48 Figure 105 - Generate Barcode From Gift Card Table .............................................. 49 Figure 106 – Generate Barcode Button ..................................................................... 49 Figure 107 – Sample Barcode ................................................................................... 49 Figure 108 – Store Configuration Screen .................................................................. 51 Figure 109 – Submit Button ....................................................................................... 51 Figure 110 – Backup Database Button ...................................................................... 51 TOTALSMES POS 2 USER MANUAL Introduction 2.1 Loggin 1. กลับไปที่ Desktop ใหคลิก ภาพ Icon “TotalSMEs POS“ เจาหนาที่ของเราหลังจากไดรับรหัสเครื่องของคุณ จะสงใบอนุญาตการปรับรุนแพกเกจ ใหคุณ สวนที่สองของซอฟตแวร - การจัดการการดําเนินงาน (1-7) ผูดูแลระบบ (ชื่อผูใช : 6931256602110 รหัสผาน : 11111111) การตั้งคาระบบการดูแลรักษาผูประกอบการและการจัดการขอมูลและอื่น ๆ ขอมูลบริษท ั , การจัดการลูกคา, การ จัดการผูจัดจําหนายผลิตภัณฑการจัดการสินคา, การจัดการผูประกอบการรวมถึงขอมูลสวนตัวของผูประกอบการ, จัดการสิทธิในการตั้งคารหัสผาน, การจัดการขอมูลรวมทั้งการสํารองขอมูล, การกูคืนขอมูล และบัตรของขวัญ และอื่น ๆ ใหคลิก ภาพ Icon “TotalSMEs POS“ เขาสูระบ บ ภาพ1: 一. ผูดูแลระบบ ผูดูแลระบบหลังจากเขาสูระบบ, ระบบจะเปดลิ้นชักเก็บเงินอัตโนมัติและใหใสเงินสํารอง ภาพ2: หลังจากสงขอมูลเงินสํารองแลวระบบจะเขาสูระบบการขาย ซึ่งสามารถใช Shortcut ในการขายได รายละเอียด Shortcut สามารถดูรายละเอียดไดตามดานลางของหนา TOTALSMES POS 2.2 Home screen USER MANUAL Figure 6 – Home Overview This is the home screen that will be shown after a successful login. The home screen contains: i. All the menus and a short description about the menu. ii. Date and time information – will be displayed in all screen. iii. Logged on user’s name. iv. Logout button - Users can logout from any screen by clicking the logout button which is located in the bottom left of the screen. v. Software version. TOTALSMES POS CHAPTER3: Customers USER MANUAL TOTALSMES POS 3 USER MANUAL Customers 3.1 Creating a new customer 1. To create new customer, click the “New Customer” button which looks like the figure below. Figure 7 – New Customer Button 2. Then a pop up box will be shown. Fill in the necessary customer. (The fields in red are required) Figure 8 – New Customer Pop Up Box 3. Then scroll down and click the “Submit” button which is in the bottom left of the pop out box. Figure 9 – Submit Button 4. Once submitted, the system will notify the user and save the customer to the database. Figure 10 – System Notification information for the TOTALSMES POS USER MANUAL 3.2 Editing a customer 1. To edit a customer, click the “edit” button which looks like the figure below. Figure 11 – Editting From Customer Table 2. Then click a pop out box will be shown. Edit the necessary information and the submit button (refer step 2 and 3 in page 23 for further details) 3. Once submitted, the system will notify the user and update the customer to the database. Figure 12 – Sytem Notification 3.3 Deleting a customer 1. To delete a customer, select the customer by clicking on their name check box provided. Figure 13 – Deleting From Customer Table 2. Then click on the “Delete” button to delete the customer. Figure 14 – Delete Button 3. Once deleted, the system will notify the user and delete the customer from the customer table. Figure 15 – System Notification or the TOTALSMES POS USER MANUAL 3.4 Import customers from Microsoft Excel 1. To import customers from a excel sheet, click the “Excel Import” button. Figure 16 – Excel Import Button 2. A pop out box will be shown. Click “Download Import Excel Template (CSV)” link to download a template of the excel file that is compatible with TotalSMEs Pos Figure 17 – Import Customer Using Excel Step 1 3. Then open the “import_customers.csv” that was downloaded. Fill in the customer information and save the file. 4. Then browse the file by clicking “Choose file” and select the excel file. Figure 18 - Import Customer Using Excel Step 2 5. Once imported, the system will notify the database. Figure 19 – System Notification user and add the customer to the TOTALSMES POS CHAPTER3: Items USER MANUAL TOTALSMES POS 4 USER MANUAL Items 4.1 Creating a new item 1. To create new item, click the “New Item” button which looks like the figure below. Figure 20 – New Item Button 2. Then a pop up box will be shown. Fill in the necessary information for the item. (The fields in red are required) Figure 21 – New Item Pop Out Box 3. Then scroll down and click the “Submit” button which is in the bottom left of the pop out box. Figure 22 – Submit Button 4. Once submitted, the system will notify the user and save the item to the database. Figure 23 – System notification TOTALSMES POS USER MANUAL 4.2 Editing an item 1. To edit an item, click the “edit” button which looks like the figure below. Figure 24 – Editting From Item Table 2. Then a pop out box will be shown. Edit the necessary information and click the submit button (refer step 2 and 3 in page 27 for further details) 3. Once submitted, the system will notify the user and update the item to the database. Figure 25 – System Notification 4.3 Deleting an item 1. To delete an item, select the item by clicking on the item name or the check box provided. Figure 26 – Deleting From Item Table 2. Then click on the “Delete” button to delete the item. Figure 27 – Delete Button 3. Once deleted, the system will notify the items table. Figure 28 – System Notification user and delete the item from the TOTALSMES POS USER MANUAL 4.4 Import item from Microsoft Excel 1. To import item from a excel sheet, click the “Excel Import” button. Figure 29 – Excel Import Button 2. A pop out box will be shown. Click “Download Import Excel Template (CSV)” link to download a template of the excel file that is compatible with TotalSMEs Pos Figure 30 - Import Item Using Excel Step 1 3. Then open the “import_items.csv” that was downloaded. Fill in the items information and save the file. 4. Then browse the file by clicking “Choose file” and select the excel file. Figure 31 - Import Item Using Excel Step 2 5. Once imported, the system will notify the database. Figure 32 – System Notification user and add the items to the TOTALSMES POS USER MANUAL 4.5 Generating a barcode for an item 1. To generate barcode for an item, select the item by clicking on the item name or the check box provided. Figure 33 – Generate Barcode From Item Table 2. Then click on the “Generate Barcodes” button to generate the barcode. Figure 34 – Generate Barcode Button 3. Once generated, a new window/tab will be opened to display the display Figure 35 – Sample Barcode TOTALSMES POS CHAPTER5: ItemKit USER MANUAL TOTALSMES POS 5 USER MANUAL Item kit An item kit is used to group two or more items together. For example, item “burger”, “fries” and “soft drinks” can be added into the item kit “meal”. By doing this, the user can easily key-in the item kit to the sales. 5.1 Creating a new item kit 1. To create new item kit, click the “New Item Kit” button which looks like the figure below. Figure 36 – New Item Kit Button 2. Then a pop up box will be shown. Add as many items as needed, followed by the quantity. Then fill in the other necessary information for the item kit. (The fields in red are required). Figure 37 - New Item Pop Out Box 3. Then scroll down and click the “Submit” button which is in the bottom left of the pop out box. Figure 38 – Submit Button 4. Once submitted, the system will notify database. Figure 39 – System Notification the user and save the item kit to the TOTALSMES POS USER MANUAL 5.2 Editing an item kit 4. To edit an item kit, click the “edit” button which looks like the figure below. Figure 40 – Editting From Item Kit Table 5. Then click a pop out box will be shown. Edit the necessary information the submit button (refer step 2 and 3 in page 32 for further details) 6. Once submitted, the system will notify the user and update the item kit to the database. Figure 41 – System Notification 5.3 Deleting an item kit 4. To delete an item kit, select the item kit by clicking on the item kit name or the check box provided. Figure 42 – Deleting From Item Kit Table 5. Then click on the “Delete” button to delete the item kit. Figure 43 – Delete Button 6. Once deleted, the system will notify the user and delete the item kit from the item kit table. Figure 44 – System Notification and TOTALSMES POS USER MANUAL 5.4 Generating a barcode for an item kit 4. To generate barcode for an item kit, select the item kit by clicking on the item kit name or the check box provided. Figure 45 - Generate Barcode From Item Kit Table 5. Then click on the “Generate Barcodes” button to generate the barcode. Figure 46 – Generate Barcode Button 6. Once generated, a new window/tab will be opened to display the display Figure 47 – Sample Barcode TOTALSMES POS CHAPTER6: Suppliers USER MANUAL TOTALSMES POS 6 USER MANUAL Suppliers 6.1 Creating a new supplier 1. To create new supplier, click the “New Supplier” button which looks like the figure below. Figure 48 – New Supplier Button 2. Then a pop up box will be shown. Add as many items as needed, followed by the quantity. Then fill in the other necessary information for the item kit. (The fields in red are required). Figure 49 - New Supplier Pop Out Box 3. Then scroll down and click the “Submit” button which is in the bottom left of the pop out box. Figure 50 – Submit Button 4. Once submitted, the system will notify the user and save the supplier to the database. Figure 51 – System Notification TOTALSMES POS USER MANUAL 6.2 Editing a supplier 1. To edit a supplier, click the “edit” button which looks like the figure below. Figure 52 – Editing From Supplier Table 2. Then a pop out box will be shown. Edit the necessary information click the submit button (refer step 2 and 3 in page 38 for further details) 3. Once submitted, the system will notify the user and update the supplier to the database. Figure 53 – System Notification 6.3 Deleting a supplier 1. To delete a supplier, select the item kit by clicking on the supplier name or the check box provided. Figure 54 – Deleting From Supplier Table 2. Then click on the “Delete” button to delete the supplier. Figure 55 – Delete Button 3. Once deleted, the system will notify the user and delete the supplier from the supplier table. Figure 56 – System Notification and TOTALSMES POS USER MANUAL CHAPTER7: Reports 33 TOTALSMES POS 7 USER MANUAL Reports The report, system is capable summary report to produce and detailed three (3) types of report. Those report. The reports are based on are graphical customers, employees, sales, categories, discounts, items, item kits, payments, suppliers, taxes, receivings, inventory and deleted sales. 7.1 Graphical Reports In this example, the sales graphical report will be generated. 1. To create a graphical report, click the “Graphical Report” button which looks like the figure below. Figure 57 – Graphical Report Button 2. The next screen that this shown will allow user to select the date range and sale type. Once it is selected to the desired option, then click the submit button to produce the report. Figure 58 – Date Range 3. The generated chart would look like the Figure 74 on the next page. 34 TOTALSMES POS USER MANUAL Figure 59 – Sample Graphical Report 4. Generation of other graphical report follows the exact step as this one. 7.2 Summary Reports In this example, the sales summary report will be generated. 1. To create a summary report, click the “Summary Report” button which looks like the figure below. Figure 60 – Summary Report Button 2. The next screen that this shown will allow user to select the date range, sale type and the option to export to Microsoft Excel. Once it is selected desired option, then click the submit button to produce the report. Refer figure 76 on the next page to the TOTALSMES POS USER MANUAL Figure 61 – Date Range 3. The generated chart would look like the Figure 77. Figure 62 – Sample Summary Report 7.3 Detailed Reports In this example, the detailed summary report will be generated. 1. To create a detailed report, click the “Detailed Report” button which looks like the figure below. Figure 63 – Detailed Report Button TOTALSMES POS 2. USER MANUAL The next screen that this shown will allow user to select the date range, sale type and the option to export to Microsoft Excel. Once it is selected to the desired option, then click the submit button to produce the report. Refer figure 79. Figure 64 – Date Range 3. The generated chart would look like the Figure 77. The +/- sign on the left will display/hide the detailed report of that particular sale. Figure 65 – Sample Detailed Report TOTALSMES POS CHAPTER8: ItemReceiving USER MANUAL TOTALSMES POS 8 USER MANUAL Item Receiving Item receivings are used during restock of the items. The supplier’s name details are added optionally to the receipt. 8.1 Item Receiving Figure 66 – Item Receiving Screen 1. To create a receiving statement/receipt, type the item’s name or scan the barcode of the item. 2. Then select the supplier’s name by typing the name or hitting the backspace to get a list of existing suppliers. (This step is optional) 3. After filling in the required items, the page will look like Figure 82. Figure 67 – Completing Item Receiving Sale 4. Then enter the payment type and click finish to complete the Once transaction is complete, a receipt will be printed automatically. transaction. TOTALSMES POS CHAPTER9: Sales USER MANUAL TOTALSMES POS 9 USER MANUAL Sales The sales screen is one of the frequently used screens in the system. It is use to conduct and complete a sale with receipt. 9.1 Completing a successful sale Figure 68 – Sales Register Screen 1. To create a sale, type the item’s name or scan the barcode of the item. Tip: Hitting the backspace will provide the list of all items 2. To edit price and quantity, simply fill in the price and quantity and click update. 3. Then choose the payment mode from the combobox provided and enter the amount given by the customer. Then click add payment Figure 69 – Adding Payment to sale 4. Once the payment has been added, click complete sale on the next screen. (Refer Figure 85 on the next page). TOTALSMES POS USER MANUAL Figure 70 – Completing a sale 6. Once transaction is complete, a receipt will be printed automatically. The receipt will look like the Figure 86 below. TOTALSMES POS CHAPTER10: Employees USER MANUAL TOTALSMES POS USER MANUAL 10 Employees 10.1 Creating an ewemployee 1. To create new employee, click the “New Employee” button which looks like the figure below. Figure 72 – New Employee Button 2. Then a pop up box will be shown. Fill in the necessary information employee and check the boxes to grant access to specific modules. (The fields in red are required) Figure 73 – New Employee Pop Up Box 3. Then scroll down and click the “Submit” button which is in the bottom right of the pop out box. Figure 74 – Submit Button 4. Once submitted, the system will notify the user and save the employee to the database. Figure 75 – System Notification for the TOTALSMES POS USER MANUAL 10.2 Editing an employee 1. To edit an employee, click the “edit” button which looks like the figure below. Figure 76 – Editing From Employee Table 2. Then click a pop out box will be shown. Edit the necessary information the submit button (refer step 2 and 3 in page 52 for further details) 3. Once submitted, the system will notify the user and update the employee to the database. Figure 77 – System notification 10.3 Deleting an employee 1. To delete an employee, select the employee by clicking on their name or the check box provided. Figure 78 – Deleting From Employee Table 2. Then click on the “Delete” button to delete the employee. Figure 79 – Delete Button 3. Once deleted, the system will notify the user and the employee table. Figure 80 – System Notification delete the employee from and TOTALSMES POS CHAPTER11: GiftCards USER MANUAL TOTALSMES POS USER MANUAL 11 GiftCards A gift card can be used to pay instead of cash if sufficient amount of credit is in the card. The card can be loaded by a user in few simple steps. 11.1 Creating a giftcard 1. To create new item kit, click the “New Giftcard” button which looks like figure below. Figure 81 – New Giftcard Button 2. Then a pop up box will be shown. Then fill in the value and card number for the gift card. (The fields in red are required). Figure 82 - New Employee Pop Up Box 3. Then click the “Submit” button which is in the bottom left of the pop out box. Figure 83 – Submit Button 4. Once submitted, the system will notify the user and save the gift card to the database. Figure 84 – System Notification the TOTALSMES POS USER MANUAL 11.2 Editing a giftcard 1. To edit a gift card, click the “edit” button which looks like the figure below. Figure 85 – Editing From Gift Card Table 2. Then a pop out box will be shown. Edit the necessary information click the submit button (refer step 2 and 3 in page 55 for further details) 3. Once submitted, the system will notify the user and update the gift card to the database. Figure 86 – System Notification 11.3 Deleting a giftcard 1. To delete a gift card, select the gift card by clicking on the gift card number or the check box provided. Figure 87 – Deleting From Gift Card Table 2. Then click on the “Delete” button to delete the gift card. Figure 88 - Delete Button 3. Once deleted, the system will notify the user and delete the gift card from the gift card table. Figure 89 – System Notification and TOTALSMES POS USER MANUAL 11.4 Generating a barcode for a giftcard 1. To generate barcode for a gift card, select the gift card by clicking on the gift card’s number or the check box provided. Figure 90 - Generate Barcode From Gift Card Table 2. Then click on the “Generate Barcodes” button to generate the barcode. Figure 91 – Generate Barcode Button 3. Once generated, a new window/tab will be opened to display the display Figure 92 – Sample Barcode TOTALSMES POS CHAPTER12: Store Configuration USER MANUAL TOTALSMES POS 12 12.1 Store Configuration Configuring store for the first time USER MANUAL To allow store information to appear in the receipt, a user should store’s information in this screen Figure 93 – Store Configuration Screen 1. Fill in the necessary information (The fields in red are required). 2. Then click the “Submit” button which is in the bottom left of the screen. Figure 94 – Submit Button 12.2 Backup 1. Click the backup database icon to backup the whole database of the system. Recommended to backup every day before closing the system) Figure 95 – Backup Database Button 12.3 Change Shift configure the TOTALSMES POS USER MANUAL 12.4 Customer payment Customers can choose installment every transaction, the system will record the time of each payment and amount. ********************************************************************************** END OF USER MANUAL ********************************************************************************** For any updates please visit www.TotalSMEs.com. If you have any about this user manual, please email to [email protected]. inquiries