1
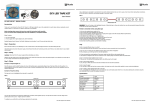
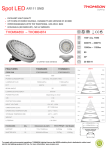
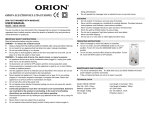
DS-SERIES
Dimmable LED Ceiling Panels
Item ref: 154.926UK, 154.927UK, 154.928UK
User Manual
Caution: Please read this manual carefully before operating
Damage caused by misuse is not covered by the warranty
Introduction
Thank you for choosing Fluxia dimmable LED ceiling panels for your lighting installation. The panels
and accessories supplied are intended for professional use only and should be fitted by a qualified
electrical installer. Please use the following instructions as a guide when installing these products.
Package contents
LED ceiling panel
Ceiling suspension kit
Dimmable LED driver
User manual
If any parts or accessories are missing, contact your dealer immediately.
Safety
Fluxia LED panels are professional mains powered items and should only be installed by a qualified
electrical installer.
All mains connections must be made in accordance with the appropriate safety regulations.
Do not attempt to use alternative power supplies or power more than one panel from a single driver.
To prevent the risk of fire or electric shock, do not expose any components to liquids or moisture.
Avoid impact, extreme pressure or heavy vibration to the housing.
No user serviceable parts inside – Do not open the panel.
Warning! The LED driver supplied with this panel must be earthed
Placement
Ensure adequate support from ceiling or grid structure for the weight of all panels to be suspended.
Do not place heavy weights on top of the panel.
Allow enough slack in cables and connections for servicing and access.
Cleaning
Clean the LED panels periodically for efficient performance using a clean dry anti-static cloth
A lightly damp cloth may be used to remove stains – allow the panel to dry completely before use.
Do not use solvents on any part of the housing.
DS-series LED Ceiling Panels User Manual
Installation
Fluxia LED panels will sit directly into the T-bars of a standard modular ceiling grid. Ensure the
correct size format for the ceiling scheme.
If there is no ceiling grid, a panel may be hung from the ceiling using the
suspension kit supplied. The kit comprises 4 steel cables, 4 flanged ceiling
anchors with screws and 4 M10 fasteners. This kit enables suspension of the
LED panel for up to 1m from the ceiling.
To suspend the panel from the ceiling, note the 4 threaded studs which are
fitted near to each corner of the LED panel. Mark out fixing points on the
ceiling corresponding to these studs. Depending upon the ceiling material, it
may be possible to drill through the ceiling to allow excess steel cable to be
fed into the ceiling void. Otherwise, each steel cable will need to be cut to
length.
Each ceiling anchor requires 3 fixings which will depend upon the ceiling type
and material (wood screws are supplied for timber ceilings). Position the
flanged ceiling anchors against the markings on the ceiling, mark out the 3
holes and fix each anchor securely to the ceiling.
Fix each of the M10 fasteners to the 4 threaded studs on the upper edge of
the LED panel and push one end of a steel cable into the narrow end until it
stops. The cable will lock so that it cannot be pulled out but this can be
released if necessary by pushing the narrow end of the fastener inward.
Whilst supporting the panel, thread the opposite end of each steel cable into
its corresponding ceiling anchor and through until the correct height
adjustment is achieved. Again, the locking anchors can be adjusted in turn by
pushing the narrow end inward to release the cable.
DS-series LED Ceiling Panels User Manual
Connection
Each LED panel is supplied with a dimmable LED driver. The input side of this driver must be
connected to the mains supply by a qualified electrical installer. All relevant wiring regulations must
be observed when connecting to the mains power supply and this driver must have a proper Earth
connection for safety. Insulate any exposed wiring connections.
The output side of the LED driver has 2 wires. One is an EL power lead which connects with its
counterpart on the LED panel and the other is a male DC5521 jack socket which can receive 0-10Vdc
control voltage for PWM dimming. When the DC5521 jack is not connected, the LED driver operates
as normal at full output to the LED panel. If a standard 0-10Vdc dimmer is connected to the DC5521
jack, the LED panel will operate as a dimmable luminaire.
Specifications
Version
154.926UK
154.927UK
154.928UK
Format
600 x 600mm modular ceiling tile
Power supply
100-240Vac, 50/60Hz
Voltage
30-42Vdc
Dimming control
0-10V
Current
1.2A
Housing material
PMMA plastic & aluminium
LED lifespan
>50,000 hours
LED colour
Warm white
White
Cool white
Colour temperature
2800K
4200K
6200K
Total luminous flux
2950lm
3100lm
3250lm
Luminous efficacy
61lm/W
64lm/W
67lm/W
Colour rendering index (CRI, Ra)
81
Beam angle
≥120°
Power consumption
48W
IP rating
IP20
Dimensions
595 x 595 x 15mm
Weight
3.56kg
Disposal: The “Crossed Wheelie Bin” symbol on the product means that the product is classed as Electrical or
Electronic equipment and should not be disposed with other household or commercial waste at the end of its useful life.
The goods must be disposed of according to your local council guidelines.
Errors and omissions excepted.
Copyright © 2014. AVSL Group Ltd.
DS-series LED Ceiling Panels User Manual