1
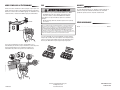
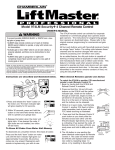
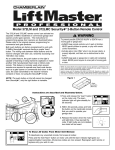
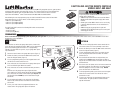
2-BUTTON AND 4-BUTTON REMOTE CONTROLS
MODELS 892LT AND 894LT
The 892LT/894LT remote control is compatible with Security✚ 2.0™ garage door openers, gate operators,
commercial door operators and commercial receivers. The remote control can also be programmed to
Security✚ 2.0™ products with encrypted DIP switches. The remote control can also be used as a
replacement for LiftMaster® remote control models 972LM/974LM and 372LM/374LM.
After following the correct programming steps, the 892LT and 894LT remote control will work with
garage door openers or receivers which use the following accessories:
• 890 Series (Security✚ 2.0™)
• 370 Series (Security✚ 315 Mhz)
• 970 Series (Security✚ 390 Mhz)
MODEL 892LT
To prevent possible SERIOUS INJURY or DEATH from a
moving gate or garage door:
• ALWAYS keep remote controls out of reach of children.
NEVER permit children to operate or play with remote
controls.
• Activate gate or door ONLY when it can be seen clearly,
is properly adjusted and there are no obstructions to
door travel.
• ALWAYS keep gate or garage door in sight until
completely closed. NEVER permit anyone to cross path
of moving gate or door.
MODEL 894LT
The 892LT and 894LT can clone the following DIP switch remote controls:
• 61LM (390 Mhz)
• 361LM (315 Mhz)
• 811LM (Security✚ 2.0™)
PROGRAMMING
There are two different programming options depending on your application. If you are programming the remote control to an existing DIP switch remote control, refer to OPTION B. For all other
programming, refer to OPTION A.
A
OPTION A
The instructions are written for garage door openers, however the
steps still apply for compatible products. Make sure the garage door
opener has a working light bulb because it is a programming
indicator. The illustrations are generic, so your garage door opener
may look different.
1
2
Locate the Learn button on the garage door opener (Figure 1).
Remove the battery cover from the new remote control and
locate the Program button (Figure 2).
3
To enter programming mode, press the Program button until
the LED on the remote control turns on.
4
Press and release the Learn button on the garage door opener.
The Learn LED will light. Within 30 seconds...
5
Press and release the remote control button that you want to
use...
Check to see if the garage door opener light bulb blinks.
If not, wait for the remote control LED to light solid then slowly
press and release the remote control button again. Repeat until
the light bulb blinks. DO NOT press the button after the light
bulb blinks.
6
To exit programming mode, press and release the Program
button on the remote control. The LED on the remote control
will turn off.
7
To test, press and release the programmed button on the
remote control. The garage door opener will activate.
B
1
Make sure the existing dip-switch remote control and the
new remote control are in close proximity to each other.
2
Remove the battery cover from the new remote control and
locate the Program button (Figure 2).
3
To enter programming mode on the new remote control,
press the program button until the LED on the remote
control turns on.
4
Press and hold the button that currently activates your
product on the existing remote control that you want to
copy to the new remote control. The LED on the new remote
control will flash.
5
Press and release the button on the new remote control that
you want to program. The LED on the new remote control
will flash rapidly, then return to a flash slowly. DO NOT
press the button after the LED flashes.
6
To exit programming mode, press and release the Program
button on the remote control. The LED on the remote
control will turn off.
7
To test, press and release the programmed button on the
remote control. The gate operator or commercial door
operator will activate.
FIGURE 1
Learn
LED
Learn
Button
OR Learn
LED
Learn
Button
OR
Learn
LED
Learn
Button
Program
Button
OPTION B
LED
FIGURE 2
HOW TO USE THE REMOTE CONTROL
Press and hold the button down until the door or gate starts to
move. The remote control will operate from up to 3 car lengths
away on typical installations. Installations and conditions vary,
contact an installing dealer for more information.
BATTERY
To prevent possible SERIOUS INJURY or DEATH:
• NEVER allow small children near batteries.
• If battery is swallowed, immediately notify doctor.
To reduce risk of fire, explosion or chemical burn:
• DO NOT recharge, disassemble, heat above 212° F (100° C)
or incinerate.
WARRANTY
ONE YEAR LIMITED WARRANTY
The Chamberlain Group, Inc. warrants to the first consumer
purchaser of this product that is free from defect in materials
and/or workmanship for a period of 1 year from the date of
purchase.
REPLACEMENT PARTS
NOTICE: To comply with FCC and or Industry Canada rules (IC), adjustment or
modifications of this receiver and/or transmitter are prohibited, except for changing the
code setting or replacing the battery. THERE ARE NO OTHER USER SERVICEABLE
PARTS.
Tested to Comply with FCC Standards for Home or office use. Operation is subject to the
following two conditions: (1) this device may not cause harmful interference, and
(2) this device must accept any interference received, including interference that may
cause undesired operation.
The LED(s) on your remote control will stop flashing when the
battery is low and needs to be replaced. To replace battery, open
the cover as shown. Insert battery. Replace the battery with AAA
batteries. Dispose of old battery properly.
Additional buttons on the remote control can be programmed to
operate up to 3 devices such as additional garage door openers,
light controls, gate operators or access control systems.
Visor Clip . . . . . . . . . . . . . . . . . . . . . . . . . . . . . . . . . . . . . 29B137
TÉLÉCOMMANDES À 2 BOUTONS ET À 4 BOUTONS
MODÈLES 892LT ET 894LT
La télécommande 892LT/894LT est compatible avec les ouvre-portes de garage, les motorisations de portails, les
motorisations de portes commerciales et les récepteurs commerciaux Security✚ 2.0™. La télécommande peut également
être programmée pour les produits Security✚ 2.0™ munis de commutateurs DIP cryptés. La télécommande peut
également être utilisée comme remplacement pour les modèles 972LM/974LM et 372LM/374LM de la télécommande
LiftMaster®.
Après avoir suivi les étapes de programmation appropriées, la télécommande 892LT et 894LT fonctionnera avec les
ouvre-portes de garage ou récepteurs qui utilisent les accessoires suivants :
• Série 890 (Security✚ 2.0™)
• Série 370 (Security✚ 315 MHz)
• Série 970 (Security✚ 390 MHz)
MODÈLE 892LT
AVERTISSEMENT
Afin d’éliminer les risques de BLESSURES GRAVES ou DE
MORT découlant de l’actionnement d’un portail ou d’une porte
de garage :
• TOUJOURS garder les télécommandes hors de la portée des
enfants. Ne JAMAIS laisser un enfant manipuler ou jouer
avec une télécommande.
• Actionner le portail ou la porte UNIQUEMENT lorsqu’il/elle
est clairement visible, correctement ajusté(e) et que le
mécanisme est libre de TOUTE entrave.
• TOUJOURS garder le portail ou la porte de garage en vue
jusqu’à sa fermeture complète. Ne laissez JAMAIS passer
quelqu’un lorsqu’un portail ou une porte est en mouvement.
AVERTISSEMENT
MODÈLE 894LT
ATTENTION
La télécommande 892LT et 894LT peut cloner les télécommandes avec commutateur DIP suivantes :
• 61LM (390 MHz)
• 361LM (315 MHz)
• 811LM (Security✚ 2.0™)
PROGRAMMATION
Il y a deux options de programmation différentes, en fonction de votre application. Si vous programmez la télécommande pour un contrôle à distance à partir d’un commutateur DIP existant, reportez-vous à l’OPTION B.
Pour tous les autres programmes, reportez-vous à l’OPTION A.
A
OPTION A
Les instructions concernent les portes de garage, mais les étapes
s’appliquent néanmoins pour les produits compatibles. Assurez-vous
que l’ouvre-porte de garage est doté d’une ampoule en état de marche
car celle-ci fait office d’indicateur de la programmation. Les illustrations
sont génériques, donc votre porte de garage peut être différente.
1
2
3
B
FIGURE 1
LED "LEARN" (APPRENTISSAGE)
OU
Repérez le bouton Learn (Apprentissage) sur l’ouvre-porte de garage
(Figure 1).
Retirez le couvercle de la pile de la nouvelle télécommande et repérez
le bouton Program (Programmation) (Figure 2).
Pour accéder au mode de programmation, enfoncez le bouton
Program (Programmation) jusqu’à ce que le voyant DEL de la
télécommande s’allume.
4
Enfoncez et relâchez le bouton Learn (Apprentissage) sur l’ouvre
porte de garage. Le voyant DEL Learn (Apprentissage) s’allume. Dans
les 30 secondes...
5
Enfoncez et relâchez le bouton de la télécommande que vous voulez
utiliser...
Vérifiez si l’ampoule de l’ouvre-porte de garage clignote. Si ce n’est
pas le cas, attendez que le voyant DEL de la télécommande s’allume
continuellement, puis enfoncez et relâchez de nouveau le bouton de
la télécommande doucement. Répétez l’opération jusqu’à ce que
l’ampoule clignote. N’enfoncez PAS le bouton une fois que l’ampoule
clignote.
6
Pour quitter le mode de programmation, enfoncez et relâchez le
bouton Program (Programmation) de la télécommande. Le voyant
DEL de la télécommande s’éteint.
7
Pour tester, enfoncez le bouton programmé de la télécommande.
L’ouvre-porte de garage se met alors à fonctionner.
LED "LEARN"
(APPRENTISSAGE)
Bouton "LEARN"
(APPRENTISSAGE)
Bouton "LEARN"
(APPRENTISSAGE)
OU
LED "LEARN"
(APPRENTISSAGE)
Bouton "LEARN"
(APPRENTISSAGE)
Bouton "LEARN"
(APPRENTISSAGE)
LED
OPTION B
ATTENTION
1
Vérifiez que la télécommande à commutateur DIP existante et la
nouvelle télécommande sont proches l’une de l’autre.
2
Retirez le couvercle de la pile de la nouvelle télécommande et repérez
le bouton Program (Programmation) (Figure 2).
3
Pour accéder au mode de programmation sur la nouvelle
télécommande, enfoncez le bouton Program (Programmation) jusqu’à
ce que le voyant DEL de la télécommande s’allume.
4
Enfoncez et maintenez le bouton qui active actuellement votre produit
sur la télécommande existante que vous voulez copier sur la nouvelle
télécommande. Le voyant DEL de la nouvelle télécommande se met à
clignoter.
5
Enfoncez et relâchez le bouton de la nouvelle télécommande que vous
voulez programmer. Le voyant DEL de la nouvelle télécommande se
met à clignoter rapidement, puis clignote plus lentement. N’enfoncez
PAS le bouton après que le voyant DEL clignote.
6
Pour quitter le mode de programmation, enfoncez et relâchez le
bouton Program (Programmation) de la télécommande. Le voyant
DEL de la télécommande s’éteint.
7
Pour tester, enfoncez le bouton programmé de la télécommande. La
motorisation du portail ou de la porte commerciale se met à
fonctionner.
FIGURE 2
AVERTISSEMENT
AVERTISSEMENT
AVERTISSEMENT
AVE
AVE
MODE D’EMPLOI DE LA TÉLÉCOMMANDE
AVERTISSEMENT
GARANTIE
PILE
GARANTIE LIMITÉE D’UN AN
Enfoncez le bouton et maintenez-le enfoncé jusqu’à ce que la porte ou le
portail commence à bouger. La télécommande fonctionne à partir d’une
distance de 3 voitures sur une installation typique. Les installations et les
conditions varient ; contactez un installateur pour plus d’informations.
AVERTISSEMENT
AVERTISSEMENT
Afin d’éliminer les risques de BLESSURES GRAVES ou de MORT :
• Ne JAMAIS laisser de jeunes enfants s’approcher des piles.
• Si la pile est avalée, en aviser immédiatement un médecin.
Pour réduire les risques d’incendie, d’explosion ou de brûlure
chimique :
• NE PAS recharger, démonter, chauffer à plus de 212° F (100° C)
ou incinérer.
La société Chamberlain Group, Inc. garantit à l’acheteur initial que le
produit est exempt de tout défaut de matériaux ou de fabrication
pendant une période d’un an à compter de la date d’achat.
ATTENTION
AVIS : Les règles de la FCC ou d’Industrie Canada (IC), ou les deux, interdisent tout
ajustement ou toute modification de ce récepteur et ou de cet émetteur, sauf pour
modifier le code ou pour remplacer la pile. IL N’EXISTE AUCUNE AUTRE PIÈCE
SUSCEPTIBLE D’ÊTRE ENTRETENUE PAR L’UTILISATEUR. Vérifié pour conformité
avec les normes de la FCC POUR UTILISATION À LA MAISON OU AU BUREAU.
L’utilisation est sujette aux deux conditions ci-après : (1) ce dispositif ne peut causer
des interférences nuisibles, et (2) ce dispositif doit accepter toute interférence reçue, y
compris une interférence pouvant causer un fonctionnement non désiré.
AVERTISSEMENT
PIÈCES DE RECHANGE
Visière . . . . . . . . . . . . . . . . . . . . . . . . . . . . . . . . . . . . . . . . . . . . . 29B137
ATTENTION
Le ou les voyants DEL sur votre télécommande cessent de clignoter
lorsque la pile est faible et doit être remplacée. Pour remplacer la pile,
ouvrez le couvercle comme indiqué. Insérez la pile. Remplacez la pile
avec des piles AAA. Éliminez la pile usagée de façon appropriée.
AVERTISSEMENT
Vous pouvez programmer des boutons supplémentaires sur la
télécommande pour actionner jusqu’à 3 mécanismes comme des portes
de garage supplémentaires, des commandes d’éclairage, des
motorisations de portail ou des systèmes de contrôle d’accès.
AVERTISSEMENT
AVERTISSEMENT
114A3935C
© 2013, The Chamberlain Group, Inc.
All Rights Reserved
Tous Droits Réservés
www.liftmaster.com
1-800-528-9131