1
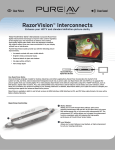
RazorVision™ Video Enhancement Cable
User Manual
This User Manual is for the
following RazorVision models:
AV62300ea/uk08
AV62400ea/uk08
AV61400ea/ukO8
Table of Contents
Page
RazorVision™ Video Enhancement Cable
Introduction ........................................................................... 2
Package Contents ............................................................. 3
Care and Maintenance ...................................................... 4
RazorVision Features ................................................... 5-6
Directions for Setup and Use ......................................7-8
Important Notes on Operation ........................................ 9
Troubleshooting Guide ................................................ 10-11
Specifications ....................................................................11
Instructions for Mounting RazorVision Unit ................12
Mounting Template .........................................................13
FCC and Warranty Statements ................................ 14-15
1
Introduction
The PureAV RazorVision Cable processes the video signal
coming from your source device and selectively enhances
contrast and other picture elements to provide more depth
to the images on your screen. Unlike the contrast control on
your TV, which adjusts every pixel on your screen equally,
regardless of what the image is, RazorVision uses proprietary
hardware and software to analyse the image and intelligently
apply change. The end result is more depth, more realism, and
a highly improved viewing experience.
RazorVision™ Video Enhancement Cable
Congratulations and thank you for buying the PureAV
RazorVision Video Enhancement Cable. This easy-to-use
product has been designed with your convenience in mind.
It will allow you to quickly make adjustments that will bring
your TV or projector’s video capabilities to life. RazorVision
optimizes both standard and high-definition video resolutions
and supports computer-video resolutions as well.
2
Package Contents
All RazorVision models come with these standard items:
RazorVision™ Video Enhancement Cable
•
•
•
•
•
RazorVision Unit
Power Adapter with 1.8M cord
2 Mounting Screws
User Manual
2 Cables*
*The Cable you get depends on the RazorVision model you purchased:
If you own this model:
You should have these cables...
AV61400ea/ukXX
2 HDMI™ Interface-to-DVI Video Cables
AV62300ea/ukXX
2 HDMI™ Interface Video Cables
AV62400ea/ukXX
1 HDMI™ Interface-to-DVI Video Cable
and 1 HDMI™ Interface Video Cable
and
3
Care and Maintenance
• Do not let the unit get wet.
• Clean with soft, dry cloth only.
• Do not use cleaning agents, as they may damage
the finish.
• Use only the supplied power adapter; use of other
power adapters may void warranty.
• For optimal performance, use only PureAV HDMI
and/or DVI Cables to connect the RazorVision to your
video equipment.
• Do not attempt to disassemble the RazorVision unit
yourself; there are no user-serviceable parts inside
the unit.
RazorVision™ Video Enhancement Cable
• Allow for ventilation; do not place the unit where it will
be exposed to temperatures below 32 degrees Fahrenheit
(0 degrees C) or above 104 degrees Fahrenheit
(40 degrees C).
4
RazorVision Features
RazorVision™ Video Enhancement Cable
1.
Status Indicator Button
a. Allows you to step through these 3 settings, each time you
press the button:
i. Split (display screen)—left side shows no enhancement,
right side shows RazorVision enhancement
ii. On—whole picture is RazorVision enhanced
iii. Off—RazorVision enhancement off
2. Level Indicator Button
a. Allows you to step through 3 levels of RazorVision
enhancement—low, medium, and high—each time you
press the button
2
1
4
3
5
3. HDMI Inputs
a. Plug in HDMI connectors of supplied cables
4. USB Data Input
a. Connects to your PC or Mac® computer for upgrades if needed
5. DC Power Input
a. Connects the supplied power adapter’s DC plug
5
RazorVision Features
(continued)
5
2
1
3
4
1. 24k Gold-Plated Connectors
create precise contact for
low loss
2. Precision-Formulated,
Polyethylene Dielectric
Material maintains stronger
signals that yield superior
video accuracy
3. Silver-Plated Conductors
deliver best high-frequency
response for optimal resolution
4. 99.99% Oxygen-Free,
Solid-Copper Conductors
and High-Purity, Silver
Solder Joints drastically
reduce signal distortion for
unrivalled video clarity
RazorVision™ Video Enhancement Cable
PureAV HDMI and DVI Cable Features
5. Five-Layer Shielding
isolates from outside
noise for superior clarity
Ferrite Inductor Blocks
protect against unwanted
interference (not shown)
6
��������������
�������������
Directions for Setup and Use
���������������
������������
�������������
��������������
RazorVision™ Video Enhancement Cable
Here are the illustrations for connecting RazorVision by
model number:
���������������
������������
AV61400ea08 and AV61400uk16
�������������
�������������
���������������
������������
��������������
AV62300ea08 and AV62300uk16
��������������
��������������
��������������
��������������
��������������
������������
���������������
������������
������������
���������������
���������������
AV62400ea08 and AV62400uk16
��������������
�������������
��������������
��������������
�������������
�������������
���������������
������������
������������
������������
��������������
��������������
��������������
or
���������������
���������������
�������������
�������������
�������������
������������
���������������
������������
������������
���������������
���������������
Here are step-by-step directions on connecting and adjusting
�������������
�������������
your RazorVision
unit:
1.
�������������
�������������
�������������
�������������
���������������
������������
Take
one digital cable and plug in one end to the HDMI
or
���������������
DVI������������
output on the video source device and the other���������������
end to
������������
the HDMI input on the RazorVision side marked “From Video
Source”. (Common video sources include: cable and satellite
boxes, DVD players, DVRs, TiVo®, and D-VHS units.)
2. Take the second digital cable and plug in one end to the HDMI
or DVI input on the TV, and the other end to the HDMI output
on the RazorVision side marked “To TV/Monitor”. NOTE: The
RazorVision Cable works with all display types—CRT, LCD,
plasma, DLP, and video projector.
7
Directions for Setup and Use
4. Plug in the RazorVision AC adapter to a wall outlet or power
console. Insert the DC plug into the DC receptacle on the side
of the RazorVision.
5. The lights on both sides of the RazorVision will flash for a few
seconds to indicate it is connecting with the video equipment.
When the lights on both sides stop blinking and remain
continuously on, the RazorVision is ready.
6. Some TVs will auto-detect the correct display source and
you will see a picture. If this does not happen, go to the video
menu option of your display and change it to DVI or HDMI
input. Depending on the TV used, the exact source name
for the digital connection will vary.
7. RazorVision can show an image in three ways:
a. Processing off (no image enhancement or modification);
b. Processing on (full-screen image enhancement)—this is
the normal viewing condition; and
c. Split screen (image enhancement off on the left half, and
on for the right half).
RazorVision™ Video Enhancement Cable
3. Turn on your TV and your source device.
To change how RazorVision is showing the image, push the
“Status” button to cycle through the three views. Each button
press will take you one step forward in the cycle.
8. With the RazorVision image enhancement on (in either
split- or full-screen view), push the “Level” button to cycle
through the three levels of processing. Now you can choose
whichever level is best for your TV and viewing conditions,
according to your personal preference.
8
Important Notes on Operation
RazorVision™ Video Enhancement Cable
• For the best effect, use RazorVision processing with HDTV,
or with source material (such as a DVD) that has been
up-converted to either 720p or 1080i. Your TV display should
indicate the resolution you are watching when the source
connection is first made. You can also check this in your TV’s
video display settings. Consult your TV manufacturer’s user
manual on how to do this.
• When connected to some TVs, the RazorVision Level LED will
blink continuously if the TV is powered off. Turning on the TV
causes the Level LED to stop blinking and remain continuously
on, indicating a good connection.
• If the source device is powered off, the RazorVision Status LED
will blink for approximately 15 seconds; then, the RazorVision
will automatically go into sleep mode. To wake up the
RazorVision from sleep mode, power on the source device.
When the Status and Level lights are both continuously on, the
unit is ready for operation.
• When the RazorVision is powered off, the device remembers
the last settings chosen by you and your picture will be
processed with those settings the next time you turn on
your equipment.
• If your source device is an up-converting DVD player with a DVI
or HDMI output, it should automatically choose the optimum
format and resolution for the TV. If it does not, or you wish
to pick a resolution other than the one your source device
chooses, you must adjust the resolution manually. This is done
either by pushing a button on the player or choosing an option
inside the player’s menu.
• RazorVision is compliant with both the HDMI and HDCP
standards. It has been designed with Plug-and-Play simplicity
and tested on a whole host of combinations of video products.
In the unlikely event the device fails to connect properly,
please see the Troubleshooting section for tips to get you
up and running quickly.
• RazorVision features a built-in USB port. This port is designed
to make the unit easily serviceable if an issue cannot be first
corrected via the Troubleshooting section of this User Manual.
If you need to contact Belkin Technical Support, please provide
the make and model number of your TV or projector and the
source device you connected with the RazorVision Cable.
9
Troubleshooting Guide
Solution
Status light is continuously
on but the Level light blinks
continuously for more than
15 seconds.
This indicates that no display has
been detected.
1. Check the connection between the
RazorVision unit and the TV.
2. Make sure your TV is powered on.
Level light is continuously
on but the Status light blinks
continuously for about 15
seconds; then, the lights on
the RazorVision turn off.
This indicates that no source
input was detected.
When I connect my TV
directly to my source device
without RazorVision, I get
a picture. When I add the
RazorVision unit to my
connection, I get snow, a
blinking picture, or no picture.
This may indicate that RazorVision is
having a problem communicating with
your video equipment. If this is the
issue, it can easily be resolved but first
try the following four suggestions.
1. Check that the connections from
your TV to the RazorVision unit to
your source device are all okay.
2. Make sure your TV, source device,
and the RazorVision
are all powered on.
3. Make sure your TV is set
to HDMI or DVI video mode.
4. Unplug the RazorVision. Wait 10
seconds and then plug it back in.
The RazorVision unit will turn on
automatically.
5. If you have tried the above four
suggestions and the RazorVision
unit still is not functioning, please
contact Belkin Technical Support at
00 800 223 55 460 for assistance.
Please provide the make and model
number of both your TV and source
device.
1. Check the connection between
the RazorVision unit and your
source device.
2. Make sure your source device is
powered on.
RazorVision™ Video Enhancement Cable
Symptom
10
Troubleshooting Guide (continued)
RazorVision™ Video Enhancement Cable
Symptom
Solution
I get a picture but no sound.
1. If you are using DVI connections
on either your TV or your source
device, then you must use separate
audio cables.
2. If you are using HDMI connections
on both your TV and source device,
check the menu settings on your
source and/or display to adjust
audio for HDMI.
TV and source device are
both on but RazorVision
is off.
1. Check power connection
to RazorVision.
2. Push the “Status” button at the
front of the RazorVision until it
shows either “On” or “Split”.
Specifications
Television system supported:
ATSC (Advanced Television Systems Committee)
Supports the following display resolutions
for televisions/projectors:
480i, 480p, 720p, 1080i
Supports display resolutions for computer
monitors up to 1024x768
Supports HDMI specifications, revision 1.1
Supports HDCP specifications, revision 1.1
Power Requirements:
Input: 100-240V AC, 50-60Hz
Output: 5V, 1.1A
Replacement Power Supply:
Part Number RV60001ea06 for continental use
RV60001uk06 for uk use
11
Instructions for Mounting
RazorVision Unit
1. Cut out the template on the following page along the
perforated lines.
2. Place the page where you want to install the
RazorVision.
3. Use a hammer and a small nail to make a starter hole
for the screws.
4. Remove the template page from your cabinet or wall.
5. Tighten the supplied screws into your cabinet or
wall, stopping approximately 1/8 inch (3mm) short
of fully tightened.
6. Place the RazorVision mounting holes over these screws
and then slide the unit down approximately 1/4 inch
(6mm) until it locks in place.
RazorVision™ Video Enhancement Cable
If you wish to mount the RazorVision to the inside of
your cabinet or to your wall, please follow these steps:
Replacement screws to mount the RazorVision are
available at any hardware store; ask for #6 round head
slotted wood screws.
12
Cut along the perforated lines.
RazorVision™ Video Enhancement Cable
13
FCC Statement
DECLARATION OF CONFORMITY WITH FCC RULES
FOR ELECTROMAGNETIC COMPATIBILITY
Europe-European Union
Notice
Products with the CE marking comply with the EMC Directive
(89/336/EEC) and the Low Voltage Directive (72/23/EEC) issued
by the Commission of the European Community. Compliance with
these directives implies conformity to the following European
Norms (in brackets are the equivalent international standards).
• EN 55022 (CISPR 22) – Electromagnetic Interference
• EN 55024 (IEC61000-4-2,3,4,5,6,8,11) – Electromagnetic
Immunity
• EN 61000-3-2 (IEC61000-3-2) – Power Line Harmonics
• EN 61000-3-3 (IEC61000) – Power Line Flicker
• EN 60950 (IEC60950) – Product Safety
RazorVision™ Video Enhancement Cable
We, Belkin Corporation, of 501 West Walnut Street, Compton, CA
90220, declare under our sole responsibility that the product,
RV60000, to which this declaration relates, complies with Part
15 of the FCC Rules. Operation is subject to the following two
conditions: (1) this device may not cause harmful interference,
and (2) this device must accept any interference received,
including interference that may cause undesired operation.
Following information is
only for EU-member states:
The use of the symbol indicates that this product may not
be treated as household waste. By ensuring this product is
disposed of correctly, you will help prevent potential negative
consequences for the environment and human health,
which could otherwise be caused by inappropriate waste
handling of this product. For more detailed information
about recycling of this product, please visit our web at
www.belkin.com (or contact your local city office, your
household waste disposal service or the shop where you
purchased the product)
14
Belkin Corporation Limited
Lifetime Product Warranty
RazorVision™ Video Enhancement Cable
Belkin Corporation warrants this product against defects
in materials and workmanship for its lifetime. If a defect is
discovered, Belkin will, at its option, repair or replace the
product at no charge provided it is returned during the
warranty period, with transportation charges prepaid, to
the authorized Belkin dealer from whom you purchased the
product. Proof of purchase may be required.
This warranty does not apply if the product has been
damaged by accident, abuse, misuse, or misapplication; if the
product has been modified without the written permission of
Belkin; or if any Belkin serial number has been removed or
defaced.
THE WARRANTY AND REMEDIES SET FORTH ABOVE ARE
EXCLUSIVE IN LIEU OF ALL OTHERS, WHETHER ORAL OR
WRITTEN, EXPRESSED OR IMPLIED. BELKIN SPECIFICALLY
DISCLAIMS ANY AND ALL IMPLIED WARRANTIES,
INCLUDING, WITHOUT LIMITATION, WARRANTIES OF
MERCHANT ABILITY AND FITNESS FOR A PARTICULAR
PURPOSE.
No Belkin dealer, agent, or employee is authorized to make
any modification, extension, or addition to this warranty.
BELKIN IS NOT RESPONSIBLE FOR SPECIAL, INCIDENTAL,
OR CONSEQUENTIAL DAMAGES RESULTING FROM ANY
BREACH OF WARRANTY, OR UNDER ANY OTHER LEGAL
THEORY, INCLUDING BUT NOT LIMITED TO LOST PROFITS,
DOWNTIME, GOODWILL, DAMAGE TO OR REPROGRAMMING,
OR REPRODUCING ANY PROGRAM OR DATA STORED IN OR
USED WITH BELKIN PRODUCTS.
Some states do not allow the exclusion or limitation of
incidental or consequential damages or exclusions of implied
warranties, so the above limitations or exclusions may not
apply to you. This warranty gives you specific legal rights,
and you may also have other rights that vary from
state to state.
15
www.pureav.com
Belkin Ltd.
Express Business Park
Shipton Way, Rushden
NN10 6GL, United Kingdom
+44 (0) 1933 35 2000
+44 (0) 1933 31 2000 fax
Belkin GmbH
Hanebergstrasse 2
80637 Munich
Germany
+49 (0) 89 143405 0
+49 (0) 89 143405 100 fax
Belkin B.V.
Boeing Avenue 333
1119 PH Schiphol-Rijk
The Netherlands
+31 (0) 20 654 7300
+31 (0) 20 654 7349 fax
Belkin SAS
130 rue de Silly
92100 Boulogne-Billancourt
France
+33 (0) 1 41 03 14 40
+33 (0) 1 41 31 01 72 fax
Belkin Tech Support
Europe: 00 800 223 55 460
© 2005 Belkin Corporation. All rights reserved. All trade names are registered
trademarks of respective manufacturers listed. HDMI and High-Definition Multimedia
Interface are trademarks or registered trademarks of HDMI Licensing LLC.
P74920uk