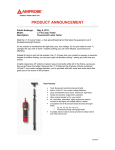
1
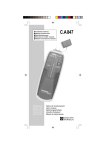
C.A 870
C.A 872
Thermomètre infrarouge
Infrared thermometer
■ Infrarot-Thermometer
■ Termometro a infrarossi
■ Termómetro infrarrojo
■
■
FRANÇAIS
ENGLISH
DEUTSCH
I TA L I A N O
E S PA N O L
Notice de fonctionnement
User's manual
Bedienungsanleitung
Libretto d’Istruzioni
Manual de Instrucciones
1
English
Meaning of the ! symbol
Warning ! Please refer to the User’s Manual before using
the instrument.In this User’s Manual, the instructions
preceded by the above symbol, should they not be carried
out as shown, can result in a physical accident or dammage
the instrument and the installations.
Significance of the LASER symbol
Laser radiation, do not look at the LASER beam.
LASER output < 0.5 mW
650 mm wavelength
Class II LASER, as per IEC 60825 standard (Ed. 1991)
Thank you for purchasing this C.A. 870 or C.A. 872
thermometer.
To get the best service from this instrument:
n read this user’s manual carefully,
n respect the safety precautions detailed
!
PRECAUTIONS FOR USE
!
■ Do not place the thermometer on or close to objects with
temperatures of > 65°C / 150°F)
■ If the thermometer is subjected to strong ambient temperature
variations, wait 20 minutes after stabilization before resuming
measurement.
■ Do not expose the thermometer to strong electrical or
magnetic fields since they may cause measurement errors
(e.g. induction heating, arc welding kits, etc.).
■ Do not direct the LASER beam of the C.A.872 towards your
eyes.
■ Comply with the environmental conditions (see § 5)
■ Keep the lens perfectly clean
WARRANTY
Our guarantee is applicable for twelve months after the date
on which the equipment is made available (extract from our
General Conditions of Sale, available on request).
8
CONTENTS
1. PRESENTATION ................................................................ 9
2. OPERATION - EMISSIVITY ............................................... 9
3. DESCRIPTION .................................................................10
4. USE ..................................................................................10
5. SPECIFICATIONS ...........................................................11
6. MAINTENANCE ................................................................. 6
7. TO ORDER .......................................................................13
8. APPENDIX .......................................................................32
1. PRESENTATION
C.A 870 and C.A 872 infrared thermometers are temperature
measurement instruments that do not require contact.
The C.A. 872 allows greater measuring accuracy, thanks to its
LASER sight.
To measure the temperature of an object, simply point the probe
at the surface of the object and the temperature will be displayed
on the digital display, the thermometer will switch off
automatically.
2. OPERATION - EMISSIVITY
All objects whose temperature is higher than absolute zero (273,15 K) emit infrared energy. This energy radiates in all
directions at the speed of light.
When you point the probe at an object, the probe’s lens senses
this energy and focuses it onto an infrared detector constituted
by a stack of thermocouples. This detector transmits a voltage
signal proportional to the amount of energy received, which
means that it is proportional to the object’s temperature.
Certain objects emit infrared energy but also reflect it. Unlike
matt surfaces, shiny or highly-polished surfaces tend to reflect
energy. This reflection is represented by a factor called emissivity
which may vary from 0.1 for a highly reflective object to 1 for a
black object.
In the case of the C.A 870 and C.A. 872 thermometers, the
emissivity is preset at 0.95, the most frequent value, enabling
approximately 90% of applications to be covered.
9
1
3. DESCRIPTION
See § 8. Attachment (at the end of this user’s manual)
➀
➁
➂
Measurement lens
LASER sight orifice (C.A. 872)
Backlit liquid crystal display
- Main display: ± numeric value of the temperature
in 3½ digits or OL error code
- Symbols:
LASER in operation (C.A. 872)
Low battery
°C/°F
➃
➄
➅
➆
Value saved to memory
Value of unit displayed
Switches the display backlighting off and on
Switches the LASER off / on (C.A. 872)
Yellow on/off and measurement activation pushbutton
°C/°F conversion pushbutton
4. USE
!
Never direct the LASER beam towards your eyes.
4.1
Procedure
1. Give a short press on the yellow pushbutton ➅ to switch the
instrument on
2. Configure the instrument with the following keys:
➃ activates the display backlighting
➄ activates/deactivates the LASER sight
3. Choose °C or °F as the measuring unit using ➆ with ➅
pressed and held down
4. Point the thermometer towards the temperature
measurement target using the LASER sight (C.A 872) or
not, (see § 4.2 and 4.3) and press on the yellow pushbutton
➅.
If the key is held down, the thermometer will constantly
measure any variations in temperature.
is displayed
5. Release the yellow button, the symbol
to indicate that the value displayed is the last value measured.
Note: The instrument switches itself off automatically after a
few seconds and keeps the last configuration of key ➆ in
memory.
If the temperature measured is outside the measurement
range, the thermometer will display OL.
10
4.2
Precautions for measurement
4.3
Ratio between distance from target / diameter
of measurement field
■ If the surface to be measured is ≤ Ø 50 mm, hold the probe
as close as possible to the surface (less than 50 cm away)
(see § 4.3)
■ If the surface to be measured is covered in frost or other
particles, clean it so that the surface is clear before taking a
measurement.
■ If the surface to be measured is highly reflective, stick matt
tape or apply matt paint to the surface before measuring.
■ If the thermometer appears to be giving incorrect indications,
check the condition of the lens of the measuring orifice, since
it may be obscured by condensation or particles. If so, clean
it by carefully following the instructions in § 6.3 Upkeep.
This ratio, also called the field of vision, indicates the diameter
of the measurement field at a given distance from the target,
D/Ø = 10/1 (see figure below).
The minimum measurement distance is 150mm - this
gives a measurement spot diameter of 15mm.
In the case of small measurement points, it is important to
bring the probe sufficiently close to the target to avoid including
other points in the measurement field.
Diameter of measurement field
Ø 200 mm
Ø 150
Ø 100
Ø 50
0
50
100
150
Distance from target
2 0 0
cm
5. SPECIFICATIONS
■
■
■
■
■
Measurement range: -20 °C to +260°C (0° to 500°F)
Resolution: 1°C/°F
Polarity indication: automatic (- values only)
Adjustment of zero: automatic
Accuracy: ±2% of the reading or ±3°C/6°F (the highest) at an
11
■
■
■
■
■
■
■
■
■
!
■
■
ambient temperature of +18 to +28°C (64.4 to 82.4°F) (the
highest) and for a distance from the target of up to 10 cm.
Temperature drift: ±0.% L or 0.2°C (0.36°F) (the highest)
in °C or °F, >28°C (82.4°F) or <18°C (64.4°F)
Spectral response: 6 to 14 µm
Emissivity: preset at 0.95
Response time: 1 sec
Repeatability: ±1% L or ±1°C (the highest)
LASER sight: < 0.5 mW (670 nm typ.)
Utilisation environment
0 to +50°C (32°F to 122°F) <75% RH
Storage environment
-20°C to +60°C, (-4°F to 140°F), 0 to 80% RH, without
battery
Power supply:9 V battery type 6LR61 or 6LF22
Dimensions / Weight
173 x 60.5 x 38 mm / 190 g with batteries
Electromagnetic compatibility
Emission as per EN 50081- Ed. 1992
Emission as per EN 50082- Ed. 1992
6. MAINTENANCE
For maintenance, use only specified spare parts. The
manufacturer will not be held responsible for any accident
occuring following a repair done other than by its After Sales
Service or approved repairers.
6.1
Upkeep
6.1.1 Changing the battery
■ Remove the cover at the back of the instrument
■ Replace the old battery (9 V 6LR61 or 6LF22 type)
6.2
!
6.3
!
■
■
!
Operating test
For a quick check that the probe is functioning correctly, point
the lens at water with ice cubes in it, since this provides a simple
reference for 0°C (32°F).
■
Cleaning the lens
Remove dust using a clean rubber dust-removing bulb
Carefully remove any remaining particles using a clean, soft
cloth
Carefully clean the lens with a damp, soft cloth and leave to dry.
Do not use solvents
6.4
Cleaning the housing
Clean the unit with a cloth and a little soapy water. Clean off with
a damp cloth.
Do not use any solvents.
12
6.5
Metrological Checks
It is essential that all measuring instruments are regularly
calibrated.
For checking and calibration of your instrument, please contact
our accredited laboratories (list on request) or the Chauvin
Arnoux subsidiary or Agent in your country.
6.6
Repairs
Repairs under or out of guarantee: please return the product to
your distributor.
7. TO ORDER
C.A 870 ............................................................. P01.6514.01Z
C.A 872 ............................................................. P01.6514.02Z
Comes with shock-proof surround, 9 V battery and these
operating instructions.
Spare parts:
Battery .................................................................. P01.1007.32
13