1
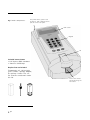
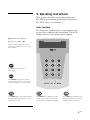
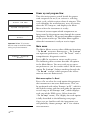
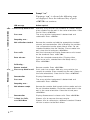
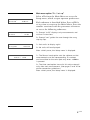
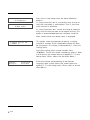
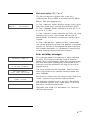
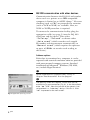
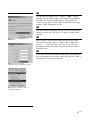
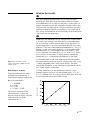
user manual DQ 200 Hoefer DQ 200 fluorometer user manual um DQ200-IM/Rev. E0/06-04 Page finder 1. Fluorometer function and description Unpacking . . . . . . . . . . . . . . . . . . . . . . . . . . . . . . . . . . . . . . . . . . . . . . . . . . . . . . . . . . 1 Specifications . . . . . . . . . . . . . . . . . . . . . . . . . . . . . . . . . . . . . . . . . . . . . . . . . . . . . 3 Important information. . . . . . . . . . . . . . . . . . . . . . . . . . . . . . . . . . . . . . . . . . 4 Instrument set-up . . . . . . . . . . . . . . . . . . . . . . . . . . . . . . . . . . . . . . . . . . . . . . . 5 2. Fluorometry principles and method overview Fluorescence measurement . . . . . . . . . . . . . . . . . . . . . . . . . . . . . . . . . . 6 Method overview . . . . . . . . . . . . . . . . . . . . . . . . . . . . . . . . . . . . . . . . . . . . . . . . . 7 Important measurement notes . . . . . . . . . . . . . . . . . . . . . . . . . . . . . . 8 3. Operating instructions User interface . . . . . . . . . . . . . . . . . . . . . . . . . . . . . . . . . . . . . . . . . . . . . . . . . . . . . 9 Power up and program flow . . . . . . . . . . . . . . . . . . . . . . . . . . . . . . . . 10 Main menu . . . . . . . . . . . . . . . . . . . . . . . . . . . . . . . . . . . . . . . . . . . . . . . . . . . . . . . 10 Error and other messages . . . . . . . . . . . . . . . . . . . . . . . . . . . . . . . . . . . 15 DQ 200 communications with other devices . . . . . . . 16 4. DNA Quantitation Guidelines for H33258/DNA assay . . . . . . . . . . . . . . . . . . . . . 18 Solutions . . . . . . . . . . . . . . . . . . . . . . . . . . . . . . . . . . . . . . . . . . . . . . . . . . . . . . . . . . 20 Protocol . . . . . . . . . . . . . . . . . . . . . . . . . . . . . . . . . . . . . . . . . . . . . . . . . . . . . . . . . . . 21 Generate a standard concentration curve . . . . . . . . . . . . . 23 Analyze the results . . . . . . . . . . . . . . . . . . . . . . . . . . . . . . . . . . . . . . . . . . . . 25 5. Enzyme Activity Quantitation Solutions . . . . . . . . . . . . . . . . . . . . . . . . . . . . . . . . . . . . . . . . . . . . . . . . . . . . . . . . . . 26 Protocol . . . . . . . . . . . . . . . . . . . . . . . . . . . . . . . . . . . . . . . . . . . . . . . . . . . . . . . . . . . 27 Generate a standard concentration curve . . . . . . . . . . . . . 28 6. Care and maintenance Cleaning . . . . . . . . . . . . . . . . . . . . . . . . . . . . . . . . . . . . . . . . . . . . . . . . . . . . . . . . . . . 30 Optical block disassembly . . . . . . . . . . . . . . . . . . . . . . . . . . . . . . . . . . 30 Optical block assembly . . . . . . . . . . . . . . . . . . . . . . . . . . . . . . . . . . . . . . 33 7. Troubleshooting . . . . . . . . . . . . . . . . . . . . . . . . . . . . . . . . . . . . . . . . . . . . . . . . . . 34 Appendices A. Enzyme assay protocols β-Glucuronidase . . . . . . . . . . . . . . . . . . . . . . . . . . . . . . . . . . . . . . . . . . . . 37 β-Galactosidase . . . . . . . . . . . . . . . . . . . . . . . . . . . . . . . . . . . . . . . . . . . . 43 B. Effect of A+T content on fluorescent . . . . . . . . . . . . . 48 DNA quantitation C. Main bibliography . . . . . . . . . . . . . . . . . . . . . . . . . . . . . . . . . . . . . . . . . 51 Ordering information . . . . . . . . . . . . . . . . . . . . . . . . . . . . . . . . . . . . . . . . . . . . . . . 52 • pi Important user information Please read this entire manual to fully understand the safe and effective use of this product. English The exclamation mark within an equilateral triangle is intended to alert the user to the presence of important operating and maintenance instructions in the literature accompanying the instrument. If you have any comments on this manual, please send them to us at: Hoefer, Inc. 953 Indiana Street San Francisco, CA 94107 USA [email protected] Hoefer, Inc. reserves the right to make changes in the specifications without prior notice. Warranty and liability Hoefer, Inc. guarantees that the product delivered has been thoroughly tested to ensure that it meets its published specifications. The warranty included in the conditions of delivery is valid only if the product has been installed and used according to the instructions supplied by Hoefer, Inc. Hoefer, Inc. shall in no event be liable for incidental or consequential damages, including, without limitation, lost profits, loss of income, loss of business opportunities, loss of use, and other related exposures, however caused, arising from the faulty or incorrect use of the product. © 2004 Hoefer, Inc. All rights reserved. No part of this publication may be reproduced, stored in a retrieval system, or transmitted in any form by any means, without permission in written form from the company. • pii Renseignements importants d’utilization Français Pour une bonne compréhension et une utilisation en sécurité maximale, il convient de lire entièrement ce manuel. Dans la documentation qui accompagne l’instrument un point d’exclamation dans un triangle équilatéral a pour but d’attirer l’attention de l’utilisateur sur des instructions importantes de fonctionnment ou de maintenance. Tous vos commentaires sur ce manuel seront les bienvenus et veuillez les adresser à: Hoefer, Inc. 953 Indiana Street San Francisco, CA 94107 USA [email protected] Hoefer, Inc. se réserve le droit d’effectuer des modifications de ces spécifications sans aucun préavis. Garantie et responsabilité Hoefer, Inc. garantit à l’utilisateur que le produit livré a subi avec succès tous les essais prévus pour s’assurer qu’il est conforme aux spécifications et normes en vigueur. La garantie incluse dans les conditions de livraison n’est valable que si le produit a été installé et utilisé conformément aux instructions fournies par Hoefer, Inc. La société Hoefer, Inc. ne sera en aucun cas responsable de tout dommage causé directement ou indirectement par toute utilisation incorrecte ou non approuvée du produit ou découlant de cette utilisation, y compris toute perte de bénéfice ou de recettes, toute perte de perspectives commerciales, tout empêchement d’utilisation, et tout autre risques ayant un rapport avec l’utilisation du produit, mais sans aucune limitation quant à la nature de ces dommages. © 2004 Hoefer, Inc. Tous droits réservés. La reproduction, le stockage dans un système de récupération d’informations, ou la transmission sous quelque forme que ce soit et par quelque moyen que ce soit de la présente publication en totalité ou en partie sont strictement interdits, sans autorisation préalable écrite de la société. • piii Información importante para el usuario Español Para comprender el producto y utilizarlo con seguridad es necesario leer este manual en su totalidad. El signo de admiración en un triángulo equilátero en el manual, advierte al usuario sobre la presencia de instrucciones importantes de operación y mantenimiento del aparato. Si desearan hacer algún comentario sobre este manual, tengan la amabilidad de remitirlo a: Hoefer, Inc. 953 Indiana Street San Francisco, CA 94107 USA [email protected] Hoefer, Inc. se reserva el derecho a modificar las especificaciones sin previo aviso. Garantía y responsabilidad Hoefer, Inc. garantiza que el producto entregado ha sido probado a fondo para comprobar el cumplimiento de las especificaciones publicadas. La garantía incluida en las condiciones de entrega sólo es válida si el producto se ha instalado y utilizado de acuerdo con las instrucciones entregadas por Hoefer, Inc. Hoefer, Inc. no será responsable, bajo ningún concepto, de daños directos o indirectos, incluyendo sin limitación la pérdida de beneficios, la pérdida de ingresos, la pérdida de oportunidades de negocio, la pérdida de utilización, y otras consecuencias relacionadas, cualquiera que sea la causa, que se deban a la utilización defectuosa e incorrecta del producto. © 2004 Hoefer, Inc. Reservados todos los derechos. No está permitida la reproducción, ni el almacenaje en un sistema de recuperación, ni la transmisión de parte alguna de esta publicación, sin la autorización por escrito de la empresa. • piv Wichtige benutzerinformationen Für ein vollständiges Verständnis und eine sichere Handhabung dieses Produktes ist es notwendig, daβ der Benutzer dieses Handbuch vollständig durchliest. Deutsch Ein Ausrufezeichen in einem gleichseitigen Dreieck soll den Benutzer auf die Anwesenheit wichtiger Betriebs und Wartungsanweisungen in der dem Gerät beiliegenden Dokumentation hinweisen. Wenn Sie Anmerkungen zu diesem Handbuch haben, dann senden Sie diese bitte an: Hoefer, Inc. 953 Indiana Street San Francisco, CA 94107 USA [email protected] Hoefer, Inc. behält sich das Recht vor, die Spezifikationen ohne vorhergehende Ankündigung zu ändern. Gewährleistung and haftung Hoefer, Inc. garantiert, daβ das gelieferte Produkt sorgfältig auf die Einhaltung der veröffentlichten Spezifikationen getestet wurde. Die in den Lieferbedingungen näher erläuterten Gewährleistungsansprüche gelten nur dann, wenn das Produkt gemäβ den von Hoefer, Inc. gelieferten Anweisungen installiert und benutzt wurde. Hoefer, Inc. übernimmt keinerlei Haftung für Schäden oder Folgeschäden, einschlieβlich, aber nicht begrenzt auf Gewinneinbuβen, Einkommensverluste, entgangene Geschäftsabschlüsse, Verlust der Gebrauchsfähigkeit oder andere Verluste, die wie auch immer durch eine fehlerhafte oder unsachgemäβe Verwendung des Produkts verursacht wurden. © 2004 Hoefer, Inc. Alle Rechte vorbehalten. Die vorliegende Veröffentlichung darf nur mit vorhergehender schriftlicher Genehmigung durch das Unternehmen vervielfältigt, in einem Abrufsystem gespeichert, oder in irgendeiner Form, oder mit irgendwelchen Mitteln übertragen werden. • pv Informazioni importanti per l’operatore Italiano Per un utilizzo sicuro del prodotto, leggere attentamente l’intero contenuto del presente manuale. Il punto esclamativo all’interno di un triangolo equilatero indica all’operatore la presenza di importanti istruzioni di funzionamento e manutenzione nella documentazione allegata al prodotto. Si prega di inviare eventuali commenti al presente manuale a: Hoefer, Inc. 953 Indiana Street San Francisco, CA 94107 USA [email protected] Hoefer, Inc. si riserva il diritto di apportare modifiche ai dati tecnici senza preavviso. Garanzia e responsabilitá Hoefer, Inc. garantisce che prima della consegna il prodotto è stato collaudato a fondo per soddisfare i requisiti specificati. La garanzia inclusa nelle condizioni di consegna risulta valida solamente se il prodotto è stato installato ed utilizzato nel rispetto delle istruzioni fornite da Hoefer, Inc. Hoefer, Inc. non potrà essere ritenuta responsabile di incidenti o danni consequenziali, inclusi’ma non limitati’a perdite di profitti, mancato guadagno, perdite di affari, difetti di funzionamento e relative esposizioni, dovuti ad un utilizzo non corretto del prodotto. © 2004 Hoefer, Inc. Tutti i diritti riservati. Nessuna parte della presente pubblicazione può essere riprodotta, conservata in sistemi di gestione dati, o trasmessa in alcun forma, né per nessuno scopo senza autorizzazione scritta del produttore. • pvi 1. Fluorometer function and description Note: Fluorescent emission output is not strictly linear, and it is affected by numerous variables. If the procedures in this manual are followed closely, accurate concentration measurements can be made with a high degree of reliability. The Hoefer DQ 200 Fluorometer is a filter fluorescence photometer with a fixed excitation bandpass source (365 nm) and an emission bandpass filter (460 nm). It is designed specifically for the accurate quantitation of low DNA concentrations using Hoechst 33258 dye. The instrument can also measure enzyme activity based on the cleavage of coumarin- (methylumbelliferyl-) linked substrates as well as other fluorescent assays for which these excitation and emission wavelengths are appropriate. A calf thymus DNA standard and the Hoechst 33258 dye are included to provide a reference point to calibrate the instrument. The sample measurement cell (cuvette, capillary adaptor, or capillary cuvette) is ordered separately. A glass cuvette is recommended for 2 ml assays. Two kits for handling micro-samples are available: The Capillary Adaptor Kit includes a capillary adaptor and capillary tubes for 10 to 100 µl of solution. The Capillary Cuvette Adaptor Kit includes a focusing cuvette cell holder, which provides increased sensitivity, and capillary tubes for 3 to 9 µl of solution. Unpacking Unwrap all packages carefully and compare contents with the packing list, making sure all items arrived. If any part is missing, contact your local sales office. Inspect all components for damage that may have occurred while the unit was in transit. If any part appears damaged, contact the carrier immediately. Be sure to keep all packing material for damage claims or for repacking should it become necessary to return the unit. • p1 Fig 1. Main components. The power switch, power cord receptacle, and communications port are on the rear panel. LCD screen Keypad Lid Included but not shown: • Calf thymus DNA standard • Hoechst 33258 dye Required but not included: Fluorometry cell, left to right: glass cuvette, capillary adaptor, or capillary cuvette. The cell fits into the cuvette well under the lid. • p2 Access the cuvette well by pressing the lid release. Specifications This declaration of conformity is only valid for the instrument when it is: • used in laboratory locations, and • used as delivered from Hoefer, Inc. except for alterations described in the user manual. Power input rating 115 V~ or 230 V~ 47– 63 Hz Fuse value T 3.15A, 250V microfuse Light source Mercury lamp (expected life 5000 hr) Lamp output 365 nm ± 7 nm Emission filter 460 nm ± 15 nm Environmental operating conditions Indoor use: 15 – 40 °C, dry area, away from intense light such as direct sunlight. Humidity: less than 80% for 5 – 31 °C, decreasing linearly to 50% for 31– 40 °C Altitude: up to 2000 m Installation category: II Pollution degree: 2 Dimensions (h × w × d) 13 × 16.5 × 35 cm Product certifications UL 61010A-1, CSA C22.2 1010.1, CE Certified • p3 Important information • Hoechst 33258 dye is a possible mutagen. Wear gloves when handling. Wear a mask when weighing. Disposal must comply with all applicable regulations. Never dispose of by pouring into a drain. • Always unplug the instrument before removing the bottom panel or cleaning the instrument. • Place the instrument so that the back vents are not obstructed. • Use and store the instrument away from direct sunlight and away from areas where the instrument may become wet. • Allow 15 minutes for the lamp to warm up each time it is switched on. • Do not add more than 2 ml of solution to the cuvette. • Wipe the cuvette exterior before placing it into the well. Take care not to spill any liquid into the well. • Reliable results depend on measurement accuracy and consistency. For the DNA assay, use a pipette accurate to 0.02 µl, and always use the same amount of assay solution. (For instance, if using the glass cuvette, always add 2 ml.) • The optical surfaces must remain clean in order to measure fluorescence accurately. Periodically clean the optical surfaces as described in the care and maintenance section. • If this equipment is used in a manner not specified by the manufacturer, the protection provided by the equipment may be impaired. • Only accessories and parts approved or supplied by Hoefer, Inc. may be used for operating, maintaining, and servicing this product. • p4 Instrument set up Mains power 1 Plug one end of the power cord into the receptacle on the back of the unit marked MAINS. Plug the other end to a suitable grounded power outlet. 2 Turn the mains power switch beside the power cord receptacle to on ( |). 3 See section 3 for complete operating instructions. Serial port connector The RS232C serial port is a DB9 9-pin male connector. The type of serial cable required depends on the type of device—DTE or DCE— that it is connected to. The DQ 200 is configured as a DTE device, so a connection to another DTE device requires a null modem serial cable. If the data is delivered to a DCE device (receives signals at pin 2 and transmits signals at pin 3) such as a printer, then a regular serial cable is required. DQ 200 RS232C signal and pin number assignments Pin 2 Transmit Pin 3 Receive Pin 5 Ground Other pins Not connected The DQ 200 requires these settings in the device receiving data: Baud rate 1200 Data bits 8 Stop bit 1 Start bit 1 Parity None • p5 2. Fluorometry principles and method overview Fluorescence measurement Fig 2. H 33258 binds to the minor groove of DNA. When 365 nm light (long UV) excites this bound dye, its fluorescence at 458 nm can be measured. Bisbenzimide, commonly known as Hoechst 33258 (H 33258) dye, exhibits changes in fluorescence characteristics in the presence of DNA that allow accurate DNA quantitation. In the absence of DNA, the excitation spectrum of H 33258 peaks at 356 nm and the emission spectrum peaks weakly at 492 nm. When H 33258 binds to DNA, these peaks shift to 365 nm ex and 458 nm em. In the cuvette well, the sample is exposed to filtered light (365 ± 7 nm) from a mercury lamp. This light excites the DNA-dye complex, causing light that peaks at 458 nm to be emitted. An emission filter in front of the photodetector allows only fluorescence at 460 ± 15 nm to register. With the appropriate dye concentration, the measured fluorescence is a direct indicator of the DNA concentration. The fluorescent β-glucuronidase (GUS) assay does not depend on the formation of a complex. Instead, measured fluorescence indicates the amount of reaction product (4-methylumbelliferone, 4MU) that has been released by the GUS hydrolysis of 4MU-glucuronide. The same excitation and emission wavelengths apply, however; the shorter 365 nm wavelength light excites the fluorescent 4MU moiety, which then exhibits a peak emission at 455 nm. Fluorometers measure fluorescence in relative rather than absolute units. Thus, after zeroing with a “blank,” always begin an assay by calibrating the instrument to display the known concentration (or a convenient multiple) of a standard solution. This relates the measured fluorescence of an unknown sample to the standard. DNA quantitation is further discussed in Section 4 and the GUS assay is described in Section 5. For a current list of DQ 200 Application Notes see “Ordering information”. • p6 Method overview All menu options are described in detail in the following sections. Users familiar with fluorescent DNA assays and this instrument can refer to these steps or the laminated Quick Reference card for an abbreviated guide to measure the concentration of an unknown sample: 1 Prepare the appropriate standard, assay, and sample solutions. (See Section 4 for DNA quantitation and Section 5 for GUS assays.) 2 To change settings to different operator preferences: Choose “2> Setup” to select options such as prompt mode, concentration units, and auto send. 3 To calibrate the instrument: Press <1> Read. Set the zero by inserting the “blank” cuvette containing the assay solution without standard or sample. Close the lid. Press <ZERO>. After “0” is displayed, remove the cuvette, add the proper standard to the cuvette, and mix. Insert cuvette into the well and press <CALIB>. Enter the standard concentration, and press <ENTER>. 4 To measure the fluorescence of the sample: Set the zero by inserting the “blank” cuvette containing assay solution without sample. Press <ZERO>. After “0” is displayed, remove the cuvette, add the sample solution, and mix well. Insert the cuvette into the well, close the lid, and record the measurement. (Closing the lid is equivalent to pressing <ENTER>). The sample can be read again by pressing <ENTER>. Continues on following page. • p7 5� Analyze the results If following the protocols as described, the actual concentration is displayed automatically. If deviating from the protocols by using different concentrations or a calibration value that is a factor of the standard concentration, use mathematical tools such as graphing and linear regression analysis to determine the concentration. Plot standard curve measurements to confirm linearity in the range of interest. Important DQ 200 measurement notes • Accurate pipetting is critical. Use a micropipetter accurate to 0.02 µl. • Turn the lamp on 15 minutes before use to allow the lamp and sample compartment temperature to stabilize. • Zero every blank assay solution before adding standard or sample. • Always orient the cuvette the same way. (Glass cuvettes usually have an identifying “G” on one side, which can serve as an orientation guide.) • If needed, clean the sides of the cuvette with a lowlint tissue. • Remove the cuvette from the well to add sample. This reduces the risk of spilling solution into the well and reduces sample exposure to the lamp, minimizing heating and photobleaching. • Always mix completely after adding standard or sample to the cuvette by drawing the solution into a disposable transfer pipet several times. Do not introduce bubbles into the solution. • Always close the lid. • Repeat the measurement at each concentration at least once to verify that the results are reproducible. Empty the cuvette between each measurement. Rinse. Drain the cuvette completely by blotting while inverted on a paper towel. • p8 3. Operating instructions This section describes instrument operation. For DNA quantitation protocols see Section 4. For GUS assays, see Section 5. User interface The keypad is used to select setup options and to zero and calibrate the instrument. The LCD display shows each current menu option. Fig 3. LCD screen display. Numeric keys <0> – <9> Use the numeric keypad to enter a calibration standard value or to choose menu options. The <ESC> key displays the Main Menu. The <ENTER> key registers numeric values, advances to the next screen or initiates a fluorescence measurement. The <SEND> key sends sample ID number and displayed reading to the serial communication port. The <CALIB> key establishes the fluorescence level used to calculate the concentration of subsequent samples. The <ZERO> key establishes the background fluorescence level to subtract from each sample. • p9 Power up and program flow Hoefer DQ 200 System Diagnostic 1>Read 2>Setup 3>Test Important! Allow 15 minutes for the lamp to stabilize before taking any measurements. 1>Read 2>Setup 3>Test Turn the mains power switch beside the power cord receptacle to on (|) to activate a self diagnostic cycle, which requires about 2 minutes. This cycle identifies the manufacturer, tests all circuits, turns the UV lamp on, and displays the Main Menu when the instrument is ready: A series of screens report which components are being tested as the program runs through the system diagnostics. Finally, a 20-second countdown appears as the system warms up. The Main Menu appears when the instrument is ready to receive input. Main menu The Main Menu accesses three different functions: “1> Read” measures fluorescence, “2> Setup” sets operator preferences, and “3> Test” runs a comprehensive diagnostic routine. Press <ESC> anytime to return to this screen. The following three sections describe all options in the Main Menu. You may wish to set operator preferences (see the section titled “Main menu option 2> Setup”) before working through the “1> Read” section, which prepares the instrument to measure fluorescence. Main menu option 1> Read Press <1> to select the read option that prepares the instrument to measure fluorescence. This can be performed with either Prompt “off”, which is the default setting and does not guide the operator at each step, or the Prompt “on”, which displays each step of the DNA assay. (Select from the “2> Setup” menu). The display for each option is fully described in the following two pages. Once you are familiar with the instrument you will probably choose prompt “off” for routine measurements. • p10 Prompt “off” Prompt “off” is the default setting. In this mode the operator is not prompted to zero every assay solution or to calibrate the instrument. Select “off” when using a capillary cuvette or capillary adaptor because the instrument is not zeroed in the same manner as when using the 2 ml cuvette. Note: Pressing the enter key at every step is not required as it is in Prompt mode “on”. LCD message Action required Concentration Displays fluorescence in chosen units. To zero the instrument: Add only assay solution (no standard) to the cuvette and place it into the cuvette well (always in the same orientation). Close the lid and press <ZERO>. Computing zero… Concentration Displays fluorescence in chosen units. To calibrate the instrument: Add the appropriate standard amount and concentration to the cuvette. Mix by drawing the solution into a disposable transfer pipet several times. Do not introduce bubbles into the solution. Place cuvette in well (always in the same orientation), close the lid, and press <CALIB>. Enter standard conc. Enter the concentration of the standard. Press <ENTER>. Calibrating… Concentration Displays fluorescence in the chosen units. To measure fluorescence: Remove the cuvette, rinse, and drain. Add only assay solution (no sample) to cuvette. Place cuvette in well (always in the same orientation) and zero the instrument as before. Remove cuvette, add sample, and mix. Place cuvette in well, close lid, and record the measurement. Concentration Displays fluorescence in chosen units. Press <ENTER> to re-read the sample concentration. • p11 Prompt “on” If prompt “on” is selected the following steps are displayed. Press the indicated key or press <ENTER> to continue. Instrument calibration <2> LCD message Action required Place assay blank in well Add only assay solution (no standard) to cuvette. Always place cuvette into the well in the same orientation. Close the lid. Press <ENTER>. Press zero The assay solution background is determined and subtracted. Press <ZERO>. Computing zero… Add calibration standard Remove the cuvette and add the appropriate standard amount and concentration. Mix by drawing the solution into a disposable transfer pipet several times. Do not introduce bubbles into the solution. Place cuvette into well, close the lid and press <ENTER>. Press calib Sets the instrument to display fluorescence units based on the standard. Press <CALIB>. Enter std conc. Enter the standard concentration. (Display either ng/ml or no units, selected from the Setup menu.) Press <ENTER>. Calibrating… Measurement <1> Remove standard Remove cuvette. Press <ENTER>. Place assay blank in well Drain and rinse cuvette. Add only assay solution (no sample) to cuvette. Place cuvette into the well (always in the same orientation). Close the lid. Press <ENTER>. Concentration Displays fluorescence. Press zero The assay solution background is determined and subtracted. Press <ZERO>. Computing zero… • p12 Add unknown sample Remove the cuvette. Add sample to the cuvette and mix. Do not introduce bubbles. Place the cuvette back in the well in the same orientation. Close the lid and press <ENTER>. Concentration Displays fluorescence in chosen units. Press <ENTER>. 1>Read, 2> Calib, Choose <1> to measure the next sample. esc> Main Menu Choose <2> to calibrate to a different standard. Choose <ESC> to return to the Main Menu. Main menu option “2> Setup” 1>Prompt 3>Send 2>Units 4>More Prompt 1>Off 2>On Select <2> from the Main Menu to access the Setup menu, which accepts operator preferences. Each submenu is described below. Press <ESC> at any time to return to the Main Menu. Press the number associated with the parameter of interest to access the following submenus: 1> Prompt “off” displays only measurements and minimal instructions. 2> Prompt “on” guides the user through the assay, step by step. 1> Sets units to display ng/ml. Units 1>ng/ml 2>None 2> No units will be displayed. After a brief pause, the Setup menu is displayed. 1>Manual send 2>Auto send 1> The Manual send option sets the software so that measurements and the corresponding ID numbers are transmitted to the serial port only when <SEND> is pressed. 2> The Auto send option transmits this data automatically after each measurement. (See pages 5 and 16 for printer connection guidelines.) After a brief pause, the Setup menu is displayed. • p13 5>Autoshut 6>ID# 7>Language Lamp auto-shut 1>Off 2>On Press <4> in the Setup menu for these additional options: 1> Lamp auto-shut “off” causes the lamp to stay on until the instrument is switched off. That is, the automatic shut off is disabled. 2> Lamp auto-shut “on” causes the lamp to automatically shut off after one hour of no keypad activity. This option is recommended because it extends lamp life. After a brief pause, the Setup menu is displayed. Please enter ID number 0 This option allows the operator to specify a starting sample ID number. Each subsequent sample will then be assigned an ID number, incremented by 1, from this starting point. Input the starting point sample number. Press <ENTER>. To turn off sample numbering, enter 0. After a brief pause, the screen returns to options 5–7 in the Setup menu. (Press <ESC> for the Main Menu.) 1>Engl 3>Franc • p14 2>Deutch 4>Espan Enter the number corresponding to the desired language. After a brief pause, the screen returns to options 5–7 in the Setup menu. (Press <ESC> for the Main Menu.) Main menu option “3> Test” Use the test menu to isolate the cause of a malfunction. Press <ESC> to return to the Main Menu. The four options are: 1>Data 3>Info 2>Lamp 4>Diagnos 1> The “<Data>” option displays voltage (mV) signals from the sample (Sig.) and the lamp reference (Ref.). 2> The “<Lamp>” option switches the lamp off if it is on, or on if it is off. 3> The “<Info>” option identifies the initial UV lamp reference signal (mV), the firmware version, the PC board version, the date of manufacture, and the serial number. 4> The “<Diagnos>” option initiates a comprehensive system diagnostic routine. The operator is required to press all 15 keys on the keypad and open and close the lid when prompted. If a component is found faulty, an error message displays the failure source. Error and other messages Turning lamp on Zero first, using a blank sample Blank>sample Zero and re-calib Re-calib using lower value Failed This message reports that the lamp is being switched on. Wait 15 minutes to allow the lamp to stabilize before taking measurements. When this message shows, the lamp was either inadvertently switched off or the auto-shut function switched it off after an hour of no keypad activity. The assay solution was not “blanked.” Zero the instrument: place blank assay solution into the cuvette and press <ZERO>. Blank value is higher than the sample value. Zero using “blank” capillary assay solution and recalibrate. The entered calibration value is too high. Recalibrate with standard solution. Use a lower factor if not using the actual standard concentration. Diagnostic test failed. Call the Hoefer, Inc. Technical Services Department. • p15 DQ 200 communication with other devices Communication between the DQ 200 and another device such as a printer or an IBM-compatible computer is limited to an ASCII “dump.” No error checking (such as CRC) or protocols for attention (such as ACK or NAK) are available. Also, no XON or XOFF procedure is required. To connect the communication facility, plug the appropriate cable (see page 5) into the DQ 200 serial port and the device. Then select “2>Setup”, “3>Send” to choose either “Auto send” (which transfers each sample ID number and measurement automatically) or “Manual send” (which requires the operator to press <SEND> to transfer each reading to the device). Software options If the data is transmitted to a computer, it can be captured with terminal emulation software provided with most personal computer systems. Standard installations of Microsoft™ Windows (XP, 2000, etc.) include HyperTerminal. 1 Locate HyperTerminal (hypertrm.exe), usually in \Program files\Accessories. Run the program. 2 The opening screen will request a name and icon for establishing a new connection (Fig 4). In the Name field enter “DQ 200”. Near the left end of the generic icon set provided is a “laboratory” design. Click on it. Click “OK” to proceed to the next screen. Fig 4. Hyperterm opening screen. • p16 3 On connection screen (Fig 5), select “COM1” (or the appropriate connection port). The choices for telephone numbers will be inactivated and the small terminal screen will go blank. Click “OK” to proceed to the next screen, COM1 Properties (Fig 6). 4 Use the various drop-down menus to set 1200 bits per second, 8 data bits, no parity, 1 stop bit, and no flow control. Fig 5. Select the appropriate COM:port. 5 At this point, the program enters the terminal mode. To capture the text, select “Transfer:Capture Text...” from the menu bar (Fig 7). You will be prompted to enter or browse for the file to receive the captured data. 6 Save the session parameters before exiting the program to save performing the setup steps the next time data is collected on the same computer. Fig 6. Connections and communication parameter setup. Fig 7. Select “Capture Text” to record readings. • p17 4. DNA Quantitation This section includes guidelines for DNA assay solutions and standards, the calibration protocol for the DNA standard supplied with the unit, and a discussion of how to analyze measurements. Refer to Appendix B for a discussion of other reference standards and a correction factor that can be applied if the base composition of the DNA standard used differs substantially from the DNA sample. Guidelines for the H 33258/DNA assay Factors that affect the assay • The AT% of a DNA sample affects H 33258-DNA fluorescence, so it is important to use a standard similar to the sample under investigation. The calf thymus DNA standard supplied can serve as a reference for most animal and plant DNA because it is double stranded, highly polymerized, and is approximately 42% GC (58% AT). • A different standard may be required for specific types of DNA such as bacterial DNA because the AT% varies widely depending on the species, as does the AT% of some polymerase chain reaction (PCR) products. (Standards with a range of AT% are available from Sigma Chemical Co. See Appendix B for a partial listing.) • H 33258 fluoresces only about half as much when it binds to single-stranded genomic DNA as when it binds to double-stranded genomic DNA. Short pieces of single-stranded DNA, such as single-stranded oligonucleotides, however, will not normally cause H 33258 to fluoresce in proportion to their concentration. • Refer to DQ 200 Application Notes 8 and 11 (listed in the ordering information section) for more detailed information. • p18 Factors with little or no effect • Buffers commonly used to extract DNA from whole cells. • Low levels of detergent (≤0.01% SDS). Generally, the final detergent concentration should be well below the detergent’s critical micelle concentration. • High salt concentrations, up to 3 M NaCl. • Note: For full fluorescence, a minimum amount of NaCl is required in the assay buffer. At least 200 mM is required for purified DNA, and 2–3 M is required for crude samples. (In crude samples, higher salt concentrations appear to cause the dissociation of proteins from DNA, making way for dye molecules.) • RNA does not interfere significantly with the DNA assay because RNA does not generally bind H 33258. Under high salt conditions, fluorescence due to RNA is usually well below 1% of that produced by the same concentration of DNA. • p19 Solutions Important! Refer to the material safety data sheet (MSDS) accompanying each chemical for detailed handling and safety information. Hazard! Hoechst 33258 is a possible mutagen. Wear gloves and a mask, and work under a fume hood. Hoechst 33258 stock dye solution (1 mg/ml) Hoechst 33258 10 mg Distilled filtered water 10 ml Do not filter. Store in an amber bottle at 4 °C for up to 6 months. 10X TNE buffer stock solution (100 mM Tris, 10 mM EDTA, 2 M NaCl, 1000 ml) Tris base [Tris (hydroxymethyl) aminomethane], (MW =121.14) 12.11 g EDTA, disodium salt, dihydrate, (MW=372.20) 3.72 g Sodium chloride, (MW=58.44) 116.89 g Distilled water to 800 ml Concentrated HCl to pH 7.4 Distilled water to 1000 ml Filter before use (0.45 µm). Store at 4 °C for up to 3 months. Calf thymus DNA (for the low range assay) 1:10 dilution of standard stock (100 µg/ml) Calf thymus DNA standard, 1 mg/ml 100 µl 10X TNE 100 µl Distilled water, filtered 800 µl Gently tap the tube to mix thoroughly. Store at 4 °C for up to 3 months. Assay solution A (for the low range DNA assay) (10–500 ng/ml final DNA conc.) 0.1 µg/ml H 33258 in 1X TNE (0.2 M NaCl, 10 mM Tris-Cl, 1 mM EDTA, pH 7.4) H 33258 stock solution 10 µl 10X TNE 10 ml Distilled filtered water 90 ml Keep assay solution A at room temperature. Prepare fresh daily. Do not filter once dye has been added. Assay solution B (for the high range DNA assay) (100–5000 ng/ml final DNA conc.) 1 µg/ml H 33258 in 1X TNE (0.2 M NaCl, 10 mM Tris-Cl, 1 mM EDTA, pH 7.4) H 33258 stock solution 100 µl 10X TNE 10 ml Distilled filtered water 90 ml Keep assay solution B at room temperature. Prepare fresh daily. Do not filter once dye is added. • p20 Protocol Since the DNA fluorescence assay is based on a relative measurement of emitted light, a calibration reference value must be established with a known DNA sample before the concentration of DNA in unknown samples can be determined. Choose the standard concentration range (low or high) according to the expected DNA concentration, and calibrate with this standard dilution. One reference point is adequate to calibrate the instrument. However, generating a standard dilution curve assures assay linearity in the range of interest. Generating a standard dilution curve once every few weeks serves as a quality check on the standard, a reliability check on the instrument, and a consistency check on technique. Low range assay (10 to 500 ng/ml final DNA concentration) Assay solution A Standard 1:10 dilution (to 100 µg/ml) of the 1 mg/ml calf thymus DNA standard.* 2 µl of this solution mixed with 2 ml assay solution is a 100 ng/ml standard solution. High range assay (100 to 5000 ng/ml final DNA concentration) Assay solution B Standard Undiluted calf thymus DNA standard* (1 mg/ml). 2 µl of this solution mixed with 2 ml assay solution is a 1000 ng/ml standard solution. *The calf thymus standard is supplied in dry form. Follow the instructions accompanying the standard precisely to achieve the proper dilution. • p21 Important! Accurate pipetting and thorough mixing are critical for reproducible results; use a micropipetter accurate to 0.02 µl. Orient the cuvette the same way each time you place it in the sample chamber. (Glass cuvettes usually have an identifying “G” on one side, which can serve as an orientation guide.) The fluorescence measurement stabilizes quickly and then begins to drop as the sample warms in the chamber. A series of dots across the display indicate that the instrument is stabilizing a measurement. If one dot remains in the left corner, check the Troubleshooting section. The following steps assume the prompt is “off”. (If unfamiliar with the instrument, you may wish to turn the prompt mode on by choosing “2>Setup” from the Main Menu and then pressing “1>Prompt”, then “2>On”.) 1 Zero the instrument with the assay solution. Add 2 ml of the proper assay solution to the cuvette, insert the cuvette into the well (always in the same orientation), close the lid, and press <ZERO>. After “0” appears, remove the cuvette. 2 Calibrate the unit. Add 2 µl of low or high range standard solution to 2 ml assay solution in the cuvette, mix by pipetting into a disposable transfer pipette several times, place cuvette in well, close the lid, and press <CALIB>. Enter the actual concentration of the standard: Low range assay calibration value High range assay calibration value 100 ng/ml 1000 ng/ml (Or enter a convenient value that will display a multiple of the actual DNA concentration.) Press <ENTER>. Calibration Tip! The suggested calibration procedure sets the instrument to display the DNA concentration of the solution in the cuvette in units of ng/ml. This corresponds to a concentration of µg/ml of DNA from the sample tube if 2 µl of sample is used. (This is a 1:1000 dilution of sample into assay solution.) This relationship only holds if the volumes for both the standard and the unknown DNA sample are the same. (That is, if you set the instrument with a different volume of standard, use the new volume for the DNA sample also to preserve the relationship.) • p22 3 Measure the fluorescence of the unknown sample. Remove the cuvette, drain, and rinse. Add 2 ml assay solution and place the cuvette into the well. Zero the instrument as in step 1. Remove cuvette, add 2 µl of the unknown DNA sample, mix thoroughly by pipetting with a disposable transfer pipette (do not introduce bubbles). Place the cuvette in the well and close the lid to display sample fluorescence. Dots flash in the lower left corner until the measurement stabilizes. Record the value displayed. Drain the cuvette. If desired, repeat the measurement with a second sample and average the readings. If the unknown sample readings exceed the display range (>5000), dilute the sample until the reading is within the linear range of the assay as determined by a dilution curve. If the unknown sample readings are very low, add more sample. Generate a standard concentration curve Generating a standard dilution curve verifies the linearity of the assay within a particular concentration range. The low range standard assay (using assay solution A) is linear for 10 ng/ml to 500 ng/ml final DNA concentration. To maintain linearity above this range, use a higher dye concentration (assay solution B). Example — low range assay Calibrate the instrument with 100 ng/ml DNA. Determine the readings for the series of concentrations in Worksheet A below: Fill the cuvette with 2 ml of assay solution A, place the cuvette in its original orientation in the cuvette well, close the lid and zero the instrument, remove the cuvette, add the next volume of standard, mix thoroughly, replace the cuvette in the well, and close the lid. Record each reading. Measure a second sample for each volume (sample 2) and average the two readings. • p23 Worksheet A Low range standard measurements DNA standard conc. (x) vol. (µl)* (ng/ml) 0 Reading sample 1 Reading sample 2 Avg. reading (y) (samples 1+2)/2 0 100 2 200 4 300 6 400 8 500 10 *100 ng/µl DNA, to be added to 2 ml assay solution A Standard curve volume calculations for the low range assay: amount added: 2 µl × 100 ng/ µl = 200 ng final concentration: 200 ng/2 ml = 100 ng/ml • p24 Analyze the results 1 Plot the sample concentration (x) vs. the averaged reading (y). Your data may be slightly lower or higher than expected, but as long as the plot is linear you can expect accurate values for unknown samples within the range of the standard curve. (Slight variations are most commonly due to pipetting variability.) The accuracy of this assay also depends on the accuracy of the start and stop times for the digestion. 2 Determine the equation of the straight line. Either draw a straight line through the data with an estimated best fit, or calculate a least squares best fit for the data. (A linear regression is quickly accomplished with any math program.) The line is described by the equation y = mx + b, where y is the instrument reading, x is the known DNA concentration, m is the slope of the line, and b is the y-axis intercept. For ideal data, m = 1 and b = 0. Statistical analysis of the error in the fit gives a correlation coefficient (r2), a measure of confidence in the data. Fig 8. Concentration curve using calf thymus DNA for low range assay. Data analysis example Duplicate data points were plotted and analyzed by a linear least squares regression. If the measured values near one end of the range deviate consistently from the best fit straight line, the assay is being extended into a non-linear region. Samples should be diluted or assay conditions adjusted to return to a linear region of the plot. A linear equation can be determined from a single reference point (using 0 as the second point, m = y/x, b = 0), however this will not give any indication that the assay might be out of the linear range. r 2 = 0.9998 b = 0.95 m = 1.00 y = 1.00x + 0.95 To find an unknown DNA concentration, assign the display value to the y variable and solve for the DNA concentration, x. Fluorescence units Best fit parameters: DNA concentration in the cuvette, ng/ml • p25 5. Enzyme Activity Quantitation Esters of 4-methylumbelliferone (4MU, 7-hydroxy4-methylcoumarin) do not fluoresce unless cleaved to release the free fluorophore. Free 4MU can be used as a standard to calibrate fluorometric enzyme assays based on the hydrolysis of 4MUcontaining substrates such as β-4-MU-glucuronide by β-glucuronidase (GUS), or β-4-MU-galactose by β-galactosidase. A solution of 4MU can also be used to check instrument performance. The accuracy of this assay is also dependent on the accuracy of the start and stop times for enzyme digestion of the substrate. Specific protocols for assaying β-galactosidase and β-glucuronidase activities are in Appendix A. Solutions 4MU stock solution A 1 mM (100 ml) 4-methylumbelliferone (sodium salt), (MW = 198.20) 19.8 mg Distilled water to 100 ml Store at 4 °C, away from light. 4MU stock solution B 1 µM 4MU (10 ml) 4MU stock solution A 10 µl Distilled water 10 ml Store at 4 °C, away from light. Carbonate stop buffer • p26 0.20 M (1000 ml) Sodium carbonate, anhydrous, (MW=105.99) 21.2 g Double distilled water to 1000 ml Protocol Since the 4MU fluorescence assay is based on a relative measurement of emitted light, a calibration reference value must be established with a known sample before the activity of unknown samples can be determined. The following steps assume the prompt is off. (If unfamiliar with the instrument, select Prompt on by choosing “2> Setup” from the Main Menu and then pressing <1>. (Since the concentration is not measured in ng/ml, select “no units” under “2> Setup” from the Main Menu, “2> Units, 2> None”.) 1 Zero the instrument with assay solution. If in place, remove the glass cuvette from the cuvette well. Add 1.9 ml of carbonate stop buffer to the cuvette. If needed, clean the sides of the cuvette with a low lint tissue. Insert the cuvette (always in the same orientation), close the lid, and press <ZERO>. 2 Calibrate the unit. Add 100 µl of stock solution B (1 µM 4MU), mix by pipetting into a disposable transfer pipette several times, close the lid, and press <CALIB>. Enter “500” within 10 seconds because this solution photodegrades quickly. Press <ENTER>. The fluorometer will now display 500 for a 50 nM solution of 4MU. (2.0 ml of a 1 nM solution equals 2 pmol of 4MU.) 3 Measure the fluorescence of the unknown sample. Note: If the reading exceeds the display range (>5000), dilute the sample. Zero the instrument as in step 1, add 100 µl of the unknown sample, mix thoroughly by pipetting with a disposable transfer pipette (do not introduce bubbles). Place cuvette into the well. Close the lid and record sample fluorescence. Repeat the measurement to verify that results are reproducible. Empty the cuvette between each measurement and rinse. Drain the cuvette completely by blotting it while inverted on a paper towel. • p27 Once the initial reference value can be reliably reproduced, proceed to determine concentrations of unknown samples, or determine assay linearity with standard dilution measurements. Generating a standard dilution curve once every few weeks serves as a quality check on the standard, a reliability check on the instrument, and a consistency check on technique. Generate a standard dilution curve Example Note: The 200 nM standard should display about 2000 fluorescence units. Determine measurements for the series of concentrations in Worksheet B below: Add the appropriate amount of carbonate stop buffer and place the cuvette in the cuvette well. Close the lid and zero the instrument. Remove the cuvette and add the corresponding volume of standard. Mix thoroughly, and place the cuvette into the well in its original orientation, close the lid, and record the display value. Measure a second sample for each value (sample 2) and average the two readings. Worksheet B 4MU standard measurements Carbonate buffer vol (ml ) 1µM 4MU stock B vol (µl) Sample conc. (x) (nM) 2.0 0 0 1.9 100 50 1.8 200 100 1.7 300 150 1.6 400 200 • p28 Reading sample 1 Reading sample 2 Avg. reading (y) (samples 1+2) / 2 Plot the 4MU concentration (x) vs. the averaged readings (y). The resulting graph should be linear, as shown in Fig. 9. See page 25 for methods to analyze the data. 2000 Fig 9. 4-MU standard curve. Fluorescence increases linearly with concentration. Fluorescence intensity 1500 1000 500 0 0 50 100 150 200 Methylumbelliferone, nM • p29 6. Care and maintenance Important! • Turn the mains power off and unplug the power cord. • The optical surfaces are easily scratched. Handle with extreme care and polish gently. • Wear gloves when servicing the optical block. This protects both the technician from hazardous materials that may have been spilled and protects the optical surfaces from fingerprints. • Use only isopropanol on a clean soft cloth to clean optical surfaces. Cleaning To clean the exterior, wipe the unit with a damp cloth. Never use abrasive cleansers or solvents. The only user-serviceable component is the optical block. Optical block assembly is described in the cleaning section below. Optical block Clean the optical block periodically, depending on the frequency of use, or if solution spills into the cuvette well. Optical block disassembly 1 Turn the mains power off and unplug the power cord. Spread a soft cloth over the work area and turn the unit upside down onto the padded surface. Wear gloves, both to protect yourself and the optical surfaces. 2 Locate the thumb screw near the front of the unit and unscrew. (The captive thumbscrew stays attached to the block.) Lift the optical block assembly straight up. 3 Hold the optical block assembly so that the ground plate (with the thumbscrew) faces up and the optical block is cradled in your palm. (In this position no components will be damaged if they slide out of their slots during disassembly.) Unscrew the Phillips screw near the thumbscrew. Lift the ground plate and remove the glass cover in front of the excitation aperture. Keep the optical block in this position for steps 4 and 5. • p30 4 The stainless steel reference mirror does not contact solution, so it requires little maintenance. If it requires cleaning, insert a hook (such as a paper clip) in the hole where the mirror bends and pull the mirror out. 5 The sample mirror, which covers two sides of the cuvette well, slides out when gently nudged from the bottom. Turn the block over (right side up) to collect the mirror. Handle with care. 6 Remove the reference and emission filter seal rings and place on a soft cloth. The emission filter should slide out easily. If required, press the filter from behind with a cotton swab. 7 Cleaning. Clean the cuvette well with cotton swabs. Dampen a soft cloth with alcohol and wipe each optical surface. If required, gently polish with a dry soft cloth. Remove all particles. Allow to air dry. All surfaces must be completely clean for accurate measurements. • p31 Reference mirror (Step 4) Fig 10. Optical block assembly. excitation aperture glass cover (Step 3) Optical block (bottom view) Sample mirror (Step 5) Optical block (top view) Cuvette well Seal ring (Reference mirror) Emission filter (Arrow points away from optical block) Seal ring (Emission filter) Thumb screw Phillips screw • p32 Ground plate Optical block assembly 1 If the reference mirror was removed, choose the best surface to face the reference beam. Slide the mirror into the slot until it stops. The mirror self-aligns. 2 Hold the block in your palm as in step 3 above, slide the glass cover into the excitation aperture slot, and seat the ground plate onto the optical block. Secure with the Phillips screw. 3 Carefully slide the sample mirror into the cuvette well. The mirror must fit flush with the top of the block. 4 Install the emission filter so that the arrow points away from the block. Install both seal rings. 5 Inspect the assembly. If necessary, wipe surfaces until clean. Slide the assembled optical block into the instrument and secure with the thumb screw. • p33 Troubleshooting problem solution Always be sure to: Operate the unit in a location isolated from equipment that radiates high-frequency electromagnetic interference. Operate the unit away from direct sunlight. Place the unit so that the back vents are not blocked. Use no more than 2 ml of liquid in the cuvette and take care not to spill any liquid into the cuvette well. Fluorescence values drift Assay solutions must be at ambient temperature for consistent readings. (Fluorescence decreases as temperature increases.) Remove the cuvette from the well as soon as the measurement is taken to avoid heating and photobleaching (destruction of the fluorescent compound by light). Protect fluorescent reagents and samples from light to prevent photobleaching. Take readings immediately after mixing in the cuvette. Assay solutions must be at pH 7.4. Adjust the salt concentration. For standard DNA extraction the concentration should be at least 200 mM NaCl in 1X TNE. For crude cell lysates, use 2 to 3 M NaCl in 1X TNE. If air bubbles are present, the reading will first drift upward as light is scattered by the bubbles until they move out of the beam range or dissipate. If particulates are present, the reading may suddenly rise as a particulate drifts in the light path, and then drop as it moves out of the beam range. Wide fluctuations in fluorescence values Thoroughly mix the sample and assay solution by gently pipetting into a disposable transfer several times without introducing bubbles. Use a micropipet accurate to 0.02 µl. If inconsistencies persist, either use larger aliquots or dilute the sample in the appropriate buffer. Use a larger sample. Use only pure distilled and filtered (0.2 or 0.4 µm filter) water for all solutions. Filter the 1X TNE working buffer to remove all particulates. Particulates may cause light to scatter, causing measurement fluctuations. (Filter the buffer before adding H 33258 because the dye binds to most membrane types.) Wipe the outside of the cuvette before placing it into the sample chamber. • p34 problem solution Readings negative or lower than expected Use freshly prepared assay solution at ambient temperature to set the zero and for all subsequent measurements. Extract ethidium bromide from DNA solutions because ethidium bromide interferes with the fluorescence of H 33258. H 33258 is useful only for measuring DNA concentrations. Spectrophotometer measurements of A260 and A280 detect DNA, RNA and protein. DNA samples may appear to have higher concentrations by absorbance than by fluorescence due to the presence of contaminants. For double-stranded DNA, the fluorometric value is usually more accurate, provided a clean DNA standard of known concentration is used. Crude cell lysates prepared with acid guanidinium thiocyanate-phenol solution Fluorescence of lysates prepared without an alkaline EDTA pretreatment is reduced by 70% compared to lysates with such pretreatment. Alkaline conditions allow formation of complexes between DNA and the dye. For a detailed protocol see: Rymaszewski, et al, (1990) Estimation of cellular DNA content in cell lysates suitable for RNA isolation. Anal. Biochem. 188: 91–96. Use the appropriate reference standard Make sure to use a standard with a G-C content very similar to the sample. H 33258 binds preferentially to A-T regions, so G-C content must be similar to ensure “equivalent” binding. Use a ssDNA standard for ssDNA samples. (Single-stranded DNA yields about 50% the fluorescence of an equal amount of double-stranded DNA.) Plasmid DNA standards should have the same conformation as the sample. Each form—supercoiled, relaxed, circular or linear—may have slightly different dye binding characteristics. Readings higher than expected Fluorescence enhancement may result from high levels of detergents. Final SDS concentration should be below 0.01% and other detergents below 10 µg/ml (the final concentration of any detergent should be well below its critical micelle concentration). Final Triton X-100 conc. must be below 0.001%. Use a standard with a G-C content very similar to that of your sample. Single-stranded genomic DNA yields about half the fluorescence of an equal amount of double-stranded DNA. Therefore, ssDNA standard should be used for ssDNA samples. If the sample contains a very high protein concentration (which may produce high background fluorescence), pretreating the sample with 0.1–0.5 mg/ml proteinase K in pronase and adding 2–3 m NaCl to the assay solution has been reported to lower the background (Moe, et al., 1994). • p35 Error and other messages One dot remains in the left corner A series of dots across the display indicate that the instrument is stabilizing a measurement. If one dot remains in the left corner, no stable reading was determined. Wipe the cuvette and repeat the measurement procedure. Turning lamp on The lamp was inadvertently turned off or the auto shut function switched the lamp off after one hour of no keypad activity. This message reports that the lamp is being turned on. Wait 15 minutes before taking measurements to allow the lamp to stabilize. Zero first, using a blank sample Assay solution was not “blanked”. Zero the instrument: place blank assay solution into cuvette and press <ZERO>. Blank>sample, Zero and re-calib Blank value is higher than the sample value. Zero using “blank” capillary assay solution and recalibrate. Re-calib using lower value The entered calibration value is too high. Recalibrate with standard solution. Use a lower factor if not using the actual standard concentration. Failed The diagnostic test failed. Call the Hoefer, Inc. Technical Service Department. • p36 Appendix A. Enzyme assay protocols β-glucuronidase Assay β-Glucuronidase (GUS) is the reporter enzyme of choice for much plant genetic research. The E. coli gene for GUS was originally isolated by R.A. Jefferson and co-workers (Jefferson, 1989) and is now commercially available from Clontech™ Laboratories in a variety of configurations. The recombinant GUS gene, mRNA and enzyme can be routinely manipulated and assayed to study promoter function, tissue specific expression, developmental regulation, mRNA stability, excision events of transposable elements, and signal sequences that target proteins for various organelles. The advantages of using GUS to report the activity of various promoters and genes are two fold: first, with few exceptions, plants lack GUS activity; and second, GUS assays are straightforward, with substrates suitable for both histochemical and enzymatic analysis readily available from a variety of companies (including Molecular Probes™, Research Organics™ and Clontech). Typically GUS activity in solution is determined with the fluorogenic substrate 4-methylumbelliferyl β-D-glucuronide (MUG): MUG (non-fluorescent) GUS glucuronic acid + 4MU (fluorescent) The reaction product 4-methylumbelliferone (4MU) is maximally fluorescent at high pH, where the hydroxyl group is ionized. Addition of a basic solution of sodium carbonate simultaneously stops the assay and adjusts the pH for quantitating the fluorescent product. The Km for the MUG substrate in this assay is 0.6 to 0.7 mM, with a minimum detectable GUS activity of 2 pmol MUG hydrolyzed. E. coli GUS has a molecular mass of 68.2 kDa and, under some conditions of SDS PAGE, an apparent molecular mass of 74 kDa. • p37 Materials • p38 Enzyme control β-glucuronidase (GUS, liquid suspension from E. coli, Roche). Substrate 4-methylumbelliferyl-β-D-glucuronide, MW = 352.3. (Clontech 8082; Molecular Probes M-1490; Roche; Sigma Chemical Co. M 9130). Calibration standard 4-methylumbelliferone, sodium salt, MW = 198.2 (4MU; 7-hydroxy-4-methylcoumarin; β-methylumbelliferone) Reagents Na2HPO4 MW=141.96 NaH2PO4 MW=119.98 Na2CO3 MW=105.99 Na2EDTA MW=372.24 Sarcosyl 2-mercaptoethanol Triton X-100 Equipment DQ 200 Fluorometer, glass cuvette. (If using disposable plastic cuvettes, order fluorescence grade.) Solutions 4-Methylumbelliferone standard (50 nM 4MU in carbonate stop buffer) Prepare standard stock solutions and carbonate stop buffer as described on page 26. Prepare 50 nM 4MU standard solution just before use: 1 µM 4MU solution 100 µl Carbonate stop buffer 1.9 ml GUS extraction buffer (50 mM NaHPO4, pH 7.0, 10 mM 2-mercaptoethanol, 10 mM Na2EDTA, 0.1% sodium lauryl sarcosine, 0.1% Triton X-100) For 100 ml extraction buffer, mix: 1M NaHPO4, pH 7.0 5.00 ml 2-mercaptoethanol 0.07 ml 0.5 M Na2EDTA, pH 8.0 2.00 ml 30% Sarcosyl 0.33 ml 10% Triton X-100 Distilled water 1.00 ml 91.60 ml GUS assay buffer (2 mM MUG in extraction buffer) To prepare 25 ml assay solution, mix: 4-methylumbelliferyl β-D-glucuronide 25 mg Extraction buffer 25 ml Note: The water content of MUG preparations may vary. For greatest accuracy, the calculation of solution molarity should take this into account. • p39 Generate a concentration curve Follow the instructions in section 5 to calibrate the instrument and generate a concentration curve using the 4 MU standard. This procedure demonstrates the linearity of readings in the expected range of the assay. Time course assay The routine MUG assay is based on a linear rate of substrate hydrolysis as a function of time. The control assay listed below uses a commercial suspension of GUS diluted into extraction buffer to demonstrate linearity. The linearity of the assay over time is critical and should be verified under your specific conditions. Once you have demonstrated that the system is linear in time, substitute aliquots of unknown sample extracts for the diluted commercial enzyme to determine the level of GUS expression in your experimental system. Depending on the level of GUS gene expression, you may need to dilute samples further or to allow the reaction to proceed longer to generate results in the linear range of the assay. If high levels of activity precision are not required, single rather than multiple time points may be used. Enzyme activity units are normally expressed in nmol product released per minute per µg of protein. This value is the slope of the line plotted through the time points divided by the amount of protein added. 1 Dilute 10 µl of the commercial enzyme stock into 1 ml extraction buffer for a 1/100 dilution. Further dilute this by adding 10 µl of the 1/100 dilution to 10 ml of extraction buffer to achieve a 1/100,000 dilution. Keep enzyme stocks on ice. Use this final dilution for subsequent assays. • p40 2 To two test tubes on ice, add: Assay solution Extraction buffer GUS enzyme (diluted 1/100,000) For a final concentration of 1 mM MUG. 250 µl 200 µl 50 µl 3 Remove duplicate 50 µl aliquots for the reagent blank. These should be quenched immediately in 2 ml carbonate stop buffer. 4 Remove the test tubes containing the assay solution from the ice and start the assay by placing them in a 37 °C water bath. Stagger successive tube assays by 30-second intervals. 5 For each time point, transfer 50 µl aliquots from each test tube (staggered by 30-seconds) into 2 ml stop buffer to quench the reaction. 6 Read sample fluorescence. A typical time course assay result is shown in Fig 11. 600 Fig 11. Typical time course assay results. Relative Fluorescence uniuts 500 400 300 200 100 0 0 5 10 15 Time (min) • p41 Bibliography Jefferson, R.A., Burgess, S.M. and Hirsh, D., β-glucuronidase from Escherichia coli as a gene-fusion marker. PNAS 83, 8447–8451 (1986). Jefferson, R.A, Kavanagh, T.A., and Bevan, M.W., GUS fusions: β-glucuronidase as a sensitive and versatile gene fusion marker in higher plants. EMBO J. 6, 3901–3907 (1987). Jefferson, R.A., Assaying chimeric genes in plants: the GUS gene fusion system. Plant Molecular Biology Reporter. 5, 387–405 (1987). Jefferson, R.A., The GUS reporter gene system. Nature. 342, 837–838 (1989). Segel, I.H., Biochemical calculations. John Wiley & Sons, New York (1976). • p42 β-galactosidase Assay Contributed by William A. Braell, Harvard Medical School, Department of Biological Chemistry The enzyme β-galactosidase hydrolyzes lactose to yield galactose and glucose. Analysis of this enzyme in E. coli has shown that it is an inducible enzyme whose level of expression is dependent on substrate concentration. The study of the lac operon has played an important role in understanding the control of gene expression in bacteria. In prokaryotes, gene expression is controlled primarily at the level of transcription. Geneticists have developed a variety of colored indicator assays that indicate the level of β-galactosidase expression. These methods may provide extra qualitative or quantitative information as a chromogenic lactose analog is cleaved by β-galactosidase. The promoter activity of mammalian genes can be analyzed by using fusion genes containing the promoter of interest attached to the bacterial β-galactosidase gene. The level of β-galactosidase expression indicates the level of transcription under different regulatory conditions. Materials • DQ 200 Fluorometer, glass cuvette • Microcentrifuge Sensitive and quantitative assays of β-galactosidase activity are often needed. The following assay measures the hydrolysis of the fluorogenic β-galactosidase substrate. Cleavage of 4-methylumbelliferyl-β-D-galactoside by β-galactosidase yields the fluorescent molecule 4-methylumbelliferone (7-hydroxy-4-methylcoumarin, 4MU). The 4-methylumbelliferone moiety is fluorescent above pH 8. When excited by 365 nm light, 4MU emits light at 460 nm. The assay is sufficiently sensitive to detect picogram quantities of β-galactosidase. • p43 Solutions Glycine-carbonate stop buffer (1 liter) Glycine 133 mM 75.1 g Na2CO3 83 mM 106.0 g pH to 10.7 4-Methylumbelliferone standard (50 nM 4MU in glycine carbonate stop buffer, 2 ml) Prepare 4MU stock solutions as described on page 26. Prepare 50 nM 4MU standard solution just before use: 1 µM 4MU solution 100.0 µl Glycine carbonate stop buffer 1.9 ml Reaction cocktail (20 ml) Prepare the reaction cocktail minus substrate at room temperature. The substrate 4-MUG* is most easily dissolved in cocktail by first dispersing in absolute ethanol. 1 M Tris-HCl, pH 7.5 5 M NaCl 0.1 M MgCl2 2-mercaptoethanol 25 mM 0.5 ml 125 mM 0.5 ml 2 mM 0.4 ml 12 mM 17.0 µl Distilled water 4-MUG* (FW = 338.3) 18.5 ml 0.3 mM 100 µl *methylumbelliferyl-β-D-galactoside. Dissolve 2 mg into 100 µl abs. EtOH (0.5% of the total volume of cocktail) and then rapidly vortex into the aqueous cocktail solution until dissolved. TCA solution 25% (w/v) trichloroacetic acid • p44 Generate a concentration curve Follow the instructions in section 5 to calibrate the instrument and generate a concentration curve using the 4 MU standard. This procedure demonstrates the linearity of readings in the expected range of the assay. Assay 1 Add 40 µl of sample to a microcentrifuge tube. (Use H20 for a blank). 2 Add 160 µl of the reaction cocktail. 3 Incubate at 37 °C for 30 minutes. 4 Stop the reaction by adding 50 µl of 25% TCA. Cool on ice. 5 Clarify the solution by centrifugation in a microcentrifuge for 1 to 2 minutes. 6 Add 0.1 ml of supernatant to 1.9 ml of glycine-carbonate reagent. 7 Read the fluorescence. Determine the concentration from the standard concentration curve of 0 to 200 nM 4MU. • p45 Notes on the standard procedure 1 A 40 µl sample should contain 10 -6 to 10 -5 units (nM 4MU min-1) of β-galactosidase activity. If other dilutions of the sample into the reaction cocktail are used, adjust samples accordingly. 2 The glycine-carbonate reagent is sufficient to titrate 1/3 its own volume in 5% TCA to proper pH for reading (200 µl reaction stopped with 50 µl of 25% TCA). 3 The protocol is designed for assay of E. coli β-galactosidase activity, which is active at neutral pH. The vertebrate form of β-galactosidase is a lysosomal enzyme, which has optimal activity at pH 4.5. The lysosomal activity can be assayed in acetate buffer instead of Tris buffer. The assay should be performed at both pH values when lysosomal contamination of reactions is anticipated. 4 Depending on the calibration setting used, maximum readings are obtained at 40 to 200 nM 4MU final concentration in the glycine-carbonate buffer. 5 Limitations on the sensitivity of the assay are determined by the background fluorescence of the substrate. It is therefore important to use freshly prepared substrate solutions in assays where high sensitivity is desired. 6 Frozen reaction cocktails may be used, but backgrounds gradually increase with repeated freeze/thaw cycles. Substrate sometimes precipitates from frozen cocktails. Resolubilization is slow unless the cocktail is heated to 37 °C and repeatedly vortexed. • p46 Bibliography An, G., Hidaka, K., and Siminovitch L., Expression of Bacterial β-galactosidase in Animal Cells. Mol. Cell. Biol., 2, 1628–1632 (1982). Beckwith, J. and Zipser, D., eds. The Lactose Operon. Cold Spring Harbor Laboratory, Cold Spring Harbor, New York (1970). Miller, J. Experiments in Molecular Genetics. Cold Spring Harbor Laboratory, Cold Spring Harbor, New York (1972). Miller, J. The Operon. Cold Spring Harbor Laboratory, Cold Spring Harbor, New York (1981). Ullman, A., Jacob, F., and Monod, J., Characterization by in vitro complementation of a peptide corresponding to an operator-proximal segment of the β-galactosidase structural gene of Escherichia coli. J. Mol. Biol., 24, 339–343 (1967). • p47 Appendix B. Effect of A+T content on fluorescent DNA quantitation Dealing with A+T content differences when using the H 33258/DNA assay Because fluorescence enhancement with H 33258 occurs only when the dye is bound to A and T bases of a double stranded DNA chain, the intensity of the fluorescent signal is determined by both the concentration of the DNA and the A+T content (AT%) of the DNA. The H 33258 fluorescence assay must be calibrated with a DNA standard of known concentration which has been determined by UV absorbance. If the AT% of the standard and the sample are similar, no correction for the base composition is required. So when measuring eukaryotic DNA, which has an AT% ranging from 56 to 60%, the standard DNA is typically calf thymus with an AT% of 58%. DNA standards with different AT% are available, and can be selected to match the characteristics of your sample. A range of standards available from Sigma Chemical company are listed below. • p48 Double-stranded DNA source (Ultra pure) GC % Sigma Chemical Co. catalog number Calf thymus 42 D 4764 Clostridium perfringens 26.5 D 5139 E. coli 50 D 4889 Human placenta 42 D 4642 Micrococcus luteus 72 D 5014 If measuring samples which differ significantly in AT% from the selected DNA standard, a modification to the calibration protocol is needed. As shown in Fig 12, fluorescence is a linear function of AT% when the DNA concentration (based on A260) is held constant. This relationship was based on several DNA samples with AT% ranging from 23 to 100%, measured with the DQ 200. With a standard DNA concentration of 100 ng/ml (A260 = 0.0020), the slope of relative fluorescence versus AT% is 2.5, while with DNA at 1000 ng/ml, the slope is 25. We noticed that poly(dAT) did not fit a linear plot as well as poly(dA)-poly(dT) did, suggesting that there is also a sequence-dependent component of H 33258 binding (Daxhelet, B.A., et al. Anal. Biochem. 179, 401– 403, 1989). Because the AT% effect and DNA concentration effect are both linear, it is straightforward to calibrate the assay when the AT% of the standard and sample differ. Equation 1 gives an adjusted setting to use when a standard of one AT% is used to calibrate the assay for sample DNA of a different AT%: Adjusted standard setting = Cstd (0.025(AT%std – AT%samp) + 1) The adjusted setting is the calibration to use for the standard at the Cstd concentration (in ng/ml). Once adjusted, the fluorometer reading will then give sample concentrations in ng/ml. For example, if the standard and sample DNA have an AT% of 40 and 50, respectively, and the standard DNA concentration is 100 ng/ml, Adjusted standard setting = 100(0.025(40–50)+1) = 2.5(–10) + 100 = 75. Thus, setting the calibration to 75 for the 100 ng DNA standard will set the fluorometer to read directly in ng/ml for the higher AT% sample DNA. • p49 2000 Fig 12. Effect of AT% on relative fluorescence. Initial concentrations were determined by A260, then diluted to either 100 ng/ml or 1000 ng/ml in assay buffer containing H 33258. The fluorometer was calibrated with calf thymus DNA at 100 ng/ml, then fluorescence readings were taken for each sample. 1750 Relative Fluorescence DNA samples of Microccocus lysodeikticus (AT%=23), E. coli strand B (AT%=50), calf thymus (AT%=58), Clostridium perfringens (AT%=69), and Poly(dA)-Poly(dT) (AT%=100) (all Sigma) were dissolved in TNE buffer. 1000 ng/ml 1500 1250 1000 750 500 100 ng/ml 250 0 0 20 40 60 80 100 DNA compostion (AT%) ■ DNA 1000 ng/ml, H 33258 1.0 µg/ml ● DNA 100 ng/ml, H 33258 0.1 µg/ml An example using calf thymus DNA as a standard for fluorescent E. coli genomic DNA measurements If you use 100 ng/ml calf thymus DNA as a standard, which has AT%=58, but your sample is E. coli DNA with ~50% AT, substitute into the equation: Adjusted standard setting =2.5(AT%std – AT%samp) + 100 (for 100 ng/ml standard), Adjusted standard setting =2.5(58 –50) + 100 = 2.5(8) + 100 = 20 + 100 = 120. Set the DQ 200 Fluorometer to display 120 when measuring your 100 ng/ml calf thymus DNA standard to read E. coli DNA concentrations in ng/ml. • p50 Appendix C. Main Bibliography Brunk, C.F., et al. Assay for nanogram quantities of DNA in cellular homogenates. Anal. Biochem. 92, 497–500 (1979). Cesarone, C., Bolognesi, C., and Santi, L. Improved microfluorometric DNA determination in biological material using 33258 Hoechst. Anal. Biochem. 100, 188–197 (1979). Daxhelet, G.A., Coene, M.M., Hoet, P.P. and Cocito, C.G. Spectrofluorometry of dyes with DNAs of different base composition and conformation. Anal. Biochem. 179, 401–403 (1989). Gallagher, S. In Current Protocols in Molecular Biology. (F.A. Ausubel, et al). A.3.9–A.3.15, Supplement 8 (1989). Gallagher, S. ed. GUS Protocols: Using the GUS Gene as a Reporter of Gene Expression. Academic Press, Inc. (1992). Jefferson, R.A. Assaying chimeric genes in plants: the GUS gene fusion system. Plant Molecular Biology Reporter. 5, 387–405 (1987). Labarca, C., and K. Paigen. A simple, rapid, and sensitive DNA assay procedure. Anal. Biochem. 102, 344–352 (1980). Marmur, J. and Doty, P. Determination of the base composition of deoxyribonucleic acid from its thermal denaturation temperature. J. Molec. Biol. 5, 109–118 (1962). Moe, D., Garbarsh, C. and Kirkeby, S., The Protein Effect on Determination of DNA with Hoechst 33258. J. Biochem. Biophys. Methods, 28, 263–276, (1994). Rymaszewski, A., et al. Estimation of cellular DNA content in cell lysates suitable for RNA isolation. Anal. Biochem. 188, 91–96 (1990). Stout, D.L., and F.F. Becker. Fluorometric quantitation of single-stranded DNA: a method applicable to the technique of alkaline elution. Anal. Biochem. 127, 302–307 (1982). • p51 Ordering information product quantity code number Basic Unit Hoefer DQ 200 Fluorometer. Includes DNA standard and Hoechst 33258 dye (100 mg). 115/230 VAC 1 DQ200 Glass fluorometry cuvette, fluorescent grade 1 DQ105 Lamp replacement assembly. 1 DQ200RK-3 Optics replacement kit. Includes filter, glass cover, mirrors, and O-ring 1 DQ200RK-5 Lid replacement assembly. Includes lid, latch, spring, and mounting screw 1 DQ200RK-4 1 DQ120 Capillary Adaptor Capillary Adaptor Kit. Includes capillary tubes, 10-, 50-, and 100 µl 20 each.) Capillary tubes, 10 µl 100 DQ120-10 Capillary tubes, 50 µl 100 DQ120-50 Capillary tubes, 100 µl 100 DQ120-100 Capillary Cuvette Capillary Cuvette Adaptor Kit. Includes one capillary cuvette, capillary tubes, 9 µl, pkg of 250, and 5/64" Allen key. Capillary tubes, 9 µl, glass 1 250 DQ130 DQ130-9 Dye and standards Hoechst 33258 dye 100 mg DQ201 Calf thymus DNA standard 250 µg DQ202 4-methylumbelliferone standard 100 mg DQ203 1 DQ210 Performance Validation Kit • p52 Clontech is a trademark of Becton, Dickinson and Company. Microsoft is a trademark of Microsoft Corporation Molecular Probes is a trademark of Molecular Probes, Inc. Research Organics is a trademark of Research Organics, Inc. Printed in the USA Hoefer, Inc. 953 Indiana Street San Francisco, CA 94107 USA www.hoeferinc.com • p54