1
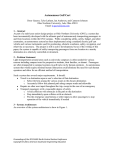
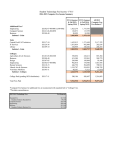
MY REMOTE LTD
GSM REMOTE RELAY MODULE
GSM REMOTE 1
USER MANUAL v 1.4
Device Firmware v 1.03 10.03.2013
Page 1 of 16
******************** WARNING !!! *********************
For safety reasons product should only be installed by qualified electrician or
person with equivalent qualification.
Any connection shall only be carried out with mains and power supply
disconnected.
Never turn on power without antenna connected.
DEVICE IS AVAILABLE IN TWO VARIATIONS; FLEXIBLE CABLE CONNECTION
AND SCREW TERMINAL. PLEASE MAKE SURE PROPER ENCLOSURE
INSTALLED WHEN TERMINAL VERSION USED TO SWITCH 230V AC OR WHEN
USED OUTSIDE!!!
Page 2 of 16
CONTENT
0.
QUICK INSTALLATION GUIDE .................................................................................................. 4
1.
MODULE FEATURES ................................................................................................................... 6
2.
DEVICE DESCRIPTION................................................................................................................ 7
3.
INSTALLATION AND PROGRAMMING.................................................................................... 8
Hardware installation............................................................................................................................... 8
Device programming ............................................................................................................................... 8
Troubleshooting ....................................................................................................................................... 9
4.
SOFTWARE PROGRAMMING.................................................................................................. 10
5.
DEVICE FIRMWARE UPDATE.................................................................................................. 12
6.
SPECIFICATIONS........................................................................................................................ 13
7.
APPENDIXES ............................................................................................................................... 14
A. RELAY TIME SETTINGS............................................................................................................... 14
B. RELAY PARAMITERS ................................................................................................................... 15
Page 3 of 16
0. QUICK INSTALLATION GUIDE
This quick installation guide provides summary of steps contained in the manual
and should be used only by installer experienced with the product.
THIS DEVICE WAS DESIGNED TO ACTIVATE RELAY ON TIME BY CALLING DEVICE SIM
NUMBER FROM ANOTHER MOBILE PHONE
In order to prepare GSM RELAY to work please follow steps:
A. Insert SIMCARD with NO PIN to the SIMCARD slot.
B. Wire relay in desired configuration. Most common scenario will be using C (stands for
common) and NO (normally open) terminal of the relay.
C. Connect Power Supply – any 12V 1A power supply can be used.
After power supply will be applied to the device the following behaviour may be
expected;
•
•
Red led stays on until phone successfully logs in to the GSM network.
Red led may be caused by PIN on the SIM card (remove PIN by inserting SIM into mobile
handset) or SIM card is not valid (please check that SIM is working with mobile handset).
Programming and testing
When the RED led is off and GREEN led is flashing device is ready for programming and usage.
Below examples what user may expect to do with the device:
A.
Learning numbers – please hold B1 and call device SIM until blue led comes on. If device
blue led is not visible wait for call being dropped or voice mail (dependent form the GSM operator
configuration).
B.
Time setting – please select jumper configuration according to the time setting desired. List of
jumper times can be found in JUMPER TIMES section. If the available time setting is not satisfactory
for the user move to point C.
C.
Set time via SMS – this is only available for numbers that where learned at point A as
unlearned/unauthorised numbers should not be able to modify the time. Device time span is from 1 to
64000 seconds. In order to program desired time send SMS containing letter T followed by desired
time value, ex. “T82” for 82 seconds, “T3600” for 1hr. By sending value between “T1” and “T64000”
user is telling to ignore the jumpers. This value is stored in permanent memory. To reverse back to
Page 4 of 16
the time configured from the jumpers please send SMS “T0” indicating that zero second is requested.
Device accepts upper and lower case “T” letter.
D.
Activate relay – making phone call from now on will activate relay on desired time (for
numbers that were learned at point A – all other numbers will be ignored). Making a phone call while
relay time is counting down will extend that time back to the original time setting.
E.
Clear relay time – sometimes user may need to clear the time to 0 and switch the relay off.
That can be done locally with the device by pressing B2 button or remotely by sending an empty
SMS (from numbers learned at point A). In some cases user may not be able to send an empty SMS,
in this case device will also accept letter ‘C’ or ‘c’.
F.
Erase numbers from memory – in order to erase numbers from the device press and release
B1 and B2 button. During erasing process red led become `s active until erase process is finished. If
erasing all numbers is not satisfactory please use our free USB software
Device Hints
•
device confirms that relay was activated by dropping the call
•
most SIM cards have Voice Mail set up. User will be charged when device drops the call to
confirm relay activation. Operator charges will apply. Please contact operator to deactivate
Voice Mail and experience charge free confirmation (busy signal will be generated instead)
•
when USB is connected buttons are not working, please use USB software for all operations
•
for device detailed status and easy number programming use software available on the
website
•
device trigger accuracy is +/- 1sec. When device is programmed for 1 second relay can trigger
for time shorter then 1 second. The reason of that behaviour is that device clock tick every
second and when triggering phone call is half way between the tick device will deactivate the
relay after remaining half of the second
Page 5 of 16
1. MODULE FEATURES
•
Control your device for free from mobile phone
•
Up to 60 users controlling one device
•
Versatile module to control various devices
•
SMS relay time programming
•
SMS relay time clearing
•
One minute installation and programming
•
Free USB software for Windows ™ PC
•
Free “one click” device firmware upgrades
•
Real plug and play – no USB drivers needed
•
Device Remote Assistance via USB PC software
•
USB software import/export numbers
•
USB software detailed device status
•
USB software number learning
•
Windows PC USB drivers embedded
•
Can be used with any GSM network
•
Easy removable connectors
•
4 LED status indicators
•
32 jumper time settings
Page 6 of 16
2. DEVICE DESCRIPTION
1. GSM 900/1800 Aerial
2. Time Jumpers
3. B1 – button 1
4. B2 – button 2
5. 12V DC IN
6. USB connector
7. SIM card slot
8. Relay connector max 50V AC/DC. Cable connection 230V AC
Page 7 of 16
3. INSTALLATION AND PROGRAMMING
GSM REMOTE device was designed to provide minimum installation and
programming effort for the installer.
All steps required to successfully install and configure device can be found in this
chapter.
Hardware installation
•
Insert SIMCARD with NO PIN to the SIMCARD slot. Please make sure that PIN code is
removed, otherwise device RED led will stay ON indicating problem
•
Wire the relay using required configuration. The relay has three
connectors C (common), NO (normally open) and NC (normally
closed). Connector version of the device can only switch the
voltage up to 50V AC/DC. Device with flexible mains cable can switch 230V AC. Mains
cable relay configuration: NC – BLUE, C – BROWN, NO- YELLOW
•
Connect 12V power supply with minimum current output of 1A. DC connector used on the
PCB is suitable for DC jack 5.5mm x 2.1mm x 10mm
Device programming
When the RED led is off and GREEN led is flashing device is ready for programming and usage.
Learning numbers – please hold B1 and call device SIM until blue led comes on.
Time setting – please select jumper configuration according to the time setting desired. List of
jumper times can be found in “JUMPER SETTINGS” appendix.
Set time via SMS – this is only available for numbers that where learned to the device. Device
time span is from 1 to 64000 seconds. In order to program desired time send SMS containing
letter T followed by desired time value;
T3 for 3 seconds
T55 for 55 seconds
T3600 for 1 hour
Any value greater then 64000 will be reduced to 64000 seconds. Number of digits following
letter T can not exceed 5 digits. Any digits beyond that limitation will be truncated.
Page 8 of 16
Device will ignore the message if any non numeric value will be found following T letter in the
text message.
SMS time is saved in static memory and can only be changed or disabled by sending another
SMS value.
When the time value send to the device ranging from 1 to 64000 seconds device is permanently
ignoring the jumper time settings.
In order to start using jumper time settings please send SMS with value T0 (time value is zero).
Activate relay – making phone call from now on will activate relay on desired time (for numbers
that where learned to the device – all other numbers will be ignored).
Making a phone call while relay time is counting down will extend that time back to the original
time setting.
Device will confirm relay activation by dropping the phone call. Please make sure
Clear relay time – by pressing B2 button or sending an empty SMS (from numbers learned to
device) relay time will be cleared to 0 what causes the relay to switch off. In some cases mobile
handset doesn’t allow to send an empty SMS. In order to solve this problem device can also
accept upper case ‘C’ letter or lower case ‘c’ letter.
Erase numbers from memory – in order to erase numbers from the device press and release
B1 and B2 button. During erasing process red led become active until erase process is finished.
If erasing all numbers is not satisfactory please use our free USB software
Troubleshooting
The device is equipped with USB connector for detailed device status via free Windows Software. In
case that laptop is nit available please see led status explained bellow:
•
RED led – stays on when device is not logged in to the network and when SIM card pin is
enabled
•
BLUE led – indicates that number has been learned to the device
•
GREEN led – indicates network status
•
YELLO led – indicates relay ON status
•
Page 9 of 16
4. SOFTWARE PROGRAMMING
Latest version of USB free software is available on the website (www.myremote.eu). For easy and
transparent programming Windows software is recommended. While USB software is connected
buttons B1 and B2 are disconnected
1. Indicates how many rings received so far
2. Shows calling number
3. Save button – becomes active when number is calling
4. Shows what buttons are pressed – buttons are not functioning when USB connected
5. Shows what jumper time is selected currently on the jumpers – when SMS time is
greater then 0 jumpers are ignored
Page 10 of 16
6. Shows what SMS time is set up. When different then 0 jumpers are ignored
7. Shows current relay time counting down when relay has been activated
8. USB device status
9. Product Code – shows product code connected to the computer
10. Product Version – shows version of the product
11. Shows GSM network status
12. Read numbers form device memory
13. Write numbers to device memory
14. Erase all numbers from device memory
15. Table with telephone numbers
16. Table order number
17. Telephone number programmed to the device
18. Shows process of saving numbers to the device
19. Device serial number
20. GSM network level
21. Write / read status progress bar
22. Tool bar strip
TOOLBAR:
File – allow to import/export numbers to the file that can
be later programmed to another device. Exit close the
application.
Program Mode – User mode is used during normal
programming activities. This mode is always
activated when program started. Service mode is
special service section unavailable for the user.
Update Firmware starts device update firmware
program that is used to replace software running in the device to newer version.
Page 11 of 16
Language Selection – changes application
language. When clicked application will close and
user must start the application again. Language can
also be change by installing the application again.
Help – Program Manual will open PDF
manual file that is located in the application
folder. Please make sure that PDF reader
software is installed on the PC.
5. DEVICE FIRMWARE UPDATE
GSM REMOTE device was equipped with remote update facility. “One Click” update replace device
firmware. Firmware file is located on MY REMOTE server and during the update process encrypted
file is downloaded and retained for the future offline use on the PC.
Every time when Program Mode – Update
Firmware is clicked PC software is attempting
to download latest update. When this operation
is successful system will display following
window shown. At this point user may continue
the update device as planned by clicking OK or
in case of later OFFLINE update CANCEL
should be clicked. When user click Update
Firmware next time with no internet connection the software will read the file that was downloaded
last time.
Update file download behaviour:
-
Update Firmware clicked – attempt to download latest firmware file and save to PC
-
Internet connection available – file update file stored to the PC
-
No internet connection , no file downloaded – system will generate an error message
-
No interned connection, file downloaded earlier – system will generate message that could not
connect to the server but has found the file that was downloaded previously and can be used.
System will display date and time when the update file was downloaded
Page 12 of 16
HOW TO PREPARE DEVICE FOR UPDATE
In order to make device ready for firmware update B2 – button 2 must be pressed while device
is being connected to the USB. Device is designed to check button 2 when powered. If button B2 is
pressed during boot device goes into bootloader mode otherwise device starts normal operation.
Once device is in bootloader mode one
click is required to perform update as
can be seen on the picture. When device
is in bootloader mode START UPDATE
button becomes active. Please click
START UPDATE and wait until message
DISCONNECT USB AND CLOSE
UPDATER.
Please restart device to start normal operation. Restart means disconnecting power from the device
and connecting it again.
Please remember that device is powered from DC jack and also from the USB port.
6. SPECIFICATIONS
- USB Mini-B connector for free software
- GSM 900/1800 operation
- Built in aerial GSM 900/1800
- 12V DC power supply
- Relay Switching capacity up to 16A AC
- Screw Terminal voltage up to 50V AC/DC
- Relay switch time from 1s to 15hrs
- Up to 60 unique numbers to be learned
- Average current consumption 120mA
- Board Dimensions 65x110 mm
Page 13 of 16
7. APPENDIXES
A. RELAY TIME SETTINGS
: : : : : = 1 sec
[:][:] : [:] : = 10 min
: [:] [:] : [:] = 2hrs20m
[:]: : : : = 5 sec
: : [:][:] : = 15 min
[:][:] [:] : [:] = 2hrs30m
:[:] : : : = 10 sec
[:] : [:][:] : = 20 min
: : : [:][:] = 3 hrs
[:][:] : : : = 15 sec
: [:][:][:] : = 25 min
[:] : : [:][:] = 4 hrs
: : [:] : : = 30 sec
[:][:][:][:] : = 30 min
: [:] : [:][:] = 5 hrs
[:] : [:] : : = 45 sec
: : : : [:] = 40 min
[:][:] : [:][:] = 7 hrs
: [:][:] : : = 1 min
[:] : : : [:] = 50 min
: : [:][:][:] = 9 hrs
[:][:][:] : : = 1m 30s
: [:] : : [:] = 1 hr
[:] : [:][:][:] = 12 hrs
: : : [:] : = 2 min
[:][:] : : [:] = 1hr 20m
: [:][:][:][:] = 15 hrs
[:] : : [:] : = 4 min
: : [:] : [:] = 1hr 40m
: [:] : [:] : = 6m 40s
[:] : [:] : [:] = 2hrs
Page 14 of 16
B. RELAY PARAMITERS
It is common scenario that relays are used with inductive loads that are beyond switching
capacity of the relay. Please find detailed relay specification to avoid relay failure.
Page 15 of 16
Page 16 of 16