1
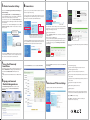
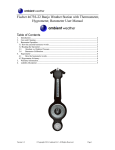
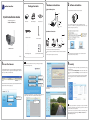
1 Hardware Introduction
Package Contents
ambient weather
2 Software Installation
Physical Description
1. Insert the CD into the CD drive of your computer.
Antenna
Quick Installation Guide
(For Windows & Mac OS)
IP Camera
Outdoor IP Camera
Power Adapter
Resource CD
LAN
LENS
Power
Infrared LED
Reset Button
2. Go to the folder “IP Camera Search Tool” and find the folder “For
Windows OS”or “For Mac OS”. Copy and paste the IP camera tool file to your
computer, or drag it onto your desktop.
Hardware Connection
Ethernet Cable
Wi-Fi Antenna
WPS
ambient weather
Quick Installation Guide
(For Windows & Mac OS)
Outdoor Wireless IP Camera
AMBIENTCAM
AMBIENTCAM
V1.1
Mounting Bracket
Quick Installation Guide
1. Mount the antenna and make it stand vertically.
2. Connect the camera to the LAN network (router or switch) via Ethernet
cable.
3. Connect the power adapter to the camera.
V4.1
3 Access the Camera
Shortcut icon for Mac OS
Note:
If your computer doesn’t have CD drive, you can download the IP
camera tool from our website for free.
4 Security
Note:
There are three login methods. According to the figure prompted,
choose a different login mode.
We strongly recommend that you modify your password when you log
in for the first time.
To do this, choose “Device Management” on the bottom of the camera
interface, then go to the “Users Settings” section on the left side of the
screen.
Here you can change the username and password to prevent intruders
from accessing your camera. The default username is admin with no
password.
1. Enable the DHCP feature of your router (Enabled by default normally),
then open the IP Camera Tool program. It should display the camera’s IP
address in your LAN (Local Area Network).
If you use IE browser,
select this login mode.
Http://192.168.11.211:88
Shortcut icon for Windows OS
If you use Firefox, Google
Chrome, Safari, select this
login mode.
2. Double click the camera list here, and your default browser will
open up to the camera’s login page.
If you use Mobile phone,
select this login mode.
4. Click Run button, and re-login the camera, you can see the live video
on the interface.
3. Take Microsoft Internet Explorer as an example. For the first time login
the camera, please make sure to install ActiveX when prompted.
Default user name is
admin with no password.
Click this button and install
the ActiveX .
Notes:
1. If you forget your username or password, you can press and hold the
reset button on the bottom of the camera using a pin for 5 seconds. This
resets the camera to factory defaults .
2. If you want to access your camera over wireless or the Internet, please
continue with the setup by following the Wireless Connection and
Remote Access steps below.
5 Wireless Connection Settings
6 Remote Access
1. Please choose “Device Management > Wireless LAN Settings”, click
“Wireless LAN Settings”.
If you want to access your camera by web browser outside of your LAN,
you need to configure some settings.
2. Enable “Using Wireless LAN” on the “Wireless LAN Settings” page.
3. Click the Scan button and the camera will detect all WIFI devices
around the area. It should also display your router in the list.
192.168.11.211
1. Choose “Settings” on the top of the camera web page, then go to the
“Device Management > Basic Network Settings” section on the left side
of the screen, then uncheck the “Obtain IP from DHCP Server”.
Input the port and IP address
of your camera and click Save.
4. Click the SSID of your router in the Wireless Network list, the
corresponding information (SSID & Encryption) will be filled in the SSID
boxes automatically.
5. You will only need to fill in the Share Key. Make sure that SSID,
Encryption and Share Key you filled in for the camera are exactly the
same for your router.
3. If the UPnP of the router has enabled, you do not need to perform this
step. Otherwise, you need to select one of the following methods to
configure port forwarding on your router.
Click the SSID of router and SSID,
Encryption will be filled in the
following box automatically .
192.168.11.211
You can see the port of your camera here.
If you want to set Remote Access for several cameras on the same
network, you will need to change the HTTP port for each camera.
Enter the same share
key with your router.
2. Enable UPnP and DDNS in the camera’s settings page. We recommend
you to use the DDNS by factory default, but if you want to use the third
party DDNS, please check the user manual for further instructions.
6. Please click the Submit button after all settings have been entered,
the camera will reboot. After the camera has completed the reboot
process, wait 10 seconds and disconnect the ethernet cable.
7Smart
Access the IP Camera by
Phone
If your router has UPnP function.
Choose “Forwarding > UPnP”, make sure that the Current UPnP
Status is Enabled.
If your router does not UPnP function.
You need to manually add port(HTTPS port) forwarding, refer to the
following steps. We will be using the TP-LINK brand wireless router as
an example. We need go to the “Forwarding > Virtual Servers”
panel for setup.
WeatherUnderground.com
1. Visit WeatherUnderground.com and create a free account.
2. From the homepage, select Photos & Videos | Webcams |
My Webcams.
4. Now you can access your IP camera by http://domain name:HTTP port
via the Internet.
Click Add New.
4. Fill out the Add A Camera section, and select Save and Continue.
5. Note your Camera ID. You will need to enter this in your Camera FTP
Services Settings.
2. Enter the following settings:
FTP Server: webcam.wunderground.com (the name of the
WeatherUnderground FTP server)
If you want to access your camera on smart phone, please search
and install IPCam Viewer on Google Play for Android devices,
or search and install IPCam_Viewer on APP Store for iOS
devices.
For details, please refer to the Android or iOS User Manual in the
CD.
8 Sign up your Camera at
Here you have finished the Port
Forwarding setup.
FTP Port: 21 (this is the standard port for any FTP server)
FTP User: Enter the Camera ID obtained in the previous section. This
is case sensitive.
9 Enter Camera FTP Service Settings
1. Login into your camera and view the camera web interface.
FTP Password: Enter your WeatherUnderground.com password. This
is case sensitive.
FTP Upload Folder: / (signifies the root folder)
FTP Mode: PASV (signifies Passive mode)
Upload Image Now: √
Upload Interval (Seconds): enter the appropriate upload interval in
seconds. It is not recommended to upload faster than 120 seconds.
Press SUBMIT to save the settings.
3. From the Add A Camera section, select I want to FTP my images.
Press TEST to confirm there are no FTP errors and the login
credentials were entered correctly.