1
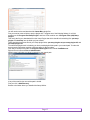
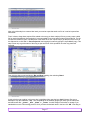
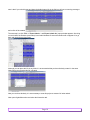
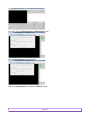
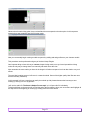
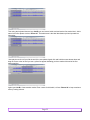
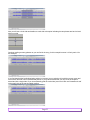
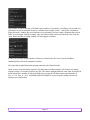
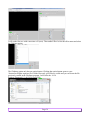
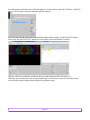
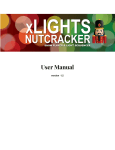
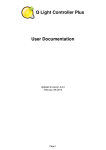
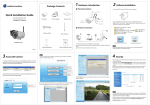
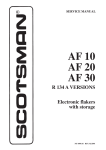
Xlights/Nutcracker User
Manual
By Sean Meighan
Version: 1.0
Last Updated: 04/29/14
Page 1
Table of Contents
Xlights/Nutcracker User Manual...............................................................................................................1
1Introduction..............................................................................................................................................3
Xlights...................................................................................................................................................3
1.3Nutcracker........................................................................................................................................3
1.4Xlights+Nutcracker..........................................................................................................................3
1.5Xlights+Nutcracker is free!..............................................................................................................3
1.6.5Hardware Controllers................................................................................................................4
1.6.5.7 DMX................................................................................................................................4
1.6.5.8 OpenDMX........................................................................................................................5
1.6.5.9 Pixelnet............................................................................................................................5
1.6.5.10 LOR................................................................................................................................5
1.6.5.11 D-Light...........................................................................................................................5
1.6.5.12 Renard............................................................................................................................5
1.7Nutcracker........................................................................................................................................6
2Download and Installation.......................................................................................................................6
2.3Download.........................................................................................................................................6
2.4Installation........................................................................................................................................6
3SETUP.....................................................................................................................................................6
3.3Verify................................................................................................................................................6
4TEST........................................................................................................................................................6
4.3How to Select/Unselect Channels....................................................................................................6
4.4Testing Channels..............................................................................................................................6
4.4.5regular lights.............................................................................................................................6
4.4.6dumb rgb...................................................................................................................................6
4.4.7smart rgb...................................................................................................................................6
4.5Save Test Group...............................................................................................................................6
5CONVERT...............................................................................................................................................6
6PREVIEW................................................................................................................................................6
7NUTCRACKER.......................................................................................................................................6
7.3Effect Classes...................................................................................................................................6
7.3.5None..........................................................................................................................................6
7.3.6Bars...........................................................................................................................................7
7.3.7Butterfly....................................................................................................................................8
7.3.8Circles.....................................................................................................................................10
7.3.9Color Wash.............................................................................................................................10
7.3.10Curtain..................................................................................................................................10
7.3.11Fire........................................................................................................................................10
7.3.12Fireworks..............................................................................................................................10
7.3.13Garlands................................................................................................................................10
7.3.14 Life.......................................................................................................................................10
7.3.15 Meteors................................................................................................................................10
7.3.16Piano.....................................................................................................................................10
7.3.17Pictures.................................................................................................................................10
Page 2
7.3.18Snowflakes............................................................................................................................10
7.3.19Snowstorm............................................................................................................................10
7.3.20Spirals...................................................................................................................................10
7.3.21Spirograph............................................................................................................................10
7.3.22Text.......................................................................................................................................10
7.3.23Tree.......................................................................................................................................10
7.3.24Twinkle.................................................................................................................................10
7.3.25SingleStrand..........................................................................................................................11
7.3.26Faces.....................................................................................................................................11
7.3.27Wave.....................................................................................................................................11
8SCHEDULE...........................................................................................................................................11
1 Introduction
Xlights was written by Matt Brown. Nutcracker was written by Sean Meighan.
Xlights
Xlights was created in 2010 by Matt Brown. Matt, a LOR user, wanted a show player that would have
low system requirements and high performance. Xlights has been a reliable player used by
hundreds of Christmas Light enthusiasts over the last 4 years.
1.3
Nutcracker
Nutcracker was written by Sean Meighan in 2012. Sean, who was new to Christmas Lights, wanted an
easier way of creating effects on smart RGB devices. Sean came up with the concept of defining
a model (Megatree, matrix, arches, .etc.) and then dropping effects (butterfly, spirals, text, .etc.)
onto the model. Nutcracker 1 and 2 were developed as a web application. To create effects you
would log into the web , define models, drop effects.
1.4
Xlights+Nutcracker
In January 2013 , Matt Brown took the web based code that Sean had written and re-wrote into C++
and made Nutcracker part of xLights. This produced a real time Nutcracker product. An
Example: The snowflake effect took 5 minutes to generate effects using Nutcracker 2 , in
Nutcracker 3 (The xLights port) , that same effect now took less than 5 seconds.
Amazing work by Matt!
1.5
Xlights+Nutcracker is free!
Both Matt and Sean have always believed their software should be made available free to the lighting
community. The sources of xLights/Nutcracker is available to download from github. You can
Page 3
download the free sources from https://github.com/smeighan/xLights.
Illustration 1: Matt Brown and Sean Meighan at The Academy show in 2012
1.6
1.6.5 Hardware Controllers
Easy configuration to any hardware controller. Choose from USB driven data or E1.31. These are the
current choices: DMX, OpenDMX, Pixelnet, LOR, D-Light, Renard
1.6.5.7 DMX
DMX controllers (or LOR or D-Light controllers in DMX mode)
attached to an Entec DMX USB Pro, Lynx DMX dongle,
DIYC RPM, DMXking.com, or DIY Blinky dongle.
Last Channel should be 512 or less, unless you are using
a DIY Blinky dongle (in which case it can be up to 3036).
Page 4
1.6.5.8 OpenDMX
DMX controllers (or LOR or D-Light controllers in DMX mode) attached to an LOR dongle, D-Light
dongle, HolidayCoro programming cable, or Entec Open DMX dongle
1.6.5.9 Pixelnet
Pixelnet hub attached to a Lynx Pixelnet dongle.
1.6.5.10
LOR
LOR controllers attached to any LOR dongle.
Max of 8 channels at 9600 baud.
Max of 48 channels at 57600 baud.
Max of 96 channels at 115200 baud.
Run your controllers in DMX mode for higher throughput.
1.6.5.11
D-Light
D-Light controllers attached to a D-Light dongle.
Max of 8 channels at 9600 baud.
Max of 48 channels at 57600 baud.
Max of 96 channels at 115200 baud.
Run your controllers in DMX mode for higher throughput.
1.6.5.12
Renard
Renard controllers connected to a serial port or a USB dongle with virtual comm port. 2 stop bits are
set automatically.
Max of 42 channels at 9600 baud.
Max of 260 channels at 57600 baud.
Page 5
1.7
Nutcracker
2 Download and Installation
2.3
2.4
Download
Installation
3 SETUP
3.3
Verify
4 TEST
4.3
How to Select/Unselect Channels
4.4
Testing Channels
4.4.5 regular lights
4.4.6 dumb rgb
4.4.7 smart rgb
4.5
Save Test Group
5 CONVERT
6 PREVIEW
7 NUTCRACKER
7.3
Effect Classes
7.3.5 None
Page 6
7.3.6 Bars
You can create horizontal or vertical bars. The direction of travel can be specified. You can ask for a 3D
effect from them.
First BAR effect.
Layering: Effect 1. Just show Effect 1
Sparkles: 200. Sparkles are turned off
Brightness: 100%. Brightness is shown as it was calculated by the effect
Contract: 0%. No enhancement to Contrast that was generated.
Effect shown on 20x120
Megatree, 180 degrees
Effect Shown on 32x32 Vertical
Matrix
Effect shown on 20x120
Megatree, 180 degrees
Effect Shown on 32x32 Vertical
Matrix
Bar effect with direction set to
“up”.
Notice how the same effect looks
like on different models.
Bar effect with 3D turned on. 3D
causes a fading of the bar. We
are using the direction called
“compress”.
Page 7
7.3.7 Butterfly
Effect shown on 20x120
Megatree, 180 degrees
Effect Shown on 32x32 Vertical
Matrix
Effect shown on 20x120
Megatree, 180 degrees
Effect Shown on 32x32 Vertical
Matrix
Butterfly effect with colors set
to “rainbow”. With the
“rainbow” color, checked colors
are ignored.
Butterfly effect effect with colors
set to “palette”.
3 colors have been checked, Red,
Green, Blue. The checked colors
are used to color the butterfly
effect using the “palette” color
process.
Page 8
Page 9
7.3.8 Circles
7.3.9 Color Wash
7.3.10
Curtain
7.3.11
Fire
7.3.12
Fireworks
7.3.13
Garlands
7.3.14
Life
7.3.15
Meteors
7.3.16
Piano
7.3.17
Pictures
7.3.18
Snowflakes
7.3.19
Snowstorm
7.3.20
Spirals
7.3.21
Spirograph
7.3.22
Text
7.3.23
Tree
7.3.24
Twinkle
Page 10
7.3.25
SingleStrand
7.3.26
Faces
7.3.27
Wave
8 SCHEDULE
9 HOW TO USE AUDACITY AND NUTCRACKER
How to use Audacity with Nutcracker.
Just using Nutcracker alone you will have to decide at what point you want your effects to change and manually
add timing marks. However Nutcracker in conjunction with the Audacity audio editing program offers you a much
better method for deciding where the best place to insert timing marks into a sequence. Audacity is a free open
source program available from http://audacity.sourceforge.net/. To use Audacity download and install it on your
PC. If you are not familiar with Audacity may I suggest that you view some YouTube training videos in order to
learn basic editing techniques. The first video I found useful is ‘Using Audacity’ http://www.youtube.com/watch?
v=X1lPvBY_ri8 and the second which is a actually a fairly extensive series of videos is 'Audacity How to Edit
Tutorial' http://www.youtube.com/watch?v=dbqJVC6kQ50&list=PL2B8A3178C78BA9CB. Viewing these will give
you the basic operational knowledge for using Audacity.
Once you have Audacity installed it is fairly easy to use. First start the Audacity program by clicking on its
desktop icon.
The Audacity opening screen should appear like this.
To open an Audio file click on ‘File’ and then ‘Open’.
Page 11
Browse to the Nutcracker folder where you have your audio files and select an audio file you are going to build
timing marks for. In this example I will use ‘Wizards In Winter.mp3’ as my audio file. I highlight this file and click
‘open’. The next screen that appears is the now opened audio file.
Audacity gives you the ability
to analyze your song for
different types of beats, beats
on bars etc.
When Audacity is initially
installed it gives you a few
limited methods for analyzing
your song. These methods are
found in the 'Analyze' options.
These are ‘Beat Finder...’,
‘Regular Interval Labels...’,
‘Simple Data export...’,
‘Silence Finder...’, and
‘Sound Finder...’.
Now I will cover an expanded set of add in analyzing utilities are called the Vamp Plugins. These are obtained
from the web site http://vamp-plugins.org/download.html.
Page 12
You will need to select and download the Queen Mary plugin Set.
First you need to create a folder to put the plugins into. I suggest one of the following folders, for a 32 bit
machine use ‘C:\Program files\Vamp Plugins’ and for a 64 bit machine use ‘C:\Program Files (x86)\Vamp
Plugins’.
Then unzip the file you downloaded from the Vamp Plugins site which should look something like ‘qm-vampplugins-1.7-win32.zip’ into the folder you just created.
There should be these three files in your Vamp plugin folder, qm-vamp-plugins.cat, qm-vamp-plugins.dll, and
qm-vamp-plugins.n3.
To make these plugins work in Audacity you have to add plugins folder path in your search path. To make this
process easier Nutcracker provides a freeware utility for this procedure.
This utility is located in the folder ‘C:\Program Files\xLights’ and is named ‘PathEditor.exe’.
Right click on this file and 'Run as administrator'.
When it starts it will show you what is currently in your search path.
If any of the small circles are red the path is invalid.
First you click '+ Add Directory'.
Browse to the folder where you installed the Vamp Utilities.
Page 13
Highlight the folder and click 'OK'.
Click 'OK' to Confirm add directory.
Finally you click 'Save to Registry'.
Exit the Path Editor by clicking on its red close X.
Now open Audacity to confirm the plugins have been added.
Page 14
Now that the new Vamp Plugins have been added you can now use them to analyze your audio files and create
timing files for use in Nutcracker.
At this point a few of Audacity controls need to be covered.
Using the keys Ctrl+1 will expand the audio timeline and Ctrl+3 will compress it. This is handy when doing fine
tuning of timing marks.
Using the keys Ctrl+b will automatically open and start a label track when doing manual timing marks.
Of the 20 plugins that were added with the Vamp Plugins the three that will used in conjunction with Nutcracker
timing mark creation is 1. Bar and Beat Tracker: Beat Count..., 2. Note Onset Detectior: Note Onsets..., and
3. Polyphonic Transcription.
The first Vamp Plugin to be covered is the ‘Bar and Beat Tracker: Beat Count...’.
First Open Audacity. Then open an audio file. As previously shown I will use ‘Wizards In Winter.mp3’ as my
audio file. I highlight this file and click ‘open’. The next screen that appears is the now opened audio file.
Next click on ‘Analyze’ and select ‘Bar and Beat Tracker: Beat Count...’
Page 15
Then the ‘Bar and Beat Tracker: Beat Count...’ popup configuration window opens. Take the default values by
clicking ‘OK’.
A progress window will appear as the audio track is analyzed.
Once the track analyzing has completed a new label track will be added. This track shows all of the Bars and
Beats that were detected in the audio. You may have to use your mouse to grab the bottom of the track and drag
it down in order to see all of the labels.
Page 16
After using this analysis to create a label track you need to export that track to a file so it can be imported into
Nutcracker.
First it is best to keep these exported files related to the song you have analyzed. Since you may create a label
file for each of the different Vamp plugins it is recommended to use a two part file name of the audio file. For the
first half of the label file name, use the name of the audio file its self. A quick way to get that part of the name to
the clipboard is to click 'File' >> 'Save Project As' and copying this name by typing the keys Ctrl+C (copy). This
step is done only to get the name of the song so just cancel out of this operation once the copy has been
executed.
Then click the down arrow besides the 'Bar and Beat' heading, then selecting 'Name'.
At this point be sure anything in this name box is highlighted then type the keys Ctrl+V (paste). Be sure to
backspace over the characters ‘.aup’. Then, depending on the Audacity plugin type used, type an underscore
and add a suffix like ‘_phrase’, ‘_bars’, ‘_beats’, or ‘_onsets’. It makes things much easier to manage if you
standardize on such a file naming process. Once you have the desired name in the box click ‘OK’. One thing to
Page 17
note is that if you miss this step and leave the default name info in the field you will see no warning messages
and no file will be created.
The next step is to click 'File' >> 'Export Labels...' and 'Export Labels As:' popup window appears. One thing
to note is that if the filename (track name) is an invalid windows file name this window will not appear. If so go
back and check the previous steps.
Although you can place this file in any folder it is recommended that you have Audacity create it in the same
folder where the original audio file is located.
Now you can close Audacity. It is not necessary to save this project so answer ‘No’ when asked.
Now open xLights/Nutcracker and select the Nutcracker tab.
Page 18
From here click the 'Open Sequence, Create Sequence' icon.
Click the ‘New Sequence’ radio button first.
Then in the ‘timing import’ box select the ‘Audacity’ option.
Page 19
Click the down arrow on the right hand side of the ‘Media file’ window and browse to the audio MP3 file you
used to create your label file.
When you click 'Ok' a second popup window appears 'Choose Audacity timing file'.
Locate the file name that matches your song plus the label type you created. Select that file and click ‘OK’.
Nutcracker will have a pop up message telling you that it has created an empty sequence with your number of
channels and the number of periods as determined by the label file you used.
Page 20
Observe that for each timing point it has a related label that corresponds to that time point. In this sequence
example there was created a total of 452 timing marks.
Now you can actually begin creating a usable sequence by adding and assign effects to your element models.
This procedure can be performed using any of the three Vamp Plugins.
One important thing to know is that you cannot reimport timing marks, once you have imported the timimg
marks the only way to change them is to manually edit each one at this time.
Also remember the more marks you insert in the longer it will take to sequence but it can also lead to very cool
effects.
The next label creation process I will cover is a manual method. Some of the higher quality label files are ones
that are manually marked up.
In this example I will use a song that can easily be marked up with phrases because the best way to start
marking up a song is to do it by phrases.
I will use the audio file ‘The Stars & Stripes Forever.mp3’ so I will open this file in Audacity.
To begin with listen to the music until you find the end of the first phrase, place your cursor there and highlight all
the way back to the beginning of the song by holding down the mouse button.
Page 21
Then using the keyboard shortcut keys Ctrl+B you can insert a Label track and set the first marker label. Add a
name for this first phrase such as ‘Phrase 01’. This label name is the label that shows up when imported into
Nutcracker.
Next play the music until you find the end of the next phrase. Again click and hold the mouse button down and
drag the cursor to the left until you see a yellow line appear indicating you have reached the end of the first
phrase marking.
Again type Ctrl+B to insert another marker. Enter a name for this label; I will use ‘Phrase 02’ to keep consistent
with my naming scheme.
Page 22
Also you will see a circle with two handles on each side at that point indicating the two phrases are back to back
with no overlap.
Continue marking as many phrases as you can find in the song, for this example however I will only mark 4 for
this example.
If you find that the label ending/beginning position is incorrect you my grab the circle with the mouse cursor and
move it back and forth until it is the desired position. If you grab the vertical bar you only move the endpoint
associated with a single label. If you do accidentally grab the vertical bar just move it back until it attaches its self
to the small circle of the previous label marking.
Page 23
Now that you have completed the label marking process you need to export that track to a file so it can be
imported into Nutcracker.
As covered earlier first get the audio file name for building the label by clicking 'File' >> 'Save Project As' and
copying this name by typing the keys Ctrl+C (copy) then click 'Cancel'.
Then click the down arrow beside the 'Label Track' heading, then selecting 'Name'.
At this point be sure anything in this name box is highlighted then type the keys Ctrl+V (paste). Be sure to
backspace over the characters ‘.aup’ and then typing ‘_phrase’ and clicking 'OK'.
The last step is to click 'File' >> 'Export Labels...' and 'Export Labels As:' popup window appears indicating
where the file will be saved. Either browse to another folder or accept the default location. Click 'OK' and the
label file is saved. I always try to save my label files where the audio file is located.
If you are working on a song and need to quit then just save the an Audacity project file with the same name as
the audio track which is usually the default file name presented when you do a ‘File’ >> ‘Save Project As..’.
Lastly there is a library of marked up label files which is additionally installed and updated each time you install
or update xLights/Nutcracker. To access these label files browse to this folder:
C:\Program Files\xLights\songs
In each folder there is a document named “‘SONG’_readme.txt” which includes a link pointing to where you can
purchase the corresponding song. If you have a favorite song that you have created label files for you may
submit them for adding to the library. Be sure to include where to purchase the audio file but NO MP3s should be
submitted.
Page 24
10 GLEDIATOR WITH NUTCRACKER
Using Glediator with Nutcracker.
Glediator stands for Graphical LED Installation AnimaTOR and is a small piece of software to control
led matrix and led stripe installations. This software was developed by Solderlab for use with their
matrix hardware.
However the program does support a way to record effects created with Glediator. Nutcracker now has
a feature added that will allow for the importation of these recorded effects into Nutcracker sequences.
To take advantage of Glediator and its effects you will firsts need to download and install the program.
Click on the followin link or copy it an put in into your browser.
http://solderlab.de/index.php/downloads/category/4-glediator
Click on the 'glediator_v2.0.3.zip' link and download it to a folder on your local hard drive. I suggest
that you create a install folder in the following location 'C:\Program Files (x86)\Glediator' and extract
all the files from the 'glediator_v2.0.3.zip' file you just downloaded.
You can start Glediator by a double click on "Glediator.jar" or by using the command "java -jar
Glediator.jar" from within a console or create a simple batch file containing the following commands.
java -jar "Glediator_V2.jar"
exit
Save the file with the name like ‘Glediator.bat’ it in the folder "C:\Program Files (x86)\Glediator\". A
shortcut can be added to the desktop for convenient starting of the Glediator program.
Glediator Layout.
The following is the screen that first appears when the program starts.
Page 25
I would recommend that you maximize this screen for easier use.
Next Glediator needs to be configured to match your Nutcracker matrix model layout. I will use the
specifications for a small horizontal matrix that is 16 strips with 54 pixels wide. This is a very critical
because if the model and Glediator information do not match the effect will not display correctly in
Nutcracker.
First click the options menu option as shown below:
Then click the ‘Matrix Size’ option.
The ‘Matrix Size’ window opens in the center of the screen as shown below:
I put these entries into this screen to match up with my model grid, Size_X = 54, Size_Y = 16.
You can experiment with the ‘Space’ option to see what best represents your grid in Glediator. I have
Page 26
set this option to 1 for this example. Then you can either click ‘Apply changes’ to instantly see the new
presentation format change in the display areas or ‘Done’ to complete this configuration.
There are 3 effect presentation areas as shown.
The center area is where the final effect output appears. There are three buttons labeled L, C, and R
which select which effect is displayed in the center. L will select the Left effect, the R will select the
Right effect and C will blend the left and right effect into a single effect in the center window. The
‘Fade’ button will fade the Left effect to the Right effect with the speed of the fade controlled by the
‘Fade Time’ slider. The ‘Black’ button will fade the center window to ‘black’ (i.e. no effect) and the
again the speed of the fade controlled by the ‘Fade Time’ slider.
There are three sliders labeled Left, Right and Master. The Left and Right sliders controls the intensity
of the respective effects that appears in the center window. The Master slider controls the intensity of
any effect in the center window.
Just above the ‘Fade Time’ slider is a slider which you can also manually control the fading of the two
effects from Left to Right or vise versa.
Glediator comes with a set of predefined effects and a way to expand this library. This library of
predefined effects are shown in the window on the far left hand side of the screen as shown below:
Page 27
Each of these library effects can be applied to either of the effect windows. This is accomplished by
first clicking on the desired effect such as ‘Double Wave’ then clicking either the ‘Set L’ button to apply
this effect to the Left effect window or ‘Set R’ button to apply this effect to the Right effect window.
The rest of the controls give you the ability to have complete control over this library. Before changing
anything in this window it is recommended that you save a copy of this Library to a backup file. To do
this click, the ‘Save’ button. The ‘Save’ window opens:
I would recommend creating a new folder and calling it ‘Glediator library’. Do this using the create a
folder button. Then double click the folder to open it. I would also recommend using the file name
GLMasterLib.06.23.2014 as the first file name. Use a file naming convention that is easiest for you to
remember what each of the saved library files contain.
If you wish to replace the current library you can do this by using the ‘Load’ button, browse to your
library folder and locating the desired saved library file, clicking on it then clicking ‘Open’.
Page 28
A new effect can be added to this library after one is defined in one of the effect windows using either
the ‘Add L’ for the left hand window or ‘Add R’ for the right hand window.
If you want to change one of your Library effects you can select that effect then either click the ‘Rep L’
for the current Left effect or ‘Rep R’ for the current Right effect.
If you want to change the position of an effect in the list you can move it up or down by first selecting
it then using the ‘Up’ or ‘Dwn’ button respectively.
If you have an effect that you no longer wish to have in your library you can remove it by first selecting
it then clicking the ‘Rem’ button.
Lastly if you wish to completely build a new library from scratch you can do this by clicking the
‘Clear’ button and all effects in the list are removed.
The main power of Glediator comes from the ability to define what your effects will look like. This
section will apply to either of Left or Right effect window.
The window where the effects are defined is shown below:
An effect can consist of from 1 to 5 definitions. Each of these is selectable using one of the buttons
numbered from 1 to 5 just below the effect window. Each of these buttons can have different options
which are configured with the ‘Type’, ‘Filter’ and ‘Mixer’ drop down menus along with the ‘Level’ and
‘Speed’ sliders. There is also a set of additional configuration options that is accessed through the
‘configure generator’ button. This button opens the following menu as it relates to each of the ‘Type’ of
effects. This window is for the ‘Wave’ type effect.
Page 29
The options for the ‘Type’ are as follows:
Black
Expanding Objects
Falling_Objects
Grid
Objects_3D
Scrolling_Text
Wave
Animated_Gif
Fade_and_Scroll
Fire
Knight_Rider
Plasma
Simple_Spectrum
Capture
Fading_Pixels
Factal
Meta_balls
Random_Pixel
Strobo
There is one section of Glediator that for Nutcracker users will not be of much value that is the area on
the right hand of the Glediator Screen as shown here:
Page 30
Next section is about Nutcracker to Glediator interface.
Once you have found a cool effect that you like it can be imported into Nutcracker using the following
process. For example you like this effect appearing in the center effect window.
Next click on the ‘Extras’ menu option.
Then select the ‘Recorder’ option and the ‘Animation Player/Recorder’ window opens.
Page 31
Next click the ‘Rec’ button and the ‘Save’ window appears.
Browse to the folder where you store your Nutcracker.Xlights files and double click on that folder.
Next you will enter a file name that should best represent the effect you are recording such as 16.54.
Rainbow.Diamonds.15.s.06.24.2014 where the first two digits indicate the grid definition values, the
name of the effect, the length of the effect and the date you recorded this effect. The file extension then
should be .gled so the final file name would be:
16.54. Rainbow.Diamonds.15.s.06.24.2014.gled
Now click the ‘Save’ button and the recording begins.
Page 32
The recorder records at the rate of 20 frames per second so if you desire a recording of 10 seconds you
will need to record at least 200 frames by carefully observing the ‘Frame:’ value in the ‘Animation
Player/Recorder’ window. Be aware that there is no warning if you have input a filename that exists it
WILL be overwritten with NO warning. Once the Frames value reaches your desired value click the
‘Stop’ button and the recording window will now appear as follows:
It shows the filename and the number of frames recorded to the file. Now close the Glediator
Animation Player/Recorder completed window.
Now open the xLights/Nutcracker program and select the Nutcracker tab.
Open or start a new Nutcracker sequence. For the purpose of this training I will create a new media
sequence using a 30 second of silence mp3 file. The matrix configuration info came from my MiniGrid
model which has 8 strands of 108 pixels folded over giving the Glediator matrix specifications of
Size_X = 54, Size_Y = 16. I will add this MiniGrid model to my test sequence along with several
timing rows as shown here:
Page 33
I will set the first row with a start time of 0 (zero). Then under Effect1 select the effect menu and select
the Glediator option.
The Glediator option only has one option button. Clicking that option button opens to your
‘Nutcracker.Xlights sequence files’ folder. Here only .gled files are visible and you can locate the file
previously created in the Glediator program. I will select the ‘16.54.
Rainbow.Diamonds.15.s.06.24.2014.gled’ file.
Page 34
Now Nutcracker loads that selected file and displays it in the info box under the ‘Glediator *.gled File’
button. This file name cannot be manually edited or entered.
Next click the selected timing slot in the MiniGrid column then click the 'Update Grid (F5)' button.
Lastly click the 'Play Effect (F3)' button to see the effect created in Glediator as shown.
After the effect has reached the end of the effects recorded time the effect will start over.
When the effect restarts there may be a detectable jump so if you don't want to see the effect restart,
record an effect that is longer than the duration you plan on using.
Page 35