1
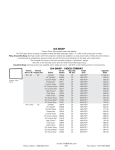
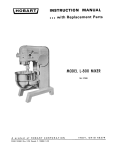
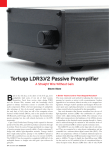
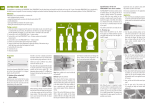
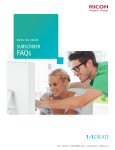
® Ride Decaf JAVA Adjustable Back Support Owner’s Handbook ® ▲ Warranty Policy Installation and Use Instructions Warranty Policy Your Ride Designs® Decaf JAVA® Adjustable Back Support has been carefully constructed to meet your posture and skin integrity needs. This Limited Warranty is effective for 24 months from the date of delivery to the original purchaser. If any defect in material or workmanship is found, Ride Designs will repair or replace the component, at our discretion. This limited warranty does not cover daily wear and tear or damage that is a result of mishandling, misuse, neglect, or not following the care and maintenance instructions. Claims and repairs should be processed through your nearest authorized Ride Designs rehab technology supplier. A copy of the Bill of Sale issued to the purchaser of the product might be required prior to processing a warranty claim. Maximum client weight capacity is 200 pounds. ▲ Ride Designs® a branch of Aspen Seating, LLC 4211- G South Natches Court Sheridan, Colorado 80110 toll-free: 866.781.1633 phone: 303.781.1633 www.ridedesigns.com General Product Safety Safe application of this product depends upon your good judgment and common sense, as well as that of your provider, caregiver, and/or healthcare professional, and your attentiveness in following the warnings, cautions, notes, and instructions in this manual. NOTE: Denotes important things to remember when using this product. WARNING: Indicates a potentially dangerous situation that, if not heeded, could result in serious injury. CAUTION: Failure to heed cautions might result in damage to your product. NOTE: Ride Designs is not liable for damage to property or personal injury arising out of unsafe use of this product. Ride Designs is also not liable for any property damage or personal injury arising out of the failure of any person and/or user to follow the instructions or recommendations set forth in 1) this manual, or 2) any other instructions or recommendations contained in related literature issued by Ride Designs, or 3) contained on the product itself, or 4) on our website www.ridedesigns.com. NOTE: We have compiled this manual from the latest specifications and product information available at the time of publication. We reserve the right to make changes as they become necessary. Any changes to our products might cause slight variations between the illustrations and explanations in this manual and the product you have purchased. WARNING: All Ride Designs support surfaces are designed to help reduce the incidence of pressure sores. However, no back support can completely eliminate sitting pressure or prevent pressure sores. The Ride JAVA back support is not a substitute for good skin care including proper diet, cleanliness, and regular pressure relief techniques. Available Sizes The Decaf Back is available in a range of sizes. Please visit www.ridedesigns.com for the most current information on size availability. Installation Instructions We recommend that a therapist or authorized Ride Designs supplier perform the initial fitting of your back support. Your Decaf Back is designed so that pelvic support and trunk balance can be adjusted independently of each other. Lateral pelvic wedges and the new Flexa-just™ support provides additional support and stability when needed. The Decaf Back consists of four components: 1) mounting hardware, 2) Flexa-just accessories, 3) the back shell, and 4) the removable foam insert and cover. WARNING: Installation of any back rest on your wheelchair might alter your center of gravity within the wheelchair. A recessed back position might cause the wheelchair to tip backwards, potentially resulting in injury. Always assess the need for anti-tippers or amputee axle adapter brackets to be added to your 1 Ride Designs, Java Back and the RIDE logo are registered trademarks of Aspen Seating, LLC. wheelchair to help increase stability. Similarly, a more forward back position might reduce the forward stability of the wheelchair, increasing risk of tipping forward, with potential for injury. WARNING: Do not use your Decaf Back without the foam insert and cover in place. WARNING: Failure to properly place and secure the Decaf Back to your wheelchair might result in serious injury. WARNING: Failure to accurately assess and adjust the fit of the Decaf Back might result in serious injury. CAUTION: Do not lift the wheelchair by the Decaf Back. I. Tools and Hardware The Decaf Back comes fully assembled and ready to install. The tools you need to install and adjust the Decaf Back are included in the package: • one 4mm Allen wrench • one 2.5mm Allen wrench A plastic bag with two screws also comes packed with the Decaf Back. They are needed only when installing the Decaf Back on wheelchairs with ¾ inch diameter back canes. II. Installing Mounting Hardware At right is a Ride Decaf Back properly installed on wheelchair back canes with FlexLoc hardware. NOTE: This picture depicts a typical installation of the standard fixed mount (non-removable) Decaf Back onto a wheelchair with conventional back canes. A quick release option, as shown below, is available for an upcharge through Ride Designs. A variety of alternatives to this configuration are possible. Contact Ride Designs toll-free at 866.781.1633 to explore solutions to your unique interface challenge. 2 Attach FlexLoc to wheelchair back canes Figure 1 1. Loosen width adjustment set screws (A) and pivot screws (B) so that the FlexLoc hardware can be adjusted in width to match wheelchair width. A B Figure 3 2. Swing clamp hinge (C) around back cane. 3. Swing clamping screw (D) into clamp hinge and gently tighten with 4mm allen wrench. NOTE: The Decaf hardware comes preassembled with the correct clamping screw for 7/8" and 1" diameter tubing. If clamping to ¾" tubing, replace screws with shorter screws included with the hardware. C 4. Repeat steps 2 and 3 on opposite side of wheelchair. 3 Figure 2 D Figure 4 Figure 5 Figure 4 b Wedge Block Flange a c 5. Gently snug all fasteners. Figure 6 a. Clamp screws (2) b. Pivot screws (2) c.Back angle screws (4) d. Width adjustment set screws (2) You are now ready to adjust the hardware for back fitting. d 4 III. Adjusting FlexLoc for back fit Figure 7a 1. Adjust back height. a. Loosen clamp screws and slide FlexLoc up/down on back canes, a and/or b. Loosen back height set screws and slide back up/down on slot. Figure 7b b 2. Adjust back angle. a. Loosen back angle screws (4) and adjust back angle to desired orientation. b. Loosening of these screws also provides for lateral movement of center clamp along connecting tube for lateral adjustment of back support. Back Angle 5 Figure 8 3. Adjust seat depth and vertical rotation. Figure 9 a. Loosening of pivot screws and width adjustment set screws allows for seat depth and vertical rotation adjustment as shown. NOTE: Pivot screws must be loosened sufficiently to separate teeth to allow movement. Seat Depth Vertical Rotation Once adjustments are completed, ensure all fasteners are securely tightened. Visit www.ridedesigns.com for additional instructions. IV. Adjusting the Flexa-just Stays 1. The Flexa-just stays are thin aluminum strips inserted into pockets on the inside surface of the back cover, behind the foam pads. NOTE: The Flexa-just stays can be bent to provide comfortable support to the gluteal area below the level of the back shell. Depending on the unique needs of the user, you can easily adjust the stays to provide the correct amount of support. The stays are easy to bend using hand pressure—no tools are required (Figure 10). Figure 10 Flexa-just stays 2. The stays can be bent while the user is sitting in the wheelchair. Simply insert your hand between the foam insert and the sitter, grasp the lower portion of the stays through the cover and foam insert, and bend in the amount and direction needed to apply comfortable support. 6 3. If opening the back angle causes undesirable pressure or discomfort in the gluteal area, simply bend the Flexa-just stays posteriorly to accommodate and comfortably support the gluteal soft tissue. 4. If there is insufficient contact with the gluteal soft tissue, bend the stays anteriorly to provide optimum support. V. Installing the Pelvic Wedges NOTE: If you determine that further posterior lateral pelvic support is necessary, use the pelvic wedges to provide greater control at the posterior lateral iliac crests. See Figure 11 for suggested orientation of pelvic wedges. Figure 11 Pelvic Wedges 1. For evaluation, have the user lean forward enough for you to position the pelvic wedges on the front of the foam insert cover to establish where they should be installed. 2. Have the user lean back, and fine-tune the height and distance from the center for each pelvic wedge. 3. Have the user lean forward or transfer from the chair, and remove the foam insert and cover from the back shell. 4. Open the cover and attach the pelvic wedges to the front surface of the Flexa-just platform, behind the foam pad, at the height and width you determined during assessment. Press the hook and loop fasteners together firmly to hold the pelvic wedges in place. 5. Close the cover and reinstall the foam insert and cover on the chair. 6. The user can now transfer back into the wheelchair. 7. Check the position of the pelvic supports and verify that the user has appropriate balance and control. 7 VI. Installing the Optional Lateral Trunk Supports Follow the instructions included with the lateral trunk supports. Figure 12 A B NOTE: If you are not installing the optional lateral trunk supports, go to Section VII. VII. Installing a Universal Headrest Mount C Figure 13 The tall Decaf back shell has provisions for attaching a Universal Headrest Mount, which is available through your Ride Designs supplier. The Universal Headrest Mount accepts most commercially available headrests. To attach the Universal Headrest Mount, use the mounting hardware provided (Figure 13). VIII. Ensure all Fasteners are secure Recheck all of the fasteners and tighten them securely. 8 Initial wearing schedule Prior to prolonged sitting, you should use your Ride Decaf Back for a short period of time and visually check any area that contacts the back support. Any reddened area should fade within 10-30 minutes. Contact your doctor or therapist if redness persists for longer than 30 minutes. As long as skin inspections do not show red areas persisting more than 30 minutes, you are safe to continue use. Make a careful skin check at least daily, even after skin tolerance is established. Continue to perform routine intermittent pressure relief techniques (forward lean) as advised by your healthcare professional. WARNING: If any redness associated with the use of the Decaf Back persists for longer than 30 minutes, cease using and contact your therapist or doctor immediately. Follow-up We recommend you have your seated posture and skin integrity checked by your healthcare professional at least annually, or whenever you experience a change in your weight, posture, or general condition that could impact your ability to sit safely, comfortably, and functionally. Retighten all of the fasteners regularly, and periodically check the hardware for security and wear. 9 Care and Maintenance of your Ride Decaf JAVA Back Cleaning the Decaf JAVA Back foam insert and cover 1. Remove the foam insert and cover from the Decaf back shell. 2. Open the cover and remove the foam pad, Flexa-just stays (make note of left and right, and direction of bend), and flexa-just platform with pelvic wedges from the outer cover. Note: Ride Designs recommends using a permanent marker to carefully outline the position of the pelvic wedges so that you can reattach them in the same positions if moved during cleaning. 3. Close the cover. Machine or hand wash the cover in warm water (regular detergent, no bleach). 4. Hang dry. 5. When re-inserting the Flexa-just stays, return them to their correct pockets, facing in the correct direction. 6. Insert the foam pad and Flexa-just platform with pelvic wedges. Be sure the inserts are not folded or wrinkled inside the cover. 7. Close the cover and reattach the foam insert and cover to the back shell. WARNING: Installing the Flexa-just stays or pelvic wedges in the wrong positions might result in serious injury to the user. Cleaning the Decaf JAVA back shell and hardware Using a damp cloth or mild disinfectant, clean the shell, pelvic wedges, and mounting hardware as needed. CAUTION: Do not clean your Decaf Back with isopropyl alcohol or any other chemical solvents. 10 The Ride Decaf JAVA Back support works best when used with the Ride Forward™ or Ride Custom Cushion. The Ride Forward cushion is most appropriate for people with mild to moderate risk for skin breakdown. For people at higher risk for skin breakdown, and/or more challenging postural control needs, the Ride Custom Cushion is the ultimate in postural support and skin care. It is specifically contoured to support a person’s unique size, shape, posture and functional requirements. The Ride Forward ™ Cushion The Ride Custom Cushion* *Cut away view of spacer mesh integrated cushion cover. © 2013, Ride Designs. OH011 2.13 Patents: www.ridedesigns.com/patents