1
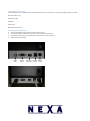
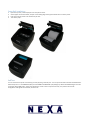
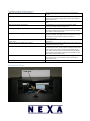
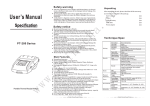
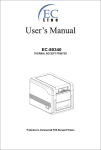
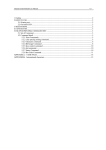
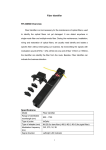
Nexa PX700IIS Thermal Receipt Printer User Manual Page |1 Table of Contents Safety Notice ....................................................................................................................................................... 3 Available Functions.............................................................................................................................................. 3 Main Features...................................................................................................................................................... 4 Technical Specifications....................................................................................................................................... 4 Unpacking the Printer.......................................................................................................................................... 5 Connection & Operation ..................................................................................................................................... 5 Paper Roll Installation.......................................................................................................................................... 6 Self Test ............................................................................................................................................................... 6 Set Print Mode (DIP Switch) ................................................................................................................................ 7 Driver Installation ................................................................................................................................................ 8 Supplies ............................................................................................................................................................... 8 Cleaning the Thermal Head ................................................................................................................................. 8 Print Chinese Characters ..................................................................................................................................... 8 Troubleshooting & Maintenance ........................................................................................................................ 9 Service ............................................................................................................................................................... 10 Warranty............................................................................................................................................................ 10 Page |2 Safety Notice Don’t touch the print head. Don’t touch the cutter blade. Don’t bend the power cord excessively or place any heavy objects onto it. Don’t use the printer when it is out of order. This can cause a fire and/or electrocution. When connecting or disconnecting the plug, always hold the plug-not the cord. Keep the desiccant out of children’s reach. Use only approved accessories and do not try to disassemble, repair or remodel it for yourself. Install the printer on a stable surface. Choose a firm, level surface and avoid vibration. Don’t let water or other foreign objects in the printer. Don’t connect a telephone line into the cash drawer port. We recommend that you unplug the printer from the power outlet if not in use it for long periods. Available Functions Print POS system Receipts Print EFT POS system Receipts Print Gym, Post, hospital, civil aviation system Receipts Print Inquiry, Service system Receipts Print Instrument test Receipts Print Tax, Tab Receipts Page |3 Main Features Command protocol is based on the ESC/POS standard Low-noise thermal printing. Various layouts are possible by using page mode. Repeated operation and copy printing are possible. Character font size optional. Easy paper-roll installation. Easy paper jam clearance. Easy maintenance for tasks such as head cleaning. Built-in interface provides control capability for cash drawer Technical Specifications Print method Thermal line printing Print speed 300mm/ sec. Paper width 79.5mm +/-0.5mm Print columns 576dots/line Character ANK Character: Font A: 12*24dots Font B: 9*17dots Simplify/Traditional: 24*24 dots Print command Compatible with ESC/POS Interface Serial (RS232C)/USB/Ethernet all in one model Barcode mode UPC-A/UPC-E/JAN13(EAN13)/JAN8(EAN8)/CODE39/CODABAR/CODE93/CODE128 Print Reliability 100 kilometres Paper thickness 0.06~0.08mm Adaptor power input AC 110V/220V, 50~60Hz Adaptor power output DC24V/2.5A Printer power input DC24V/2.5A Cash Drawer DC 12-24V/1A Work Temperature 0~45ºC, Humidity: 10~80% Storage temperature -10~50ºC, Humidity: 10~90% Page |4 Unpacking the Printer The following items are included with the standard specification printer. If any item is missing or damaged contact your dealer. Australian power cord 24v power supply USB cable Serial (9 pin) 80mm thermal paper roll Connection & Operation 1. 2. 3. 4. Connect the adapter cable to power connector of the printer. Connect the interface cable to the connector on the rear panel of the printer. Connect the cash drawer’s RJ-11 phone jack to the connector on the rear panel. Switch on the power switch Page |5 Paper Roll Installation 1. 2. 3. 4. Open the top cover, install the paper roll as the picture shows. Set the paper roll into the hollow, and pull on the leading edge of the paper towards the front of the printer. Press the centre of printer cover down firmly to close. Tear off the paper. Self Test You can check that the printer is functioning correctly by doing a self test print. Turn the printer off then hold down the FEED button. Switch the printer on. The POWER LED (blue) and the ERROR and PAPER LEDs (red) will light up. When the PAPER LED goes out take your finger off the FEED button. A test print will be done. Check to ensure it printed correctly. The printout also includes configuration settings like the IP address, baud rate etc. Page |6 Set Print Mode (DIP Switch) Use the DIP Switch to set options such as density, cutter, beep, etc. INTERFACE DIP-8 SERIAL FUNCTION ON OFF SW-1 SELECT CUTTER NO YES SW-2 SELECT BEEPER YES NO SW-3 SELECT PRINT DENSITY DARK LIGHT SW-4 TWO-BYTE CHARACTER CODE NO YES SW-5 CHARACTER PER LINE 42 48 SW-6 DK(RJ11) PORT OUTPUT SIGNAL YES NO SW-7 ON OFF ON OFF SW-8 ON ON OFF OFF 38400 115200 9600 19200 BAUD RATE Page |7 Driver Installation Driver and installation procedures can be downloaded from www.nexapos.com/support.html. Supplies The printer uses 80mm thermal paper rolls. It is recommended you use Nexa brand paper rolls as inferior brands may cause damage to the printer or have poor print quality. These can be purchased through your dealer or from a stationery and office supplies retailer. Cleaning the Thermal Head It is recommended that the thermal head be cleaned periodically (generally every 3 months) to maintain receipt print quality. Turn off the printer, open the roll paper cover, and clean the thermal elements of the thermal head with a cotton swab moistened with an alcohol solvent (ethanol or IPA). Depending on the roll paper used, paper dust may stick to the platen roller and roll paper end sensor. To remove the paper dust, clean the platen roller and roll paper end sensor with a cotton swab moistened with water. Turn on the printer power only after the water has completely dried. Print Chinese Characters The printer has Simplified Chinese font resident. To activate it set Dip Switch 4 OFF. Do a self-test print by holding the paper feed button down and turning the printer on. When the red error light goes out release the feed button. The printout will show: Chinese character mode: yes Resident Character: Alphanumeric, Chinese GB18030 Simplified Chinese. The printer is now ready to print Simplified Chinese characters. If Traditional Chinese (Big 5) is required then download the Set Language program from www.nexapos.com. Connect the printer and turn it on. Run the program and select the correct port the printer is attached to then select Taiwanese Big5 as the language. The printer will do a one line carriage feed indicating the program has worked. Page |8 Troubleshooting & Maintenance Why does serial printer not print properly? Please check if the baud rate of PC host is compatible with printer. Why can’t the printer open the cash drawer? Please check if the cash drawer is connected to the printer properly. If connected properly, please contact your dealer or www.nexapos.com. Please clean the printer sensor with soft brush if the sensor is dirty. Why doesn’t the printer do a test print? Why can’t the printer feed paper? The FEED button or print head may be damaged. Please contact your dealer or www.nexapos.com. Why is the red light flashing with paper installed properly? Print head is too hot or printer hasn’t detect the paper. The print head and cutter may not be connected correctly. Contact your dealer or www.nexapos.com. Please check if power supply is inserted correctly to printer, adapter and socket, and check if printer is powered on. If all of the above are correct, please contact your dealer or www.nexapos.com. NEXA series printers all support USB to Parallel and on-line server print. NEXA series printers include simplified Chinese plus other fonts as listed in the self-test printout. Please confirm if the whole print area or part of it is unclear. If the whole print area is unclear check the quality of the thermal paper. If part of print area is unclear the print head may be dirty. Please clean the surface of the thermal head gently with alcohol using a cotton swab. If the fault persists please contact your dealer or www.nexapos.com. Slide up the front cover of cutter and move the gear by hand. If the cutter still does not work please contact your dealer or www.nexapos.com. Reinstall the driver program and choose “LPT1”. Why aren’t the indicator lights on? Can NEXA series printers support USB to Parallel and on-line server print? What languages does NEXA series support? Why does the thermal printer print unclearly? Why is the thermal printer cutter locked? Why won’t the printer work when connected to a parallel port? Checking The Cutter Page |9 Service If the printer develops a fault refer back to the dealer you bought the printer from or www.nexapos.com. Warranty WHAT THIS WARRANTY COVERS: Nexa offers you a warranty that the product purchased and its enclosed accessories are free from defects in material and workmanship according to the following terms and conditions: The warranty for the product is for a period of 24 months from the original date of purchase. The warranty applies only to the original consumer purchaser of the product (”Customer”) and is not assignable or transferrable to any subsequent consumer. The warranty is good only to the Customer during the warranty period as long as it is in Australia. During the warranty period, Nexa or its authorised service agents will repair or replace any defective Product or component at Nexa's option, with new or rebuilt items. The product will be returned to the Customer in working condition. No charge for parts or labour in repair or replacement of the product will be incurred by the Customer. Any items that are replaced will become the property of Nexa. The Customer must provide proof of purchase if requested. WHAT THIS WARRANTY DOES NOT COVER: damage caused by the user; spillages or moisture; neglect, abuse or misuse, including but not limited to the failure to use the printer for its normal purpose in accordance with the manufacturer's instructions for usage, failure to properly maintain the printer in accordance with the manufacturer's instructions, and/or the failure to use the printer in accordance with the manufacturer's specifications; normal wear and tear; use of the printer with incompatible or faulty equipment; unauthorised modifications; repairs conducted by unauthorised persons or service centres; the model and/or serial number of the printer being altered, removed or made illegible; accidents; acts of god or any cause beyond the control of Nexa. Any warranty claim should be addressed to the dealer where you purchased the printer. P a g e | 10