1
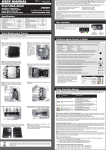
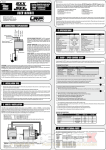
Air-Jockey V1 User Manual
Product Description:
The Air-Jockey is a high-accuracy air pressure gauge as well as a failsafe retract deployment
actuator in the event of a system air leak. The Air-Jockey can be set to a user specified “gear
down” position and pressure at which to activate the gear in the event of an in-flight pressure
loss. During normal operation (air pressure higher than emergency setpoint) the servo
connected to the output of the Air-Jockey behaves exactly as it would if connected directly to
the receiver. If air pressure dips below the setpoint, the Air-Jockey will automatically deploy the
landing gear, regardless of receiver input. Should pressure be somehow regained, at a pressure
10 psi above the low-pressure setpoint, the servo will again behave normally. Other failsafe
mechanisms include a signal-loss detection algorithm, where if the receiver stops outputting
valid data, gear is automatically lowered until signal validity is regained.
Installation:
Installation of the Air-Jockey is simple.
1. Connect the INPUT connector of the Air-Jockey to the “gear” port of your receiver or
power distribution system using the included M-M radio cable [be careful to note
polarity of connections – the Air-Jockey is clearly marked].
2. Connect the air pressure sensor of the Air-Jockey to your pneumatic system using
the included quick-connect system and T-fittings (if required). Be gentle with the
pressure sensor and its air line, it is a delicate piece of instrumentation.
3. Before connecting your retract servo to the OUTPUT connector, please complete the
electronic Setup of the Air-Jockey.
Setup:
1. With the Air-Jockey connected to your receiver gear channel and your transmitter
on (with gear switch “down”) power up the receiver while simultaneously holding
both the up & down buttons to enter setup mode.
2. “PSI” will appear on the display (release the buttons now) for a few seconds,
followed by the default low pressure value, 50 psi – “50.” This is your low-threshold
psi level for the emergency deployment of your landing gear. Use the up/down
buttons to set whatever pressure level you desire.
3. To save your pressure setting, simultaneously press both up & down buttons.
4. The display should now read “POS.” This is where you set the servo position of the
emergency state (gear down). When the red LED turns on, confirm that your radio
gear switch is in proper position and press either of the two Air-Jockey buttons to
save these settings.
General Use:
1. On power-up, the Air-Jockey tests the display sections by reading “888” for a few
seconds.
2. During normal operation, the Air-Jockey will indicate current air pressure in psi.
3. If the display is flashing, there is no valid radio data being received and the AirJockey will (or already has) entered an emergency state.
4. If the red LED is on, the Air-Jockey is in an emergency state and has locked the
landing gear down until either radio signal returns, pressure rises or power is cycled.
5. Once air pressure has dropped below the low pressure setpoint, the pressure must
raise 10 psi above the setpoint to reset the fault or power must be cycled.
6. If pressure and radio input are valid, the output of the Air-Jockey mimics the input
and connected servos will behave as if the Air-Jockey is not present.
Questions or Problems?
Contact us for quick and friendly support!
42-percent-products.com
[email protected]
916-821-2635