1
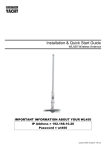
Installation & Quick Start Guide ANT200 AIS Receiver 1. Introduction Congratulations on the purchase of your ANT200 AIS Receiver. It is recommended that your receiver is installed by a professional installer. You will need to purchase a suitable 1” x 14 TPI thread mounting bracket for the ANT200. Before operating the unit you should also familiarise yourself again with the user manual of the chart plotter that you are connecting the ANT200 to. Pay particular attention to the AIS section and any settings that need to be configured for correct operation. 2. Before you start The ANT200 is a smart “all in one” AIS receiver solution for small boats. Simply connect the ANT200 to a 12v or 24v DC supply and it will immediately start receiving AIS target data and outputting this data in high speed NMEA 0183 format (38,400 baud). In some installations, it maybe desirable to connect low speed NMEA 0183 (4800 baud) GPS data to the ANT200 and for the ANT200 to merge (multiplex) the AIS data with the GPS data and send everything at 38,400 baud to a dedicated chart plotter or PC with just one serial port. Carefully consider how you wish to connect the ANT200 to your existing navigation system before you start installing cables. To display the AIS targets and data you will need: Suitable dedicated chart plotter that can read and display AIS data via NMEA0183 ® ® Or a suitable PC Navigation software running on a PC with Microsoft Windows XP /Windows 2000 or Windows ® ® Vista /Windows 7 with a free RS232 serial port or a free USB port and USB to serial port adaptor. QUICK START AIS400-01-VR1 www.busse-yachtshop.de | [email protected] DIGITAL YACHT LTD ANT200 Quick Start Guide 3. Installation Before starting installation select a suitable location for the ANT200 AIS Receiver. The unit is water proof and designed for on-deck mounting. The ANT200 antenna has the popular 1” x 14 TPI thread mount, found in many VHF antennas. A wide variety of different brackets are available for this type of threaded mount, consult your local marine electronics dealer or chandlery for more information. The 1” x 14 TPI thread mount can also be removed, allowing the ANT200 to be flush mounted on a flat horizontal surface. The ANT200 is supplied with 15m of cable and this should be routed through the vessel to a suitable dry internal location where it can be connected to the boat’s DC power system and the equipment it will be interfaced with. The cable can be shortened, lengthened or joined without problems. The ANT200 should be connected to the boat’s DC supply via a 1 Amp fuse. The unit requires 9.6V to 28.8V supply voltage. Below are the wiring details for the ANT200 and a connection diagram that shows how to interface it to other navigational equipment. Wiring Colours; Red Black Grey Brown Yellow Green Power + (12v or 24v) Power – (0v) NMEA Out + (AIS+GPS data)@38400 NMEA Out NMEA In+ (GPS data)@4800 NMEA In- Connection Diagram; NOTE: Connection of the GPS Unit to the ANT200 is not mandatory but can be useful in some installations where the dedicated chart plotter only has one NMEA Input port www.busse-yachtshop.de | [email protected]