1
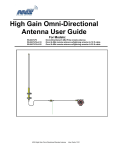
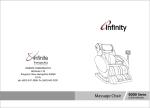
Premier Health Products
Zero-Gravity Massage Chair
User Manual
30706 Bryant Drive, Suite 205
Evergreen, CO 80439
303-670-8882
www.premierhealthproducts.net
[email protected].
User Manual for
Zero-Gravity Massage Chair
CONTENTS
Page 3
Safety precautions
Page 4 & 5
Assembling chair back and seat
Assembling seat cushion
Assembling arm rest
Page 6 & 7
Using your Remote Control
Page 8
Recline Positions
Page 9
Basics of Shiatsu Massage
Page 10
Troubleshooting Guide
Page 11
Warranty & Service
2
Safety Precautions
Before Use
A. Follow this user guide to assemble all parts and ensure complete setup.
B. Place the chair on a flat solid surface. Utilize a power outlet
close to the chair with good grounding. Always use a highquality surge protector and don’
t share the outlet with other devices. Don’
t place the chair in direct sunlight, high-humidity, or
dusty locations.
C. Make sure main power switch is in the 'OFF' position before
setting up the chair.
D. Keep power cords, wires and the chair away from heat
sources.
E. Do not block air circulation to the chair.
F. Consult your medical provider prior to using, especially if you
have, or may have heart or circulatory problems, injuries, or any
neurological, spinal, orthopedic, menstrual problems or any other
medical condition.
G. DO NOT USE IF YOU ARE PREGNANT or think you might
be pregnant.
While In Use
A. Keep all items away from the chair.
B. Never use this chair to massage head, face, hands, elbows,
knees, feet, buttocks or abdomen.
C. Wear loose and comfortable clothes, with no collars or other
tight bands. Remove all hard objects from pockets before massaging.
D. Use for no longer than 30 minutes per session. For best effect
use for 15 minute sessions and no longer than 3 minutes of stationary massage in a single position.
E. Stop use immediately if you experience discomfort.
After Use
A. Restore the chair to its full upright position and fold up the foot
rest.
B. Place your remote control in the pocket at left side of the
chair-back.
C. Do not disassemble the chair or attempt maintenance or repairs without contacting Premier Health Products first.
D. If you will not be using the chair for several days in a row,
turn the power switch on the chair off, and then unplug it from the
surge protector.
3
Assembly Instruction s
Install the two rear caster
wheels on the seat frame
legs.
Cut the two tie-wraps securing
the seat frame to the chair frame
on the front of the chair.
PADS— two full size and one 1/2 size back pads have
been included. They can be inserted into the pouch on
the back side of the back pillow to adjust the massage
strength. It is highly recommended to use one or more
pads when you first start your sessions, then remove
them as you adjust to the massage strength.
Place the chair-back on the floor with the front face up.
Push down seat-frame to connect the two shaft-pins at the
upper-rear, to the two claws at the left and right sides of the
chair-back.
4
Push to link the knuckle at the bottom of chair-back to the
'U' hook at the reclining driven sleeve under the seat-frame.
Connect the yellow ‘
A’
wires together and the
white ‘
R’wire connectors
together.
Place seat cushion on the
seat frame and wrap the
Velcro strips around the
seat-frame.
Line up and insert the 3 prongs on the
inner side of the armrest into holes at
the edge of seat-frame. Attach the
wing nut to the middle prong and handtighten.
Attach the seat front
cover by wrapping the
Velcro strips around the
frame .
5
Remote Control Functions
AUTO When the chair is powered on, the
red light will light, indicating the chair is in
automatic mode and will perform a preprogrammed massage. To switch to manual
mode, press the button once and the red
light will go off, indicating you can set your
own manual functions for Rolling, Kneading
and Tapping.
FUNCTION (Kneading, Tapping) When in manual mode the light is orange. Press once to go to
kneading and light will turn red, press once more
for tapping and the light will turn green. Press the
button once more to stop the function and the light
returns to orange. See page 8 for function descriptions.
SHOULDER When in manual mode, press this
button to confine the rolling stroke to the shoulder
area only.
BACK When in manual mode, press this button
once to confine the rolling stroke to the back area
only.
WAIST
When in manual mode, press
this button once to confine the rolling
stroke to the waist area only.
DOWN Press this button once and the chair will
go to it’
s full recline position. Press again and the
chair will stop in that position. The footrest and
back work in combination and are not controllable
individually.
6
ON-OFF Power Button. Press this button once to turn
the chair on. If no other buttons are pressed, it will give
a pre-programmed 15 minutes massage. Press the button again and the chair will reset to the full upright starting position and turn off.
FULL STROKE (ROLLING) This is the default mode
when the chair is powered on and the light will be red.
Press this button once (the red light goes off) to go to
manual control of Rolling, Then press the FUNCTION
button to add Kneading or Tapping to customize your
massage.
UP & DOWN (ROLLING) When in manual
mode, press and hold the up or down button;
when the rollers reach the desired position, release the button and the rollers will stay at the
desired position for kneading or tapping.
FOOT Press this button to start your
leg / foot massage at the slow speed.
Press again to increase the speed to medium, and once again for high speed.
Then press once more to turn off the
leg / foot massage.
WIDTH Press this button and hold until the
rollers reach the desired width, then release
the button. The massage rollers will stay at
that width for the duration of your session.
UP When in the recline position, press this button once and the chair will return to it’
s full, upright
position. Press again at any time and the chair
will stop in that position. The footrest and back
work in combination and are not controllable individually.
7
Introducing the Inversion position
and the Zero Gravity position
s norFor Inversion position, start with the chair in it’
mal upright position and pull the control cable loop up
and toward the rear of the chair. The cable loop will
appear longer.
For Zero Gravity position, start with the chair in it’
s normal upright position and pull up and forward to lock the
chair in 0 Gravity position, the cable loop will appear
shorter.
CAUTION: Change from Zero Gravity to Inversion (and
vice versa) only when the chair is in the full upright position.
8
ROLLING Your massage begins with the up an down motion
known as effleurage. Rolling
warms up and loosens muscles
to enable your body to receive a
deeper therapeutic massage
while relieving tension.
KNEADING is a technique
which is more intense than rolling. It relieves soreness and
releases ‘
knots’while stretching back muscles. This therapy is best known for improving circulation while revitalizing
muscles and tissue.
TAPPING
This technique
emulates the feel of fists rapidly tapping your back muscles
leaving you stimulated, rejuvenated and free from daily
stress.
9
Troubleshooting
Problem
No Power
Make sure the chair is plugged in
Make sure the main power switch on your
chair is 'ON' (illuminated)
Check the fuse and replace if burned out (fuse
location is below the red power switch)
Chair will not recline
Check the White 'R' wire connector underneath your chair.
A
B
Check For
Foot massage will Check the Yellow 'A' wire connector undernot work
neath your chair.
C
D
E
Chair 'jams' while Referring to this manual and the setup instrucreclining or makes tions, check to ensure the chair back is
latched to chair seat correctly (page 5)
loud 'popping'
noises while reclining
Chair is operating Follow the procedure for B, and
erratically, or won't 'Reset' the chair by 1) turning off power on
respond to remote your remote, 2) turn off the power on the main
switch on your chair, 3) unplug the power
cord. Allow to remain off for at least 10 minutes. Then power the chair back on by reversing the sequence.
If you cannot solve the problem by using this guide,
see page 11 for warranty details and call for service.
10
Warranty & Service
LIMITED CUSTOMER WARRANTY
for the PHP Zero-Gravity
WARRANTY, subject to limitations set forth herein.
Labor: If during the One (1) YEAR period commencing on the date of
delivery to the original owner, any defect shall occur which is covered
under this Limited Warranty (see limitation section below), Premier
Health Products will provide labor without charge.
Parts: If any defect shall occur within the first Three (3) Year time
period on the covered parts, Premier Health Products will repair or replace those parts.
Shipping: Return shipping to our service center will be paid by Premier
Health Products for the first One (1) Year. Boxing, packaging material
and availability for pickup of any items to be returned for repair will be
the responsibility of the customer. Shipping only applies to chairs sold
and delivered in the contiguous 48 United States of America .
LIMITATIONS:This Limited Warranty shall be void if in the sole discretion
of Premier Health Products the defect was caused by accident, misuse and improper or unauthorized service, alteration or tampering. In addition this Limited Warranty does not cover upholstery or covering defective due to the above
listed circumstances. The Limited Warranty does not include costs for unnecessary service calls, including costs for in home service solely for the purpose
of educating the customer about the product. This warranty is not transferable
and not valid in commercial applications.
SERVICE:To obtain service, call the warranty Service Authorization Center
at 303-670-8882. If upon examination by the service center no breakdown is
found, you will be responsible for all charges incurred.
Premier Health Products
30706 Bryant Drive, Suite 205
Evergreen, CO 80439
303-670-8882
www.premierhealthproducts.net
Email:
[email protected]
11
Premier Health Products
Zero-Gravity Massage Chair
User Manual
30706 Bryant Drive, Suite 205
Evergreen, CO 80439
303-670-8882
www.premierhealthproducts.net
[email protected]
12