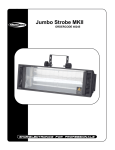
1
Auto-Black-Box 3311 und 3320 Gebrauchsanweisung 1 Main Features Unlike other in-car recording systems, the Drive Recorder is used to record both video and audio data in a continuous loop fashion. If the vehicle is involved in an accident such as a collision, impact, and sudden acceleration-related incident, this data is marked and stored. One may thereafter analyze the data to find its root cause by playing back the scenes of interest and where acceleration, vehicle speed, direction, and location are available for review. Added to the recording are vehicle speed and direction and GPS location. Continuous recording The video and audio data from the front and interior views is continuously recorded while power on. When the capacity of the SD card has been reached, the oldest files are overwritten by the latest ones in a “round-robin”, first in, first out fashion. Pre and post event recording When impact or unusual acceleration or deceleration is detected by the built-in G-Sensor and has exceeded the preset limit or one activates the manual emergency record button, the recorded video data is locked-in and is erased only by an authorized party and by using a PC or laptop, accessing the SD card. Event data records 1 minute before and 1 minute after(Note: The User may set the pre-event time to either 1 minute, 2 minutes or 3 minutes of pre-event recording). The next time the SD card is read by the unit, the unit’s set up parameters will be uploaded into the recorder. As previously mentioned, stored event recording data in the SD card will not be erased by the unit, and where this must be done manually by the user. Nachtaufnahmen der Innenkamera mit Infra-Rot- Licht nur bei AutoBlackBox 3320 The included IR (Infra-Red) Light module with adjustment used this invisible light source to assist in recording nighttime views from the interior facing camera. Playback of video/audio data The recorded data can be played back using the provided playback soft ware which resides on the SD card. By removing the SD card and accessing the Player folder and double clicking on the “Player.exe” line starts the playback soft ware. Data analysis The recorded data can be easily analyzed for speed, vehicle location and direction of travel including impact by using the Player that is found on the supplied SD card. 2 Contents Before using the product 4 Safety Instructions 4 Installation sequence and method 5 Caution prior to installation Caution prior to storing Caution prior to cleaning Components 7 Technical Specifications 7 SD Memory Card Specifications 8 SD Card Formatting 9 Operation Sequence 10 Preparation for video recording Continuous recording while driving Running the viewer program after driving Namen der Einzelteile 11 Installiation der AutoBlackBox 14 Parküberwachung 15 LCD Display 18 Running the program (Player) PC System Requirements 18 Player Installation 19 To review video 20 Playback Interface Controls 21 Volume and Playback Speed Control 21 System Configuration 22 Parking surveillance Setting 23 Playback 23 Converting into AVI file format 24 Interfacing with a GIS/City map 26 Pop-up Display window 26 TV-OUT Viewer 28 Analyzing G-SENSOR data 30 Warranty 31 3 Before using the product Warranty and responsibilities ◆ Damage due to production malfunction, loss of data, or other damages occurring while using this product shall not be the responsibility of the manufacturer. ◆ Although the Drive Recorder is a device used for recording/storing videos, the device is not guaranteed to record information on every accident in the case of a malfunction. ◆ Im Falle eines Unfalls wird ein geringer Aufprall oder eine geringe Verzögerung die AutomatikSicherung durch die Fliehkraftsensoren nicht auslösen. In einem solchen Fall muss der manuelle Sicherungsknopf an der AutoBlackBox vom Fahrer oder Beifahrer gedrückt werden um dieses Ereignis unüberschreibbar zu sichern. ◆ Zur stabilen Funktion der AutoBlackBox ist es notwendig die SD-Karte und die AutoBlackBox regelmäßig auf ihre Funktionalität zu überpüfen. Safety Instructions User Manual ● To ensure proper operation please read the manual before installation and use. Failure to follow this safety notice may cause a malfunction and may void the warranty. Power ● Use only the provided cables and specified power input. A cable not supplied by the manufacturer may cause product damage, a fire or a short circuit. ● Please use rated capacity for the fuse and confirm the message if the product correctly connected after the installation. SD memory card ● Insert the SD card to the product. ● Ensure that the capacity of the SD card is not exceeded. ※ A full SD card will not allow one to record manual alarms or G-sensor based triggers. ● Bitte die Stromversorgung unterbrechen bevor die SD-Karte entnommen oder wieder eingesetzt 4 wird. (Bei Stillstand des Autos die Zündung ausschalten. Die AutoBlackBox schaltet auf Parküberwachung. Jetzt den obersten Knopf (Event Release Button) für 3 Sekunden drücken und die AutoBlackBox schaltet sofort aus). ※ Inside SD memory data loss may occur due to SD error. Caution! ● Do not remove the SD card during product operation while power is on. ● In case of ejecting the SD card while power is on, press the emergency button Product or SD card could be damaged. over 5 seconds. The device will reboot and the LCD display will turn off. (After LCD turn off, eject the SD memory card within 10~15 seconds.) Tip. For safe and long-term use of the SD card. ◆ Please make sure to turn off the device power when inserting or ejecting the SD card. ◆ Generally, the SD card has a set lifespan and may not be able to store new data after a certain period of time. In such a case, please purchase a new SD card for use. Please take caution as loss of data due to overuse of the SD card as it shall not be the responsibility of the manufacturer. ◆ Always store data within a storage case as data loss may occur during storage or transport due to static electricity or external voltage. ◆ Always back up all important data in a different storage media. (Hard disk device, CD, portable disk drive, etc) ◆ Please refer to the SD card precaution for safe and long term use of product. (Page. 8.) Installation sequence and method Caution prior to installation ● Stop the car at a safe parking lot before operating the device. Do not operate the product while driving. It might be a cause of car accident. ● Do not obstruct the view of the product through the front windshield. ※ The GPS receiver may not work properly. ● Do not disassemble, repair or modify the device ※ This voids the warranty and where we take no responsibility for product damage or problems caused by the user. 5 ● When replacing the fuse, please use a fuse with the rated capacity under the recommended power guidelines. Using this product in alternative power situation will void the product warranty and could result in fire. ● Any excessive window tinting may cause an unclear or distorted image on playback. First record and then play back the video to see if the recorded video is acceptable. ● Use only the provided cables and specified power input. ※ A cable not supplied by the manufacturer may cause product damage, a fire or a short circuit. ● When using double-faced tape, wipe the window clean and clean the surface of the device with dry cloth before putting the tape. ※ From dropage of a product by any foreign substances or dust, it may cause a fatal damage to the product or a car accident while driving. Caution prior to Storing ● Do not insert foreign substances into the product. ● Do not cover the camera lens with any materials or objects. This may affect recording quality. ● Do not drop or apply excessive shock. This may cause product damage. ● Avoid high temperature from heating device. ● Avoid placing the product under high moisture or dust level. Caution prior to Cleaning ● Turn the device off before cleaning the device. ● Avoid placing the device under high moisture or dust level. Only clean the device with dry cloth if it is necessary. 6 Einzelteile Einzelteile TV-OUT / IR Kabel Gehäuse & Zigarettenanzünder-Stecker Terminal Box Externer Alarm Knopf Halter SD Karte Gebrauchsanweisung Fernsteuerung *Produkteinzelteile können ohne vorhergehende Ankündigung ein unterschiedliches Aussehen haben. Technische Details Video Eingebaute Kamera 2 (1.3 Mega pixel CMOS sensor) Kompression Front H.264/AVC 143º/ Rear 170º Auflösung VGA (640X480) TV-OUT ○ (PIP Mode) Audio 1 CH, Mono (in & out) GPS eingebautes smart GPS G-Sensor 3D Beschleunigungssensor eingebaut Stromversorgung durch Autobatterie ausgerüstet für Parküberwachung Speicher SD Card bis zu 32GB Stromstärke DC 9V ~ 30V *Diese Beschreibung kann ohne vorhergehende Bekanntgabe zum Zweck der Produktverbesserung geändert werden. 7 SD Memory Card Spezifikationen Bezeichnet eine Durchschnitts-Aufzeichnungszeit, Bewegung beeinträchtigt die Aufzeichnungszeit. Die angegebenen Zeiten entsprechen Aufnahmen während Tageslicht im städtischen Bereich für eine 2 GB-Karte. Maximale Aufzeichnunszeit (Min.) Gesamt Bild (Bild/Sec.) Lowest Lower Normal Higher 15 Bilder 300 240 160 120 96 10 Bilder 480 300 240 160 120 7.5 Bilder 600 400 300 200 160 5 Bilder 800 600 400 300 200 3 Bilder 1,200 800 600 400 300 2 Bilder 1,600 1,200 800 600 400 1 Bilde 2,000 1,600 1,200 800 * Aufnahmezeit variiert abhängig von der Bewegungsintensität und den Lichtverhältnissen Highest 600 (gilt für 2GB) Achtung! 1. Die SD Karte nur bei ausgeschalteter Stromversorgung herausnehmen. (Die SD-Karte kann ansonsten zerstört werden) 2. Die SD-Karte nicht für andere Zwecke verwenden oder fremde Daten darauf kopieren. 3. Überprüfen und formatieren sie die SD-Karte regelmäßig um eine einwandfreie Funktionsweise sicherzustellen. Vor dem Formatieren sichern sie bitte alle Daten der SD-Karte auf ihrem PC. 4. Im Falle, dass ihr PC die SD- und die SD SDHC2.0 Memory Karte Standards nicht unterstützt, verwenden sie bitte einen externen Kartenlesen (SD Karte zu USB Stecker) 5. Die SD-Karte muss durch eine neue SD-Karte ersetzt werden wenn sie das Ende ihres Produktlebens erreicht hat und keine neuen Daten mehr speichern kann. (Die Produkthaftung der SD-Karte erstreckt sich auf 3 Monate nach Kaufdatum.) 6. Verwenden sie nur SD-Karten die vom Erzeuger bereitgestellt werden. Wir empfehlen die Verwendung einer SD-Karte ab “SDHC Klasse 4 ”. 8 SD Card Formatting Caution! ● Format the SD card at least twice a month regularly for optimal performance. ● Format function will delete all files in the player. Backup all the important data before formatting the removable disk. (Any loss of data shall not be the responsibility of the manufacturer.) ● After formatting the SD card, set the time zone in the view program configuration (Refer to 21p.) If you do not configure the settings, system initialization may take up to 10 minutes and where the time and the Time zone may not match. Operation sequence Preparation for video recording 1. Check to see whether the SD memory card has been inserted in to the device. and connect the power cable 2. If the device is connected to power, [HELLO] appears on the LCD display, indicating that the video recorder is initializing. 3. After a few seconds, a chime sound will occur and the continuous recording will be conducted while driving the vehicle. Continuous recording while driving 1. Drive Recorder informs you of your vehicle’s speed, when stopped, the unit it displays the time. 2. When the capacity of the SD card has been reached, the oldest files are over written for continuous recording. The data recorded by either the unit’s internal G-Sensor or external manual record button are not over written. (This alarm data must be erased by the User with the SD card inserted in the computer, erasing event data in the DATA folder.) 3. When you stop the engine or remove the power cable from the cigarette lighter plug, the device stops recording. 9 Running the viewer program after driving 1. The player is built in the SD card so the user is able to view the recorded data on any PC. 2. Check the recorded SD card data regularly for stable operation of the device and the SD card. 3. Always back up all important data in a different storage media. (Hard disk drive, CD, portable disk drive, etc) Bezeichnung der Einzelteile Lautsprecher SD Karten-Schlitz für Klingelzeichen Zur Aufnahme der SD-Karte. Display Zeigt die Uhrzeit oder während Event release button der Fahrt die Geschwindigkeit. Ermöglicht das Überschreiben von gesicherten Daten bei einer Infrarot-Licht-Modul vollen SD-Karte. nur bei AutoBlackBox 3320 IR Light module for night vision. Sicherungs-Knopf (Event Recording) Zur manuellen Sicherung eines Ereignisses. Innen Kamera nur bei AutoBlackBox 3320 Records interior images of the vehicle. ……………………………………………………………………………………………………………………….. 10 Front Kamera GPS Modul & Filmt Ereignisse vor dem Auto. Befestigungs-Sockel für den „Halter“ - zur Befestigung der AutoBlackBox am Fahrzeug. 11 T-BOX Befestigungsmöglichkeit USB - Schnittstelle To connect to USB interface device as 2nd recorded data storage. TV-out & Remote controller IR port Verbindung zu nicht mitgeliefertem Monitor oder Navigation. External Camera port Verbindung zur Heckkamera. (Nur bei AutoBlackBox 3311) External button slot Verbindet den externen Notfall-Knopf. Achtung! After inserting the memory into USB port and powering it on, USB memory will be in priority to save the data. ● If SD card and USB memory are inserted at the same time, USB memory will work only for the recording. ● Please use the USB memories which are recommended. 12 Remote controller für externen Monitor (Monitor nicht dabei) MOVE & MENU Button Move and select the desired menu function. (Activate TV-Out by pressing OK key and select the menu.) Playback control button Playback the selected file and adjust the frames. MODE button Activate PIP function MENU cancel button Page Up/Down Cancel the previous function Adjust the playback file list page. 13 Montage der Auto-Black-Box Achtung! ● Stellen sie sicher, dass die Zündung aus und der Autoschlüssel entfernt ist. Zuerst die Auto-Black-Box montieren und installieren und danach die Stromversorgung herstellen. ● Der Empfang des GPS-Signals wird verbessert, wenn die Montage der Auto-Black-Box an der Frontscheibe erfolgt. ● Achten Sie darauf, dass die Kamera-Linse in Aufnahmerichtung freie Sicht hat. (Spiegel, Beschattungen, Sonnenblenden usw. ● Die Auto-Black-Box sollte horizontal und vertikal ausgerichtet werden. Befestigung der Auto-Black-Box an der Scheibe Für diesen Abschnitt nimm dir wirklich viel Zeit. Warum? Weil der Kleber am Befestigungssockel der AutoBlackBox sehr stark ist. Einmal geklebt - gibt es kein Verrücken mehr. Säuber die ausgewählte Klebestelle an Lass der Frontscheibe. Schiebe den Befestigungssockel noch darauf. die Schutzfolie Befestigungssockel auf den Halte die AutoBlackBox an die Befestigungsfuss der AutoBlackBox. Frontscheibe und wähle am die Befestigungsstelle aus (senkrecht und waagrecht). Achte auf die Verbinde die AutoBlackBox freie Sicht des Fahrers auf die mit der T-Box. Fahrbahn. Sichere die AutoBlackBox vor ungewolltem Absturz. (z.B. mit einem Kabelbinder zum Rückspiegel) Beachte dabei: Kannst du die AutoBlackBox nach dem Ankleben an dieser Stelle auch wieder aus dem Befestigungssockel herausnehmen? Ist die AutoBlackBox senkrecht und waagrecht ausgerichtet? Wenn du eine Innen-Kamera hast (3000, 3320) achte darauf, dass die InnenKamera freie Sicht auf den Innenraum hat und nicht hinter dem Rückspiegel versteckt ist. Markiere dir die Stelle. OK - jetzt bist du bereit die Schutzfolie abzuziehen. Drücke nur ein wenig die ober Kante des Sockels an die Scheibe und kontrolliere nochmals (auch von aussen) - jetzt kannst du den Sockel fest an die Frontscheibe andrücken. 14 Installation der Accessories Bestimme die beste Position für Locate the best position for den externen Notfall-Knopf und Remote control IR reception. befestige ihn durch entfernen der Schutzfolie. Connect the video cable to Keep the remote control at the connection port of the the safe place to be device. reached easily. . Park-Überwachung Achtung - Installation nur durch die Profis in der Auto-Werkstätte ● Jedes Auto hat sein eigenes System und Eigenheiten. Bitte verwende diese Informationen nur als Hinweis und nicht als perfekte Anleitung. ● Zündung während der Installation der Parküberwachung ausschalten. Bitte kontaktiere einen Fachmann.. ● Um die Parküberwachung verwenden zu können muss der Stecker für den Zigarettenanzünder abgezwickt werden um die Drähte für die Verbindung zu den Sicherungen verwenden zu können. . Stromverbindung der T-BOX zu den Sicherungen 1 ROT 2 WEISS 3 SCHWARZ All-Zeit-Strom (+12V ~ 24V) Nur Strom bei eingeschalteter Zündung Erdung – Null-Leiter Verbindung zur Karosserie 1. Verbinde den schwarzen Draht mit der Auto-Karosserie oder mit der Erdung. (Erdung - Null-Leiter) . 2. Verbinde den roten Draht mit einem All-Zeit-Strom führenden Sicherung. Der rote Draht braucht Strom auch wenn die Zündung ausgeschaltet ist. (z.B. Warnblinkanlage, Innenraumsicherung…) 3. Verbinde den weißen Draht (Zündung) mit der Sicherung die NUR Strom führt wenn die Zündung eingeschaltet ist. (z.B. Zigarettenanzünder). 15 Achtung! ● ● Aus Sicherheitsgründen bitte zuerst den schwarzen Draht mit der Karosserie verbinden. Bitte die stromführenden Drähte über die Sicherungen in der Sicherungs-Box verbinden. CAUTION! ● Jedes Auto hat sein eigenes System und Eigenheiten. Bitte verwende diese Informationen nur als Hinweis und nicht als perfekte Anleitung. ● Zündung während der Installation der Parküberwachung ausschalten. Bitte kontaktiere einen Fachmann.. ● Um die Parküberwachung verwenden zu können muss der Stecker für den Zigarettenanzünder abgezwickt werden um die Drähte für die Verbindung zu den Sicherungen verwenden zu können. . ● Bitte verstaue die T-Box an einer sicheren Stelle. T-BOX Installation 1. Check the location of the fuse box in the vehicle. 2. Fix the place to install the T-BOX in the vehicle. 3. Adjust the length of the wire from T-BOX to the fuse box. 4. Remove the A pillar like picture (1) and insert (install) the cable at The gap between sealing and windshield like picture (2) 5. After adjusting the cable, connect the power cable. ● 1) Red wire is connected to “emergency button” fuse (the fuse with power after the ignition is off) (2) ( black wire should be connected to the ground of vehicle. ● At the last, (3) white wire which is ignition wire is connected to cigarette lighter power cable after the ignition is of and 16 check the status of cigarette lighter power. (Some vehicles are having the power at cigarette lighter power after the ignition is off.) 6. Check all wires and power on. Zündung einschalten damit die AutoBlackBox in Betrieb ist. Es ertönt ein Klingelzeichen und im Display erscheint das Wort „Hello“ danach die Uhrzeit. Jetzt die Zündung ausschalten. Die AutoBlackBox muss in den Park-Modus wechseln, dies erkennt man daran, dass das Display farblos wird und ein „P“ für Parken im Display erscheint. Sollte nach dem Ausschalten der Zündung kein „P“ erscheinen ist die Verkabelung falsch. 7. Verstaue die Kabel und sicher die T-Box und die AutoBlackbox. T-BOX System Operation Item(s) Input power voltage Low voltage detection Description Min. 9V ~ Max. 30V Min. 11.6V(12V battery) or Min. 23.2V(24V battery) 17 LCD Display No. Name Description 1 Zeigt die Uhrzeit oder die Geschwindigkeit 2 The sign is ON, while event recording (E button, G-Sensor detected) 3 The sign is ON, while it is recording. 4 The sign is ON, while front camera is recording. 5 The sign is ON, while extra (rear) camera is recording. 6 The sign is ON, while TV-out in process. 7 The sign is ON, while USB connected. 8 The sign is ON, while GPS signal captured. 9 Designated speed measurement unit. Start des Programms von der SD-Karte (Player) PC System Anforderungen Component Requirements CPU Above Pentium4 / 1GHz processor or higher Menory 512MB of RAM or higher Orperating System Microsoft Windows XP Home Edition or higher Graphics DirectX 8.1b or higher HDD space 200MB or higher ※ Beachte: Beim ersten Start des Programms (Player) ist es möglich, dass das Programm als Administator ausgeführt warden muss. (rechte Maustaste – öffen als Administrator ) 18 Player - Installation 1. Gib die SD Karte in den Kartenleser des PC´s. 2. Wähle “Wechseldatenträger” 3. Doppel-Klick den Ordner “PLAYER”. 4. Doppel-Klick das „gelbe Auto“ den “Player” um das Programm zu starten. To review video To playback video, select the “Open a File” button, explore the SD card or other location where the recorded (or saved) data is located, (file called DATA is on the SD card), then double click the selected file from the list in order to play. 19 No. Name Description 1 Front - Kamera Displays the video images recorded by the forward facing camera. 2 Zweite Kamera Displays the video images recorded by the interior facing camera. 3 Auto-Geschwindigkeit 4 Auto - Position Displays the speed of your vehicle. Displays the coordinates (latitude and longitude) of the vehicle. (Requires GPS signal lock) 5 6 Fahrtrichtung - Kompass Displays the vehicle’s direction of travel. Fliehkraft-Sensoren Analyse Displays vehicle motion and any impact detected by the G-Sensor with a graphically in 3-axis. 20 Schaltflächen-Beschreibung des Players Schaltfläche Funktion Schaltfläche Springt zum vorangegangen Bild Funktion Springt zum nächsten Datensatz Wiedergabe der vorangegangenen Öffnet Dateien für die Wiedergabe Bilder Pause für die Wiedergabe Ändert Dateien in AVI Format Stop Verbindet mit der Satelliten-Karte Konfiguration der persönlichen Wiedergabe Einstellungen Springt zum nächsten Bild Schließt den Player Springt zum vorangegangen versteckt / schließt das Fenster Datensatz Lautstärke und Playback Geschwindigkeits-Kontrolle Lautstärkenregler Wiedergabe-Geschwindigkeit No. Name 1 2 Volume Control Description Adjusts the volume level while playing back the recorded data. Playback speed control Adjusts the video playback speed. 21 System Konfiguration Click on the System Setup configuration icon ( ) located at the lower right corner of the player. The following window will then appear. No. Name Description 1 Video Quality Sets the video recording quality. ( 5 Levels) 2 Frame rate setting 3 Video Format 4 Audio Recording Enables or Disables the audio record function. 5 Password Setting Sets any Password to access the recorded data. 6 Time Zone Setting 7 Unit for Speed 8 Vehicle ID Number 9 G-Sensor Sensitivity 10 Pre-Event Recording Time Sets the time to record the previous scenes before the event. 11 Parking surveillance Setting Sets video frame rate of parking surveillance. ( Refer to Page.22) Sets the video frame rate (1, 2, 3, 5, 7.5, 10, 15 frame/sec) Sets the video format for TV-OUT & external camera (NTSC, PAL) Sets the time zone for the user. (z.B. Europa Sommer GMT+02:00 Winterzeit GMT +01:00) Set the unit of the car speed Sets the license plate number or fleet vehicle ID number associated with the vehicle where the SD card is to be installed in. Sets the sensitivity of G-Sensor. (6 Levels) 22 Parking surveillance Setting No. Name Description 1 Timer for parking 2 Video Quality 3 Frame Rate 4 Audio Recording 5 G-Sensor Sensitivity Sets the parking surveillance time (none ~ 24h) Sets the video recording quality. (5 Levels) Sets the video frame rate during the parking surveillance (1, 2, 3, 5, 7.5, 10, 15 Bilder pro Sekunde) Enables or7.5, Disables audio record function. (1, 2, 3, 5, 10, 15the frame/sec) Sets the sensitivity of G-Sensor. ( 6 Levels) ※The setting for parking surveillance will be different from the normal operation. ※The parking surveillance will be off if the status(capacity) of battery is lower than the required capacity regardless of Time setting. Wiedergabe von aufgezeichneten Daten 1. After clicking the folder icon ( ) on the lower right corner of the viewer, click “Change Directory” to select the location for the recorded data. Typically the first time you do this all the files are located on the data folder of SD card. If saved elsewhere, use this utility to explore your computer to locate the file for playback. 2. When the file list appears, double-click the desired file to play back. 23 ※Click the list name to sort by File Name, Record Time or Event Type. FILE NAME: File name of the recorded video images. RECORD TIME: Date and time when the images have been recorded. EVENT TYPE: Displays the recording type (Continuous recording /event button recording /remote event butt on recording). Click the list name to sort by File Name, Record Time or Event Type. Event Type Description Continuous recording No nomenclature applied. Clicking on this shows the recorded file when driving. Manual Event Recording (EVENTXX-BUTTON) Annotated with the word BUTTON. This allows you to locate files that were marked by the driver using the push button on the recorder or the remote event push button. G-Sensor automatic recording (EVENTXX-GSENSOR) Annotated with G-SENSOR. This data is recorded when any impact, sudden acceleration, or accident is detected. Converting into AVI file format Convert a portion of the recorded data into an AVI file format to playback on “Window media player” or to share the recorded data with someone else or email a file. 1. Click the AVI conversion button ( ) at the start of video clip position to convert the images into the AVI 24 file format. The video playback stops and the AVI conversion window appear as below. 2. Set the following options from the window and click Start. 1) AVI storage directory 2) Selection of previous/next video and whether or not to include audio data 3) AVI recording time 3. The conversion progress appears as follows. ※ The AVI files cannot be created on a portable disk such as SD Card or USB memory stick but only on a hard disk first due to speed required for the conversion. 25 Interfacing with a GIS/City map Drive Recorder simultaneously records the GPS data while driving so you can check the driver’s route on the map. Click the GIS/MAP icon ( ) on the lower right corner. The map window appears for the user to see the vehicle location and travel onto a city map. ※ To use this function, the system must access the Internet. Pop-up Display window With double-click the display window, the recorded images are played back at the original size. Double clicking the screen returns the view to normal, original size. Use the PC’s mouse to move the screens and adjust them within desktop window. TV-OUT Viewer Double click No. Name 1 2 3 4 Description Live Video Displays live video streaming Playback Playback video and audio data recorded recorded System video data Configurati Exit on previously Configuration settings Closing TV-out 26 Live Video 1. Displays live video streaming. 2. With the extra camera (the 2nd CH), PIP (picture in picture) function will be activated by [MODE ] button. Playback recorded video data 1. Playback video and audio data recorded previously. 2. By Page [UP/DOWN ] , it moves page of the file list. 3. By [ / ], it moves files. 4. Selects file by press [OK] button.. 1. By [Playback control button], move to previous/next frame or rewind/pause the playing files. . 2. Press [ MODE ] and activate PIP function.. System Setting 1. Setting page consist with total 11 sections. 2. Setting value will be shared with its viewer program (Player) ※For the setting detail, refert to the viewer program option. (21p) 27 Analyzing G-SENSOR data The G-sensor (Gravity Sensor) furnishes data for X, Y and Z axis and stores it along with the other recorded data on the SD card. When using the playback software, this information is represented in a graphic format. The resulting graph may be used to analysis the driving condition and driver’s habits. Depending on the type of the vehicle, the amplitude of the curve of shown may vary. * X - Achse: links und rechts des Autos * Y - Achse: vorne und hinten vom Auto * Z - Achse: Dach und Boden vom Auto Bremsung Auto steht Frontal Aufprall Beschleunigung Rückwärtiger Aufprall Links / Rechts / Links Kurve 28 Warranty Warranty Cover The warranty period covers for one full year for this device, return to base from the date of purchase. Should you believe that your device is defectives within the warranty period, please contact to the service center. The product may be repaired or exchanged for a factory refurbished unit. Faults reported outside of the warranty period are subject to a chargeable repair. 29