1
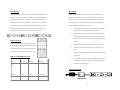
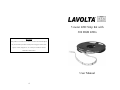
5 meter LED Strip Kit with
300 RGB LEDs
Warranty
This product is warranted free from defects in material and workmanship for
one year from date of purchase. Warranty does not apply to misuse, abuse,
neglect, accident, improper use, etc. Contact your reseller for a Return
Merchandise Authorization.
User Manual
4
Introduction
Installation
RGB LED tape strips are great for creatively transforming a room, cabinet or
Note: Plan out your installation before you remove the backing from the
display case into a lighted work of art. 3M adhesive on the back of the LED
adhesive. Once the adhesive tape has been "stuck" in place removing the
strip makes installation of these LED strips, on most clean and flat finish
adhesive will cause it to loose significant holding strength. Make sure the
surfaces, quick and efficient. Copper pads are repeated every 2" to provide an
mounting surface is clean and will hold the adhesive tape. We recommend
easy cut point to make strips the length needed for your unique installation.
cleaning the surface with alcohol for best results.
Removal of the IP65 silicone layer exposes the copper pads allowing you to
•
solder jumpers to make 90 degree turns or extensions to the strip.
Once the strip layout is determined, remove the backing from the
tape a little at a time and firmly press the strip in place
•
Plug the male connector of the LED strip into the corresponding
cable from the white controller. Make sure the arrows (◄) on the
male and female connectors are lined up or the LED strip will not
Remote Control
function
The key to bringing the Lavolta™ LED strip to life is
the included 44 key IR remote control which provides
•
Plug the power supply cable into the DC jack on the controller
•
Connect the power cord and plug the power supply into an AC
control for intensity, color, fade in/out, and flash rate.
outlet
Sit back and change the lighting effects as you wish!
•
Aim the IR receiving diode in the direction where the IR controller
will be used
Remote Control Button Layout
•
Bright + (7 steps) Bright - (7 steps) Pause/Run
On/Off
Static red
Static green
Static white
Static orange
Static pea green Static dark blue
Static dark yellow Static cyan
Static yellow
Static blue
Static royal blue
Static light blue Static pink
Static off-white
and familiarize yourself with the remote control commands using
the remote control layout chart
Static light pink
Static green white
Static light yellow Static sky blue
Static brown
Static blue white
Increase red
Increase green
Increase blue
Speed up
Decrease red
Decrease green
Decrease blue
Speed down
Memory 1
Memory 2
Memory 3
Automatic change
Memory 4
Memory 5
Memory 6
Flash on and off
3 color change
7 color change
3 color fade change 7 color fade change
2
Turn the LED strip on by pressing the On/Off button on the remote
Typical Connection
3