1
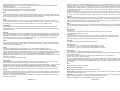
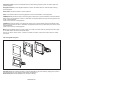
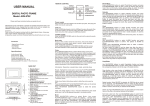
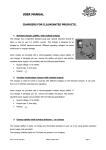
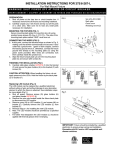
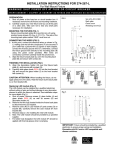
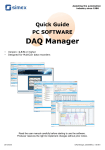
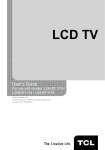
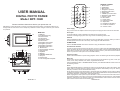
USER MANUAL
DIGITAL PHOTO FRAME
Model: BPF-106D
Please read these instructions before you operate the unit
Manufacturer of this unit follows a principle of constant improvement and is not held responsible for any
changes that are made to the unit nor accepts any liabilities for these changes. Thanks for your choice of
our products.
19
1
2
3
10
4 5 6 7 8 9 11 12
13
14
15
16
MAIN UNIT
1. USB port
2. TFT display(screen)
3. Remote sensor
4. Power button
5. Play/Enter button
6. Return button
7. Navigation down button
8. Navigation up button
9. Navigation right button
10. Navigation left button
11. Mode button
12. Snooze/Alarm off button
13. Hanging hole
14. Speaker
15. Bracket
16. SD/MMC/XD/MS slot
17. DC jack
18. Phones jack
19. Inter-changeable faceplate
1
11
2
12
3
4
5
6
13
7
8
9
10
15
REMOTE CONTROL
1. Mode button
2. OSD button
3. Menu button
4. Navigation up button
5. Navigation left button
6. Enter button
7. F.BWD & previous button
8. Navigation down button
9. Volume+ button
10. Mute button
11. Power button
12. Play/pause button
13. Stop button
14. Navigation right button
15. F.FWD & next button
16. Volume- button
14
16
Power supply
Plug one end of the AC adaptor into the DC input jack, then plug the other end into AC wall outlet.
Phone jack
For private listening, insert a headphone or earphone into the phone jack.
CAUTION: Listening at high power for a long moment could damage users' ears.
USB slot
Insert a USB data traveller into the USB port to enjoy the audio files or pictures. When you need to unplug
the USB, please enter the main menu firstly, then unplug the USB data traveller.
SD/MMC/XD/MS
Insert an SD/MMC/XD/MS card into the card slot to enjoy the audio files or pictures.
Snooze/Alarm off button
To sleep an extra several minutes when the alarm comes on, lightly touch the SNOOZE/ALARM OFF
button, the alarm will stop for several minutes and comes on again. Press and hold SNOOZE/ALARM OFF
button about 3 seconds in normal mode to disable the alarm function. (This button works as described
above only when the mode option is set to ALARM enabled.)
Play/pause button
Press PLAY/PAUSE button to pause during playback. Press this button again will resume playback.
Basic play
Power on the unit then enter the main menu, the screen shows ten functions, eg: photo, music, photo &
music, movie, setup, calendar, clock, alarm, copy/delete and favorite.
Insert a USB data traveller or SD/MMC/XD/MS card first, press NAVIGATION BUTTON to select one of
the following function.
Photo
Press NAVIGATION buttons to select photo option, then press ENTER to confirm the selection. After the
player read it for several seconds, it begins to browse the picture automatically one by one. When photo in
auto play off mode, it enters Thumbnail mode directly.
During picture playing, press STOP button, thumbnail mode menu appears on the screen as below.
Thumbnail of each title: select the thumbnail by using NAVIGATION buttons and press ENTER to play.
Information: Resolution, created date, rotate, and slide show
Rotate: Highlight the rotate option and press ENTER to confirm, then enter the rotate mode, there are
three options appear in the bottom of the screen including Rotate it, Reset and return. Use NAVIGATION
buttons to select picture you desired to rotate, then press ENTER to rotate it. Select reset to restore the
picture. Select return to back the thumbnail mode.
17 18
-ENGLISH 1-
-ENGLISH 2-
Slide show: Select slide show option to slide the picture one by one.
Press NAVIGATION LEFT and NAVIGATION RIGHT buttons to rotate the picture Clockwise and Anticlockwise respectively.
Press STOP button twice to return the file manager.
Press NAVIGATION DOWN button to flip the picture vertically.
Press NAVIGATION UP button to flip the picture horizontally.
Music
Press NAVIGATION buttons to select music, then press ENTER to confirm the selection, a browse menu
appears on the screen and the player begins to play the files automatically. Use NAVIGATION UP/DOWN
button to highlight desired file, then press PLAY/PAUSE to play selected file.
Movie
Press NAVIGATION buttons to select movie, then press ENTER to confirm. After the player read it for
several seconds, it begins to play movie automatically. Press STOP button to return the root menu during
movie playback, press PLAY/PAUSE to resume playback. This unit supports MPEG4 format.
Photo&Music
Press NAVIGATION buttons to select photo & music function and press ENTER to start slideshow the
pictures and play the music files synchronously. During picture sliding, to rotate or flip picture by pressing
NAVIGATION buttons.
Calendar
Use NAVIGATION buttons to select CALENDAR function and press ENTER to confirm, the calendar will
be shown on the display . By now you can adjust the calendar by pressing NAVIGATION BUTTONS. Use
NAVIGATION LEFT/RIGHT button to adjust year, use NAVIGATION UP/DOWN button to adjust month,
then press STOP button to confirm, use NAVIGATION buttons to select the date and press ENTER to
confirm. To exit this function, please press MENU button.
Clock
Use NAVIGATION buttons to select CLOCK function and press ENTER to confirm, then the current time
will be shown on the screen in big characters, and the current date, month, year and week will be shown
under the time in small characters.
Alarm
Use NAVIGATION buttons to select ALARM function. The options of ALARM as follows:
Enable: Press NAVIGATION UP/DOWN button to make a selection between the two options(on/off)
Set time: Select this option to set the alarm time after the alarm is enabled. Use NAVIGATION UP/DOWN
button to select SET TIME option and press ENTER to confirm, use NAVIGATION LEFT/RIGHT button to
highlight the time you desired to set, then use NAVIGATION UP/DOWN button to adjust, press
NAVIGATION RIGHT button to confirm and press ENTER to exit the alarm time set. Buzzer will sound at
the pre-set alarm time.
Exit: Select exit option to exit alarm setting.
Copy/Delete
Use NAVIGATION buttons to select Copy/delete function and press ENTER to confirm, select COPY or
DELETE to enter the correspond windows to do the file copy or file delete function.
Copy function: When copy function is selected, all JPEG files in the USB data traveller or memory card will
be displayed in the file manager. Use NAVIGATION UP/DOWN buttons to select the files and press
ENTER to confirm, then the selected file will be highlighted in a rectangle frame. When the selection is
finished, use NAVIGATION buttons to select SAVE to save the selected files into the internal memory of
the unit.
Delete function: When DELETE is selected, all JPEG files you saved will be displayed, use NAVIGATION
buttons to select the files that you want to delete from the internal memory and press ENTER to confirm,
then the file of you selected will be deleted.
Delete all: Press NAVIGATION buttons to select delete all in the bottom menu, all the files in the internal
memory will be deleted.
Sort mode: Select sort, then use NAVIGATION buttons to select the file that you want to move and press
ENTER to confirm. Then press LEFT NAVIGATION button to move the picture to up sequence. (For
example, move its sequence from 3rd position to 2nd position.). Press RIGHT NAVIGATION button to
move the picture to down sequence. (For example, move its sequence from 3rd position to 4th position.).
Press NAVIGATION buttons to select RETURN to return the edit mode, select SLIDE SHOW to browse
the pictures one by one.
Please note that the saving process may take some time to finish, larger file size will take more time.
Please don't remove the USB data traveller or memory card, or turn off the power while in saving, deleting
or sorting, it may cause data lose or damage in USB data traveller, memory card or internal memory.
Favorite
Use NAVIGATION buttons to select favorite option, then it begins to browse the files saved in the internal
memory one by one. During playback press PLAY/PAUSE to pause, to resume playback press this button
again. Press NAVIGATION buttons to rotate the picture. During slide show, press STOP button, it enters
thumbnail mode. To exit this option by pressing MENU button.
Setup
Select setup option to display setup menu. Use NAVIGATION UP/DOWN keys to select the desired item.
Then press NAVIGATION RIGHT button, the sub-options for each item will appear on the right side of the
screen.
Photo setting
Interval time
To browse picture at interval time. There are several options for you to set as follows:
5sec./10sec./15sec./30sec./1min./3min.
Transition effect
To select one of the effects when changing from one picture to another: No effect/Cover up/Cover
down/Cover left/Cover right/Uncover up/Uncover down/Uncover left/Uncover right/Wipe up/Wipe
down/Wipe left/Wipe right/Push up/Push down/Push left/Push right/random
Auto play
The options of auto play include photo, music and movie.
Display setup
TFT Brightness: To set TFT brightness until desired effect is reached.
TFT Contrast: To set the TFT Contrast until desired effect is reached.
TFT Saturation: To set the TFT Saturation until desired effect is reached.
Custom setup
OSD language: The OSD language options vary with the software.
Style: Select one of following style to display different setup menu style. The option of styles as follows:
style1/style2/style3/style4
Repeat mode: Select one of following options to do a repeat function: off/ one/ folder/ all.
Default: Select read to restore the setting.
Set time: Use NAVIGATION UP/DOWN button to select SET TIME option and press ENTER to confirm,
use NAVIGATION LEFT/RIGHT button to highlight the time you desired to set, then use NAVIGATION
UP/DOWN button to adjust, press NAVIGATION RIGHT button to confirm and press ENTER to exit the
clock time set.
Exit
Select this option to exit the setup menu.
Remote function illustration
Power button: Press this button to power on or off the player.
Mode button: Press MODE button once display clock time, press this button twice display calendar,
press this button three times to exit.
OSD button: Press this button, the screen will display parts of information(current file number, total files
number ,current file name, and/or play time during movie playback mode).
Menu: Press MENU button during playback to return the main menu.
-ENGLISH 3-
-ENGLISH 4-
Play/pause button: Press PLAY/PAUSE button to pause during playback, press this button again will
resume playback.
Navigation buttons: Press navigation buttons to select the desired items or rotate the picture during
picture playback.
Enter button: Press this button to confirm selection.
Stop: Press STOP button to stop during playback. Press PLAY/PAUSE to resume playback.
F.BWD/previous: Press this button once during play to skip a file or picture backward, press and hold this
button during normal playback of video or audio files, the playback speed will cycle with each press as:2X,
4X,8X, 16X,32X,Normal
Press PLAY to resume normal playback.
F.FWD/next: Press this button once during play to skip a file or picture ahead, press and hold this button
during normal playback of video or audio files, the playback speed will cycle with each press as:2X, 4X,8X,
16X,32X,Normal
Press PLAY to resume normal playback.
Mute:Press the MUTE button, the audio output of the main unit will be shut off; pressing this button again
or VOLUME button will resume the audio output.
Volume+ & volume-:Press volume + button to increase the volume, and press volume- button to reduce
the volume.
Inter-changeable faceplate
Assemble panel: to install the faceplate, locate the faceplate to the photo frame by aligning them point to
point as above show, then clasp the panel slightly to assembly it .
Disassemble pane :lift the faceplate from the screen directly.
-ENGLISH 5-