1
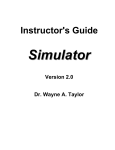
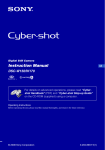
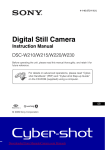
The Airgun Shooting-cinema User´s Guide www.aircine.com AirCine– The Airgun shooting-cinema Version 1.450 Date: 07/02/2015 2 User´s guide AirCine– The Airgun shooting-cinema Contents Introduction ........................................................................................................................ 5 Functionality .............................................................................................................. 5 Safety ........................................................................................................................ 5 Conditions for Operation ........................................................................................... 6 Installation and Setup........................................................................................................ 7 Construction of the Screen ........................................................................................ 7 Connecting the AirCine Box .................................................................................... 12 AirCine Box LED Displays ....................................................................................... 12 Installing the AirCine Box Driver .............................................................................. 13 Installing the AirCine Software ................................................................................ 14 Windows 7 and Windows Vista ............................................................................... 15 Measurements of the Screen .................................................................................. 16 Setting up the Projection ......................................................................................... 19 Checking the Function ............................................................................................ 20 Performing Calibration (firmware 2.6 or higher) ...................................................... 21 Performing Calibration (all versions) ....................................................................... 21 Calibration - Turning on and off ............................................................................... 22 Selecting a Language ............................................................................................. 23 Diagnostic Information ............................................................................................ 23 Selecting the Projection Screen .............................................................................. 23 The Shot Counter .................................................................................................... 23 Installation Quick Reference Guide................................................................................ 24 General Information about all Games and Simulations................................................ 25 Full-Auto Mode ........................................................................................................ 25 Short delays ............................................................................................................ 25 Key codes ............................................................................................................... 26 Records and Highscores ......................................................................................... 27 Games for a single shooter ............................................................................................. 28 Clay discs ................................................................................................................ 28 Birds ........................................................................................................................ 29 How many Hits in 2 Minutes? .................................................................................. 30 How long for 10 Hits? .............................................................................................. 30 Shooting Gallery...................................................................................................... 31 Games for 2 Shooters ............................................................................................. 32 User´s guide 3 AirCine– The Airgun shooting-cinema Shooting Cans......................................................................................................... 32 How many Hits in 2 Minutes? .................................................................................. 33 How long for 10 Hits? .............................................................................................. 33 Hunting ............................................................................................................................. 34 Wild Boar................................................................................................................. 34 Training Simulations of Shooting Disciplines ............................................................... 35 Falling plates ........................................................................................................... 35 Speed shooting ....................................................................................................... 37 Precision ................................................................................................................. 39 3/7 seconds ............................................................................................................. 40 10 seconds .............................................................................................................. 40 20 seconds .............................................................................................................. 40 Video shooting ................................................................................................................. 41 Selecting video files ................................................................................................ 41 Video shooting ........................................................................................................ 42 Report printing......................................................................................................... 43 Action shooting........................................................................................................ 44 Pictures............................................................................................................................. 45 Configure ................................................................................................................ 45 Play ......................................................................................................................... 46 Picture scripts .................................................................................................................. 47 Funktion .................................................................................................................. 47 Select script............................................................................................................. 47 Run script ................................................................................................................ 47 Create your own scripts .......................................................................................... 48 Further Functions ............................................................................................................ 51 The AirCine server .................................................................................................. 51 AirCine mouse......................................................................................................... 51 Appendix .......................................................................................................................... 52 How to Prepare New Video Files ............................................................................ 52 Maintenance of the Screen ..................................................................................... 53 Contact .................................................................................................................... 53 Copyright Notice...................................................................................................... 53 4 User´s guide AirCine– The Airgun shooting-cinema Introduction Thank you for choosing AirCine. This innovative product enables the performance of a new kind of shooting training and shooting games in a simple and cost-effective way. The following guide shows the installation and the functioning of AirCine in detail. Enjoy! Functionality The Airgun shooting cinema is designed to shoot at a distance of 5 metres on the projection of a video image that is constructed from a PC. The hit location on the screen is measured by the measuring microphones and electronics of the AirCine box and sent to the PC. This displays the hit or the running program responds appropriately to the hit. An average accuracy of 5 mm is reached on the impact measurement. This means that the measured hit position is on average 5mm different from the actual position. The shooting-cinema is suitable and currently tested for the following operating conditions: Compressed-air rifles, such as pressurized air and spring rifles Compressed-air handguns, such as pressurized air and spring handguns CO2 weapons as long and short rifles Airsoft weapons (spring pressure, CO2, Gas, AEG) Silenced and not silenced weapons (please pay attention to the legal requirements for the operation of silencers) Bullet energy up to 7.5 joules Shot distance at least 5 metres The AirCine box, as well as the microphones are designed to operate within enclosed spaces. Operation out in the open is NOT provided. The box is not splash-proof and the air vents of the box may not be sealed, otherwise faulty measurements or malfunctions might be caused. AirCine is designed for a maximum bullet energy of 7.5 joules. Higher bullet energy could result in malfunction, damage or cause a risk to others. Safety Please note all necessary safety measures in the operation of your shooting cinema. Ensure that no people or animals are in the area of the screen or behind it. Also make sure that no one is in the line of fire or accidently enters the line of fire. Important! Please note the applicable legal provisions in the use of airguns. User´s guide 5 AirCine– The Airgun shooting-cinema Conditions for Operation In addition to the AirCine box, the further following devices or installations are required for the operation of AirCine: A PC or laptop. The PC must be powerful enough to play back AVI-format video files full-. In the event that the performance of the PC is not strong enough, one can for instance reduce the resolution of the video files. At present, AirCine is being tested on Windows XP, Windows 2000 and Windows 7. We recommend a PC with a clock speed of at least 1 GHz. The AirCine software supports operation on multiple screens. A video projector that can be operated from the PC. Any image resolution is possible, we recommend a resolution of 800 x 600 pixels. A screen. This is made in a simple way. See page 7 for screen assembly instructions. 6 User´s guide AirCine– The Airgun shooting-cinema Installation and Setup The following paragraphs describe the steps required for the initial setup. Construction of the Screen The shootable screen to project the target images must be built by the AirCine user. Simple and inexpensive material is suitable for the screen construction, which can be found at any hardware store. Also, no special tools or technical skills are required. The easy self-made screen is also the reason that AirCine is delivered without these additional materials, as the preparation and mailing of the bulky parts would far exceed the price of a self-made screen and not necessarily save time in constructing. Moreover, this makes it possible for the user to adjust the size of the screen to his/her own need. The following guide shows a typical projection screen. The self-made screen may of course be adapted to one's own needs. The size shown in the guide is the size of the maximum tested and should not be substantially exceeded. The following material is required: 4 strips of wood, 25 x 50 mm cross section, 2000 mm long. Use simple softwood (coniferous) because of the accoustic quality. 4 small rectangular wooden triangles, size approx. 80 x 80 mm, 20 mm width. Bolts to connect the pieces of wood. Small nails to mark the microphone position and to secure the back of the material (this can be fixed alternatively with a stapler). Large-format paper as shooting projection surface. 4 layers of pool film, 1 mm thick in the screen size as a bullet trap. 3mm strong soft PVC, so-called door plate, can alternatively be used. The material is available at www.modulor.de under the order number 134027L. This material has the advantage that it is vitually wear-free (for shots up to 7.5 joules). Caution: Do not use any hard material for trapping the bullets. Bullets could bounce back at the shooter. User´s guide 7 AirCine– The Airgun shooting-cinema The finished frame looks then for example like this: 180 cm 100 cm 140 cm 135 cm The frame should be as far as possible unattached or hanging. If the frame is firmly screwed on a wall, this may result in a transmission of structure-borne sound from the bullet impact. This then leads to faulty measurements. 8 User´s guide AirCine– The Airgun shooting-cinema The 4 strips of wood are to be cut off at the required length and screwed into the corners together. The narrow sides of the strips of wood point to the front and the back, so that the frame encompasses a 5 cm wide space. The wooden triangles are to be fixed frontwards facing the shooter. View from the front: The microphones will be attached to behind the triangles so that they are at an angle of 45 degrees to the frame. A view from behind should show that: be sure when attaching the cable that it is protected against fire or other potential damage. The microphone cable may in no way be modified or shortened, because otherwise no exact measurement can be taken! View from the rear: Caution: Please be aware that there are 2 pairs of microphones with different direction of the plug. This can be useful when attaching the cables. User´s guide 9 AirCine– The Airgun shooting-cinema In order to find the position of the microphone later, it is recommended to put a nail partly into the board beforehand. If the nail is not fully knocked into the board, the nail can be easily found afterwards through the paper, hence the position of the microphone can be marked onto the paper. This is important in order to align the position of the microphone and projection with each other later. The whole thing then looks like this: 10 User´s guide AirCine– The Airgun shooting-cinema When the frame is finished, the bullet trap can then be applied. One layer should be stretched across and attached by nails or staples directly onto the frame. Further layers should be allowed to hang loosely by fixing them to the top edge of the frame. In doing so, a tight and flexible multilayer bullet trap backplane can thus be created. Instead of using the pool foil, other materials can also be experimented with, however it should be noted that these materials should be soft and flexible. Hard materials cause a transfer of structure-borne sound by a hit, in which the measurement of the hit by AirCine is negatively affected. Caution: The bullet trap should be made using soft flexible material. A hard or very tightly stretched backplane causes a transfer of structure-borne sound. Thus a measurement of the results may no longer be possible! Do not use any sound-absorbing material such as fabric or wood. An accurate measurement of the hit would be impossible! The following image shows schematically the structure of the bullet trap. It shows a side view of the screen with the shooting position from the left: This frame is covered with 3 mm thick soft PVC (door panel). This drawing shows schematically a frame with pool foil stretched across as a bullet trap. The first layer is attached all around the whole frame and slightly stretched. This ensures that there is free space between the paper and the bullet trap. The other layers are suspended freely and only attached at the top edge. As a result, trapped bullets can fall out down to the bottom. Now, you can fix the first paper onto the front of the frame. This is done easiest with adhesive tape, such as masking tape. Hereby, the projection surface is complete and the AirCine box, as well as the software on the PC can be prepared. User´s guide 11 AirCine– The Airgun shooting-cinema Connecting the AirCine Box The box has different connectors and displays. These are all grouped together on the front panel: The connectors and displays in detail: 1 to 4 The red LED indicates the power supply. The green LED provides information on the current status of the box. The USB port serves as a link to the PC. Here, the microphones of the screen are connected. AirCine Box LED Displays The box has 2 LEDs that provide information about the status and the activity of the box. To do this, a red and a green LED are present. The importance of the LEDs is listed in the following table: 12 Red Green Meaning Off Off The box is turned off or has no power supply. On Off The box is turned on, however is not active. Normally after rebooting the box (eg. contolled by the AirCine program). On On (dark) The box is waiting for a hit. On Flickering bright The box is communicating with the PC. On Blinking A communication error has occurred. The box is blocked until the next restart. User´s guide AirCine– The Airgun shooting-cinema Installing the AirCine Box Driver Insert the AirCine CD ROM into your CD ROM drive and connect the AirCine box to an available USB port of the PC. After a few seconds, the following message appears: Please select the listed option "Install the software from a list or specific source" and confirm with "Next". Then enter the name of your CD ROM drive and the path to the driver. In the following example the D: drive is the CD ROM drive: The driver will now be installed and the AirCine box is now ready to use. On some systems, it may happen that Windows will attempt to install the driver a second time.You should also do this because otherwise the AirCine box will not work. User´s guide 13 AirCine– The Airgun shooting-cinema You need to now look in the Control Panel to see which port the box from Windows has been assigned. Go to "System" in the Control Panel. Select the section "Hardware" then "Device Manager". In the section "Ports (COM and LPT)" you will now find the entry "USB Serial Port". Please make a note of the name of the connection, e.g. COM3. You must configure this later in the AirCine software. Now, the microphones are connected to the AirCine box. The provided microphone positions are as follows: Microphone 1: Top left Microphone 2: Top right Microphone 3: Bottom left Microphone 4: Bottom right All items are specified from the view of the shooter. If you connect the microphones in a different order, no precise measurements are possible. Installing the AirCine Software Insert the AirCine CD into the CD ROM drive. Start the program "setup.exe" in Windows Explorer in the file "Program" of the CD ROM. Now, the AirCine installation program will start: Click on the "Start" button. The program will now be installed and registered in the start menu. Then the following dialog box will appear: The installation is now complete. 14 User´s guide AirCine– The Airgun shooting-cinema Windows 7 and Windows Vista The AirCine program has been designed specifically for older PCs that run Windows 2000 or Windows XP. Thus, the XP compatibilty mode must be activated for operation on Windows 7 or Vista. Also, the program must be run in these operating systems with administrator rights. Do this by opening the "Context" menu with a right click on the program icon in the start menu, then select "Properties". From the "Compatibility" window, you must then make the following settings: User´s guide 15 AirCine– The Airgun shooting-cinema Measurements of the Screen Now start the AirCine program. The main menu appears: In the main menu at the bottom left you can select the sub-menu "Configuration". The following menu will appear: 16 User´s guide AirCine– The Airgun shooting-cinema Select first the item "Select Interface". All available ports in the system are displayed: Select here the Interface shown previously in the control panel and confirm with OK. The selected setting is stored permanently. From the software version 1.267 onwards, the box will be found automatically, this step is then no longer necessary! Next select the button "Dimensions & Sensitivity" in the configuration menu. The following window will appear: To calculate the hit positions, it is imperative that the exact position of the microphones is known. It is only possible this way later to measure the hits accurately. All co-ordinates are specified in X and Y direction. X is the horizontal, Y is the vertical axis. The position X=0/Y=0 is the outer edge of the screen frame top left. Please measure out as accurately as possible the positions and distances. Any deviation here can lead to significant greater variations in measuring the hit! Upon the delivery of your new AirCine box, data will have already been stored. These are the dimentions of the test screen, with which the device has been checked. Here, you enter the dimentions determined by you. User´s guide 17 AirCine– The Airgun shooting-cinema The position of the microphones will now be shown in the window "Screen Adjustment". You can not measure and enter the positions of X and Y directly. As the screen may not be built at an exact right-angle, there is a more accurate method. To do this, choose "Calculate Positions....": Here you can enter relative to each other the positions of the microphones. This method then calculates the X and Y coordinate of the microphones and enters it in the previous dialog. Caution: The microphone position always refers to the centre of the black surface of the microphone. Variations in the position measurement can lead to much larger variations in the measuring of the hit! Next you should set the sensitivity of the microphones. This is important for the measurement of the hit and is also dependent on the screen. Start with a sensitivity of 0 for the size of the screen specified in the manual. If the sensitivity is set too high, the hit will be measured incorrectly. Alternatively, if the sensitivity is set too low no hit might be recognized at all. Important: The setting of the sensitivity depends on the type of weapon used. Spring air guns or silenced CO2 weapons work well when set at 0. For very loud CO2 weapons the sensitivity should be re-adjusted to -5. You should not change the amplification setting, this is reserved for future extensions. After completing the settings dialog by clicking on "Save" all the data will be transmitted and stored in the AirCine box. Thus, only now is the box ready to measure the results accurately. 18 User´s guide AirCine– The Airgun shooting-cinema Setting up the Projection Now it's time to stretch paper across the screen for the first time. This can be done e.g. with tape. When attaching the paper in front of the screen, the microphone positions must be determined on the paper. If you have knocked in the nails as explained, it is enough to press them so they are visible though the paper. Caution: Use sufficiently strong paper. Newspaper is usually too thin and does not allow exact measurements. The paper should have at least a weight of 80 to 100g. Now connect the projector to your PC and align the image on the screen. The projection must cover at least all 4 microphones, although it does not necessarily have to cover the entire screen. If you now select "Projection Setting" in the main menu, the following screen will appear: First you need to bring the microphone marks (crosses marked "1" to "4") to cover the real microphones. Select one of the microphones on the keyboard with the keys "1" to "4". Then, the respective cross above the mic can be positioned using the arrow keys (cursor keys). The border between the microphones displays the subsequent screen on which all targets will be displayed. This border is automatically adapted to the microphone positions. User´s guide 19 AirCine– The Airgun shooting-cinema When all settings are complete, you can exit the settings´ screen by the space bar. The data is stored user-related permanently. Therefore, if you log on to Windows under a different user name, you will have to reset the projection settings. Also a change in the position of the projector or the screen requires a check of the projection as changes may have effected it. This also applies to projectors that positions may have shifted by several millimetres due to heating up whilst in use. Congratulations! All preparations are now complete! Only a short test, and then off you go...... Checking the Function Start the function of "Hit Test". You will see a green background and the microphone positions marked with small circles. If you now shoot at the screen, the hit will be detected and measured. The hit is projected onto the screen. For this purpose, a yellow circle with a radius of about 10mm is drawn around the appropriate position. If you have everything set up and measured properly, the results should always be within the yellow circle: In the corners of the screen, there may be slight divergences because of technical reasons. This is however normal and is not relevant during normal operation. 20 User´s guide AirCine– The Airgun shooting-cinema Performing Calibration (firmware 2.6 or higher) If the firmware-version of your AirCine-box is at least 2.6, then your microphone positions will be calibrated now - with an accuracy of up to 1/10 mm!. You only need to shoot 4 shots into the white circle on the screen. Based on these 4 shots the microphone positions will be optimized. But this works only if you prepared everything well as described before. If the calibration will not accept your shots, please go back to the sensitivity settings and test your settings before performing the calibration. After calibrating the microphone positions you will be automatically forwared to the screen calibration: Performing Calibration (all versions) The measure of the hit can be improved significantly through calibration. To do this, 20 shots are carried out at different target zones. The hit position measured is compared with the bullet hole in the screen. The deviations are stored and then used to calculate a more accurate point of impact. Note: You should only run a calibration when the hit test was successful, a deviation of a maximum of 1-2 cm in measurement. Otherwise the measurements through the calibration get worse!!! Calibration: select the item "Calibration" in the configuration menu. The calibration screen will then appear: User´s guide 21 AirCine– The Airgun shooting-cinema It will display a white circle as a target zone. Shoot in the white circle. You can repeat each shot any number of times. The hit is only used for the calibration if you select it. This is done as follows: When a target is hit, a yellow circle is shown around the appropriate point of impact. It also shows a black crosshairs at the same position. Now move the crosshairs with the cursor keys (left, right, up, down) as accurately as possible over the bullet-hole. To confirm, press the "X" button now. The position will be saved, the circle and crosshairs then disappear. Caution! Only calibrate hits that are already close to the bullet hole. If your shot touches an outlier, the calibration result will be distorted. Should you not want to include a hit in the calibration, simply give off another shot. After 5 recorded shots the target circle moves on to the next position. When you have recorded 20 shots the correction values will be calculated and stored. The calibration is now activated for all games and will be stored permanently. You can repeat the calibration any time. Please be aware that only a completed calibration will be stored. It will replace any previous calibration. Calibration - Turning on and off A checkmark in front of "Calibration activated" in the configuration menu refers to the possibility to turn the calibration on or off at any time. If however calibration has not yet been performed, the checkmark will be deactivated. 22 User´s guide AirCine– The Airgun shooting-cinema Selecting a Language At the first startup, you are asked for the desired language. Presently, German and English are available. If you want to change the language later, you can do this in the configuration menu under "Select language". Finally, in order to activate the new setting you should end the program and restart it. Diagnostic Information Should you ever encounter any problems with the setup of AirCine, you should select "Display diagnostic information" in the configuration menu. The data displayed there can be copied and sent by e-mail to [email protected]. This allows a quick help in the troubleshooting. Selecting the Projection Screen If you have a PC with more than one screen output, you can connect the projector to any of these ports. Select now "Extend my desktop onto this screen" in Windows, under the screen properties for this screen. In the main menu you can select this screen as a projection screen for the target image display. For this purpose, it may be necessary to restart the AirCine program to detect the screen. The selected setting will be stored and reactivated the next time, as long as the screen is still available. Therefore the main menu, as well as all other menus can be kept on the same screen. The Shot Counter The program has 2 independent shot counters that are similar in function to the car odometer: Shots today: Counts the "daily output" of the shooting range (shots per day). However as a shooting evening can take even longer, the counter does not start from zero at midnight, but at 05:00am instead. Or, if you switch off for example at 03:00am, at the next system startup. Total shots: This counter will continue throughout the whole life span of the AirCine box. The counter cannot be reset to zero. User´s guide 23 AirCine– The Airgun shooting-cinema Installation Quick Reference Guide The following steps must be performed in order to operate AirCine: 1. Construction of the screen Construct the screen according to the manual. 2. AirCine box installation Connect the box to your PC and install the driver. 3. Installation of software onto PC Install the CD ROM software onto your PC. 4. Measurements of the screen Measure the distances, such as the positions of the microphones as accurately as possible and specify these measurements in the configuration of the software. 5. Setting up the projection Position the microphone markings for the projection as precisely as possible over the microphones and line up the size of the range. 6. Checking the function Check the hit measurement and projection by the function "Hit test". 7. Calibration Increase the accuracy of measuring the hit with a one-time calibration. Only calibrate if it has worked good up to this point! 24 User´s guide AirCine– The Airgun shooting-cinema General Information about all Games and Simulations The basic process is the same for all games and simulations: Except for the video shooting, this game begins with a reasonable pause to allow the preparation for the first shot (e.g. load the weapon). Each game then runs until the appropriate time (number of hits or time limit) is reached. At the end of the game, the following dialog box appears: Am Ende des Spieles wird die folgende Dialogbox angezeigt: You can choose here with the corresponding (letter) button or by hitting with a shot the desired selection box of your choice. All games can be terminated at any time by pressing on the space bar. Full-Auto Mode In the configuration menu, from the AirCine box version 1.20 onwards, you will be able to turn the full auto mode on or off. This means that fast consecutive shots will be detected. The maximum shot frequency is about 30 hits per second. The full auto mode can be used e.g. for Airsoft weapons for fully automatic operation. If the full auto mode is turned off, a break is inserted after each hit measurement of 0.5 seconds. This serves the purpose that in the screen/canvas frame, falling bullets may not cause any measurement errors. Short delays Usually, the preparation time and loading pauses (for example in clay disc shooting) are set to keep sufficient time for air rifles with break-barrel, or for side clamping devices. By activating the switch and using a weapon that is reloaded faster, the waiting time can be reduced. User´s guide 25 AirCine– The Airgun shooting-cinema Key codes From the current AirCine software version (1.267), the AirCine software is subject to an additional game - the wild boar hunt game. For this, a separate registration code must be purchased, which is then entered in the configuration menu, under "Key codes". The code is linked to the AirCine box, thus it can be used so on multiple PCs, but only with a single AirCine box. 26 User´s guide AirCine– The Airgun shooting-cinema Records and Highscores In all single-player games and training simulations, the 10 best results along with the shooter´s name are stored. If you reach a result that is good enough for the list, a input window for the name of the shooter will open at the end. After each round, the list of the best 10 results will be displayed: In the main menu, you can view the records for each discipline at your own leisure by clicking on the button "Highscores": Each individual list can be deleted separately. In addition to the records, a checksum also appears. This is needed to enable the record to be entered and published on the www.aircine.com website. Thus, this way you can make comparisons with other users. User´s guide 27 AirCine– The Airgun shooting-cinema Games for a single shooter Clay discs The game starts after selecting "Clay discs" in the main menu. The aim is to hit all of the thrown clay discs. At the top left corner of the screen you will see what number is the next shot. The number of previous hits is displayed at the top right side of the screen. The discs are thrown alternatively from right to left. Additionally, a backwards running counter in the bottom right or left corner displays the time to the next throw. The position of the counter shows the side of the next throw. In the last 3 seconds prior to the throw, the screen flashes briefly to display the directly following throw. Then the clay disc is thrown with a changing trajectory from throw to throw: You can now try throughout the whole flight to hit the clay discs. Keep in mind that depending on the speed of the target, a rough size of the hit area is calculated. When all 10 discs have been thrown, the number of hits is shown and the dialog to restart or quit is displayed. 28 User´s guide AirCine– The Airgun shooting-cinema Birds In this game you have to shoot as many birds as you can within 3 minutes, in order to gain as many points as possible. During the game, blue birds fly across the screen in various distances and at various heights. During the 3 minutes of the game you can shoot the birds down in any desired order. Depending on the distance, the shot points are calculated differently: Near: Middle: Far: 5 points 10 points 20 points The remaining playing time is displayed above on the left and on the right the score achieved so far: The image freezes after the 3 minutes are up and the dialog box appears giving the choice to restart or quit the game. User´s guide 29 AirCine– The Airgun shooting-cinema How many Hits in 2 Minutes? Here the aim is to hit as many of the targets as possible within 2 minutes. After the waiting time countdown at the beginning, 5 targets will move randomly across the screen. When a target reaches the edge of the image, it bounces off and remains in the impact zone. A shot is shown briefly as a yellow dot on the screen. When a target is hit, it disappears out of the image and is counted. If 2 or more targets are hit at the same point, they will all be counted as hit. In this instance the targets for example represent balloons, flying across the screen. The number of hits is displayed at the top left corner of the screen: After the 2 minutes are up the targets are faded into the background and the dialog box appears giving the option to either restart or quit the game How long for 10 Hits? This game is similar to the previous, but differs in the game time. There is no maximum time specified, but it is determined instead by the time needed for 10 hits. Otherwise, the screen layout and gameplay is the same. After hitting the 10th target, the targets disappear and the clock stops. The dialog box giving the option to restart or quit will appear 30 User´s guide AirCine– The Airgun shooting-cinema Shooting Gallery When you start the game "Shooting gallery", after a preparation time, different targets on 4 levels will begin to move across the screen. The objects move alternately from the left or from the right, the middle levels runs twice as fast as the upper and lower level through the picture. The faster targets are scored with double points, as they are harder to hit. The points are scored according to the size of the targets (more precisely: the surface). The scores of the various targets are: Target points(slow) STOP sign Bucket Dart Football Teddy Cup Can Right of way sign Beaker Doll Duck Bottle Car Train Motorbike Rose 5 5 10 15 20 20 25 25 25 25 30 35 35 35 40 50 points(fast) 10 10 10 30 40 40 50 50 50 50 60 70 70 70 80 100 When the time is up the game stops and the dialog box appears giving the option to restart or quit the game. User´s guide 31 AirCine– The Airgun shooting-cinema Games for 2 Shooters Shooting Cans In this game, not only your accuracy, but also your speed of reaction is required. The aim is to be faster than the other player in shooting 10 targets. The tin cans are not moving, they appear at a random location on one of the shelf boards/shelves. There the cans remain visible for only 3 seconds then disappear again. They must be hit within this time limit. Each of the 2 shooters are assigned to one of the 2 colours (usually the left player gets the blue targets and the right player the green targets) and tries to hit them. If a player shoots the opponents´ target by accident the opponent gets the point credited. The game ends when one of the players hits 10 targets. Then the targets disappear and the dialog box appears giving the option to restart or quit the game. 32 User´s guide AirCine– The Airgun shooting-cinema How many Hits in 2 Minutes? Here the aim is to hit as many of the targets as possible within 2 minutes. After the waiting time countdown at the beginning, 5 targets for each player will move randomly across the screen. When a target reaches the edge of the screen it bounces off and remains on the screen. Here too, a target colour is assigned to both players after the players have positioned themselves appropriately in front of the screen. A shot is shown briefly as a yellow dot on the screen. When a target is hit, it disappears and is replaced with a new target. If 2 or more targets are hit at the same point, they will all be counted as hit. In this instance, the targets for example represent balloons, flying across the screen. If a player shoots the opponents´ target by accident, the opponent gets the point credited. The current number of hits are displayed at the top left and right corners of the screen: After the 2 minutes are up the targets are faded into the background and the dialog box appears giving the option to either restart or quit the game. How long for 10 Hits? This game is similar to the previous, but differs in the game time. There is no maximum time specified, but it is determined instead by the time needed for one of the players to hit 10 targets. Otherwise, the screen layout and gameplay is the same. After hitting the 10th target the targets disappear and the clock stops. The dialog box giving the option to restart or quit will appear. User´s guide 33 AirCine– The Airgun shooting-cinema Hunting Wild Boar In the game of hunting wild boars, 10 shots can be fired at any time. The target hits are then evaluated with accordance to how fast and how far away a wild boar is. An expert shot results in a positive evaluation, meaning the wild boar is fatally hit. An animal that is wounded runs away quickly and points are thus deducted. The fatal hit area is shown in the following picture: The red zone is the central target zone for fatal hits. The points achieved so far are displayed at the bottom left corner of the screen. At the bottom right corner, the shots remaining are displayed. 34 User´s guide AirCine– The Airgun shooting-cinema Training Simulations of Shooting Disciplines Falling plates This is a simulation for multi-shot handguns. The original discipline is to shoot falling targets, of a size of 20cm from a distance of 25 metres. In the simulation, the discs´ size is reduced to 8cm in diameter, which corresponds to a distance of 10 metres. The shots are carried out in 6 rounds with 5 targets for each round. A maximum of 24 shots is permitted per round (in magazines of 6 or 8 rounds). There is a time limit of 1 minute for each round. The time is measured that is needed until all 5 discs have fallen over. Discs which are still standing at the end of the time are considered as an error and are evaluated with 10seconds penalty time per disc. After the 6 rounds, the times and penalty times are calculated to give the end result. The process ist he same for every round: - First, the weapon is prepared and loaded. Further magazines and barrels up to the number of shots permitted are prepared. When the shooter is ready the enter key should be pressed for confirmation. - Next, a waiting period of between 3 to 7 seconds begins. During this time the discs appear as silhouettes. - The beginning of the shooting is indicated by an audible signal and the discs become visible. Now all discs can be fired at in any order. Discs that are hit disappear: User´s guide 35 AirCine– The Airgun shooting-cinema - The result is shown after all the discs have been hit or after the time has run out. By hpressing on the enter key, the round is ended. - Finally, after completing all rounds the end result will be displayed. The end result indicates that the lowest total amount of time (shooting time and penalty time) represents the best result. 36 User´s guide AirCine– The Airgun shooting-cinema Speed shooting This training mode simulates a discipline for multilayer shot handguns too. The target size is also converted to a distance of 10 metres. The shots too are carried out in 6 rounds with 5 targets each round. However, there are only 5 shots at your disposal. This means that the 5 targets should be continuously fired at from left to right. If a target is missed, the next target should be aimed at. The shooting time is unlimited, however the time needed until the last shot will be measured. The process of the 6 rounds is as follows: - First, the weapon is prepared and loaded. Further magazines and barrels up to the number of shots permitted are prepared. When the shooter is ready the enter key should be pressed for confirmation. - Next, a waiting period of between 3 to 7 seconds begins. During this time the discs appear as silhouettes. - The beginning of the shooting is indicated by an audible signal and the targets become visible. Now the targets can be fired at using one shot each: The sum of all hits is calculated minus the time measured. A hit in the white centre counts as 10 points, a hit in the black area of the ring counts as 7 points. Hits outside of the ring count as 0 points. The point assessment is determined by fast shooting, however accuracy is even more important! User´s guide 37 AirCine– The Airgun shooting-cinema - The result of the round appears after 5 shots. You can then exit the round by pressing the enter button. - After the completion of all rounds, the end result is displayed. The end result indicates the points of all rings shot minus the required time. Therefore the higher the score is, the better the result is. 38 User´s guide AirCine– The Airgun shooting-cinema Precision In the precision shooting, the target distance is reduced from a scale of 25 metres to 10 metres. First, the shooter can prepare himself/herself before pressing on the enter button. Then, the target is displayed on the screen: Next, 5 shots can be fired at the target in an unlimited amount of time. The result will be shown shortly after the last shot has been fired.: Subsequently, further rounds of training can be started. User´s guide 39 AirCine– The Airgun shooting-cinema 3/7 seconds The hit display and detection works the same here as in precision shooting. In contrast however, for each individual shot the target will only appear for 3 seconds. The position of the target is shown as an outline for 7 seconds in between shots. After 5 shots, the result is displayed. 10 seconds In contrast to the precision shooting, the target is displayed for 10 seconds. Within this time limit 5 shots have to be fired. 20 seconds This training program functions exactly the same as the previous one, except the target is displayed for 20 seconds. 40 User´s guide AirCine– The Airgun shooting-cinema Video shooting In video shooting almost any video films can be used. The following describes the procedure. Selecting video files First, click on "Select". The following dialog appears: You now have the following options to choose from: Add new file: A file selection flield appears, where you can choose any files in "AVI" format. Please note that to play a file, the matching codec (driver to decompress a video file) must be installed on your computer system. The selected file is then added to the playlist. On the AirCine CD, a few examples in the "Videos" are available. Remove selected files: Select one or more files (using the mouse to click whilst pressing the "CTRL" key). They will then be deleted from the collection. Delete entire list: The entire list will be deleted. Please note that at least one file must be available in the list, to be able to perform video shooting. Cancel: The window will be closed without saving any of the changes made. Save: The displayed list will be saved and the selection dialog will close. User´s guide 41 AirCine– The Airgun shooting-cinema Video shooting Now, choose the item "Play" from the main menu. The films are played according to the compilation successively. You can choose any targets within the film itself. After a shot is fired, the image is stopped and the hit is shown with an aiming point (crosshairs with a dot in the middle). The marking is designed to be visible on both light and dark areas of the image. In addition, each hit is saved so that a hit report can be printed later. After 5 seconds the marking disappears and the video continues. Now you can shoot again. The whole thing is repeated until all the films are over or until the video is ended by pressing the enter key. After the end of the last film, the dialog box to restart or quit is displayed. 42 User´s guide AirCine– The Airgun shooting-cinema Report printing Select "Print" from the main menu. Then the following dialog box will appear: Select now one of the picture series from the list on the left. Next select one of the installed printers. Below, you can enter the name of the shooter whose name should be printed on the report. If you now select "Print" the report will be printed. User´s guide 43 AirCine– The Airgun shooting-cinema All shots are printed in the report. Of each hit, an enlargement with the hit mark is printed in order to identify the hit better. Up to 12 pictures will be printed per page, if required multiple numbered pages can be printed. Depending on the printer, the pictures will be automatically printed in colour, if facilitated. To delete a series of pictures, you need to select the page then click on "Delete". After answering security questions, the whole series will be deleted. Action shooting Here too, the selected films are played and serve as targets. However, by hits the movie does not stop. Instead, hits will be displayed for about 5 seconds. In this way, you can perform fast training or game with a multi-shot guns. 44 User´s guide AirCine– The Airgun shooting-cinema Pictures Here you can chosse a set of pictures as targets. You need one picture without any target as background and s set of 2 pictures for every target: The picture of the target and a picture defining the hit area. Examples can be found on the CD in the folder “Grafiken”. A hit score will be calculated depending on the colour (red, green, blue and white) and brightness (0 to 100%) of the hit area in the mask picture. An example of a target picture and hit mask. By using these pictures you can define any type of target, e.g. IPSC targets. The mask pictures may contain any combination of target colours. This way you can define “good” and “bad” targets or tagets for several shooters that are scored separately. Configure Here you define the general configuration oft he picture shooting: The background image and the directorsy containing the target and mask pictures. The files must be JPG picrues and the file name has to start with “Target” and “Mask”. Corresponding pictures need to have the same remaining file name. You can also define the minimum and maximum display time for the background and target pictures as well as the overall time of the game. User´s guide 45 AirCine– The Airgun shooting-cinema Play When the game is started, the available pictures are display in random order. You can shoot any time, every hit will be displayed on the screen. _Every hit will be scored depending on the colour and brightness of the corresponding position in the mask picture. You will see 4 scores representing each colour. The meaning of these scores can be defined by yourself: The can represent 4 types of targets or 4 different shooters. 46 User´s guide AirCine– The Airgun shooting-cinema Picture scripts Funktion In this module you can run your own scripts. These script define any number of pictures and what will happen on a shot. The pictures have to be available as displayed picture and as hit mask, similar to the random picture module. For every picture you can define what will happen after a a target has been hit or what will happen after a certain time. The script will run until it reaches a maximum execution time or until it will reach an “exit”. With these script you can easily define your own games or trainings based on pictures. You can find 2 examples on the CD, where you are randomly placed into a labyrinth and you have to find the exit by shooting on the doors (and “walking” through them). This module has to be unlocked by a key code and has to be purchased separately. Select script Here you can select the script to run. It is a simple text file (extension .txt) and it hast o be stored in the same directory as the picture files: Run script Here you can run the selectedscript. It will run until it reaches the maximum execution time or until it reaches the exit. Afterwards you will immediately see the menu again. User´s guide 47 AirCine– The Airgun shooting-cinema Create your own scripts The scripts are plain text files, you can edit or create them by using notepad.exe (part of every Windows installation). The file contains a start area, one block per picture and comments. All elements will be explained on the following pages. But you also have a look into the sample scripts from the AirCine-CD. Comments Comments can be added on any position oft he script file. Every comment begins with a „/“ (slash) character. Every text from the dash until the end of the line will be ignored. Start area The start area contains 3 commands that define the behavior of the script. These commands are not optional and they have to be placed on top of the script (excluding comments): maxtime: x Here you need to define the maximumexecution time oft he script. It will stop after x seconds, no matter where it currently is. If you want to run the script “forever”, you can define a very long time, e.g. 86400 seconds (24 hours). maxshots: x This command defines the maximum number of shots until the script stops. Here you can also enter a very large number if you don’t want to stop it after a certain number of shots. start: blockname You need to define a starting point for the script. This command needs a block name as parameter, where the script will start to run. 48 User´s guide AirCine– The Airgun shooting-cinema Blocks A block defines a target picture and the rules for this picture. Every block starts with the block name in squared brackets “[name]” and contains a number of mandatory and optional commands to define the rules for this block. filename: filename.jpg This mandatory parameter defines the picture that will be displayed on the screen for this block. It has to be a picture file in JPG-format. maskfile: filename.jpg Here you need to define the hit mask picture defining the target areas of the displayed picture. This also has to be a JPG-file. random: block1; block2; block3; … This optional command can be used to randomly switch to one target block out of the list. By using random commands you can define unpredictable scripts that cannot be “learned”. The command can contain up to 10 target block names. It will immediately go to one of the target block and continue execution there. If you use the randomcommand in a block, no other commands are necessary. timeout: time; score; block This command defines the default behavior of a block, when no shot is registered. After the defined time a score will be added (or substracted, if score is negative) and the script will continue with the defined target block. red: time; score; block Here you define what happens when a red target is hit. A red target is a area in the hit mask file where the dominant colour is red. After the hit the score will be added (or substracted, if score is negative). The script will wait for the defined time and continue with the target block. green: time; score; block Similar to „red“, but with green targets. blue: time; score; block Similar to „red“, but with blue targets. white: time; score; block Similar to „red“, but with white or grey targets. miss: time; score; block Similar to „red“, but it defines what happens when the black background (no target) is hit. User´s guide 49 AirCine– The Airgun shooting-cinema Exit If any target block name is “exit”, the script will immediately stop execution. 50 User´s guide AirCine– The Airgun shooting-cinema Further Functions The AirCine server The AirCine server can be started from the main menu. Thus, external programs for targets and scoring can be connected to AirCine. The server is running as a TCP server on the local network interface (e.g. 127.0.0.1) on port 24724. To test it, you can set up a connection to the server by using the command "telnet 127.0.0.1 24724". Relevant information is then delivered that is required for a proper evaluation in your own application. All results are delivered immediately as screen coordinates (pixels). For more information about the server and interface, please contact [email protected]. AirCine mouse AirCine can also be used as a simple mouse driver, instead of the built-in games or training. Each hit in the target zone results in a simple mouse click on the corresponding point of the screen. At the start, the status window will be displayed in the middle of the screen: This window can be minimized on the taskbar. If the AirCine mouse function is closed, the main menu appears again. Should multiple screens be connected, the screen selected in the main menu will always be the screen that is used for the target area. Only hits within the target area are registered, which are defined in the settings. Hits outside this area do not activate a mouse click. User´s guide 51 AirCine– The Airgun shooting-cinema Appendix How to Prepare New Video Files To convert these video files, there are too many different programs to be able to give a definite recommendation. However, the program "SUPER" (Simplified Universal Player Encoder & Renderer), has proved to be a very easy to use program for converting video files. The following settings have proven to be very good and can be played by Windows XP, since the used codec is part of every installation: File format: AVI Video-Codec: MS-MPEG4-v2 Audio-Codec: MP3 Video size: 640x480 Frames per second: 25 Bitrate video: 1500 Mb/s Bitrate audio: 64 kb/s Currently, the program is available free of charge on the following website: http://www.erightsoft.com/SUPER.html 52 User´s guide AirCine– The Airgun shooting-cinema Maintenance of the Screen The screen requires very little maintenance to get consistently good results. 2 components are designed as a wearing part and must be exchanged regularly: The front paper usually has a durability of 250 to 400 hits. This of course depends on the distribution of hits on the surface. If the bullet holes are focused on a small area, you may have to change the paper earlier. However, if the bullet holes are spread evenly over the whole surface, it can last even longer. Weapons with a shot energy of less than about 5 joules tend in the use of flat head-diabolos to rip large holes in the paper, because the bullet speed for a clean hole is not sufficient. In this case, use other bullets, e.g. diabolos with angled (tapered) or round heads. This also extends the durability of the paper. The bullet trap material should also be exchanged after some time, depending on the material used. If you use pool film/foil 1mm thick, you can expect the durability of the bullet trap to last for approximately 5.000 hits. But also here, depending on the distribution of bullets it could last longer or shorter. Check the bullet trap before each session for damages and exchange immediately if a bullet has gone through! Contact If you have any questions or comments about AirCine, please send them to the following e-mail address: [email protected] Visit the website to learn about new information, such as new software versions: www.aircine.com Copyright Notice It should be noted that, the AirCine software, all components of the AirCine Box and this manual is copyright-protected material. Violations of this property right will be prosecuted and punished. User´s guide 53