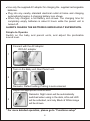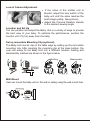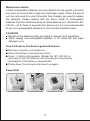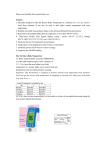
1
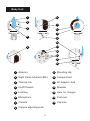
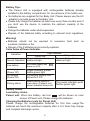
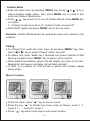
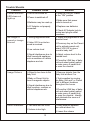
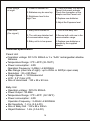
Digital Baby Monitor
USER MANUAL
EHB256
Congratulations
You have just purchased a qualified Wireless 2.4GHz Digital Baby
Monitor. Please read these instructions carefully before using the product.
Keep these instructions for future reference.
Table of Contents
Parts and Quick Reference................................................................. 1
Safety Precautions............................................................................. 3
Color Index of Power Indicator............................................................ 5
Battery Status......................................................................................5
Simple to Operate................................................................................6
Reception Testing................................................................................7
Functions Setup..................................................................................7
Location and Set Up..........................................................................11
Maintenance Notice...........................................................................12
Trouble Shooting...............................................................................13
Technical Specification......................................................................14
Parts and Quick Reference
Parent Unit
10
11
1
8
12
MENU
PT T
13
3a 3b
1 VOX Switch
8 Microphone
2 LCD Display
9 Speaker
14
3a Power Indicator
10 Antenna
3b Signal strength indicator
11 On /Off & volume switch
4 Option key (
12 Adaptor Jack
)
13 Battery door
5 Menu key
6 Option key (
)
14 Stand
7 PTT Switch
1
Baby Unit:
6
1
2
7
3
8
3
4
9
10
13
5
14
15
11
12
9 Mounting clip
1 Antenna
2 Night Vision Infrared LED’s
10 Compartment
3 Thermal Via
11 AC Adaptor Jack
4
On/Off Switch
12 Speaker
5
Link Key
13 Hole for Hanger
6 Microphone
14 Foot mat
7 Camera
15 Clip hole
8 Camera adjusting knob
2
AC Adaptor:
The AC Adaptor is device that allows you to power on the system with
your household electricity. The adaptor can be separately connected to
DC IN connectors of Parent Unit and Baby Unit. Please be reminded to
switch off the system before plugging or unplugging the adaptors.
CAUTION: These adaptors are with exclusive design for this system.
Please NEVER try to power up the system with different adaptors or use
them for any other appliances.
Safety Precautions
When using this unit, basic safety precautions should always be followed
to reduce the risk of fire, electric shock, or personal injury.
!
Read and understand all instructions.
!
Follow all warnings and instructions marked on this unit or mentioned in
this operation instruction.
!
This product is not intended to replace adult supervision Its intent is to
assist the adult. It is important that users should stay within the
communication range of the system at all times when using it.
!
It is essential to check the reception regularly. Please see the reception
section for complete instructions.
!
Never put the system near water, such as the bathtub, bathroom sink,
laundry tub, kitchen sink or in a wet basement, etc. Immersion of this
unit in water could cause an electrical shock.
!
Place the unit securely on a stable surface. Serious damage and/or
injury may result if the unit falls.
!
Do not cover slots and openings on the unit. They are provided for
ventilation and protection against overheating.
!
Install the unit where no one can step or trip on the cord.
!
Never push any objects through slots in this unit. This may result in the
risk of fire or electric shock. Never spill any liquid on the unit.
!
To reduce the risk of electric shock, do not disassemble this unit. Take
the unit to authorized service center or qualified technician when
service or repair work is required. Opening or removing covers may
expose you to dangerous voltages or other risks. Incorrect reassembly
can cause electric shock when the unit is subsequently used.
!
Keep the system away from heat sources such as radiators, heat
registers, stoves or other appliances producing heat. Also keep these
3
!
units out of direct sunlight.
!
Always unplug the AC adaptors if not using the system for long periods
of time.
!
The outer surface of the Baby Unit and Parent Unit can be cleaned with
a cloth LIGHTLY dampened with water or a mild cleaning solution.
WARNING:
To reduce the risk of fire or electrical shock, do not expose this unit to
rain or any type of moisture.
Privacy Protection
Always remember that you are using public airwaves when you use the
Wireless 2.4GHz Digital Baby Monitor. Sound and video may be
broadcasted to other receiving devices. Conversations, even from
rooms near the camera, may be broadcast as well.
CAUTION: To protect your privacy, always turn the system off when not
in use. It is possible that the Parent Unit may be interfered from other
devices in the 2.4GHz frequency range.
User can directly operate the unit by the supplied AC adaptor.
◇ Use only the AC adaptor included supplied.
◇ Unwrap and fully extend the AC adaptor cord.
◇ Plug AC adaptor into a standard wall outlet.
◇ Wrap up and secure any excess AC adaptor cord.
4
Battery Tips:
The Parent Unit is equipped with rechargeable batteries already
!
installed in the battery compartment, for convenience of its mobile use.
No batteries are supplied for the Baby Unit. Please always use the AC
!
adaptor to provide power to the Baby Unit.
Please fully charge the batteries at least once every three months even if
!
you don't use the device, to maintain the optimum capacity of the
batteries.
Charge the batteries under adult supervision.
!
!
Dispose of the batteries safely according to relevant local regulations.
Warning!
Batteries should not be exposed to excessive heat such as
!
sunshine, radiators or fire
Danger of fire if batteries are incorrectly replaced
!
Color Index of Power Indicator
Indication
Normal Operation
Light Indicator
Baby unit
Parent unit
Power indicator shows
Power indicator shows
stable red light
stable red light
Low battery
Red blank battery icon “
shows on LCD
In charging
(Power Off)
In charging
(Power On)
Power indicator shows
stable green light
Pairing status
”
A charging battery icon
shows on LCD
Select pairing option in
main menu of parent unit,
power indicator shows red.
The power indicator quick
flashes green light.
Battery Status
Low battery status
Parent unit: When low battery, red icon
will be shown on main
screen of Parent unit. Please charge the batteries .
Charging the Batteries (only for Parent Unit)
Please charge the rechargeable batteries for first time usage.The
batteries will reach the maximum capacity after 4 to 5 times fully charge
and complete discharge cycles.
5
!
Use only the supplied AC adaptor for charging the supplied rechargeable
batteries.
!
Plug into any nearby standard electrical outlet at home and charging
automatically begins. A charging battery icon shows.
!
When fully charged, a full battery icon shows. The charging time for
completely empty batteries is about 8 hours while the parent unit is
turned off.
ALWAYS CHARGE THE BATTERIES UNDER ADULT SUPERVISION.
Simple to Operate
Switch on the baby and parent units, and adjust the preferable
sound level.
Connect with the AC Adaptor
With AC adaptor
1
Turn on the Baby unit, then Parent unit.
2
Remarks: Default setting: Pairing is auto-scanned.
Adjust the appropriate volume level.
3
Remarks: Night vision will be automatically
switched when using in the dark, infra-red LED
will be activated, and only Black & White image
will be shown.
* For more detailed operation, please go to “Functions setup”
6
Reception Testing
Before using the Parent Unit or changing the location of the system, it is
very important to test the video and sound reception:
To test the video reception
!
Place the Baby Unit in the most appropriate location. (e.g. on top of the
table, mounting on the wall or ceiling)
!
Focus and adjust the camera lens towards the baby.
!
Check the video reception on screen of the Parent Unit and adjust the
appropriate brightness level. (To adjust brightness, please see the
“Functions Setup” section)
To test the sound quality
!
Speak in a whisper and with normal conversation sound level to Baby
Unit.
!
Put the Parent Unit far away enough (at least 1m) from Baby Unit to
prevent noise feedback.
!
Check the sound reception on speaker of the Parent Unit and adjust
the appropriate volume. (To adjust volume, please see the “Functions
Setup” section )
Functions Setup
Baby Monitor Functions Setup
Power ON/OFF
!
Power on the Parent unit by turning on the ON/Off & VOL Switch until a
click sound can be heard. The Power Indicator will show red light and 3
second music will be heard for 3 seconds. Power on the Baby unit by
turning on the ON/Off Switch. The power indicator will be on and music
will be heard for 3 seconds.
!
An image will show on the LCD display if signal is received, otherwise
a white screen will show.
!
Power off the Parent unit by turning off the ON/Off & VOL Switch until a
click sound is heard, The Red light of the power indicator will be off
after 3 seconds with no display on LCD. Power off Baby unit by turning
off the ON/Off Switch. All functions of baby monitor will be stopped.
7
Parent Unit Screen Display
!
Signal Strength: It shows the strength of the transmission signal of the
transmitting unit. 6 levels for signal strength, higher level means
stronger signal.
!
Parent unit Battery: indicates the current battery status.
Status can be: full charge, 3/4 charge, 1/2 charge, 1/4 charge, low
battery.
Charging time for completely empty batteries is about 8 hours while
the parent unit is turned off.
Volume Control
!
Increase the volume by turning up the On/Off & Volume Switch
!
Decrease the volume by turning down On/Off & Volume Switch
Main Menu
!
Press MENU key to enter into main menu. Use / key to select, and
press again MENU key to confirm.
!
Then, Select EXIT, Parent unit will return to LCD display.
MAIN MENU
Brightness
Outdoor Mode
Pairing
Exit
3
0
Brightness
!
Enter into main menu by pressing “MENU” key, press “ or ” key to
select Brightness option, then confirm and enter into Brightness menu.
!
Press
/
key to adjust the brightness level from 1 to 5. Press
MENU key to confirm.
!
Select EXIT option and press “MENU” key to the live video.
Notes: 1 is the darkest .5 is the brightest
8
Outdoor Mode
!
Enter into main menu by pressing “MENU” key, press “ or ” key to
select Outdoor Mode option, then press MENU key to confirm and
enter into Outdoor Mode menu.
!
Press /
key to turn on or turn off Outdoor Mode. Press MENU key
to confirm.
1 = Outdoor mode is turned on. 0= Outdoor mode is turned off.
!
Select EXIT option and press “MENU” key to the live video.
Remarks: Outdoor Mode should be used when baby unit is placed in the
outdoors.
Pairing
!
For Parent Unit, enter into main menu by pressing “MENU” key, then
press “ or ” key to select “Pairing” option and wait.
!
For Baby Unit, press “Link” key 3 seconds until power indicator is fast
flashing red light. Press “MENU” key of parent unit to confirm.
!
When paired successfully, parent unit will display live video on its own.
Meanwhile, both parent and baby unit will flash red light.
!
If there is no display on LCD screen of parent unit. Please repeat
above steps.
Music Function
!
At the live video, press “ ” key to turn on music.
!
Press the key “
” to choose the music order as follows, music 1 >
music 2 >..music 6> music 1
!
Press “ ” key when music play to exit music function.
9
Talking Function
!
Under normal communication, baby unit will transmit sound and image
to parent unit.
!
If parent unit needs to talk back to baby unit, press PTT key on parent
unit to talk.
!
Release PTT key after talking. The parent unit will be returned to
receiving status.
VOX
When turning on VOX, transmission will be activated ONLY
if sound is detected by Baby unit. LCD screen would be
turned off if no sound is detected within 30 seconds. Once
the sound is detected, it will automatically turn on the LCD
screen. This is a power saving feature.
Infrared Night Vision
When Baby unit is placed in dark environment, parent
unit will be switched to Night Vision mode
automatically. At this circumstance, parent unit can
also receive image and sound. The image shows in
black & white (See picture)
Out of Range Alert.
Under the following conditions, the parent unit will emit the “out of
range” alert.
!
Baby unit is turned off.
!
The units are detected out of communication range.
!
Baby unit is in low power.
Antenna
If parent unit is too far from baby unit and can't receive
good image from baby unit, there is an antenna to
help strength the signal. (See picture)
10
Lens & Camera Adjustment
!
If the video of the mother unit is
blurred, adjust the lens switch of the
baby unit until the video reaches the
best image quality. (See picture)
!
Adjust the Camera Rotation Handle
to the desired viewing angle.
Location and Set Up
You can position and adjust the Baby Unit in a variety of ways to provide
the best view of your baby. To optimize the performance, position the
monitor unit 3 ft (1m) away from the baby.
Set up removable Mounting Clip (optional)
The Baby Unit can be clip on the table edge by setting up the removable
mounting clip. After inserting the mounting clip at the base bottom, the
user can easily fix the Baby Unit into a different location. Setting and
disassembly method are shown in the figure below.
Setting
Disassembly
Table Edge
Wall Mount
User can mount the baby unit on the wall or ceiling using the wall mount hole.
wall mount hole
On the wall
11
Maintenance Notice
3 AAA rechargeable batteries are pre-installed into the parent unit which
can work for around 500 charge and discharge cycles. When the parent
unit can only work for a short time after fully charged, you need to replace
the batteries. Please replace with the same model of rechargeable
batteries from the distributor Easy At Home Medical LLC. (Model No.:BT100-AC, not for free) or equivalent for parent unit. It is not recommended
to use non-rechargeable batteries for environment protection sake.
CAUSION
!
Dispose of the batteries safely according to relevant local regulations.
!
Never charge non-rechargeable batteries, or it'll cause fire and major
damage to you.
How To Replace the Rechargeable Batteries
!
Remove screw by a screwdriver.
!
Open the battery compartment cover.
!
Insert 3 AAA rechargeable (Model No.:BT-100-AC or
equivalent) into the Parent unit according to the polarity
illustrated in the battery compartment.
Press down the screw and screw it up again.
!
Parent Unit
1
3
2
12
4
Trouble Shootin
Problem
Power indicator
LED does not
light up
Possible Cause
1. Unit is not turned on.
2. Power is switched off
3. Batteries may be used up
4. AC Adaptor not properly
connected.
No image or
sound , or image
blurred
1. Wrong brightness level
2. Video VOX is on but no
sound is received.
3. Low volume level
4. Signal interference due to
other household appliance
such as cordless or cellular
telephone and etc.
Image flickers
2. Make sure that power
outlet is turned on.
3. Replace new batteries
4. Check AC Adaptor jack-tosocket and plug-to-outlet
nnections.
1. Adjust the brightness to the
desired level.
2. Press any key on the Parent
unit to activate parent unit,
select VOX Off, to give a
sound to baby unit.
3. Adjust volume level to the
desired level.
4. Press the LINK key of baby
unit and select pairing option
in main menu of parent unit
to scan the channel.
1. Object is too close to the
Baby Unit.
1. Remove objects from the
Baby Unit at about 1m.
2. Baby or Parent Unit is
close to magnetic objects.
2. Test reception by moving
the Baby Unit and / or Parent
Unit to different locations
throughout the house.
3. Signal interference due to
other monitors, cordless or
cellular telephones etc.
Audio feedback
Solution
1. Slide the ON/OFF switch
to the “ON” position
1. Two units are too close
2. Volume is too high.
13
3. Press the LINK key of baby
unit and select pairing option
in main menu of parent unit
to scan the channel.. Identify
and eliminate the source of
interference.
1. Keep distance between
two units at about 1m
2. Lower the volume
Dark image
at night
1. Power is switched off
2. Batteries may be used up
3. Brightness level is too
high / low
1. Check the Baby Unit and/or
Parent Unit power indicator.
Check the connection of the
adaptor and the Parent unit.
2. Replace new batteries.
3. Adjust the Exposure level
Lose Link
(No signal)
1. Baby unit is turned off.
1. Turn on the Baby unit.
2. The units are detected out
of communication range
2. Ensure both units are in the
communication range.
3. Baby unit is in low power.
3. Replace new batteries or
operate by the supplied
adaptor.
Technical Specification
Parent Unit
!
Operation voltage: DC 5.5V 800mA or 3 x “AAA” rechargeable/ alkaline
batteries
!
Temperature Range : 0℃~40℃ (32-104℉)
!
Power consumption : ≤4W
Operation Frequency: 2.4GHz~2.4835GHz
!
Max Range (clear line of sight) : up to 250m or 820ft(in open area)
!
Resolution : 32 x 240 Pixel
!
Image Speed : > 12 films/second
!
LCD : 3.5” Color LCD
!
Size of Hand Held : 120 x 28 x 90 mm
Baby Unit
!
Operation voltage : DC5.5V 800mA
!
Power Output : 20 dBm
!
Temperature Range : 0℃~40℃ (32-104℉)
!
Power consumption : ≤4W
Operation Frequency : 2.4GHz~2.4835GHz
!
Mic Sensitivity : 1-2 m (3.5-6.5ft)
!
Size of Baby Unit : 129 x 88 x 83mm
!
Object Distance : 1-2m (3.5-6.5ft)
14
FCC Statement:
This device complies with part 15 of the FCC Rules. Operation is subject
to the following two conditions: (1) This device may not cause harmful
interference, and (2) this device must accept any interference received,
including interference that may cause undesired operation.
Note: This equipment has been tested and found to comply with the
limits for a Class B digital device, pursuant to part 15 of the FCC Rules.
These limits are designed to provide reasonable protection against
harmful interference in a residential installation. This equipment
generates uses and can radiate radio frequency energy and, if not
installed and used in accordance with the instructions, may cause
harmful interference to radio communications. However, there is no
guarantee that interference will not occur in a particular installation. If this
equipment does cause harmful interference to radio or television
reception, which can be determined by turning the equipment off and on,
the user is encouraged to try to correct the interference by one or more
of the following measures:
—Reorient or relocate the receiving antenna.
—Increase the separation between the equipment and receiver.
—Connect the equipment into an outlet on a circuit different from that to
which the receiver is connected.
—Consult the dealer or an experienced radio/TV technician for help.
Any Changes or modifications not expressly approved by the party
responsible for compliance could void the user’s authority to operate the
equipment.
FCC Radiation Exposure Statement:
This equipment complies with FCC radiation exposure limits set forth for
an uncontrolled environment.
This equipment should be installed and operated with minimum distance
20cm between the radiator & your body.
This transmitter must not be co-located or operating in conjunction with
any other antenna or transmitter.
The End
15
Easy At Home Medical, LLC
Any questions, please call toll-free 1-855-822-6999
M-F 9:00 a.m. - 5:00 p.m. Central Time
E-mail: [email protected]
Web-site: www.easyathometesting.com