1
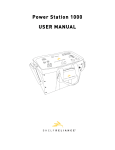
T1 Battery Floor Scrubber English EN Operator Manual Models: 9008636 - T1, AGM Battery 9008639 - T1, Lithium--ion Battery 9008591 Rev. 00 (03-- 2011) *9008591* www.tennantco.com Home Find... Go To.. EN OPERATION This manual is furnished with each new model. It provides necessary operation and maintenance instructions. Read this manual completely and understand the machine before operating or servicing it. This machine will provide excellent service. However, the best results will be obtained at minimum costs if: S The machine is operated with reasonable care according to instructions provided. Model No. -Serial No. -- Sales Rep. phone no. -- machine maintenance instructions provided. Customer Number -- S The machine is maintained with manufacturer--supplied or equivalent parts. Installation Date -- Use the Parts Manual to order replacement parts. UNCRATING MACHINE: Carefully check carton for signs of damage. Report damages at once to carrier. PROTECT THE ENVIRONMENT Please dispose of packaging materials and old machine components in an environmentally safe way according to local waste disposal regulations. Always remember to recycle. DECLARATION OF CONFORMITY FOR MACHINERY (according to Annex II A of the Machinery Directive) Machine Type -- Battery Floor Scrubber No.: 9008636, 9008639 This machine is in conformity with the following directives and standards: S Machinery Directive: 2006/42/EC S EMC Directive: 2004/108/EC S Harmonized Standards: EN ISO 14121--1, EN 1037, EN 60335--1, EN 60204--1, EN ISO 13849--1, EN ISO 13849--2, EN 60529, EN ISO 4413, EN 349, EN 55012, EN 61000--6--2, EN ISO 11201, EN ISO 4871, EN ISO 3744, EN ISO 13059, EN ISO 3450, EN 60335--2--72. TENNANT Europe Uden Industrielaan 6 5405 AB P.O. Box 6 5400 AA Uden -- The Netherlands Uden, 25/1/2010 Please fill out at time of installation for future reference. Sales Rep. -- S The machine is maintained regularly - per the EN MACHINE DATA Richard van den Hoogen Sr. Product Regulatory Engineer TABLE OF CONTENTS SAFETY PRECAUTIONS . . . . . . . . . . . . . . . . . . . . 3 SAFETY LABELS . . . . . . . . . . . . . . . . . . . . . . . . . . . 4 MACHINE COMPONENTS . . . . . . . . . . . . . . . . . . . 5 MACHINE SETUP . . . . . . . . . . . . . . . . . . . . . . . . . . INSTALLING BRUSH . . . . . . . . . . . . . . . . . . . . FILLING SOLUTION TANK . . . . . . . . . . . . . . . 6 6 6 MACHINE OPERATION . . . . . . . . . . . . . . . . . . . . . PRE--OPERATION . . . . . . . . . . . . . . . . . . . . . . . SCRUBBING FLOORS . . . . . . . . . . . . . . . . . . . BATTERY DISCHARGE INDICATOR . . . . . . . CIRCUIT BREAKERS . . . . . . . . . . . . . . . . . . . . HOUR METER . . . . . . . . . . . . . . . . . . . . . . . . . . 7 7 7 9 9 9 BATTERY . . . . . . . . . . . . . . . . . . . . . . . . . . . . . . . . . . CHARGING BATTERY: . . . . . . . . . . . . . . . . . . . REPLACING BATTERY: . . . . . . . . . . . . . . . . . . 9 10 11 MACHINE MAINTENANCE . . . . . . . . . . . . . . . . . . AFTER EACH USE . . . . . . . . . . . . . . . . . . . . . . AFTER WEEKLY USE . . . . . . . . . . . . . . . . . . . VACUUM HOSE MAINTENANCE . . . . . . . . . . SQUEEGEE BLADE REPLACEMENT . . . . . . 12 12 12 13 14 TRANSPORTING MACHINE . . . . . . . . . . . . . . . . . 14 STORING MACHINE . . . . . . . . . . . . . . . . . . . . . . . . 14 TROUBLESHOOTING . . . . . . . . . . . . . . . . . . . . . . . 15 MACHINE SPECIFICATIONS . . . . . . . . . . . . . . . . 16 MACHINE DIMENSIONS . . . . . . . . . . . . . . . . . . . . 16 TENNANT N.V. Industrielaan 6 5405 AB P.O. Box 6 5400 AA Uden--The Netherlands [email protected] www.tennantco.com Specifications and parts are subject to change without notice. Original Instructions. Copyright E 2011 Tennant Company. All rights reserved. 2 Tennant T1 Battery (03--11) Home Find... Go To.. OPERATION EN FOR SAFETY: SAFETY PRECAUTIONS This machine is intended for commercial use. It is designed exclusively to scrub hard floors in an indoor environment and is not constructed for any other use. Use only recommended brushes and commercially approved floor cleaners intended for machine application. All operators must read, understand and practice the following safety precautions. The following warning alert symbol and the “FOR SAFETY” heading are used throughout this manual as indicated in their description: WARNING: To warn of hazards or unsafe practices which could result in severe personal injury or death. FOR SAFETY: To identify actions which must be followed for safe operation of equipment. The following safety precautions signal potentially dangerous conditions to the operator or equipment. WARNING: Fire Or Explosion Hazard ----- Do Not Use or Pick Up Flammable Materials Only Use Commercially Available Floor Cleaners Intended for Machine Application. Do Not Use Near Flammable Liquids, Vapors or Combustible Dusts. Batteries Emit Hydrogen Gases. Keep Machine Away from Heat, Sparks and Open Flame. This machine is not equipped with explosion proof motors. The electric motors will spark upon start up and during operation which could cause a flash fire or explosion if machine is used in an area where flammable vapors/liquids or combustible dusts are present. WARNING: Electrical Hazard -- Do Not Charge Batteries with Damaged Cord. Do Not Modify Plug. If the charger cord is damaged or broken, it must be replaced by the manufacturer or its service agent or a similarly qualified person in order to avoid a hazard. -- Disconnect Battery Cable and Charger Cord Before Servicing. WARNING: Spinning Brush. Keep Hands Away. WARNING: Electrical Shock Hazard. Do Not Use Outdoors. Do Not Expose To Rain/Moisture. Store Indoors. 1. Do not operate machine: -- Unless trained and authorized. -- Unless operator manual is read and understood. -- Unless mentally and physically capable of following machine instructions. -- In an area where flammable vapors/liquids or combustible dusts are present. -- Outdoors. -- If not in proper operating condition. -- If battery emits an unusual odor. Move machine to a ventilated area and contact Customer Service immediately. -- If battery is leaking any substance. Avoid contact with battery substance and contact Customer Service immediately. -- If battery becomes excessively hot. Disconnect battery charger. Move machine to a ventilated area and contact Customer Service immediately. 2. Before operating machine: -- Make sure all safety devices are in place and operate properly. -- Wear non--slip shoes. -- Follow safety guidelines concerning wet floors. -- Follow mixing, handling and disposal instructions on chemical containers. 3. When operating machine: -- Report machine damage or faulty operation immediately. -- Do not allow children to play on or around machine. -- If foam or liquid begins to leak from machine, immediately shut off machine. -- Do not operate on inclines. 4. Before leaving machine: -- Stop on level surface. -- Turn the main power switch to the off position. 5. When servicing machine: -- Stop on level surface. -- Turn the main power switch to the off position. -- Do not tilt machine back unless main power switch is turned off and tanks are empty. -- Disconnect battery connections before working on machine. -- Do not disconnect the charger’s DC cord from the machine’s receptacle when the charger is operating. Arcing may result. If the charger must be interrupted during charging, disconnect the AC power supply cord first. 3 Tennant T1 Battery (03--11) Home Find... Go To.. EN --------- OPERATION The use of incompatible battery chargers may damage battery and potentially cause a fire hazard. Wear protective gloves and eye protection when handling batteries or battery cables. Avoid contact with battery acid. Use manufacturer supplied or approved replacement parts. All repairs must be performed by a qualified service person. Avoid moving parts. Do not wear loose clothing or jewelry Do not power spray or hose off machine. Electrical malfunction may occur. Do not modify the machine from its original design. 6. When transporting machine: -- Turn the main power switch to the off position. -- Get assistance or use a mechanical lift when lifting machine. -- Do not wheel up or down stairs. -- Do not tilt on rear casters or wheels. -- Use tie--down straps to secure machine when transporting by vehicle. SAFETY LABELS The safety labels appear on the machine in the locations indicated. Replace labels if they are missing or become damaged or illegible. FOR SAFETY: Do not operate machine unless operation manual is read and understood. WARNING: Spinning Brush. Keep Hands Away. Turn Off Power Before Working On Machine. WARNING: Fire or Explosion Hazard. Do not use flammable liquids. Do not pick up flammable liquids WARNING: Electrical Hazard. Do not use with damaged cord. Unplug cord before servicing. Lithium--ion Battery Model FOR SAFETY: When servicing machine, the use of incompatible battery chargers may damage battery and potentially cause a fire hazard. 4 Tennant T1 Battery (03--11) Home Find... Go To.. OPERATION EN MACHINE COMPONENTS 2 1 3 5 4 15 13 14 16 18 6 20 17 21 19 26 7 8 22 25 9 10 11 1. 2. 3. 4. 5. 6. 7. 8. 9. 10. 11. 12. 13. Adjustable Control Handle Main Power ON/OFF Switch Battery Discharge Indicator Start Triggers Handle Adjustment Lever Battery Charger Connector Vacuum Power ON/OFF Switch Battery Compartment Transport Release Pedal Scrub Head Lift Pedal Curb Climbing Wheels Main Wheels Tank Cover 23 24 12 14. 15. 16. 17. 18. 19. 20. 21. 22. 23. 24. 25. 26. Recovery Window Vacuum Shut--Off Float Solution Tank Screen Brush Circuit Breaker Button Vacuum Circuit Breaker Button Recovery Tank Solution Tank Hour meter Vacuum Intake Screen Scrub Head Squeegee Blades Brush Housing Bumper Wheel MACHINE OPERATION SYMBOLS Power On Battery Discharge Indicator Power Off Vacuum Vacuum Circuit Breaker Brush Circuit Breaker Battery Charging 2% (1) Maximum Grade Level 5 Tennant T1 Battery (03--11) Home Find... Go To.. EN OPERATION 5. Connect the idler plate to the brush and reinstall the idler plate. Make sure the idler plate tabs engage the brush base and that the locking knob is secure (Figure 4). MACHINE SETUP INSTALLING BRUSH 1. Turn the main power switch to the (O) off position. FOR SAFETY: Before servicing machine turn the main power switch to the off position. 2. Raise the scrub head to the transport position by stepping on the scrub head lift pedal (Figure 1). FIG. 4 NOTE: If storing the machine for an extended period, raise the scrub head to the transport position to prevent a flat spot developing on the brush. FILLING SOLUTION TANK 1. Remove the solution tank from machine and carry tank to water source (Figure 5). FIG. 1 3. Remove the brush idler plate from the brush base. Turn the idler plate locking knob counter--clockwise to remove (Figure 2). FIG. 5 2. Fill the solution tank with 9.5 L of clean water (50C maximum temperature). Do not fill beyond the “MAX” fill label (Figure 6). Partially fill if unable to lift a full tank. A full tank weighs 12 kg. FIG. 2 4. Connect the slotted end of the brush to the drive hub (Figure 3). FIG. 6 ATTENTION: When refilling solution tank always empty the recovery tank. FIG. 3 6 Tennant T1 Battery (03--11) Home Find... Go To.. OPERATION ATTENTION: Do not use the recovery tank to fill the solution tank. Dirt from the recovery tank may cause damage to the solution pump. 3. Pour an approved low foaming cleaning detergent into the solution tank according to the mixing instructions on the bottle. ATTENTION: Only use approved cleaning detergents. Machine damage due to improper detergent usage will void the manufacturer’s warranty. Contact your dealer for recommended cleaning detergents. FOR SAFETY: Follow mixing, handling and disposal instructions on detergent containers. EN SCRUBBING FLOORS FOR SAFETY: Before Operating machine, follow safety guidelines concerning wet floors. WARNING: Fire or Explosion Hazard, Do Not Use or Pick Up Flammable Materials. WARNING: Spinning Brush. Keep Hands Away. 1. Pull the handle adjustment lever and adjust the handle to a comfortable operating height (Figure 8). Release the lever to lock the position. WARNING: Fire Or Explosion Hazard. Do Not Use Flammable Materials. Only Use Commercially Available Floor Cleaners intended for machine application. 4. Replace the solution tank on the machine. Submerge the solution tank screen into solution and close the cover (Figure 7). ATTENTION: Be careful to not splash water on the vacuum motor intake screen. Vacuum motor failure may result. FIG. 8 2. Lower the scrub head to the floor by stepping on the transport release pedal (Figure 9). FIG. 7 MACHINE OPERATION FIG. 9 FOR SAFETY: Do not operate machine unless operator manual is read and understood. 3. Press the main power switch to the on ( I ) position (Figure 10). PRE--OPERATION 1. IMPORTANT: To prevent vacuum system from clogging, sweep and dust--mop floor. 2. Make sure battery is charged. 3. Check that the brush and squeegee blades are installed. FIG. 10 7 Tennant T1 Battery (03--11) Home Find... Go To.. EN OPERATION 4. Press the vacuum switch to the on ( I ) position (Figure 11). ATTENTION: Check for excessive foam in the recovery tank. Foam may not activate the shut--off float. Foam intake may damage machine and void the manufacturer’s warranty. FOR SAFETY: When operating machine, if foam or liquid begins to leak from machine, immediately shut off machine. 8. For heavily soiled areas, use the double scrub method. First scrub the soiled area with the vacuum switch turned off then scrub the area a second time with vacuum switch turned on (Figure 15). FOR SAFETY: Before Operating machine, follow safety guidelines concerning wet floors. FIG. 11 5. To begin scrubbing, pull the start triggers and push or pull the machine in either direction (Figure 12). FIG. 15 FIG. 12 9. To transport machine from one room to another, raise the scrub head to the transport position and push the machine forward (Figure 16). 6. To stop scrubbing, release the triggers and continue to move the machine to pick up all solution. 7. When scrubbing, view the water pickup from the recovery window (Figure 13). When the water pickup stops, stop scrubbing and empty the recovery tank. DO NOT tilt machine on the rear wheels. Only use rear wheels to transport machine up and down a curb. ATTENTION: When refilling solution tank always empty the recovery tank. NOTE: To protect the vacuum motor from potential damage, the cover is equipped with a vacuum shut--off float that will stop water pickup when the recovery tank becomes full (Figure 14). A sudden change in vacuum motor sound will occur when this happens. FIG. 16 Curb FIG. 13 FIG. 14 FOR SAFETY: When transporting machine, do not wheel up or down stairs. Get assistance or use a mechanical lift when lifting machine. 8 Tennant T1 Battery (03--11) Home Find... Go To.. OPERATION EN BATTERY DISCHARGE INDICATOR HOUR METER The battery discharge indicator displays the charge level of the battery (Figure 17). The hour meter records the number of total hours the machine has been powered on. Use the hour meter to record machine use and service history (Figure 19). When the discharge level reaches the red zone, the machine will automatically shut down (Figure 17). Recharge battery at this time (See CHARGING BATTERY). To prolong battery life, do not leave battery discharged for a lengthy period. FIG. 19 BATTERY Your machine is equipped with either a 12V lithium--ion battery or a 12V sealed AGM lead acid battery. The battery does not require any maintenance other than routine charging. FIG. 17 CIRCUIT BREAKERS The machine is equipped with two resettable circuit breakers to protect the brush and vacuum motors from damage (Figure 18). If the brush or vacuum become obstructed, the circuit breaker will trip. To reset circuit breaker, turn off the main power switch, remove the obstruction then reset the circuit breaker button (Figure 18). If the circuit breaker does not reset immediately, allow the machine to cool. FOR SAFETY: Before removing obstruction turn the main power switch to the off position. 12V AGM Sealed Lead Acid Battery 12V Lithium--ion Battery FIG. 20 To convert a machine with an AGM battery to a Lithium--ion battery or a Lithium--ion battery to an AGM battery, a battery conversion kit is required. Do not exchange battery types unless conversion kit is installed, machine and battery damage may result. 9008689 -- AGM to Lithium--ion Battery Conversion Kit 9008688 -- Lithium--ion to AGM Battery Conversion Kit FIG. 18 9 Tennant T1 Battery (03--11) Home Find... Go To.. EN OPERATION 5. The charger will start automatically and begin the charging process until battery is fully charged. The charger’s three LEDs will display solid when fully charged. CHARGING BATTERY: Only use the battery charger that is approved and supplied by Tennant (Fig. 21). FOR SAFETY: When servicing machine, the use of incompatible battery chargers may damage battery and potentially cause a fire hazard. Maximum Charging Cycle: 3 hours -- Lithium--ion battery 8 hours -- AGM battery NOTE: If charger is left plugged in after charging is complete, the charger will go into a maintenance mode and keep battery fully charged. 6. After charging cycle has completed, turn charger off by disconnecting the AC power supply cord from electrical outlet. Then unplug DC charger plug from machine (Figure 23). Lithium--ion Battery Model -AGM Battery Model -HB250--12 Battery Charger CBHD1--12 Battery Charger FIG. 21 For battery charger operating instructions, refer to the User’s Manual supplied with the battery charger. The charger’s User’s Manual should remain with the battery charger at all times. For Lithium--ion battery models, recharge battery after every use even if only slightly discharged. For AGM battery models, only recharge battery after 20 minutes of use or more. This will prolong the life of the battery. FOR SAFETY: When servicing machine, do not disconnect the charger’s DC cord from the machine’s receptacle when the charger is operating. Arcing may result. If the charger must be interrupted during charging, disconnect the AC power supply cord first. 7. Replace the charging receptacle cover on the machine (Figure 23). FOR SAFETY: Do not operate machine if battery emits an unusual odor, leaks any substance or becomes excessively hot. To Charge Battery: 1. Transport the machine to a ventilated area. FIG. 23 2. Park the machine on a flat, dry surface and turn the main power switch to the off position. 3. Remove the charging receptacle cover at the rear of the machine and plug the charger’s DC cord into the receptacle (Figure 22). FIG. 22 4. Connect the charger’s AC power supply plug into a properly grounded receptacle. NOTE: The machine will not operate once the battery charger is connected. 10 Tennant T1 Battery (03--11) Home Find... Go To.. OPERATION REPLACING BATTERY: FOR SAFETY: When servicing machine, wear protective gloves and eye protection when handling batteries and battery cables. Avoid contact with battery acid. NOTE: Make sure the battery type is the same as the one you are replacing. To convert from an AGM to Lithium--ion or from Lithium--ion to AGM a Battery Conversion Kit is required. EN 4. Install new battery (Figure 25). Connect the black cables to negative (--) terminal first then red cables to positive (+) terminal. Secure battery with support strap. On a lithium--ion battery, connect the female plug from battery to machine harness. This plug is the communication cable to the battery management system. The second plug (male) on the battery is not used. AGM Battery 1. Park the machine on a level surface and turn the main power switch to the off position. 2. Remove battery compartment cover from machine by removing two screws at bottom of cover (Fig. 24). (+) (-- ) Lithium--ion Battery (-- ) (+) FIG. 24 3. Unfasten the battery support strap. Disconnect the red positive (+) cable first then black negative (--) cable from battery. Carefully remove battery from machine. Female Plug FIG. 25 5. Dispose of old battery in an environmentally safe way according to your local regulations. Contact your local regulatory authorities for proper transporting and disposal instructions. Help preserve the environment – Recycle! 11 Tennant T1 Battery (03--11) Home Find... Go To.. EN OPERATION MACHINE MAINTENANCE To keep the machine in good working condition, simply follow the machine’s maintenance procedures. FOR SAFETY: Before performing any maintenance procedures turn the main power switch to the off position. AFTER WEEKLY USE 1. Clean the vacuum shut--off float with damp cloth (Figure 29) and remove any debris buildup from vacuum intake screen (Figure 30). ATTENTION: Be careful not to get water in vacuum intake screen, vacuum damage may result. FOR SAFETY: When servicing machine, all repairs must be performed by a qualified service person. AFTER EACH USE 1. Empty the recovery tank and thoroughly rinse with clean water (Figure 26). FIG. 29 FIG. 30 2. Remove the brush and check for entangled debris (Figure 31). Replace brush if damaged or worn. FIG. 26 2. Recharge the battery (See CHARGING BATTERY) (Figure 27). FIG. 31 3. Tilt the machine back and clean the underside of the scrub head (Figure 32). FOR SAFETY: Before tilting machine, turn the main power switch to the off position and empty tanks. FIG. 27 3. Raise the scrub head to the transport position to prevent flat spot on brush (Figure 28). FIG. 32 FIG. 28 12 Tennant T1 Battery (03--11) Home Find... Go To.. OPERATION 4. Wipe the squeegee blades (Figure 33). Replace the blades if worn or damaged. Remove any clogged debris inside both inlet openings. FOR SAFETY: Before tilting machine, turn the main power switch to the off position and empty tanks. EN VACUUM HOSE MAINTENANCE To prevent debris buildup in vacuum system, flush vacuum hose as described below: 1. Place machine over floor drain and turn the main power switch to the off position (Figure 36). Inlet Openings FIG. 33 5. Clean the machine with an all purpose cleaner and damp cloth (Figure 34). FOR SAFETY: When cleaning machine, do not power spray or hose off machine. Electrical malfunction may occur. FIG. 36 2. Place a dry towel over the vacuum intake screen to prevent water from entering vacuum motor (Figure 37). 3. With water turned off, insert a garden hose into the vacuum intake hose as shown (Figure 38). FIG. 34 6. Clean the solution hose screen (Figure 35). FIG. 37 FIG. 38 4. Slowly turn on water to prevent back--splash if vacuum system is clogged. Increase water pressure to flush out debris buildup. NOTE: The vacuum hose is Y--shaped. Make sure to flush out both sides (Figure 39). FIG. 35 FIG. 39 13 Tennant T1 Battery (03--11) Home Find... Go To.. EN OPERATION SQUEEGEE BLADE REPLACEMENT TRANSPORTING MACHINE Tilt the machine back to access the squeegee blades. FOR SAFETY: Before tilting machine, turn the main power switch to the off position and empty tanks. To remove the squeegee blades, lift the blade retainer clip and pull the blade from the channel (Figure 40). Retainer Clip Before transporting machine, empty water from tanks and turn the main power switch to the off position. FOR SAFETY: When transporting machine, get assistance or use a mechanical lift when lifting machine. FOR SAFETY: When transporting machine, use tie--down straps to secure machine. To wheel machine from room to room, raise the scrub head to the transport position and push the machine forward (Figure 43). DO NOT tilt machine on the rear wheels. Only use rear wheels to transport machine up and down a curb. FIG. 40 For easy blade installation, the squeegee blades are color coded to match the scrub head blade channel (Figure 41). Gray -- Outside Blade FIG. 43 Gray Curb Black Black -- Inside Blade FIG. 41 To install blade, slide each blade into the appropriate channel until retainer clip engages blade (Figure 42). The squeegee blade ribs should face away from each other. FOR SAFETY: When transporting machine, do not tilt on rear wheels and do not wheel up or down stairs. Get assistance or use a mechanical lift when lifting machine. STORING MACHINE Before storing machine, empty tanks and fully charge the battery. Store the machine in an open, well--ventilated, dry and clean area less than 45C in the upright position. Raise the scrub head to the transport position. If storing machine in freezing temperatures, make sure to purge all water from solution system. To purge water from solution system, empty solution tank, and operate the machine as normal for approximately 15 seconds. FIG. 42 WARNING: Electrical Shock Hazard. Do Not Use Outdoors. Do Not Expose To Rain/Moisture. Store Indoors. 14 Tennant T1 Battery (03--11) Home Find... Go To.. OPERATION EN TROUBLESHOOTING PROBLEM CAUSE SOLUTION Machine does not operate. Discharged battery. Charger plug is connected. Defective battery. Loose battery cable connection. Vacuum switch not activated. Tripped vacuum circuit breaker. Charge battery. Disconnect charger plug. Replace battery. Tighten connections. Turn on vacuum switch. Turn off main power switch. Remove obstruction and reset circuit breaker. Lower scrub head to floor. Empty recovery tank. Clean debris from squeegee blades and both inlet openings. Replace squeegee blades. Clean debris from shut--off float. Clean debris from intake screen. Contact Customer Service. Flush out debris buildup from vacuum hose. See MACHINE MAINTENANCE. Contact Customer Service. Turn off main power switch. Remove obstruction from brush and reset circuit breaker. Contact Customer Service. Contact Customer Service. Refill solution tank. Clean solution tank screen. Contact Customer Service. Contact Customer Service. Replace brush. Connect output plug securely. No vacuum Poor solution pickup Brush does not spin Little or no solution spray. Poor scrubbing performance. Lithium--ion charger is blinking three green LEDs AGM charger is blinking yellow Short battery run time Machine is in transport position. Recovery tank is full. Clogged squeegee blades or inlet openings. Worn or damaged squeegee blades. Clogged shut--off float. Clogged vacuum intake screen. Worn tank cover gasket. Clogged vacuum hose. Faulty vacuum motor. Tripped brush circuit breaker. Broken brush belt. Faulty brush motor Solution tank is empty. Clogged solution tank screen Clogged or defective spray tip. Faulty solution system. Worn brush. Output plug not connected to machine. Battery not fully charged. Charger AC cord not plugged into wall outlet. Defective battery or charger. Defective charger plug. Charge battery. Plug AC cord into wall outlet. Replace battery or charger. Contact Customer Service. 15 Tennant T1 Battery (03--11) Home Find... Go To.. EN OPERATION MACHINE SPECIFICATIONS MODEL T1 Battery LENGTH 695 mm with handle folded WIDTH 502 mm HEIGHT 594 mm with handle folded 965 mm with handle in working position WEIGHT 50 kg with Lithium--ion battery 57 kg with AGM battery SOLUTION TANK CAPACITY 9.5 L RECOVERY TANK CAPACITY 12.9 L PRODUCTIVITY RATE -- AVG. 719 m2/hr CLEANING PATH WIDTH 381 mm SQUEEGEE WIDTH 444 mm BRUSH PRESSURE 17 kg BRUSH MOTOR 12.8 VDC, .49 kW, 900 brush rpm VACUUM MOTOR 12.8 VDC, .38 kW, 1--stage 5.7 in WATER LIFT 305 mm Operating -- 635 mm Sealed SOLUTION PUMP 12.8 VDC, 11.9 W SOLUTION FLOW RATE 0.38 L/min BATTERY CAPACITY 12V Lithium--ion, 40Ah / 512Wh 12V AGM, 50Ah / 600Wh MACHINE RUN TIME 60 min--Lithium--ion battery, 45 min -- AGM Battery VOLTAGE 12.8 VDC TOTAL POWER CONSUMPTION 500W BATTERY CHARGER (Supplied with AGM model) 220--240 VAC, 2.4 A, 50 Hz, 14.6 VDC, 10 A output BATTERY CHARGER (Supplied with Lithium--ion model) 220--240 VAC, 2.4 A, 50 Hz, 14.6 VDC, 15 A output DECIBEL RATING AT OPERATOR’S EAR, INDOORS LEVEL OF UNCERTAINTY 68 dBA 3 dBA VIBRATIONS AT HAND CONTROLS <2.5m/s2 PROTECTION GRADE IPX3 MACHINE DIMENSIONS 695 mm 594 mm 502 mm 16 Tennant T1 Battery (03--11) Home Find... Go To..