1
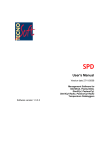
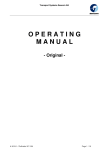
G800AV
Man. revision 1
SAVE Sampler
15.09.2013
Installation and Setting-Up Instructions
Spare Parts List
Contents:
1
Purpose of Use
2
Types and Applications
3
Installation
3.1
3.2
3.3
Choosing the mounting location
Installing the process coupling
Mounting SAVE
4
Sampling
5
Maintenance
6
Structural drawings, parts list and
spare parts list
Appendix: Technical Specifications G800
We reserve the right for technical modifications without prior notice.
Hastelloy® is the registered trademark of Haynes International.
Teflon® E.I. is the registered trademark du Pont de Nemours & Co.
Viton® is the registered trademark DuPont Down Elastomer.
DOCUMENTS
Technical Specifications: G800
Installation and Setting-Up Instructions: G800AV
Satron Instruments Inc.
P.O.Box 22, FIN-33901 Tampere, Finland
TEL.INT. +358 207 464 800
Telefax +358 207 464 801
www.satron.com, [email protected]
1
G800AV
Man. revision 1
SAVE Sampler
15.09.2013
1. Purpose of use:
SAVE has been designed for the sampling of pulp slurry.
SAVE is suitable for all chemical and mechanical pulps
and recycled fibre pulps. SAVE is installed directly on the
process pipe.
Material options for parts in constant contact with
process medium include AISI316L (EN 1.4404),
Hastelloy C276 (EN 2.4819) and Titanium (EN
3.7035). The flange-mounted SAVE FA has a
fibreglass-reinforced plastic process coupling.
2. Types and applications
Refer to the selection chart in Technical Specifications.
The construction of different types is shown in Figures
6-1 ...6-4 in Section 6.
AISI316L suits a majority of applications.
Titanium is recommended for bleashing stages
that use chlorine or chlorine compounds. Peroxide
bleaching stages and applications where free
chlorine gas may occur are an exception. Hastelloy
C276 should be used in such applications.
SAVE is available in three types, depending on the
mounting method: clamp-, thread- and flange-mounted
types. All types are available with either manual or
pneumatic cylinder, see Figures 6-1 and 6-2.
3. Installation
3.1 Choosing the mounting location
SAVE's mounting location is selected as shown in
Figures 3-1a, b and c. When installed in this way,
the delay between consistency transmitter and
sampling point will be as small as possible and a
representative sample will be obtained from the
pipe.
When SAVE is installed immediately after stock
pump, it should be mounted on the side shown in
Figure 3-1a a relative to the position of the pump.
There should be a 45° - degree angle from the
pump shaft on the side where the pulp rushes from
the pump.
Figures 6-1 and 6-2 show clamp-mounted SAVE types
with NS 40 flanges. Figure 6-3 shows SAVE TA with 1½NPT thread mounting.
The SAVE FA with fibreglass-reinforced plastic coupling,
Figure 6-4, has been designed for mounting on a
fibreglass-reinforced plastic process pipe.
Manually operated SAVE is suitable for easily. The
pneumatically operated type is also suitable for locations
of difficult access. In this case the sample is run from
SAVE to a sample receptacle through a sufficiently long
discharge tube or pipe. The pneumatically operated
sampler is controlled with a control valve mounted
close to the sampler or through remote control. The
pneumatically operated type can also be used for
automatic sampling.
1)
Refer to consistency transmitter's installation
instructions.
SAVE
pneumatic
sampler
400
Flushing
water
Consistency
transmitter
Consistency
transmitter
SAVE
manual
sampler
Discharge pipe
Funnel
Flushing
water
Discharge pipe
Flow direction
Funnel
Figure 3-1a Mounting pneumatic SAVE on vertical
pipe
Figure 3-1b
2
Mounting manual SAVE on vertical
pipe
G800AV
Man. revision 1
SAVE Sampler
15.09.2013
3.2.2
L min
1)
Consistency
Transmitter on
opposite side
400 mm
Process coupling with 1½ - 11½ NPS,
Figure 3-2b
Make a hole with V-bevelling on the process pipe.
The diameter of the hole should be approx. 1 mm
larger than the coupling's outside diameter ØD.
Recommendable length of the coupling is L = 35
mm. Weld coupling as shown in Figure 3-2b.
Horizontal
pipe
SAVE
Pneumatic
Sampler
L
Verical
pipe
Refer to consistency transmitter's installation
instructions.
3.2 Installing the process coupling
The safety requirements should be observed when
installing process couplings. The installation should be
performed by a skilled fitter.
ØD
1)
Mounting SAVE on horizontal pipe after
consistency transmitter
1½ - 11½ NPS
Figure 3-1c
Figure 3-2b Installing process coupling, SAVE TA
3.2.1 Coupling for clamp mounting, Figure 3-2a
Make a 50 mm hole with V-bevelling on the process pipe.
Place the coupling in the hole so that edges A are on
a revel with the pipe's inner surface (Note: the process
coupling's straight edge need not be machined to curve
shape). Weld the coupling as shown in Figure 3-2a.
3.2.3 Fibreglass-reinforced plastic flanged
coupling, Figure 3-2c
Make in the fibreglass-reiforced plastic process pipe
a hole to suit the coupling. Laminated the coupling
in position as shown in Figure 3-2c.
25
25
Figure 3-2a Installing process coupling, SAVE SA
Ø150
A
Ø110
Ø40
Ø54
Ø40
Ø49
A
Ø18
(4x90°)
Laminated
Figure 3-2c Installing process coupling, SAVE FA
3
G800AV
Man. revision 1
SAVE Sampler
12
15
7
15.09.2013
In this way the sample can be taken out without
splashing. If SAVE is installed at the location with difficult
access e.g. at a great height in the pipework, you have to
use a longer discharge tube or metal pipe (Figure 3-3).
Install a funnel below the sampling point. To prevent
overflowing pulp from getting to the floor, install a pipe
having at least 60 mm diameter from the funnel to sewer.
25
30
33
3.3.1 Pneumatic installations (function AD)
27
Pneumatic connections are made as shown in Figure 3-3
, connections G1/8.
The manually operated compressed air valve (27) is
mounted with two M6 screws on wall or mounting bracket.
1
2
4
32
34
20
3.3.2 Connection for water flushing (33),
Figure 3-3
32
SAVE has an G¼, flushing connector that allows the
connection of a pressure-water pipe equipped with a
shutoff valve.
Flushing should be used to ensure a representative
sample and to prevent clogging. Flushing may only be
omitted in cases where pulp will not dry and accumulate
inside SAVE and where representativeness is not such a
critical factor.
If SAVE's material is Titaani or Hastelloy, flushing should
always be used to avoid corrosion.
31
7.
12.
15.
20.
25.
27.
30.
31.
32.
33.
34.
Stop nut
Mounting clamp
Process coupling
Discharge tube
Actuating cylinder
Manually operated compressed air valve
Valve OPEN / CLOSED detector assy 1)
Overflow tunnel 2)
Water valve 1)
Water flushing connection
Water pipe 2)
1)
2)
3.3.3 Closed/Open detector (30), Figure 3-3
SAVE function AD is also supplied with a pressure switch
that provides a binary signal to the system from sampling
moment.
4
4.1
Adjust the stop nut (7, 14 mm jaw width, Figure 3-3, 6-1,
6-2 and 6-3) to adjust the valve stroke for1.0 to 1.5 l/s
sample discharge rate. If the valve stem is adjusted for
maximum opening, the discharge rate may also be less
than 1 l/s.
Is supplied on special order
Not supplied with SAVE
4.2
General instructions
Use at least 1-litre sample receptacles equipped with
cover. Transport the receptacles in a basket suitable
for the purpose. Before beginning to take consistency
samples, make sure that consistency level stays as stable
as possible.
To get representative average consistency sample
from the process, we recommend that you take 3 to 5
samples at e.g. 30 second intervals. The laboratory will
then analyze the consistency of each sample separately.
Another method to obtain a good average consistency
sample is to run out 5 to 10 litres of pulp at a time and
take a sample from this amount for laboratory analysis
in accordance with the TAPPI, T240 standard. (The pulp
should be well mixed when taking the sample).
Figure 3-3 Mounting SAVE with pneumatic
cylinder (Function AD)
3.3
Sampling
Preparing SAVE
Mounting SAVE
SAVE SA
First place the PTFE coupling seal in its groove. Then mount
SAVE SA with clamp (12) as shown in Figures 3-3, 6-1 and 6-2.
Apply 6,5Nm force to tighten the screws.
SAVE TA
Apply locking medium (e.g. Loctite 572) to SAVE TA's thread.
Then screw SAVE by hand into coupling so that the discharge
tube will be downwards.
SAVE FA (with plastic process coupling)
4.3
Procedure
-
Write down the consistency transmitter's output.
First allow some of the sample to run past the
reseptacle.
Take a suitable portion of sample flow into the
receptacle, so that the receptacle is filled in a
controlled manner without overflowing. Do not pour
out any pulp from the receptacle, because then
would change the sample's consistency. If any
overfilling occurs, pour out the entire sample and
take a new sample
Flush SAVE
-
Use four M16 screws to mount SAVE FA with PTFE seal. Be
careful not to tighten the screws excessively.
Using sample discharge tube (or pipe)
(20) in Figures 3-3, 6-1, 6-2 and 6-3
Attach the supplied plastic discharge tube with hose clamps as
shown in figures.
4
G800AV
Man. revision 1
SAVE Sampler
-
15.09.2013
5. Maintenance
Put cover on the sample receptacles and take
the reseptacles to laboratory for consistency
analysis.
Perform consistency analysis in accordance
with mill-specific instructions or general
standard (e.g. TAPPI, T240) . If the pulp
contains fillers, also perform ash analysis e.g.
in accordance with TAPPI T211.
SAVE does not require regular servicing.
Replacing valve shaft (4)
- SAVE function MD, Figures 6-1 and 6-3
Remove the pivot pin cotter (19) and pivot pin (8). Make sure that
the spring (16) and guide sleeves (5) come out in a controlled
manner. Unscrew the stop nut (7). Replace the valve shaft with a
new one.
4.4 Automatic sample taking
SAVE (function AD) can be used for automatic
sample taking, for instance when wanting to observe
the average consistency over a specific period of
time from n samples. SAVE's discharge tube is then
directed to a large-volume receptacle equipped with a
cover.
Note: Flushing cannot be used in this case. However,
the pulp will not dry in the channels because the end of
the discharge tube is in a recptacle has a cover, and
even under the surface of the sample pulp.
The sampling times and sample volumes can be
determined with a local timer through a solenoid valve
or by means of remote control.
- SAVE function AD, Figure 6-2
Heat extension nut (24) to soften the locking medium in the
thread. Then unscrew the coupier. While doing this, keep hold of
the compressed-air cylinder's piston. Avoid overheating. Unscrew
the stop nut (7). Replace the valve shaft and reassemble the
other parts. Apply locking medium (e.g. Loctite 270) to the
thread of the extension nut.
Replacing the bearing sleeve (6) and O-ring (23),
Figures 6-1, 6-2 and 6-3
With the valve shaft and compressed-air cylinder (function AD)
removed, remove the locking ring (17). Remove the bearing sleeve
and o-ring. Put in the new o-ring and bearing sleeve.
6. Structural drawings, parts list and spare parts
list
Adjustable restrictors must be used at the exhaust air
side to attenuate the plunger stroke.
Parts indicated with asterisk (*) are spare parts.
When ordering spares, please quote this document's number
G800AV 15.09.2013, the name and order number of the required
part, and the sampler's serial number.
22
5
16
7
5
17
6
23
1
13
10
19
8
3
18
9
14
12
21
2
20
11
Figure 6-1 SAVE SA 2 2 MD 0
5
15
4
G800AV
Man. revision 1
SAVE Sampler
25
26
24
15.09.2013
7
17
6
23
1
13
12
10
9
4
15
14
21
20
Figure 6-2 SAVE SA 2 2 AD 0
22
5
16
7
5
17
6
23
15
1
19
8
3
18
9
21
20
2
11
Figure 6-3 SAVE TA 2 0 MD 0
6
4
G800AV
Man. revision 1
SAVE Sampler
No.
1
1
1
1
1
1
2
3
* 4
* 4
* 4
* 4
5
* 6
7
8
9
*10
11
12
13
14
*15
*15
*15
*16
17
18
19
20
21
*22
*23
24
*25
26
*27
15.09.2013
Name
Pcs
Sampler body SAVE SA (MD)
Sampler body SAVE SA (AD)
Sampler body SAVE TA (MD)
Sampler body SAVE TA (AD)
Sampler body SAVE FA (MD)
Sampler body SAVE FA (AD)
Operating handle
Pivot pin
Valve shaft MD
Valve shaft AD
Valve shaft FA MD
Valve shaft FA AD
Guide sleeve
Bearing sleeve
Stop nut
Pivot pin
Plug G¼
Seal PTFE SAVE SA
Ball knob
Clamp DN40/44,5
Hex screw M6 x 25
Hex nut M6
Process coupling (SAVE SA)
Process coupling 1½ - 11½ NPS (SAVE TA)
Process coupling DN40 (SAVE FA)
Valve spring
Locking ring
Cotter pin 2,5 x 25 DIN94 A4
Cotter pin 1,5 x 12 DIN94 A4
Discharge tube
Hose clamp
Protective bellows
O-ring Ø10,1 x 1,6 FPM
Extension nut AD
Double acting air cylinder
Hexagon socket screw M5 x 12 DIN912 A4
Hand-controlled valve 5/2 with mounting bracket
Order number (AISI316L)
1
1
1
1
1
1
1
1
1
1
1
1
1
1
1
1
1
1
1
2
2
2
1
1
1
1
1
1
1
1
1
1
1
1
1
1
1
T1035002
T1035004
T1035005
T1035215
T1035205
T1035213
T1035221
T1035202
T1035208
T1035214
T1035204
T1035209
T1035210
81200040
82220001
54226030
56022600
T1035200
T1035224
T1035217
T1035216
57301154
57301152
T1035219
82220005
80450500
80011116
T1035222
82920005
54425011
82920007
Note!
Parts are made of AISI 316 in the table above, but the material options defined in Technical
Specifications are also possible.
60
110
60
9/14 4 pcs
Figure 6-4 Mounting bracket for hand-controlled valve
7
G800AV
Man. revision 1
SAVE Sampler
15.09.2013
WARNING!
Make sure always before installation or disconnestion
that the process pipe is empty and unpressurized!
Satron Instruments Inc.
P.O.Box 22, FIN-33901 Tampere, Finland
TEL.INT. +358 207 464 800
Telefax +358 207 464 801
www.satron.com, [email protected]
8