1
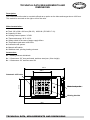
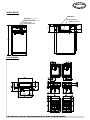
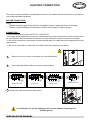
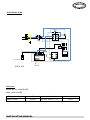
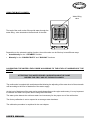
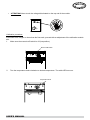
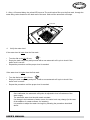
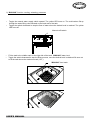
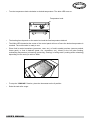
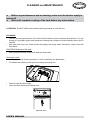
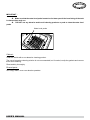
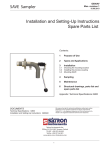
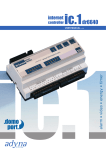
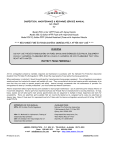
MULTI-COOKER
MODULE
LAE 010 CVA
Sommaire
FICHE TECHNIQUE, COTES ET DIMENSIONS3
MANUEL D’INSTALLATION 6
Installation et placement7
RACCORDEMENT ELECTRIQUE9
RACCORDEMENT EN EAU ET EVACUATION11
MANUEL D’UTILISATION 13
NETTOYAGE & ENTRETIEN26
Multicooker Module
LAE 010 CVA
TECHNICAL DATA SHEETS,
MEASUREMENTS AND DIMENSIONS
TECHNICAL DATA MEASUREMENTS AND
DIMENSIONS
Description:
The Lacanche multi-cooker is a module offered as an option on the hobs and ranges above 1000 mm.
This module is mounted on the right or left of the units.
Main characteristics: :
► Tank: 336 x 308 x 200 mm (GN 2/3) AISI316L (Z2 CND 17-12).
► Capacity:12 litres.
► Heating element power: 3.5 kW.
► Thermostat range: 30°C-110°C.
► Safety switch in the case of water supply failure.
► Temperature and water refill LEDs.
► Automatic refill system.
► Manual refill switch.
► Stainless steel, pivoting heating element.
Accessoires :
► 1 Heating element shield/rack.
► 1 “Gastronorm 2/3” size perforated, stainless steel pan (10cm height).
► 1 “Gastronorm 2/3” stainless steel lid.
724.3
339.5
311.5
Buse de remplissage
Automatic
refill valve
Water
level
probe
Sonde de
niveau
d’eau
Heating
Elément element
chauffant
650
TECHNICAL DATA, MEASUREMENTS AND DIMENSIONS
Range Model
Buse devalve
remplissage
Refill
VoyantLED
témoin de remplissage
Refill
Heating
element
Elément chauffant
Interrupteur
de remplissage
Manual
refill
switch manuel
Voyant témoin
Heating
LEDde mise en chauffe
Thermostatthermostat
de réglage de température
Heating
900
71
226.5
155.5
72
Water
Sonde delevel
niveauprobe
d’eau
SNACK Model
200
650
200
200
56
341
105
177
37.5
373
90
54
441
31
342
342
31
28
350
350
28
124
450
450
120
652
120
428.5
197
40
202
TECHNICAL DATA, MEASUREMENTS AND DIMENSIONS
Multicooker Module
LAE 010 CVA
INSTALLATION MANUAL
The installation must be executed according to the instructions of this notice and the local
regulations of the city/region/country where the unit is installed. The instructions contained in this
manual are destined to professional installers with a good knowledge of electrical and plumbing
installation techniques.
This manual will be handed over to the user after installation of the unit.
ELECTRIC CONNECTION
The cooker must be installed in a workmanlike manner in accordance with the instructions in this manual
and locally applicable regulations.
BEFORE CONNECTION:
Verify:
• That the electrical supply of the system is compatible with the voltage and power of the range.
• The user’s fixed installation must include an all-pole circuit-breaker of approved type.
CONNECTION :
- Cable insulation must be type 245 IEC 57 or 245 IEC 66
- The length of the conductors of the power cable between the strain relief device and the terminals must
be such that the conductors become taut before the earth conductor in case of traction on the cable.
- If this unit is permanently connected to a fixed electrical cable, the cable should be equipped with a fault
leak protector.
- If this unit is connected to a wall outlet, the outlet should be permanently accessible.
1
Remove cover (or covers), to the back of the unit identified by
2
Use a standard flexible cable to connect to terminal block.
1
2
L
3
4
5
N
220-240 V 1N ~ 50 Hz
3
1
2
L1
3
4
L2
5
L3
230 V 3 ~ 50 Hz
1
2
3
L1 L2 L3
4
5
N
400 V 3N ~ 50 Hz
1
2
LN
220-240 V 1N ~ 50 Hz
Secure the cable by means of cable clamp.
It is hazardous to put the appliance into service without connecting it to
suitable ground.
INSTALLATION MANUAL
ELECTRICAL PLAN
TH
32
22
12
P2
1
P1
L
VTH
(blanc)
1
L N
2
31
21
11
L1
L2
L3
L4
THS
T1
T2
T3
T4
KM
A1
KM
A2
EV1
A1 A2 12
Max Min Com
EV1: 5,5l/min
11 14
6
5
4
3
V remplissage (orange)
Détection
SCE4_016
Directives :
Basse tension : 2006/95/CEE.
CEM : 2004/108/CEE.
Référence
LAE 010 CVA
P
3,5 kW
INSTALLATION MANUAL
U
230 V1N~ 50 Hz + T / E
I
15,20
WATER SUPPLY CONNECTION
Water supply hook-up:
The multi-cooker must be connected to a potable water supply.
The minimal pressure of the water supply must of 1 bar and the maximum must be 5 bars.
Before connecting the final connection, the pipes, hoses and connectors must be cleaned to remove any
debris and impurities.
98
Water supply connector
180
Raccord d’arrivée d’eau
469
648
150
VueLeft
côtéview
gauche
Water connection diameter : 3/4".
M a xi m um flow  : 5 ,5 l/mn.
Pre ssur e  : 1 à 5 b a rs.
INSTALLATION MANUAL
Vue
arrière
Back
view
Draining of used water:
VueLeft
cotéview
gauche
Flexible pipe (included)
Flexible d’évacuation (fourni)
Vue
arrière
Back view
Air-gap
Rupture
de charge
Vanne
Water
drain
d’évacuation
valve
Max:
500 mm
P-trap
Syphon
en
(mademetal
of metal)
(Non fourni)
IMPORTANT:
The P trap must be made of metal.
An “Air Gap” disconnect is required between the flexible water drain and the P trap leading to the local
waste water network.
The disconnect must feature either an “air-gap” disconnect or an “air-vent” disconnect. See drawings
below:
Raccord
ouvert
Air-gap
1 : Drain pipe
E
2 : Overfill level
1
E: Diameter
b
2
G: Diameter
S1, S2... : Air vents sections
G
Z : Smallest dimension for air vent
Calculation :
•
b≥G
•
b ≥ 20 mm
•
G > E : G must be large enough to allow full drainage of E
•
S1 + S2 + .... b x 2G
•
•
Z ≥ 4 mm
3
Raccord
à grille
Air-vent
E
1
z
b
2
S1, S2...
G
INSTALLATION MANUAL
MULTI-COOKER MODULE
LAE 010 CVA
USER MANUAL
IMPORTANT
This unit must be installed in accordance with the applicable regulations and standards in an adequately
ventilated room.
Any changeover to a voltage other than that for which the cooker is set up must be carried out by a
qualified engineer.
Warranty:
The warranty is stated on the sales contract. Please contact your approved Dealer if any work has to be
carried out under warranty. This warranty excludes damage resulting from incorrect installation, improper
use or inadequate servicing.
UTILISATION
INTRODUCTION :
The Lacanche multi-cooker is a multi-use cooking tool that allows cooking of all kinds of food through three
different cooking functions.
•
The “STEAMER” cooking function allows cooking of vegetables, fish, meat, or any preparations
needing soft, regular and homogenous cooking, with a high level of moisture.
•
The “DOUBLE-BATH” function allows the maintaining in temperature of prepared food, the soft
cooking at controlled temperature and the making of preserves.
•
The “BOILING” function allows the cooking through immersion, the reheating of vacuum packed food,
the reheating of pasta and rice, and convection cooking in temperature controlled water.
The thermostatically controlled temperature offers the user a complete array of possible use.
Numerous recipes are available on our website: http://www.lacanche.com.
PRECAUTIONS :
è
This appliance is not for use by children. If unfamiliar with this appliance, use should be overseen
by a competent person who has read all the relevant information. Before use, it is mandatory to remove all
the internal and external plastic packing, failure to do so will cause irreversible damage to the steel walls
of the cooker.
è Wash the tank of the multi-cooker with non-aggressive soapy water
Before any use:
è
Make sure that the water-supply is opened
è
Shut the drain valve situated below the tank inside the cabinet
Opened valve
Closed valve
IMPORTANT : During any use, the unit must never be left unattended
USER’S MANUAL
USING THE MULTI-COOKER :
Water-filling
Buse
de remplissage
valve
The tank of the multi-cooker fills-up with water through the
water-filling valve situated on the back wall of the tank.
Depending on the selected cooking function, the multi-cooker can be filled-up in two different ways:
• Automatically for the “STEAMER” function
• Manually for the “DOUBLE BATH” and “BOILING” functions
CALIBRATING THE WATER LEVEL PROBE ACCORDING TO THE LEVEL OF HARDNESS OF THE
WATER:
ATTENTION! THIS WATER PROBE CALIBRATION MUST BE DONE
BEFORE THE FIRST USE OF THE MULTICOOKER
The multicooker is equiped with a adjustment dial allowing the adjusting of the water level of the automatic
refill according to the level of hardness of the water supply.
As the level of hardness of the water varies greatly depending on the region and country, it is very important
to calibrate the water level probe before using the multicooker.
The water probe detects the minimum water level necessary for the proper use of the multicooker.
The factory calibration is set to respond to an average water hardness.
The calibration procedure is explained in the next chapter.
USER’S MANUAL
Calibrating of the probe:
To calibrate the probe, first verify that once the automatic refill stops, the minimum level reaches the first
mark (STEAM level).
First mark (STEAM level)
•
•
If the water level is higher or lower than this mark, you need to proceed with an adjustment of the
calibration module dial.
The calibration adjustment dial is situated on the back wall of the lower cabinet, on the upper left
corner (on the range model)
5
150
KΩ
5
150
KΩ
calibration adjustment
dial
•
The adjustment is made by turning the large dial on the lower part of the module.
5
Calibrating dial
150
KΩ
USER’S MANUAL
•
ATTENTION! Never touch the voltage dial situated on the top end of the module.
5
150
KΩ
Calibration procedure:
If the water level is higher or lower than the first mark, proceed with an adjustment of the calibration module
dial.
1.
Make sure the manual refill switch is off (low position)
Interrupteur
remplissage manuel
Manual
refillde
switch
2.
Turn the temperature knob clockwise to desired temperature. The white LED turns-on.
Manette de thermostat
Temperature
knob
USER’S MANUAL
3. After a 15-second delay, the yellow LED turns-on.The multi-cooker fills-up to the first mark, through the
water-filling valve situated on the back wall of the tank. Wait until the automatic refill stops.
First mark
4.
Verify the water level.
If the water level is lower than the first mark :
•
•
•
150
5
Turn the dial to the left 1/8 turn.
KΩ
Empty the tank completely and proceed with a new automatic refil cycle to check if the water level is correct.
Repeat the procedure until the proper level is reached.
If the water level is higher than the first mark:
•
•
•
Turn the dial to the right 1/8 turn.
KΩ
Empty the tank completely and proceed with a new automatic refil cycle to check if the water level is correct.
Repeat the procedure until the proper level is reached.
5
150
Once calibrated, the automatic refill probe is adjusted to level of hardness of the
water supply.
The automatic water level should remain constant.
If a change in the hardness of water occurs, the water level may change (In the case
of the addition of a water softener, for instance).
It is possible to adjust the water level agin by following the procedure described
above.
USER’S MANUAL
FUNCTIONS
1) “STEAMER” function: steam cooking
•
Make sure that the manual water supply switch is on the lower position.
Interrupteur
de remplissage
Manual
refill switchmanuel
•
Turn the temperature knob clockwise to desired temperature. The white LED turns-on.
Manette deTemperature
thermostat knob
USER’S MANUAL
•
After a 15-second delay, the yellow LED turns-on.The multi-cooker fills-up to the first mark, through the
water-filling valve situated on the back wall of the tank. (“STEAMER” level.)
Niveau
cuisson Vapeurlevel
“STEAMER”
mark
•
To compensate for any evaporation during the cooking process, the automatic refill system will readjust the water level automatically by refilling the tank to the first mark. The yellow LED will turn-on
each time the water refill activates.
•
Place the perforated Gastronorm 2/3 perforated pan (supplied) in the tank of the multi-cooker. Place
the food to be cooked in the pan and cover it with the lid (supplied) if necessary. Cook accordingly to
the recipe.
Flat lid (included)
•
To stop the function, place the thermostat on the 0 position
•
Drain the tank after usage
USER’S MANUAL
Tall lid (optionnal)
2) “DOUBLE BATH” function: cooking, slow cooking, controlled temperature cooking, holding hot
•
•
Toggle the manual water supply switch upward. The yellow LED turns on. The multi-cooker fills-up
through the water-filling valve situated on the back wall of the tank.
Toggle the switch downward to stop the flow of water when the desired level is reached. The yellow
LED turns off.
Manual
refill switch
Interrupteur
de remplissage
manuel
•
Fill the tank to the middle mark on the right side of the tank (“DOUBLE BATH” water level).
“DOUBLE
BATH” level
Niveau
cuisson Bain-marie
USER’S MANUAL
mark
•
Turn the temperature knob clockwise to desired temperature. The white LED turns on.
ManetteTemperature
de thermostat
knob
•
•
The heating time depends on the water level and the final temperature desired.
The White LED situated at the center of the control panel will turn-off once the desired temperature is
reached. The multi-cooker is ready to use.
•
To maintain food at temperature, place one or several Gastronorm pans (2/3, 1/3, etc.) containing food
and preparation in the multi-cooker and cover it with the corresponding lid.
•
It is also possible to place jars, terrines, dishes, pots and pans directly on the Heating element
shield/rack, or in the perforated Gastronorm 2/3 pan supplied with the multi-cooker to maintain in
temperature, and cook at low temperature (lower than 90°). In this case, the containers will be partially
immerged according to their size, to insure sufficient heat exchange. To obtain best result, it is usually
recommended to cover the items with a tight fitting lid.
•
To stop the “DOUBLE BATH” function, place the thermostat on the 0 position.
•
Drain the tank after usage.
USER’S MANUAL
3) “BOILING” function: cooking, reheating, preserves
•
•
Toggle the manual water supply switch upward. The yellow LED turns on. The multi-cooker fills-up
through the water-filling valve situated on the back wall of the tank.
Toggle the switch downward to stop the flow of water when the desired level is reached. The yellow
LED turns off.
Manual refill switch
Interrupteur de remplissage manuel
•
•
Fill the tank to the middle mark on the right side of the tank. “BOILING” water level
Toggle the switch downward to stop the filling process, once the desired level is obtained. Be sure not
to fill the tank above the maximum mark (12 L.)
Niveau
cuisson Eau bouillante
“BOILING”
level mark
USER’S MANUAL
•
Turn the temperature knob clockwise to desired temperature. The white LED turns on.
ManetteTemperature
de thermostat
knob
•
The heating time depends on the water level and the final temperature desired.
•
The White LED situated at the center of the control panel will turn-off once the desired temperature is
reached. The multi-cooker is ready to use.
•
Place food in sealed containers (preserves, cans, etc.) or food in sealed pouches (vacuum packed,
frozen pack), or food in baskets (pasta, rice, vegetables, etc.), directly in the hot (slow cooking,
maintaining temperature), simmering (preserving, canning) or boiling water (cooking and/or reheating)
depending on the result you wish to attain.
•
To stop the “BOILING” function, place the thermostat on the 0 position.
•
Drain the tank after usage.
USER’S MANUAL
Summary of essential points
relating to automatic refill:
• As soon as the temperature handle is turned to the left
(clockwise) the tank of the multi-cooker will start filling-up
automatically, up to the first mark (“STEAMER” level)
• As a safety, the automatic water refill is set at the
factory to reach the first mark at the bottom of the
tank, situated right above the heating element.
• The automatic refill system maintains the level of water at the
first mark (“STEAMER” level) automatically and indefinitely,
so the heating element remains submerged at all time.
• Since the automatic water refill system functions only to
the first mark level (“STEAMER” level), any water level
above this mark (“DOUBLE BATH” and “BOILING”
level) must be reached using the manual refill switch.
• It is possible to use the manual refill switch at any point before
or during any cooking function to adjust the water level to your
specific needs. This adjustment doesn’t affect the minimum
water level (“STEAMER” level) which is managed by the
automatic water refill system. If the water level reache the
minimum level, the automatic water refill will take over.
USER’S MANUAL
SAFETY SWITCH
SAFETY AND SECURITY SWITCH :
FUNCTION:
To prevent any overheating, a security/safety switch will shut off the unit if the automatic watr refill fails or
if the water supply is cut-off, o if the water level in the tank drops below the level of the heating element.
This safety/security switch will cut-off all electrical supply to the unit and it needs to be reset by hand.
MANUAL RESET OF THE SAFETY/SECURITY SWITCH:
The manual reset is done by pushing the red button A situated below the tank in the cupboard.
A
USER’S MANUAL
UTILISATION DES FONCTIONS DU POLYCUISEUR
Below are a few examples of recipes made possible by the different functions
along with the temperatures to use. A large number of recipes are available on
our website: http://www.lacanche.fr.
1. STEAM FUNCTION
RECIPES
110°
-Stérilization (Baby bottles, jars, utensils)
105°
-Vegetable cooking
-Meat cooking (including pre-roasting)
100°
95°
-Poultry cooking (including pre-roasting)
-Finishing and holding (Rice, bulgur, couscous, quinoa, etc.)
90°
-Whole fish
-Fish filets
TEMPERATURES
85°
-Flans, custards
-Dim Sum
80°
-Risen doughs (cooking)
75°
-Cakes, sponge cakes, angel-food cakes (cooking)
-Quenelles (rechauffage, cuisson)
70°
-Poached eggs
-Snow eggs, floating island
-Custards, pudding
65°
60°
55°
-Foie gras (whole)
50°
45°
-Yogurt, farmer cheese
40°
35°
-yeast dough (proofing)
30°
USER’S MANUAL
2. DOUBLE BATH
RECIPES
110°
- Jarring, preserves
TEMPERATURES
105°
100°
- Température holding (soups, sauces, garnishes etc.)
95°
- Infusing (flavored huiles, teas, butters, sauces, etc.)
90°
- Molded and dished cooking (meat based terrine, etc.)
85°
- Egg based molded and dished cooking (Fish and vegetable terrines & mousses)
80°
- Whole egg based dessert molded (Flans, crèmes caramel, custards, etc.)
75°
70°
- Egg yolk based desserts
65°
- Defrosting before cooking
60°
- Foie gras terrines
55°
50°
45°
40°
- Chocolate melting and tempering
35°
30°
USER’S MANUAL
3. BOILING
RECIPES
110°
- Stérilization, preserves
105°
- Pasta and rice cooking
- Pasta and rice re-heating
TEMPERATURES
100°
- Eggs in shells
95°
- Sausage and ham cooking
90°
- Risen doughs before oven cooking (Bagels, Pretzels)
85°
- Ballotines (meat, poultry, fish)
- Galantine before roasting (meat, poultry, fish)
80°
- Towel wrapped cooking (whole ham)
75°
- Vacuum packed cooking (prepared dishes)
70°
65°
60°
-De-frosting of sealed food before re-heating
55°
- Vacuum packed foie gras
50°
45°
40°
35°
30°
USER’S MANUAL
CLEANING and MAINTENANCE
Before any maintenance and:or cleaning, make sure the electric supply is
turned off
è
Wait until complete cooling of the tank before any intervention
è
ATTENTION : DO NOT USE chlorine based cleaning products to clean the unit.
CLEANING :
•
•
The low operating temperature of the multi-cooker makes it prone to bacteria development. It is only
through a very thight hygiene and systematic cleaning that complete food and sanitary safety can be
ensured.
After each and every use, clean the tank thoroughly with soapy water followed by a triple rinse with
clear water.
CAUTION: Draining of the tank:
•
Wait until partial cooling of the tank. Open the drain valve.
Cleaning the tank:
• remove the heating element protection. It can be washed in the dishwasher.
•
To facilitate the washing of the tank, the heating element pivots.
•
•
Wipe the tank dry after rinsing
Leave the drain valve open between use
Opened valve
USER’S MANUAL
IMPORTANT :
è Make sure that the water level probe located on the lower part of the inner facing of the tank
is cleaned after each use.
è DO NOT use any abrasive and/or acid cleaning products or pads to clean the water level
probe.
Water level probe
Cabinet :
Clean the inside with a non-abrasive cleaning product.
The use of agressive cleaning solution is not recommanded, but if needed, unclip the gaskets and remove
them while cleaning.
Rinse and dry thoroughly.
Enamel parts :
Use soapy water, never use abrasive powders.
USER’S MANUAL