1
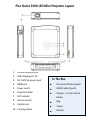
Pico Genie P100 LED Mini Projector Layout 1. 3.5mm earphone jack 2. USB charging port 5V 3. DC 12V/1.5A power input 4. HDMI port Pico Genie P100 projector 5. Power switch HDMI Cable (Type A) 6. Projector Model Charger + 3 international 7. LED indicator blades 8. Volume control Bag 9. Optical Lens 10. Focusing wheel In The Box Tripod Manual Specification Product dimensions: 99.5 x 99 x 22.5mm Brightness of projection: 85 ANSI Lumens Projection image size (recommended): 10" ~ 60" Projection distance (recommended): 36mm~2200mm Contrast: 1000:1 Resolution: 854 x 480(WVGA) Screen aspect ratio: 16:9 Charger specification: DC 12V 1500mA Built-in battery: 3.7V/3800mA Battery projection time: up to 2 hours at full brightness Built-in loudspeaker: 2 x 1W Instruction Manual The P100 supports HDMI signal input only. Any other form of signal will need to be transformed through the HDMI port with an adapter E.g. Android HDMI stick. The P100 can be operated whilst connected to the mains and the battery is being charged by the (DC12V) power supply. The USB host port can be used to power USB devices such as Smartphones (>5V/500mA) so that your phone and projector do not run out of power whilst projecting. The USB port cannot be used for file transfer. The touch panel on top of the device changes the contrast between 2 modes, Standard/ Presentation and controls the volume. To switch modes, long press the “M” key in the centre. For volume control, slide your finger in a clockwise/anti-clockwise direction to increase/reduce the volume respectively. To focus: Slowly turn the focus wheel until the image is in focus When connected to mains (AC) power, a red LED light indicates the projector is charging and will turn green when fully charged. A battery icon will display on screen when the battery power is low. If the projector will not switch on without mains power, the battery is not charged enough to operate. Mains power must then be used to project. To connect HDMI devices: Connect a HDMI cable to both devices and power them both on. You may need an HDMI adapter (Type A). The device will usually be recognized automatically. Sometimes you will need to toggle between output monitors on your device (usually Fn + F7 on a laptop). To connect to a non-Apple Smartphone, use an MHL adapter cable. See list of compatible devices on our website. To connect to an Apple iPhone you will need a Digital AV HDMI Adapter. These are only available directly from Apple. To connect to a MAC you will need to know the port that your MAC has and source the appropriate HDMI adapter Instructions for safety and use Ensure that the product is kept in a room between 5 – 35°C. Temperature fluctuations may damage the product and cause instability. This product cannot be exposed to humid environments and should be kept away from water otherwise it may be damaged or cause explosion. Do not use in smoke or dust filled areas as this may affect the performance of the product or damage its components. Keep out of reach of children. [Never allow any persons to look directly at the LED beam as this may damage your eyes]. Never place items on top of the projector or cover vents. Only qualified persons may perform technical work on the product. Do not open or change the product if there is a fault as this will invalidate the warranty. Please contact your retailer to receive official maintenance advice.