1
NAVIGON 42 Essential
User's manual
English (United Kingdom)
November 2011
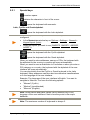
The crossed-out wheeled bin means that within the European Union
the product must be taken to separate collection at the product end-oflife. This applies to your device but also to any enhancements marked
with this symbol. Do not dispose of these products as unsorted
municipal waste.
Imprint
NAVIGON GmbH
Schottmüllerstraße 20A
D-20251 Hamburg
The information contained herein may be changed at any time without prior
notification. Neither this manual nor any parts thereof may be reproduced for any
purpose whatsoever without the express written consent of NAVIGON GmbH, nor
may they be transmitted in any form either electronically or mechanically, including
photocopying and recording. All technical specifications, drawings etc are subject to
copyright law.
2011, NAVIGON GmbH
All rights reserved.
User's manual NAVIGON 42 Essential
Table of contents
1
Introduction .......................................................................................6
1.1
1.2
1.3
2
About this manual ................................................................................ 6
1.1.1
Conventions.......................................................................... 6
1.1.2
Symbols................................................................................ 6
Legal notice ......................................................................................... 6
1.2.1
Liability ................................................................................. 6
1.2.2
Trade marks ......................................................................... 7
Questions about the product ................................................................ 7
Before you begin...............................................................................7
2.1
2.2
2.3
2.4
2.5
Scope of Delivery ................................................................................ 7
Description of the navigation device..................................................... 8
Important safety information ................................................................ 8
2.3.1
Navigation safety information ................................................ 9
2.3.2
Safety information for the navigation device .......................... 9
2.3.3
Safety information for installing the device in your car ......... 10
Preparing the navigation system for use ............................................ 10
2.4.1
Installing the navigation system in the vehicle ..................... 10
2.4.2
Memory card....................................................................... 12
Navigating with GPS .......................................................................... 13
3
Switching on the navigation device ..............................................13
4
Using the Navigation System for the First Time ..........................15
5
Operating the navigation system ..................................................16
3.1
4.1
4.2
5.1
5.2
5.3
5.4
6
Switching on the device ..................................................................... 14
Manual .............................................................................................. 16
Options .............................................................................................. 16
Information ........................................................................................ 16
Software keyboard ............................................................................. 18
5.2.1
Special keys ....................................................................... 19
5.2.2
Entering data ...................................................................... 20
Options .............................................................................................. 21
Menus ............................................................................................... 21
Navigation........................................................................................21
6.1
6.2
User's manual
Starting the navigation application ..................................................... 21
Specifying a destination ..................................................................... 23
6.2.1
Specifying the country in which the destination is
situated ............................................................................... 23
6.2.2
Entering a destination address............................................ 24
6.2.3
Enter Coordinates ............................................................... 25
6.2.4
Points of interest ................................................................. 26
6.2.5
Information about the destination ........................................ 30
6.2.6
Favourites ........................................................................... 30
6.2.7
Last Destinations ................................................................ 31
6.2.8
Imported Addresses: Outlook / Internet ............................... 31
6.2.9
Navigating home ................................................................. 32
Table of contents III
User's manual NAVIGON 42 Essential
6.3
6.4
7
8
Options ............................................................................................40
Working with the map .....................................................................42
8.1
8.2
8.3
8.4
8.5
9
6.2.10 Selecting destinations on the map ...................................... 32
6.2.11 Route preview..................................................................... 33
Managing destinations ....................................................................... 34
6.3.1
Saving destinations............................................................. 34
6.3.2
Defining the home address ................................................. 35
Multi-leg routes .................................................................................. 35
6.4.1
Entering the starting point ................................................... 36
6.4.2
Entering route points ........................................................... 36
6.4.3
Editing route points ............................................................. 37
6.4.4
Managing routes ................................................................. 37
6.4.5
Loading routes .................................................................... 38
6.4.6
Calculating and displaying routes........................................ 38
6.4.7
Simulating routes ................................................................ 38
6.4.8
Route preview..................................................................... 39
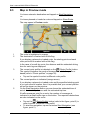
Selecting the navigation map ............................................................. 42
Map in Standard mode ...................................................................... 42
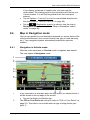
Map in Preview mode ........................................................................ 44
Map in Navigation mode .................................................................... 45
8.4.1
Navigation in Vehicle mode................................................. 45
8.4.2
Map options in Navigation mode ......................................... 48
8.4.3
Quitting navigation .............................................................. 48
Map in Destination search mode........................................................ 48
8.5.1
Operating in Destination search mode ................................ 49
Useful functions ..............................................................................50
9.1
9.2
9.3
9.4
9.5
Route profiles .................................................................................... 50
9.1.1
Route profile settings .......................................................... 50
9.1.2
NAVIGON basic profiles ..................................................... 51
9.1.3
Creating a new route profile ................................................ 51
9.1.4
Selecting a route profile ...................................................... 52
9.1.5
Managing route profiles ...................................................... 52
MyPOIs: My POIs .............................................................................. 53
9.2.1
Creating your own destinations ........................................... 53
9.2.2
Symbols for your own POIs................................................. 55
9.2.3
POI-Import: Importing your own POIs onto the
navigation device ................................................................ 55
Screenshots ...................................................................................... 55
9.3.1
Enabling screenshots.......................................................... 55
9.3.2
Creating a screenshot ......................................................... 55
Nearby ............................................................................................... 56
POI on Your Route ............................................................................ 56
9.5.1
Displaying POIs along the route.......................................... 56
9.5.2
Navigating to one of the destinations .................................. 58
9.5.3
Selecting categories ........................................................... 58
IV Table of contents
User's manual
User's manual NAVIGON 42 Essential
9.6
9.7
9.8
9.9
9.10
9.11
Direct Help......................................................................................... 58
GPS Status, saving the current location ............................................. 59
Block ................................................................................................. 59
Turn-by-Turn List ............................................................................... 60
TMC (Traffic Information) ................................................................... 61
9.10.1 Preview TMC ...................................................................... 62
9.10.2 Displaying traffic information ............................................... 63
9.10.3 Showing a single message in detail .................................... 65
9.10.4 TMC Settings ...................................................................... 65
Logbook ............................................................................................ 66
10
11
Configuring the navigation system ...............................................67
Appendix .........................................................................................68
12
13
Troubleshooting..............................................................................73
Index ................................................................................................75
11.1
11.3
11.4
User's manual
Technical data of the navigation device ............................................. 68
NAVIGON Licensing Policy................................................................ 69
Declaration of Conformity .................................................................. 73
Table of contents V
User's manual NAVIGON 42 Essential
1
Introduction
1.1
About this manual
1.1.1
Conventions
For better legibility and clarification, the following styles are used in this
manual:
Bold and italics:
Names of products
SMALL CAPITALS:
Names of windows and dialogue boxes
Bold:
Highlighting of important parts in the text
Underlined:
Descriptions of buttons, input boxes and other
elements on the user interface
Underlined and italics:
Names of control elements on the navigation
device
1.1.2
Symbols
The following symbols refer to specific passages of text:
Instructions and tips for operating the software
More detailed information and explanations
Warnings
1.2
Legal notice
1.2.1
Liability
The software and manual are subject to change without notice.
NAVIGON GmbH is not liable for the accuracy of the information
contained in this manual or for damages resulting from the use of this
manual.
Suggestions for improvements and information regarding errors are
always welcome so that we can supply you with even better products in
the future.
-6-
Introduction
User's manual NAVIGON 42 Essential
1.2.2
Trade marks
All brand and trade marks mentioned in this document and registered
by third parties are subject without reservation to copyright law and the
proprietary rights of their respective owners. All trade marks, trade
names and company names used in this document are or may be trade
marks or registered trademarks of their respective owners. All rights
reserved except those explicitly granted.
If the registered trade marks used in this manual are not explicitly
identified as such, this does not imply that the name is not subject to the
rights of a third party.
►
►
1.3
Microsoft, Outlook, Excel and Windows are registered trade marks
of the Microsoft Corporation.
NAVIGON is a registered trade mark of NAVIGON GmbH.
Questions about the product
You have a question concerning your product? Then visit our website
www.navigon.com and click on "Customer Services". There you will find
an area with frequently asked questions (FAQ Center) along with details
of how to contact us by phone or e-mail.
2
Before you begin
2.1
Scope of Delivery
Please check that the contents are complete. If anything is missing, get
in touch immediately with the dealer who sold you the product.
The purchased product includes the following:
►
Navigation device
►
Designer car cradle
►
Car charger cable (10-24V adapter for the vehicle's cigarette lighter)
with integrated TMC antenna
►
USB cable
►
Illustrated installation instructions
Before you begin
-7-
User's manual NAVIGON 42 Essential
2.2
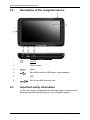
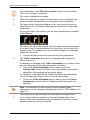
Description of the navigation device
1
On/Off
2
Touch-screen
3
Reset
4
Mini USB socket for USB cable / mains adapter
5
LED
6
Slot for microSD memory card
2.3
Important safety information
In your own interest, please read the following safety information and
warnings carefully before starting up your navigation system.
-8-
Before you begin
User's manual NAVIGON 42 Essential
2.3.1
Navigation safety information
Use the navigation system at your own risk.
Caution! To prevent accidents, do not operate the navigation system
while driving.
Caution! Do not look at the screen unless it is absolutely safe to do so!
Caution! Traffic regulations have priority over any instructions from the
navigation system.
Caution! Follow the instructions of the navigation system only when the
circumstances and the road traffic regulations allow you to do so! The
navigation system will still guide you to your destination even if you
deviate from the calculated route.
Caution! Check that the cradle is secured and adjusted properly before
each journey.
2.3.2
Safety information for the navigation device
Caution! Protect the device from moisture. The device is neither
waterproof nor protected against splash water.
Caution! Do not open the case of the navigation device under any
circumstances.
Caution! Do not expose the navigation device to extreme heat or cold.
This may damage the device or impair its function (see "Technical data"
on page 68).
Caution! Never unplug by pulling the cable. Doing so could severely
damage or destroy the device.
Caution! Do not subject the navigation device to severe temperature
fluctuations. This can lead to condensation.
Note: Do not kink the cable. Make sure that the cable cannot be
damaged by sharp-edged objects.
Note: Create a backup of the data which exist in the internal memory of
your navigation device.
This is very easy to do with the NAVIGON Fresh software which can be
downloaded free of charge from our website www.navigon.com/fresh.
Before you begin
-9-
User's manual NAVIGON 42 Essential
2.3.3
Safety information for installing the device in your car
Caution! Fasten the cradle so that the navigation device is easy to see
and operate by the driver. Make sure that the driver's view of the traffic
is not impeded.
Caution! Do not attach the cradle within the working zone of any
airbags.
Caution! Do not fasten the cradle too close to the steering wheel or
other controls. The driver must not be obstructed in operating any car
functions.
Caution! When installing the cradle, make sure that it will not pose a
risk in the event of an accident.
Caution! Do not run cables within the operating radius of airbags or in
the direct vicinity of other safety-relevant devices and power supply
lines.
Caution! Check that the cradle is secured and adjusted properly before
each journey. The suction cup may become loose after a while.
Caution! After installation, check all safety-relevant equipment in the
car.
Caution! Connect the car charger cable only to cigarette lighters with
an operating voltage of 10-24V.
Caution! Disconnect the car charger cable from the cigarette lighter
whenever you park the car. The integrated mains adapter always
consumes a small amount of energy and could drain the car battery.
2.4
Preparing the navigation system for use
2.4.1
Installing the navigation system in the vehicle
Caution! Be sure to refer to all the safety information in chapter
"Important safety information" on page 8.
- 10 -
Before you begin
User's manual NAVIGON 42 Essential
Securing the cradle
1. Clean the suction cup and that part of the windscreen to which you
want to secure the cradle. Both must be dry and free of dirt and
grease.
2. Open the lever on the suction cup as far as possible.
3. Place the cradle suction cup against the windscreen.
4. Press the lever towards the windscreen.
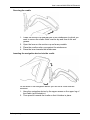
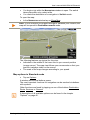
Inserting the navigation device into the cradle
On the back of the navigation device you will see a circle with two
recesses.
1. Hang the navigation device by the upper recess on the upper lug of
the cradle (see illustration).
2. Then press it towards the cradle so that it latches in place.
Before you begin
- 11 -
User's manual NAVIGON 42 Essential
Supplying power to the navigation device
Included in delivery of the navigation device is a car charger cable with
which power can be supplied to the navigation device via the vehicle's
cigarette lighter.
Note: Use only the charger cable supplied with your navigation device
or an equivalent model from NAVIGON!
►
Connect the car charger cable to the vehicle's cigarette lighter and
to the mini USB socket of the navigation device.
The LED on the bottom of the navigation device lights up orange during
charging.
As soon as the battery is fully charged, the LED lights up green.
Caution! Connect the car charger cable only to cigarette lighters with
an operating voltage of 10-24V.
Caution! Be sure to refer to all the safety information in chapter
"Important safety information" on page 8.
Note: Insert the USB connector securely in the corresponding USB
sockets!
Note: It takes approx. 3 hours to charge the device when the battery is
flat.
A fully charged battery enables up to 3 hours of use depending on the
device configuration.
TMC antenna
The navigation device has an integrated TMC receiver. The TMC
antenna is integrated in the car charger cable. Once the car charger
cable is connected, the device can receive current traffic messages. If
required, it can change your route dynamically, e.g. in order to avoid a
traffic jam.
2.4.2
Memory card
A memory card is not required to operate the navigation system
because all the data required for navigation are stored in the internal
memory of the device.
When you connect the navigation system to your computer using a USB
cable, the internal memory is detected as the 'NAVIGON' drive. The slot
for the memory card is detected as the 'NAVIGON SD' drive.
Data back-ups, software updates and navigation map updates can be
carried out quickly and conveniently with the NAVIGON Fresh software,
which you can download free of charge from the website
www.navigon.com/fresh.
- 12 -
Before you begin
User's manual NAVIGON 42 Essential
If you purchase additional navigation maps but no longer have enough
space for them in the internal memory of your navigation device, it is
also possible for you to save these maps on a memory card microSD
which you then insert in the device. The navigation system can use
navigation maps from both memories.
2.5
Navigating with GPS
GPS is based on a total of at least 24 satellites orbiting the Earth and
continuously transmitting signals of their position and time. The GPS
receiver receives this data and calculates its own geographical position
on the basis of the information transmitted by the various satellites.
Data from at least three satellites is required for positioning with an
acceptable degree of accuracy. With data from four or more satellites it
is possible in addition to determine the position's altitude above sea
level. Positioning is accurate to within three metres.
Once the navigation device has determined your position, this position
can be used as a starting point for calculating a route.
The map data on your navigation device includes the geographical
coordinates of all digitally recorded points of interest, streets and
places. This enables the device to calculate a route between a starting
point and a destination.
Calculation of the current position and its representation on the map
take place approximately once every second. In other words, your
current position is always shown on the map.
3
Switching on the navigation device
The navigation device can be in one of three states:
►
►
►
On: The navigation device is on and can be operated.
Standby: When you switch the navigation device to standby mode,
the next time it is switched on it will start very quickly and with the
window which was active when switched off. In standby mode the
device still consumes a small amount of energy however.
Depending on how full the battery is, it can become flat within a few
days or a few weeks.
Off: When you switch off the device, it consumes hardly any
energy. It can then take several months for the battery to become
flat. Switching the device on again triggers a restart which can take
some time (approx. 60 seconds). Your settings and your saved
destinations and routes will be retained.
Switching on the navigation device
- 13 -
User's manual NAVIGON 42 Essential
3.1
Switching on the device
►
Press the
(On/Off) key and keep it pressed until the device
switches on.
The NAVIGATION window opens.
Switching the navigation device to standby mode
►
Press briefly on the
(On/Off) key (max. 2 seconds).
A message will appear telling you that the device will be switched to
standby mode in several seconds.
►
Wait for the device to be switched to standby mode or tap on
Standby.
Automatic Standby
You can configure the navigation device so that it is automatically
switched to standby mode when not in use.
►
►
►
In the NAVIGATION window tap on Options > Settings > General >
Automatic Standby.
Select after how much time you want the navigation device to be
switched to standby mode (Never, After 10 mins., After 20 mins.,
After 30 mins.).
Select Power Loss in order to switch the device to standby mode
when the external power supply is interrupted. As soon as the
device is connected again to the external power supply it will switch
on again automatically.
Switching off the navigation device
►
Press the
(On/Off) key and keep it pressed until the device
switches off (approx. 6 seconds)
-or-
1. Press briefly on the
(On/Off) key (max. 2 seconds).
A message will appear telling you that the device will be switched to
standby mode in several seconds.
2. Tap on Switch off.
- 14 -
Switching on the navigation device
User's manual NAVIGON 42 Essential
4
Using the Navigation System for the First
Time
When you switch on the navigation system for the first time, you will be
asked to make a number of basic settings:
The LANGUAGE window opens.
1. Select your preferred language for using the software.
2. Tap on OK.
The DISTANCE UNIT window opens.
3. Determine how you want distances to be shown ('Kilometres' or
'Miles').
4. Tap on OK.
The TIME FORMAT window opens.
5. Determine the time format ('12h (am/pm)' or '24h').
6. Tap on OK.
The DATE FORMAT window opens.
7. Select the date format. This means:
►
YYYY: the year in 4 digits
►
MM: the month in 2 digits
►
DD: the day in 2 digits
8. Tap on OK.
1. The DEMO MODE window opens.
Demo mode is intended only for demonstrating the product when no
GPS reception is possible.
When demo mode is active, navigation is not possible! Demo mode
is designed solely to simulate navigation to the centre of the
indicated destination.
►
Make sure that the Start in Demo Mode setting is at No. If
necessary tap on the
(Toggle) button in order to change
the setting from Yes to No.
►
Tap on OK.
Note: How to deactivate demo mode is explained in "Troubleshooting"
in section "I have accidentally activated demo mode" on page 74.
The NAVIGATION window opens.
Using the Navigation System for the First Time
- 15 -
User's manual NAVIGON 42 Essential
4.1
Manual
An excerpt of this manual describing the most important functions of the
navigation software is saved on the navigation device.
To open the manual:
1. In the NAVIGATION window, tap on Options > Manual.
The TABLE OF CONTENTS window opens.
2. Tap on the name of the chapter you want to read.
The content of the chapter is shown.
With the
(Up) and
(Down) buttons you can scroll up one
page and down one page respectively.
With the
(To the Left) and
(To the Right) buttons you
can open the previous or the next chapter respectively.
►
►
Tap on the Table of Contents button in order to open the Table of
Contents window.
Tap on the
(Close) button in order to close the manual.
The NAVIGATION window is opened.
4.2
Options
Some windows offer options that lead to more functions.
A description of all available options can be found in the chapter
"Options" on page 40.
5
Operating the navigation system
5.1
Information
Various information symbols are located at the top of many windows.
GPS
The GPS symbol can indicate the following GPS reception states:
No GPS (No symbol): The built-in GPS receiver is not operational.
Contact us if the problem persists (refer to "Questions about the
product" on page 7).
- 16 -
Operating the navigation system
User's manual NAVIGON 42 Essential
No Signal: Data is being received from less than three satellites.
Position cannot be calculated.
GPS Ready: Data is being received from at least 3 satellites. Position
can be calculated.
For details of the GPS status refer to chapter "GPS Status, saving the
current location" on page 59.
Compass
The Compass symbol indicates in which direction you are currently
heading. It can indicate the following points of the compass: N, NE, E,
SE, S, SW, W, NW.
Energy
The Energy symbol can indicate the following states of the integrated
battery:
The device is being supplied by an external power source. The battery
is fully charged.
The battery cannot be charged because its temperature is too high or
too low.
The device is being supplied by an external power source. The battery
is being charged.
The device is being supplied by its internal battery. The battery charge
is sufficient.
The device is being supplied by its internal battery. The battery charge
is low.
TMC
The navigation system has an integrated TMC receiver which supplies
up-to-date traffic information. Using this information the navigation
system can change your route dynamically, for example in order to
avoid a traffic jam.
Note: This function is only available if TMC traffic messages are being
transmitted in the country in which you are travelling. This is not the
case in all countries.
Operating the navigation system
- 17 -
User's manual NAVIGON 42 Essential
The TMC symbol can display the following TMC reception status:
Tuning (in red): The TMC receiver is operational but cannot find a
transmitter that is sending TCM signals. There are no active traffic
messages.
Tuning: The TMC receiver is operational but cannot find a station that
is transmitting TMC signals. Traffic messages are active however. This
can be the case, for example, when travelling through a tunnel.
TMC on Standby (in grey): Traffic messages can be received.
Note: The TMC antenna is integrated in the car charger cable. The
Tuning symbol may still appear therefore when the car charger cable is
not connected to the navigation device.
For details of the TMC function refer to chapter "TMC (Traffic
Information)" on page 61.
Muting
The Muting symbol can indicate the following states:
No symbol: The navigation application is not muted.
Muting: The navigation application is muted. If the device is navigating
at the moment, you will not hear any driving instructions.
Note: This icon indicates only the muted state of the navigation
instructions. It says nothing about the volume of the hands-free module.
5.2
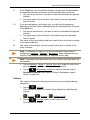
Software keyboard
A software keyboard appears on the screen when text entries are
necessary.
All entries can be made on the software keyboard using your fingertips.
Only capital letters can be entered.
When entering town or street names you need not enter any special
characters or umlauts. The navigation system fills in these characters
for you automatically. For example, if you are looking for the town of
"Bärnau", then simply type in the word "BARNAU". Special characters
may be helpful however when naming saved destinations and routes.
- 18 -
Operating the navigation system
User's manual NAVIGON 42 Essential
5.2.1
Special keys
inserts a space.
deletes the character in front of the cursor.
opens the keyboard with numerals.
Latin, Cyrillic and Greek alphabet
opens the keyboard with the Latin alphabet.
Note: The layout for the keyboard with the Latin alphabet can be
configured.
►
►
In the NAVIGATION window tap on Options > Settings > General >
Keypad layout (Latin).
Select the layout you want to use (QWERTZ, QWERTY, ABCDEF,
AZERTY).
opens the keyboard with the Cyrillic alphabet.
opens the keyboard with the Greek alphabet.
When you want to enter addresses, names or POIs, the keyboard with
the alphabet for the country in question will open automatically.
When you want to save a destination to Favourites or when you enter a
POI category or a country, the keyboard with the alphabet of the user
interface will open automatically.
You can also switch from the Cyrillic or Greek keyboard to the Latin
keyboard. Many addresses can then also be entered as transliterations
or in the language of the user interface.
Example: The language of the user interface is English. You want to
navigate to Moscow. You have the following options:
►
"Москва" (Cyrillic)
►
"Moskva" (transliterated)
►
"Moscow" (English).
Note: Street names and place names can be entered only in the
language of the user interface if that is how they exist in the map's
database.
Note: The maximum number of keyboards is always 2.
Operating the navigation system
- 19 -
User's manual NAVIGON 42 Essential
Umlauts, accents and other letters
Another keyboard with special characters is available for each alphabet.
opens the keyboard with Latin special characters.
opens the keyboard with Cyrillic special characters.
opens the keyboard with Greek special characters.
As soon as you have entered a special character the letter keyboard
reappears.
5.2.2
Entering data
Often you can select an entry from a list. This is the case, for example,
when you enter a location.
As soon as you enter the first letter, the largest city in the given country
that begins with this letter appears.
Enter more letters and after each entry the first city which begins with
these letters will appear.
►
When the correct location appears, tap on
complete the entry.
(OK) in order to
You can open at any time a list containing all the locations which begin
with the letters or include the text already entered. The more letters you
enter, the shorter the list becomes.
►
Tap on
(Open List) in order to call up this list.
You can use the
(Up) button and the
move through the list.
►
(Down) button to
Tap on an entry in the list to select it and transfer it to the input box.
The list closes once an entry has been selected. You are now
finished with entering the city.
►
Tap on
an entry.
(Close List) in order to close the list without selecting
Note: The list opens automatically as soon as it contains only 4 or less
entries.
- 20 -
Operating the navigation system
User's manual NAVIGON 42 Essential
5.3
Options
Some windows offer options that lead to more functions.
A description of all available options can be found in the chapter
"Options" on page 40.
5.4
Menus
Some buttons have menus which open when activated.
►
Tap on a menu point to execute its function.
If you would like to quit the options list without selecting a function, tap
on the button you used to open the menu.
6
Navigation
Use the navigation system at your own risk.
Caution! Be sure to refer to all the safety information in chapter
"Important safety information" on page 8.
Impaired GPS reception
If GPS reception is impaired, navigation will be interrupted. As soon as
GPS reception is restored, the navigation system calculates any change
of position which has occurred in the meantime. Navigation is then
continued automatically.
Arriving at your destination
When you have reached your selected destination, a message to this
effect will be displayed.
Only your current position (orange arrow) and the destination flag will
now be shown on the map.
6.1
Starting the navigation application
You have switched on the navigation device.
The following message appears:
"Please note that the road traffic regulations are prior to the instructions
of the navigation system. Please do not operate the device while
driving."
►
After you have read and fully understood the message, tap on OK.
If you do not accept the content of the message, tap on Cancel in
order to exit the navigation application.
Navigation
- 21 -
User's manual NAVIGON 42 Essential
The NAVIGATION window is opened. From here you can access all the
functions of the navigation application.
Initialising the GPS receiver
Note: Good reception of GPS data requires an unobstructed path from
the GPS receiver to the satellites. Tunnels, narrow thoroughfares
between buildings and reflecting house fronts can restrict GPS
reception greatly or make it impossible. If the GPS receiver or the
navigation device is inside a vehicle, a metallised windscreen or a
windscreen heater can be the cause of poor GPS reception.
As soon as the navigation device has been switched on, initialisation of
the GPS receiver will begin.
The integrated GPS receiver is not initialised for the first time until the
navigation application is started for the first time. It can take up to
5 minutes to initialise the GPS receiver for the first time.
Each time you switch on the navigation device after this, GPS reception
will start within a short time.
If the navigation device has not been switched on for more than a week,
it can take up to 10 minutes to re-initialise the receiver.
Note: Directly after the GPS symbol indicates the GPS Ready state,
the accuracy of the positioning may be reduced for a few minutes.
In the top right hand corner of the screen you will see the GPS symbol.
As soon as data from at least three satellites is received, the symbol will
change to
(GPS Ready).
Note: Initialisation takes the least time if you do not start driving until
the initialisation has finished.
For more details about the GPS symbol refer to chapter "GPS" on
page 16.
Returning to the Navigation window
The NAVIGATION window opens when the navigation application is
started.
If another window of the navigation application is open, tap on
(Back). This will return you to the window you came from.
►
- 22 -
Tap on
opened.
(Back) repeatedly until the NAVIGATION window is
Navigation
User's manual NAVIGON 42 Essential
6.2
Specifying a destination
Under New Destination you can enter destinations to which you have
not yet navigated or which you have not saved.
Here you can enter the destination's address or coordinates, select a
POI, or select a destination with the Direct Access function.
Note: The first time that you want to enter a new destination you will be
asked to select the country in which your destination is situated.
Under My Destinations you can select from the following lists of
destinations and addresses:
►
FAVOURITES: All destinations that you have entered and then saved.
Two special destinations are also saved in the FAVOURITES list:
►
My Address: The address which was saved as the home
address (refer to "Defining the home address" on page 35).
My Starting Point: The starting point of the last navigation is
automatically saved.
LAST DESTINATIONS: Destinations to which you have navigated on a
previous occasion.
►
►
►
6.2.1
IMPORTED ADDRESSES: All destinations that you have imported from
Microsoft Outlook or from other data sources.
Specifying the country in which the destination is situated
At top left in the ADDRESS, POI IN A CITY and POI NATIONWIDE windows
you will find the Country button. It bears the flag of the country in which
you can currently select destinations for the navigation application.
If your destination is in a different country, then proceed as follows:
1. Tap on the Country button.
2. Enter the name of the country in which your destination is situated.
The button shows the flag of the destination country.
Note: The selection list contains only those countries whose maps are
available to the navigation device.
Navigation
- 23 -
User's manual NAVIGON 42 Essential
6.2.2
Entering a destination address
1. In the NAVIGATION window, tap on New Destination > Enter an
Address.
Note: The following description is based on City First as the order for
entering the address.
If the navigation device contains the map of a country in which the
street is usually listed first (e.g. Sweden, Norway, ...), you can also
choose Street First as the order for entering the destination address.
You can define the order in the NAVIGATION window at Options >
Settings > General > Input Mode for Address Data.
Please note however that the Street First order of entry is not possible
for all countries. In this case you must enter the city first.
The ADDRESS window opens.
1. Enter the name or the postal code of the destination town.
2. Enter the name of the destination street.
3. Enter the house number. If you do not know the house number,
then leave this box empty.
If you don't know the house number but know the name of a nearby
side street, then tap on the Cross Street box and enter the name of
this street. The navigation system will calculate a route to the
intersection of the streets you have entered.
The DETAILED INFORMATION ABOUT THE DESTINATION window opens.
4. Tap on Start Navigation in order to navigate to the stipulated
address.
-orTap on Parking in order to search for and navigate to a car park
near your destination.
Sometimes the destination cannot be found exactly because, for
example, the entered combination of place and street name exists
several times.
In this case a window will open with a list of all the addresses
matching your entry plus additional information.
►
Tap on the address to which you want to navigate.
If the entered house number is not included on the map, the window
will show an address with the house number closest to the one
entered.
The map opens in Preview mode. The destination is indicated on
the map.
For detailed information on how to start navigation, please refer to
chapter "Route preview" on page 33. Please read on there.
- 24 -
Navigation
User's manual NAVIGON 42 Essential
Note: It is not necessary to enter all the address details. You can tap on
(Start Navigation) before you get that far.
If you specify the town only, the navigation system will calculate a route
to the town centre.
If you specify only the town and street without specifying a house
number or cross street, the navigation system will calculate the best
route to this street.
6.2.3
Enter Coordinates
You can also enter the geographic coordinates of your destination. The
coordinates can be entered as decimal degrees or in degrees, minutes
and seconds.
1. In the NAVIGATION window, tap on New Destination > Enter
Coordinates.
The ENTER COORDINATES window opens.
Entering as a decimal number
2. Enter the degree of latitude.
Begin the entry with a minus sign if you want to enter a southern
degree of latitude.
3. Enter the degree of longitude.
Begin the entry with a minus sign if you want to enter a western
degree of longitude.
Entering with minutes / seconds
2. Enter the degree of latitude.
Use the corresponding buttons shown on the keyboard in order to
enter the units:
(degrees),
(minutes),
(seconds).
The (N S) button alongside the entry box indicates whether it is a
northern or southern degree of latitude.
►
Tap on the button if you want to change the current setting.
3. Enter the degree of longitude.
Use the corresponding buttons shown on the keyboard in order to
enter the units:
(degrees),
(minutes),
(seconds).
The (E W) button alongside the entry box indicates whether it is an
eastern or western degree of longitude.
Navigation
- 25 -
User's manual NAVIGON 42 Essential
Tap on the button if you want to change the current setting.
The DETAILED INFORMATION ABOUT THE DESTINATION window opens.
►
4. Tap on Start Navigation in order to navigate to the stipulated
address.
-orTap on Parking in order to search for and navigate to a car park
near your destination.
6.2.4
Points of interest
Points of Interest, called POI for short, are useful addresses that are
catalogued according to particular criteria.
POIs include ports, airports, restaurants, hotels, petrol stations, public
buildings, doctor's surgeries, hospitals, shopping centres, etc.
Points of interest can be displayed on the map by means of a symbol.
In the NAVIGATION window tap on Options > Settings > Map Display >
Categories Shown in order to select the categories you want to appear
on the map.
Note: If you have created your own POIs, they will be available under
the MyPOIs category. For more details about creating your own POIs
refer to chapter "MyPOIs: My POIs" on page 53.
POI nearby
POIs nearby are POIs located within a certain radius of your current
location. This means you can always find the nearest petrol station for
example, no matter where you are.
Note: GPS reception must be good enough for determining your
position. Check the
(GPS Ready) symbol to see whether GPS
reception is good enough.
For more details refer to the chapter "Initialising the GPS receiver" on
page 22.
Note: The Direct Access section offers 3 categories of POI from the
current vicinity which can be searched for quickly and without additional
entry.
For more details refer to the chapter "Direct access to POI" on page 29.
1. In the NAVIGATION window tap on New Destination > Search for
POI > Nearby.
The POI NEARBY window opens.
2. Select a category from which you would like to find a POI.
Categories in which no destinations are available nearby cannot be
selected.
- 26 -
Navigation
User's manual NAVIGON 42 Essential
If sub-categories exist for the category you have selected, the Sub
Category list opens.
3. Select the sub-category from which you would like to select a POI.
The Destination list opens. It contains the nearest POIs in the
specified category, sorted by distance.
4. If the list is very long:
►
Tap on
(Close List).
The keyboard appears.
►
Enter a number of letters from the destination.
►
Tap on
(Open List).
The list now contains only those destinations which begin with the
letters entered.
5. Tap on the name of the destination.
The DETAILED INFORMATION ABOUT THE DESTINATION window opens.
6. Tap on Start Navigation.
-orTap on Parking in order to search for and navigate to a car park
near your destination.
The map opens in Preview mode. The destination is indicated on
the map.
For detailed information on how to start navigation, please refer to
chapter "Route preview" on page 33. Please read on there.
POI of nationwide significance
POIs of nationwide significance are airports, sights, national
monuments, large ports etc. This way you can find well-known places of
interest even if you don't know the name of their location.
1. In the NAVIGATION window tap on New Destination > Search for
POI > Nationwide.
The POI NATIONWIDE window opens.
2. Select a category from which you would like to find a POI.
The Destination list opens. It contains the POI from the selected
category, sorted alphabetically.
3. If the list is very long:
►
Tap on
(Close List).
The keyboard appears.
►
Navigation
Enter a number of letters from the destination.
- 27 -
User's manual NAVIGON 42 Essential
►
Tap on
(Open List).
The list now contains only those destinations which begin with or
contain the letters entered.
4. Tap on the name of the destination.
The DETAILED INFORMATION ABOUT THE DESTINATION window opens.
5. Tap on Start Navigation.
-orTap on Parking in order to search for and navigate to a car park
near your destination.
The map opens in Preview mode. The destination is indicated on
the map.
For detailed information on how to start navigation, please refer to
chapter "Route preview" on page 33. Please read on there.
POI in a particular location
POIs in a particular location can be useful when navigating in an
unfamiliar town.
1. In the NAVIGATION window tap on New Destination > Search for
POI > in a City.
The POI IN A CITY window opens.
2. Enter the name or the postal code of the destination town.
3. Select a category from which you would like to find a POI.
Categories in which no destinations are available in the selected
town cannot be entered.
If sub-categories exist for the category you have selected, the Sub
Category list opens.
4. Select the sub-category from which you would like to select a POI.
The Destination list opens. It contains POI from the specified
category, sorted alphabetically.
5. If the list is very long:
►
Tap on
(Close List).
The keyboard appears.
►
Enter a number of letters from the destination.
►
Tap on
(Open List).
The list now contains only those destinations which begin with or
contain the letters entered.
6. Tap on the name of the destination.
- 28 -
Navigation
User's manual NAVIGON 42 Essential
The DETAILED INFORMATION ABOUT THE DESTINATION window opens.
Sometimes the destination cannot be found exactly because, for
example, several restaurants with the same name exist in the town
in question.
In this case a window opens with all the destinations matching your
entry plus additional information.
►
Tap on the destination to which you want to navigate.
7. Tap on Start Navigation.
-orTap on Parking in order to search for and navigate to a car park
near your destination.
The map opens in Preview mode. The destination is indicated on
the map.
For detailed information on how to start navigation, please refer to
chapter "Route preview" on page 33. Please read on there.
Direct access to POI
The direct access area contains 3 categories of POI. Destinations in
your vicinity that correspond to one of these categories can be viewed
here quickly and without further entry.
►
In the NAVIGATION window tap on Options > Settings > General in
order to select which categories or sub-categories are to be
available for direct access.
Note: GPS reception must be good enough for determining your
position. Check the
(GPS Ready) symbol to see whether GPS
reception is good enough.
For more details refer to the chapter "Initialising the GPS receiver" on
page 22.
1. In the NAVIGATION window tap on New Destination.
The NEW DESTINATION menu opens.
In the Direct Access area you are shown the symbols of those POI
categories that are available by direct access.
2. Tap on the category from which you would like to select a POI.
A list opens. It contains the nearest POIs in the specified category,
sorted by distance.
3. Tap on the name of the destination in order to start navigation to it.
The map opens in Preview mode. The destination is indicated on
the map.
Navigation
- 29 -
User's manual NAVIGON 42 Essential
For detailed information on how to start navigation, please refer to
chapter "Route preview" on page 33. Please read on there.
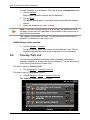
6.2.5
Information about the destination
For many destinations that you specify, there will be further information
available, stored in the navigation system's database.
There is, for example, a telephone number available for many
restaurants. You can then call the restaurant to reserve a table, for
example.
One of the destination entry windows described above is open.
►
Tap on Options > Info.
The DESTINATION INFO window opens. It contains all the information
about the specified destination that is stored in the navigation system's
database.
►
►
►
6.2.6
Tap on Close in order to close the DESTINATION INFO window again.
Tap on
map.
(Show on Map) in order to see the destination on the
Tap on
(Save Destination) in order to save the destination in the
FAVOURITES list.
Favourites
Destinations to which you want to travel often can be saved in the
FAVOURITES list.
In the FAVOURITES list you can save up to 500 destinations.
Information on how to save a destination can be found in chapter
"Saving destinations" on page 34.
1. In the NAVIGATION window, tap on My Destinations > Favourites.
2. Tap on the destination to which you want to navigate.
The DETAILED INFORMATION ABOUT THE DESTINATION window opens.
3. Tap on Start Navigation.
-orTap on Parking in order to search for and navigate to a car park
near your destination.
The map opens in Preview mode. The destination is indicated on
the map.
For detailed information on how to start navigation, please refer to
chapter "Route preview" on page 33. Please read on there.
- 30 -
Navigation
User's manual NAVIGON 42 Essential
Note: Favourites are indicated on the map by a small flag with their
name.
6.2.7
Last Destinations
The last 12 destinations to which you have navigated are saved by the
navigation system in the LAST DESTINATIONS list.
1. In the NAVIGATION window, tap on My Destinations > Last
Destinations.
2. Tap on the destination to which you want to navigate.
The DETAILED INFORMATION ABOUT THE DESTINATION window opens.
3. Tap on Start Navigation.
-orTap on Parking in order to search for and navigate to a car park
near your destination.
The map opens in Preview mode. The destination is indicated on
the map.
For detailed information on how to start navigation, please refer to
chapter "Route preview" on page 33. Please read on there.
6.2.8
Imported Addresses: Outlook / Internet
You can use the NAVIGON Sync software to export to your navigation
system the contact addresses which you have saved in Microsoft
Outlook on your computer.
From many route planners on the Internet it is also possible to copy the
entered destination address directly onto your navigation system. This
function is clearly indicated on those websites which offer it.
Note: You can download NAVIGON Sync free of charge from our
website www.navigon.com.
Contacts which have been saved with several addresses will appear
once with each address in the IMPORTED ADDRESSES list.
1. In the NAVIGATION window tap on My Destinations > Imported
Addresses > Outlook / Internet.
2. Tap on the address to which you want to navigate.
The DETAILED INFORMATION ABOUT THE DESTINATION window opens.
3. Tap on Start Navigation.
-orTap on Parking in order to search for and navigate to a car park
near your destination.
Navigation
- 31 -
User's manual NAVIGON 42 Essential
The map opens in Preview mode. The destination is indicated on
the map.
For detailed information on how to start navigation, please refer to
chapter "Route preview" on page 33. Please read on there.
6.2.9
Navigating home
You can save an address as your home address. You can navigate to
your home address at any time by pressing a single button.
More information about entering your home address can be found in the
chapter "Defining the home address" on page 35.
►
In the NAVIGATION window tap on Take Me Home.
If you have not yet entered your home address, a dialog box will
notify you of this.
Navigation starts. The route profile used for the previous navigation will
be applied.
6.2.10
Selecting destinations on the map
You may select a destination directly on the map. This is a quick way to
select towns, streets and POI.
1. In the NAVIGATION window tap on Show Map.
2. Tap on
(Destination search).
The map opens in Destination search mode.
3. Tap on the point to which you want to navigate.
Note: For details of how to change the map view so that your destination
is easily seen refer to the chapter "Map in Destination search mode" on
page 48.
The destination that you have selected appears under the cross
hairs.
The geographical coordinates of the destination and the
corresponding address are shown in the bottom third of the screen.
4. Tap on
(OK).
The DESTINATION ON M AP window opens. The detailed address data
of the selected destination is displayed in the upper left-hand
corner.
5. Tap on Take Me There.
The map opens in Preview mode. The destination is indicated on
the map.
- 32 -
Navigation
User's manual NAVIGON 42 Essential
For detailed information on how to start navigation, please refer to
chapter "Route preview" on page 33. Please read on there.
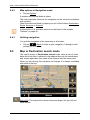
6.2.11
Route preview
The map is open in Preview mode.
The navigation destination is depicted by a small flag.
For detailed information refer to the chapter "Map in Preview mode" on
page 44.
Route Profile
The route is calculated on the basis of a route profile. The current route
profile is indicated at the top right edge of the map.
Route profiles take account of the characteristics and special aspects of
the different modes of transport. For example a route profile for bicycles
will exclude motorways from the route calculation but will include roads
which other vehicles are not allowed to use. And a bicycle profile will
calculate different arrival times than a motorcycle profile.
►
Tap on the Route Profile button if you want to select a different
route profile.
For details of how to create and select route profiles refer to chapter
"Route profiles" on page 50.
Turn-by-Turn List
►
If you want to see detailed directions for the route, tap on Options >
Turn-by-Turn List.
For details of the functions in the TURN-BY-TURN LIST window refer to
chapter "Turn-by-Turn List" on page 60.
Start Navigation
►
Tap the Start Navigation button or simply start driving.
If you select a route for which traffic obstructions have been announced,
the PREVIEW TMC window may open before navigation starts (refer to
"Preview TMC" on page 62).
►
Navigation
Select whether you want to use the original route (Current Route) or
a detour (Alternative route).
- 33 -
User's manual NAVIGON 42 Essential
No GPS reception
If GPS signal reception is not good enough, the following message will
appear: "Waiting for GPS-Signal…"
You have the following options:
►
►
►
Wait. As soon as GPS reception is good enough for determining
your position, the route will be recalculated and navigation will
begin.
Tap on Cancel. The window in which you entered your destination
will open again. Your destination is saved in the LAST DESTINATIONS
list.
Tap on Demo. The route will be calculated using the centre of the
destination location as starting point. Navigation will then be
simulated on this route.
Tap on
(Back) in order to terminate the demonstration.
Note: If you selected the destination on the map, then the Demo button
is not available.
6.3
Managing destinations
Every destination you enter and destinations from the LAST
DESTINATIONS and IMPORTED ADDRESSES lists can be saved in the
FAVOURITES list. This makes sense if you frequently navigate to this
particular destination.
Note: Favourites are indicated on the map by a small flag with their
name.
6.3.1
Saving destinations
1. Enter a destination. (refer to "Entering a destination address " on
page 24 or "Points of interest" on page 26). Do not tap on the Start
Navigation button!
2. Tap on Options > Save Destination.
-or1. Select a destination from the LAST DESTINATIONS list or from the
IMPORTED ADDRESSES list (refer to "Last Destinations" on page 31
or "Imported Addresses: Outlook / Internet" on page 31). Do not tap
on the Start Navigation button!
2. Tap on Options > Save as Favourite.
3. Enter a name for the destination.
4. Tap on Save.
- 34 -
Navigation
User's manual NAVIGON 42 Essential
6.3.2
Defining the home address
You can always start navigation to your home address very quickly by
tapping in the NAVIGATION window on Take Me Home.
You can define exactly one destination as your home address. This
destination is saved in the FAVOURITES list.
Proceed as follows:
1. In the NAVIGATION window, tap on New Destination > Enter an
Address.
The ADDRESS window opens.
2. Enter your home address.
3. Tap on Options > Save Destination.
4. Enter a name for the address (e.g. "Home Address").
Your home address is now saved in the FAVOURITES list.
5. Tap on
(Back).
The NAVIGATION window opens.
6. Tap on My Destinations > Favourites.
7. Select from the FAVOURITES list the destination which you want to
define as your new home address (refer also to Favourites on
page 30).
8. Tap on Options > Home Address.
The selected destination has now been saved as your home address.
Your home address now appears in the FAVOURITES list marked by a
house symbol.
Note: The home address is also indicated on the map by a house
symbol.
Changing the home address
You can define a different address as the home address at any time.
Proceed as described above.
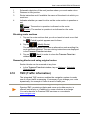
6.4
Multi-leg routes
It is possible to plan routes without GPS reception, for example in the
comfort of your home. Planned routes can be saved for later use. This
allows you to plan as many routes as you like, for example for your
holidays.
1. In the NAVIGATION window tap on Options.
The options list opens.
2. Tap on the Route Planning option.
The ROUTE PLANNING window opens.
Navigation
- 35 -
User's manual NAVIGON 42 Essential
6.4.1
Entering the starting point
The starting point of a route is the point at which you want to begin your
trip. This is not necessarily the current location. If you are planning a
route for your holidays at home, you could, for example, enter your
hotel as the starting point.
The starting point is only important if you want to see a planned route
on the map but currently have no GPS reception, or if you are not
currently at the planned starting point. This is why your selected starting
point has the flow number "0".
As soon as you start navigation, your current location will be used as
the starting point for the route calculation.
The first leg of the route is therefore the journey to the route point with
flow number "1".
1. Tap on the Specify Starting Point box.
The STARTING POINT menu opens.
If you want to enter your current location as the starting point:
2. Tap on the Current Position menu item.
If you want to enter a different starting point:
2. Tap on the corresponding button.
3. Enter the starting point (refer to the corresponding section of the
chapter "Specifying a destination" on page 23).
4. Tap on
(Set Starting Point).
The selected starting point will now be shown next to the 0 (Starting
Point) button.
Changing the starting point
Tap on the starting point (button 0).
The STARTING POINT menu opens. You can now enter a different
starting point. Proceed as described above.
►
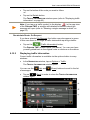
6.4.2
Entering route points
The route points of a route are the destinations that you want to
navigate to.
The flow number for each route point is indicated on a button in front of
it.
1. Tap on the Add Route Point box.
The ROUTE POINT menu opens.
2. Tap on the button for how you want to enter the destination.
- 36 -
Navigation
User's manual NAVIGON 42 Essential
3. Enter the route point (refer to the corresponding section of the
chapter "Specifying a destination" on page 23).
4. Tap on
(Add).
The selected route point is now shown next to its flow number.
Repeat these steps for each destination that you want to add to your
route.
6.4.3
Editing route points
Route points can be deleted from a route. The order of the route points
can be changed as you wish.
Note: The starting point (flow number "0") can be neither moved nor
deleted. However you can make another route point into the starting
point provided the Current Position setting was not selected for the
starting point.
►
Tap on the route point that you want to edit.
The context menu contains the following buttons:
Route Point Up: Moves the selected route point further to the front.
(Example: route point 2 becomes route point 1)
Route Point Down: Moves the selected route point further to the back.
(Example: route point 2 becomes route point 3)
Delete: Deletes the selected route point. A dialog window prompts you
to confirm deletion.
6.4.4
Managing routes
You can save each planned route under a particular name.
Note: Only the start point and route points will be saved, not the
calculated route. When you load a saved route, it must be recalculated
before navigation can start.
You can load, rename or delete stored routes.
Saving routes
The ROUTE PLANNING window is open. You have entered the starting
point and at least one route point.
1. Tap on Options > Save Route.
2. Enter a name for the route.
3. Tap on
Navigation
(Save).
- 37 -
User's manual NAVIGON 42 Essential
The destination is now saved to the SAVED ROUTES list. The dialog
window closes.
6.4.5
Loading routes
1. Tap on Options > Saved Routes.
2. Tap on the route that you want to load.
3. Tap on
(Load Route).
The ROUTE PLANNING window opens. The starting point and the
route points of the loaded route have been entered. For the route
calculation the starting point is replaced by the current position. You
will now be guided to the first route point.
6.4.6
Calculating and displaying routes
It is possible to calculate and display a planned route on the map even
without GPS reception in order to get an impression of the journey.
The ROUTE PLANNING window is open. The starting point and at least
one route point have been entered.
►
Tap on Show Route.
The map opens in Preview mode.
The starting point and the route points are marked by flags. The
distance and the estimated trip time is given for each leg of the
route.
6.4.7
Simulating routes
It is also possible simply to simulate navigation on a planned route.
Note: GPS reception is not necessary for simulation.
If you have planned a multi-leg route, only the first leg will be simulated.
You have calculated and displayed a route.
1. Tap on Options > Simulation.
The route will be recalculated for simulation purposes.
Simulation starts when calculation has finished.
Stopping simulation
You can stop simulation at any time.
►
Tap on
(Back).
The ROUTE PLANNING window opens.
- 38 -
Navigation
User's manual NAVIGON 42 Essential
6.4.8
Route preview
You have calculated and displayed a route. The map is open in
Preview mode.
Route Profile
Route profiles take account of the characteristics and special aspects of
the different modes of transport. For example a route profile for bicycles
will exclude motorways from the route calculation but will include roads
which other vehicles are not allowed to use. And a bicycle profile will
calculate different arrival times than a motorcycle profile.
►
Tap on the Route Profile button if you want to select a different
route profile.
For details of how to create and select route profiles refer to chapter
"Route profiles" on page 50.
Note: When you load routes which originate from a different provider
than NAVIGON, it may be impossible for you to change the route profile
of this route.
Turn-by-Turn List
If you want to see detailed directions for the route, tap on Options >
Turn-by-Turn List.
For details of the functions in the TURN-BY-TURN LIST window refer to
chapter "Turn-by-Turn List" on page 60.
Start Navigation
►
Tap the Start Navigation button or simply start driving.
If you select a route for which traffic obstructions have been announced,
the PREVIEW TMC window may open before navigation starts (refer to
"Preview TMC" on page 62).
►
Select whether you want to use the original route (Current Route) or
a detour (Alternative route).
No GPS reception
If GPS signal reception is not good enough, the following message will
appear: "Waiting for GPS-Signal…"
You have the following options:
►
►
Navigation
Wait. As soon as GPS reception is good enough for determining
your position, the route will be recalculated and navigation will
begin.
Tap on Cancel. The map opens in Preview mode.
- 39 -
User's manual NAVIGON 42 Essential
7
Options
Some windows offer options that lead to more functions.
►
Open the Options menu.
►
Tap on the option you would like to use.
►
If you would like to quit the options list without selecting an option,
tap on the Options button again.
2D/3D: Changes between 2D and 3D mode. The symbol indicates the current
mode.
Add to Route: Opens the route planning. The address specified will be added as
a route point (refer to "Multi-leg routes" on page 35).
Block: Opens a window in which you can block a section of the route lying
ahead in order to calculate a route which avoids this section, e.g. if you
have heard on the radio of a traffic jam relating to this section (refer to
"Block" on page 59).
Day/Night: Changes between "Day" and "Night" screen modes. The symbol
indicates the current mode.
Delete All: Deletes all destinations in the list (LAST DESTINATIONS list or
FAVOURITES list, depending on where you opened the options). The list
is then empty. A dialog window prompts you to confirm deletion.
Delete: Deletes the selected destination from the LAST DESTINATIONS or
FAVOURITES list or the selected route or track from the SAVED ROUTES
list. A dialog window prompts you to confirm deletion.
Direct Help: Opens a window in which you can find in quick and uncomplicated
manner the addresses and phone numbers of offices in your direct
vicinity that can be useful in emergencies (refer to "Direct Help" on
page 58).
Factory Settings: Resets all settings to the as-delivered state. Routes and
saved destinations are deleted. The software is re-started and behaves
as if started for the first time after being purchased (refer to "Switching
on the navigation device" on page 13).
GPS Status: Opens the GPS STATUS window. Here you can see details
regarding GPS reception. You can also save the data of your current
location (refer to "GPS Status, saving the current location" on page 59).
Home Address: Saves the selected destination as your home address. You can
then always start navigation to this destination very quickly by tapping in
the NAVIGATION window on Take Me Home.
- 40 -
Options
User's manual NAVIGON 42 Essential
Interim Destination: Sets the selected point as interim destination. The
navigation system will first guide you to this interim destination.
Afterwards you can continue navigation to your original destination.
Manual: Opens the manual on the navigation device (refer to "Manual" on
page 16).
MyReport: Opens the MYREPORT window. Here you can notify NAVIGON about
any changes to traffic monitoring systems and routing.
New Route: Deletes the starting point and all route points from the ROUTE
PLANNING window so that you can plan a new route. If necessary, save
the previously planned route!
Parking: Starts navigation to a car park near the destination.
POI on Your Route: Opens a list with POIs lying on your route. A destination
shown here can be selected as an interim destination and can be
navigated to (refer to "POI on Your Route" on page 56).
Product Information: Here you are shown the version numbers and copyright
details of the hardware and software.
Rename: Opens a window in which you can change the name for the selected
destination or route.
Route Profile: Opens the ROUTE PROFILE window. Here you can view the
options for route planning and, if necessary, change them.
Route Planning: Opens the ROUTE PLANNING window. Here you can plan
routes, manage planned routes and start navigation on a planned route
(refer to "Multi-leg routes" on page 35).
Save as Favourite: Saves the selected destination to the FAVOURITES list (refer
to "Saving destinations" on page 34).
Save Destination: Saves the selected address in the FAVOURITES list (refer to
"Saving destinations" on page 34).
Save Position: Opens the SAVE DESTINATION AS window. Here you can save
your current position under a certain name in the FAVOURITES list.
Save Route: Opens a window in which you can save the planned route under a
specific name (refer to "Saving routes" on page 37).
Saved Routes: Opens a window in which you can load a saved route or a track.
Options
- 41 -
User's manual NAVIGON 42 Essential
Settings: Opens the SETTINGS window. Here you can configure the navigation
system (refer to "Configuring the navigation system" on page 67).
Show Map: Opens the map in Standard mode (refer to "Map in Standard
mode" on page 42).
Show on Map: Shows the selected address on the map.
Simulation: Simulates a navigation on the route indicated. This simulation can
be performed without GPS reception. On multi-leg routes, only the first
leg is simulated.
Skip current destination: Tap on this button to omit the next route point. This
button is active only when at least 2 route points still lie ahead of you
(refer to "Multi-leg routes" on page 35).
Traffic: Opens the TRAFFIC INFORMATION window in which pending reports are
listed (refer to "TMC (Traffic Information)" on page 61).
Turn-by-Turn List: Shows detailed directions for the route, including all points at
which you must turn (refer to "Turn-by-Turn List" on page 60).
8
Working with the map
8.1
Selecting the navigation map
Each country has its own navigation map. Seamless navigation over
several maps on one continent is possible however if a continuous
route can be calculated with the maps saved on the device.
Even if maps of countries in other continents are available on the
navigation device, it can only ever work with the maps of a single
continent.
Tap in the NAVIGATION window on Options > Settings > Map Display in
order to see which maps are currently in use. Here you can also select
a different continent if the navigation device contains any maps of
countries on other continents.
8.2
Map in Standard mode
The map is always in Standard mode when you are not navigating,
have not calculated a route and are not searching for a destination on
the map.
Under the following circumstances the map switches automatically to
Standard mode:
- 42 -
Working with the map
User's manual NAVIGON 42 Essential
►
►
You begin a trip while the NAVIGATION window is open. The switch
takes place after only a short while.
You reach the destination of a navigation in Vehicle mode.
To open the map:
►
In the NAVIGATION window tap on Show Map.
Note: If GPS reception is not good enough to establish your location, the
map will be opened in Destination search mode.
The following features are typical for this view:
►
►
Indicated in the middle of the lower third is your current position
(orange arrow). The map view follows your movements so that your
position is always visible on the screen.
The scale of the map changes according to your speed.
Map options in Standard mode
►
Tap on Options.
A window with several buttons opens.
The most important functions for navigation can be reached via buttons
with symbols.
Other functions are found by tapping on one of the buttons Destination,
Route, Services or General.
A description of all available options can be found in the chapter
"Options" on page 40.
Working with the map
- 43 -
User's manual NAVIGON 42 Essential
8.3
Map in Preview mode
You have entered a destination and tapped on Start Navigation.
-orYou have planned or loaded a route and tapped on Show Route.
The map opens in Preview mode.
1
2
The route is highlighted in orange.
The destination is marked with a little flag.
If you display a planned or loaded route, the starting point and each
route point will be marked with a little flag.
In the case of a multi-leg route, the distance and the estimated driving
time for each leg are displayed.
3
The current route profile is indicated on the
(Route Profile) button.
The symbol illustrates the mode of transport on which the profile is
based (refer to "Route profiles" on page 50).
►
4
Tap on the symbol to select a different route profile.
The current position is indicated (orange arrow).
If you display a planned or loaded route and the specified starting point
is not your current location, then it is possible that your current position
will not be shown on the preview.
5
On the Start Navigation button you are shown the estimated time of
arrival, the total trip distance and the estimated trip time.
If traffic messages exist for a route, the number of messages is
indicated in a small traffic sign on the button. The reported obstructions
are also indicated on the route.
►
►
- 44 -
Tap on the
(Route Profile) button (refer to the figure, point 3) in
order to select a different route profile.
To start the navigation, tap on the button Start Navigation (see
figure, point 5).
Working with the map
User's manual NAVIGON 42 Essential
If you display a planned or loaded route, the route may be
recalculated. The starting point for the calculation will now be your
current location. You will first be guided to the first route point
entered.
►
►
8.4
Tap on Options > Turn-by-Turn List to view detailed directions for
the route (refer to "Turn-by-Turn List" on page 60).
Tap on
(Destination search) in order to view the map in
Destination search mode (refer to "Map in Destination search
mode" on page 48).
Map in Navigation mode
How you are guided to your destination depends on various factors (the
route profile selected, your current location, the type of route planning,
etc.). Your navigation system automatically selects the optimum
method.
8.4.1
Navigation in Vehicle mode
After the route was shown in Preview mode, navigation was started.
The map opens in Navigation mode.
1
If any information is available about the sign which you should follow, it
will be shown at the top edge of the screen.
Tap on the display to hide the sign.
The POI on Your Route bar will open (refer to "POI on Your Route" on
page 56). This button is not visible when a sign is being shown (see
point 1).
►
2
Working with the map
- 45 -
User's manual NAVIGON 42 Essential
For a description of the POI on Your Route function refer to chapter
"POI on Your Route" on page 56.
3
The route is highlighted in orange.
4
When two manoeuvres need to be executed in quick succession, the
small arrow box indicates the second manoeuvre to be executed.
5
The large arrow box shows a diagram of the next junction which you
should turn on to. The distance remaining to this junction is indicated
underneath.
As you get closer to the junction you will see a spot diagram in addition
to the distance:
The nearer you get to the junction, the more yellow spots are displayed.
If you don't have to change direction for a long time, you will see only a
straight arrow. The distance you must continue straight on is indicated
underneath the arrow.
►
6
Tap on the large arrow box to hear current route instructions.
The Traffic Information box opens if a reported traffic obstruction
affects your route.
If a distance is indicated in the Traffic Information box, no detour route
was calculated yet for the traffic obstruction in question.
►
Tap on the Traffic Information box in order to open the
PREVIEW TMC window. It shows a map view with the route section
affected by the message and a possible detour.
If no distance is indicated, all the obstructions which are reported for
your route and would lead to a loss of time will be avoided.
►
Tap on the Traffic Information box in order to open the TRAFFIC
INFORMATION window (refer to "Displaying traffic information" on
page 63).
Note: The calculation of detour routes to avoid reported traffic
obstructions can be performed automatically (refer to "TMC Settings" on
page 65).
7
The height above sea level and the current speed are shown here.
8
Your current position is indicated on the map (orange arrow). The
section of the map displayed changes continually so that your current
position is always in view on the map.
- 46 -
Working with the map
User's manual NAVIGON 42 Essential
9
In the Total box you can see the distance remaining to the destination,
the estimated duration of the trip and the estimated time of arrival.
►
►
10
Tap on the arrival time if you want to see the estimated driving time
instead.
Tap once again on the info box if you want to see the estimated
time of arrival.
If you are navigating a multi-leg route, you will see the remaining
distance to the next interim destination and the estimated time of arrival
in the Next box.
►
►
Tap on the arrival time if you want to see the estimated driving time
instead.
Tap once again on the info box if you want to see the estimated
time of arrival.
11
The name of the route section that you need to drive onto next is shown
in the upper road box.
12
The name of the section you are currently driving on is shown in the
lower road box.
Note: The displays of many of the above mentioned areas can be
configured in Options > Settings > Navigation. Some displays will only
function if the required information is available on the map.
Note: If you tap on the large arrow box, the current route instruction will
be repeated.
►
►
Tap on Options > Route > Turn-by-Turn List in order to view a turnby-turn list (refer to "Turn-by-Turn List" on page 60).
Tap on
(Destination search) in order to view the map in
Destination search mode (refer to "Map in Destination search
mode" on page 48).
Volume
The volume of the spoken driving instructions can be adjusted during
navigation.
1. Tap on
(Volume).
The volume bar opens. It contains three buttons for adjusting the
volume:
(Louder),
2. Tap on
(Quieter),
(Volume on/off).
(Volume) again or wait a few seconds.
The volume bar closes.
Working with the map
- 47 -
User's manual NAVIGON 42 Essential
8.4.2
Map options in Navigation mode
►
Tap on Options.
A window with several buttons opens.
The most important functions for navigation can be reached via buttons
with symbols.
Other functions are found by tapping on one of the buttons Destination,
Route, Services or General.
A description of all available options can be found in the chapter
"Options" on page 40.
8.4.3
Quitting navigation
You quit the navigation in the same way in all modes:
►
8.5
Tap on
(Back) in order to quit navigation. A dialog box will
prompt you to confirm.
Map in Destination search mode
The map is always in Destination search mode, when a pair of cross
hairs are to be seen. Indicated in the address box are the coordinates
and, where applicable, the name of the street under the cross hairs.
When you are driving, the map does not change. It is always orientated
with north at the top.
Zoom Out: The map section shown becomes larger, but you will see
fewer details.
- 48 -
Working with the map
User's manual NAVIGON 42 Essential
Zoom In: The map section becomes smaller, but you will see more
details.
Zoom Mode: When this button is active you can mark out a section of
the map with your finger.
Mark out the section from upper left to bottom right to zoom in until the
section fills the screen.
Mark out the map section from bottom right to top left to zoom out.
Pan Mode: When this button is active you can change the section of
map shown with your finger. Simply drag the map in the desired
direction.
Entire Route: Zooms the map so that the entire route is visible.
Current Position: Selects the section of map displayed so that the
current location is at the centre.
8.5.1
Operating in Destination search mode
1. Tap on the point to which you want to navigate.
The destination that you have selected appears under the cross
hairs.
The geographical coordinates of the destination and the
corresponding address are shown in the bottom third of the screen.
2. Tap on
(OK).
Buttons with various functions will be displayed.
Take Me There: Starts navigation to the selected point. If you are currently
navigating, this route navigation will be cancelled.
MyReport: Opens the MYREPORT window. Here you can notify NAVIGON about
any changes to traffic monitoring systems and routing.
Interim Destination: Sets the selected point as interim destination. The
navigation system will first guide you to this interim destination.
Afterwards you can continue navigation to your original destination.
This function is only active during navigation.
Add to Route: Adds the selected point to the route planning as the last point.
Navigation will then continue to this point after you have reached the
original destination or the other route points.
Working with the map
- 49 -
User's manual NAVIGON 42 Essential
Save: Opens the SAVE DESTINATION AS window. You can enter a name under
which the selected point will be saved in the FAVOURITES list (refer to
"Saving destinations" on page 34).
Search Nearby: Opens the POI NEARBY window. Here you can search for
destinations near the selected point (refer to "POI nearby" on page 26).
►
Tap on
(Back) in order to quit Destination search mode.
You will be returned to the window from which you started this
mode.
9
Useful functions
9.1
Route profiles
Route profiles define the characteristics and special aspects of the
different modes of transport which are to be taken into account when
calculating routes. For example a route profile for bicycles will exclude
motorways from the route calculation but will include roads which other
vehicles are not allowed to use. And different arrival times will be
calculated for a bicycle than for a motorcycle for example.
9.1.1
Route profile settings
A route profile is made up of several settings:
►
►
►
►
►
Speed Profile: Defines the mode of transport (e.g. Bicycle, Car, ...).
Type of Route: Defines the type of route which is to be calculated
(e.g. Short Route, Fast Route, ...).
Consider Traffic Information: defines whether traffic messages are
to be considered when calculating the route
Motorways, Ferries, Restricted Areas: Defines whether these types
of road are allowed to be used.
Use of Toll Roads: defines whether toll roads are allowed to be
used when calculating the route
►
Tap on the
(Edit) button.
The USE OF TOLL ROADS window opens.
►
Adapt the individual settings to your requirements (Yes, No, Ask
before) (refer also to Configuring the navigation system on
page 67).
If you activate the Ask before setting, every time your route can
take a toll road you will be prompted to make the corresponding
setting(s).
For each setting there is a
(Help) button. When you tap on it you
will see an exact definition of the setting in question.
- 50 -
Useful functions
User's manual NAVIGON 42 Essential
The number of possible settings depends on the selected speed profile.
For example, for the Bicycle speed profile there are no Motorways and
Use of Toll Roads settings.
9.1.2
NAVIGON basic profiles
A basic profile is already defined for each speed profile.
Bicycle
Lorry
Motorbike
Car
The speed profile of a basic profile cannot be changed. You can adapt
the other settings to your requirements.
Basic profiles cannot be renamed or deleted.
To have a choice of different profiles for example for several cars, you
can create your own route profiles.
9.1.3
Creating a new route profile
You can create your own route profiles. This makes sense for example
if you own two cars and only one has a prepaid toll disc for Austrian
motorways.
1. Tap on Options > Settings.
If the map is open in Standard mode, tap on Options > General >
Settings.
2. Tap on the
(Current Route Profile) button. This button can also
show a different symbol.
3. Tap on the name of the route profile which you want to take as
basis for the new profile.
4. Tap on Options > Copy.
5. Enter a name for the route profile.
6. Tap on Save.
7. Adapt the route profile to your requirements.
8. Tap on OK.
The new route profile is shown in the ROUTE PROFILES list.
Useful functions
- 51 -
User's manual NAVIGON 42 Essential
9.1.4
Selecting a route profile
1. Tap on Options > Settings >
(Current Route Profile).
If the map is open in Standard mode, tap on Options > Route >
Current Route Profile:.
2. Tap on the name of the route profile which you want to use.
3. Tap on
9.1.5
(Back).
Managing route profiles
User-defined route profiles can be edited, renamed and deleted.
Editing a route profile
1. Tap on Options > Settings.
If the map is open in Standard mode, tap on Options > General >
Settings.
2. Tap on the
(Current Route Profile) button. This button can also
show a different symbol.
3. Tap on the
want to edit.
(Edit) button alongside the route profile that you
4. Make the required settings.
5. Tap on OK.
The Use of Toll Roads setting is comprised of several individual
settings. For example for each country with toll motorways you can
select whether you want to use these roads for the navigation.
1. Tap on the
(Edit) button alongside the Use of Toll Roads
setting.
The USE OF TOLL ROADS window opens.
2. Adapt the individual settings to your requirements (Yes, No, Ask
before).
If you activate the Ask before setting, each time the route preview
wants to calculate a route with a toll road you will be asked whether
you want to use the type of toll roads in question. You can then lay
down this setting for future journeys as well.
Renaming a route profile
1. Tap on Options > Settings.
If the map is open in Standard mode, tap on Options > General >
Settings.
2. Tap on the
(Current Route Profile) button. This button can also
show a different symbol.
- 52 -
Useful functions
User's manual NAVIGON 42 Essential
3. Tap on the name of the route profile which you want to rename.
4. Tap on Options > Rename.
5. Enter the new name for the route profile.
6. Tap on Save.
Note: Basic profiles cannot be renamed.
Deleting a route profile
1. Tap on Options > Settings.
If the map is open in Standard mode, tap on Options > General >
Settings.
2. Tap on the
(Current Route Profile) button. This button can also
show a different symbol.
3. Tap on the name of the route profile which you want to delete.
4. Tap on Options > Delete.
5. A dialog window prompts you to confirm deletion.
6. Tap on Yes.
Note: Basic profiles cannot be deleted.
9.2
MyPOIs: My POIs
You can create files with your own POIs. These files have to be made
available to your navigation system in a specific folder.
If you want to choose from your own POIs, you will find them under the
MyPOIs category of POIs. Each file with your own POIs is listed as a
sub-category. Each sub-category can have a personally created symbol
for representing your destinations on the map.
Note: The navigation device can import a maximum of 10,000 POIs.
These destinations are allowed to be shared among a maximum of
40 sub-categories.
9.2.1
Creating your own destinations
1. Open an empty document in an editor which can save the files in
UTF8 code (e.g. MS Notepad, Microsoft Word).
Note: The following description is based on the use of MS Notepad as
editor. If a different editor is used, the saving of the file and its UTF-8
coding (point 4-9) may differ from this description.
Useful functions
- 53 -
User's manual NAVIGON 42 Essential
2. For each destination create a data record (one line) with the
following form:
►
►
►
►
►
Longitude. Begin the entry with a minus sign if you want to
enter a western degree of longitude. The longitude must be
entered as a decimal number with a dot as the decimal sign.
Comma (as list separator)
Latitude. Begin the entry with a minus sign if you want to enter
a southern degree of latitude. The latitude must be entered as a
decimal number with a dot as the decimal sign.
Comma (as list separator)
Name of the destination. Any name is possible, but no commas
are allowed. If the use of a comma is indispensable, precede it
with a backslash ('\').
►
Comma (as list separator)
►
PHONENUMBER=
►
A phone number. This entry can remain empty.
►
Tilde ('~')
►
Additional information. This entry can remain empty.
►
Enter (in order to begin a new data record)
The address does not have to be included in the data record. It is
shown automatically when you select this POI for navigation. If you
enter additional information, it will appear under the address.
Example:
9.94302,49.79906,NAVIGON GmbH,PHONENUMBER=+49
931~Best Navigation Devices
3. Repeat step 2 for each destination you want to save in this file.
4. Click on File > Save.
5. Select a folder in which you want to save the data.
6. In the File type box select the All Files option.
7. In the file name box enter a name of your choice followed by '.csv',
e.g. 'XYZ.csv'. Please note that the file name will appear in the
navigation system as a sub-category! This means that if you save a
file under the name 'XYZ.csv', the destinations of this file will appear
in the sub-category XYZ.
8. In the Encoding box select the UTF8 option.
9. Tap on Save.
- 54 -
Useful functions
User's manual NAVIGON 42 Essential
9.2.2
Symbols for your own POIs
For each sub-category of your own POIs you can create a symbol
which is used to represent the destinations of this sub-category on the
map.
These symbols must be graphic files with the following characteristics:
►
File format bmp (Bitmap) or png (Portable Network Graphic)
►
Size max. 40x25 pixels
The graphic files must be saved in the same folder as the related files
with the POIs.
The file name must be the same as the name of the category.
Example:
Destinations of the XYZ sub-category are saved in the 'XYZ.csv' file.
They are represented on the map by the 'XYZ.bmp'symbol.
9.2.3
POI-Import: Importing your own POIs onto the navigation
device
The files you have created with your own POIs and the related symbols
must still be transferred to the navigation device. This is easy and
convenient to do with the NAVIGON Fresh software which you can
install on your computer using NAVIGON Suite or download free of
charge from our website www.navigon.com/fresh.
9.3
Screenshots
You can create and save screenshots of the content currently shown on
the screen at any moment.
9.3.1
Enabling screenshots
1. In the NAVIGATION window tap on Options > Settings > General >
Enable Screenshots.
2. Select whether you want to enable screenshots (Yes) or not (No).
The
(Screenshots) button appears at the bottom right edge of
the screen.
9.3.2
Creating a screenshot
►
Tap on the
(Screenshots) button.
The screen is saved as a graphic. The
not shown in the figure.
(Screenshots) button is
The screenshots are saved in the ScreenShots folder. This folder can
be found either in the internal memory of the navigation device, on the
inserted memory card or in both memories.
Useful functions
- 55 -
User's manual NAVIGON 42 Essential
9.4
Nearby
During the navigation, or after having opened the map using the Show
Map button, you can have POIs, Favourites and traffic information of
the current map view shown in a clearly arranged list.
Note: This function is not available if the map was opened in one of the
modes Destination search or Preview.
1. Tap on any point on the map.
The NEARBY list opens. It contains POIs, Favourites or traffic messages
of the current map view.
2. Tap on an entry in the list in order to receive detailed information
about it.
You have the following options:
►
Tap on Interim Destination in order to set the selected point as an
interim destination. The navigation system will first guide you to this
interim destination. Afterwards you can continue navigation to your
original destination. The Interim Destination button is available in
navigation mode only.
►
Tap on Start Navigation in order to navigate to the selected point.
►
Tap on Cancel in order to close the list again.
Note: The Nearby function is available only if GPS reception is good
enough.
9.5
POI on Your Route
Note: This function is available only during navigation in Vehicle mode
(refer to "Navigation in Vehicle mode" on page 45).
You can stipulate 3 categories of POI for the POI on Your Route
function. POIs which lie along your route and match one of these
categories can be quickly displayed and selected as an interim
destination during the navigation.
9.5.1
Displaying POIs along the route
1. Tap on the
(POI on Your Route) button which appears at the
top left of the map (refer to point 2 in "Navigation in Vehicle mode"
on page 45).
The POI on Your Route bar opens.
- 56 -
Useful functions
User's manual NAVIGON 42 Essential
It shows symbols of the 3 stipulated categories of POI. The distance
to the nearest POI in each category is indicated. The marking along
the route also indicates whether the POI lies on the right (
) or
left (
) in driving direction.
Note: The POI on Your Route bar closes after a few seconds.
If you want the bar to remain open, tap on the
(Fix) button. The
button changes to
(Fixed). The bar will now remain visible until
you open the POI ON YOUR ROUTE list.
2. Tap on one of the categories in order to show a list with more POIs
in this category.
The POI ON YOUR ROUTE list opens.
1
Symbols of those categories in which POIs are available are shown at
the top edge of the screen. The symbol of the currently selected
category is highlighted.
►
Tap on the symbol of the category whose POIs you want to have
displayed.
2
The list contains the next 5 POIs, sorted by distance in descending
order, which lie along your route and are in the stipulated category. The
nearest POI is therefore the lowest entry in the list.
3
Additional information about each POI in the list can be displayed.
►
4
Tap on the
(Info) button on the right alongside the
corresponding POI (refer also to "Information about the destination"
on page 30).
The route and your current position are shown schematically on the left
edge of the screen. The markings along the route indicate the distance
of the listed destinations from your position. The orange-coloured
Useful functions
- 57 -
User's manual NAVIGON 42 Essential
markings indicate whether the respective destination is on the right
(
) or on the left (
) in driving direction.
9.5.2
Navigating to one of the destinations
►
Tap in the list on the destination to which you want to navigate.
The selected destination will be inserted as an interim destination.
The system recalculates the route. Navigation to the original
destination will be continued after reaching the interim destination.
9.5.3
Selecting categories
You can stipulate which 3 categories or sub-categories are to be
available for the POIs along the route.
1. Tap in the POI ON YOUR ROUTE list on Settings.
The SETTINGS: POI ON YOUR ROUTE window opens.
2. Tap on the
(List) button alongside the category you want.
The list of POI categories will open.
If any sub-categories exist for a category, the
(List) button will
be shown again alongside it. Tap on this button to show the subcategories.
3. Select a category.
4. Tap on OK.
The SETTINGS: POI ON YOUR ROUTE window opens.
5. Tap on OK.
6. The POI ON YOUR ROUTE list opens. If there are POIs of the newly
selected category along the route, they will already appear in the
list.
7. Tap on
(Back) in order to close the list.
The map opens.
9.6
Direct Help
If you arrive at the scene of an accident or have an accident yourself, it
may be necessary to call for emergency aid and to give the answering
office your current location.
►
Tap on Options > Services > Direct Help.
The DIRECT HELP window opens.
If GPS reception is good enough, the address and the geographic
coordinates of your current location will be indicated.
►
- 58 -
Tap on
(Show on Map) if you want to view your current location
on the map.
Useful functions
User's manual NAVIGON 42 Essential
In the bottom half of the window you will find the buttons for
4 categories: Petrol Station, Police Station, Hospital, Pharmacy.
►
Tap on the corresponding button.
The nearest help point in the selected category will be indicated.
You are shown the name, address, phone number (if known) and
distance of the help point from your current location.
You have the following options:
►
►
►
Tap on the Map button in order to see your location and the help
point on the map. This gives you an overview of the route to the
help point.
Tap on Start Navigation. You will then be guided directly to the
displayed help point.
You can use the
(Up) and
(Down) buttons to select other
help points in the selected category.
The help points are sorted by distance from your current position.
►
Use the
(Back) button to return to the DIRECT HELP window.
Note: Only those help points are displayed which are situated no further
than 30 mi from your position.
9.7
GPS Status, saving the current location
In the GPS STATUS window you will find an overview of the data the
navigation system calculates from the GPS signals it receives.
The GPS status can be accessed from the options button in many
windows.
►
Tap on Options > GPS Status.
The current location can be saved in the FAVOURITES list.
1. Tap on Save Position.
The SAVE DESTINATION AS dialog box opens.
2. Enter a name for the destination.
3. Tap on Save.
9.8
Block
You can block a leg of the route at any time during a navigation, i.e. to
re-calculate the route in order to avoid the leg, e.g. if you have heard on
the radio of a traffic jam affecting this section.
Note: The block is valid only for the current navigation. It no longer
exists on a new navigation.
Useful functions
- 59 -
User's manual NAVIGON 42 Essential
You are currently in a navigation. The map is open in Navigation mode.
1. Tap on Options.
Buttons with various functions will be displayed.
2. Tap on Block.
The BLOCK menu opens. It contains buttons with different distance
values.
3. Select the distance you want to block.
Note: If you are currently driving on a motorway, the alternative route
will begin at the next exit. Indicated on the buttons is the junction up to
which the block extends.
The system recalculates the route. The blocked route section will be
avoided. It is marked on the map in red.
Unblocking a route section
►
Tap on Options > Unblock.
The block will be lifted. The system recalculates the route. The unblocked route section can now be integrated into the calculation.
9.9
Turn-by-Turn List
You can display detailed directions of the calculated route before
starting navigation or at any time during navigation. This list displays all
of the driving instructions in table form.
The map is open in Preview mode:
►
Tap on Options > Turn-by-Turn List.
The map is open in Navigation mode.
►
Tap on Options > Route > Turn-by-Turn List.
The TURN-BY-TURN LIST window opens.
- 60 -
Useful functions
User's manual NAVIGON 42 Essential
1
Schematic depiction of the next junction where you must make a turn.
2
Distance to this junction.
3
Route instruction and if available the name of the street into which you
must turn.
4
Indicates whether you want to drive on the route section in question or
not.
(Allow): The section in question is allowed on the route.
(Forbid): The section in question is not allowed on the route.
Blocking route sections
1. Tap on the route sections that you do not want to travel on so that
the
2. Tap on
(Forbid) symbol appears next to them.
(Modify Route).
The navigation system calculates an alternative route avoiding the
route sections selected. The new driving instructions are displayed
in the TURN-BY-TURN LIST window.
3. Tap on
(Back) in order to close the TURN-BY-TURN LIST
window again.
Removing blocks and using original routes
Section blocks can be removed at any time.
►
9.10
In the TURN-BY-TURN LIST window, tap on Options > Calculate
Original Route.
TMC (Traffic Information)
The integrated TMC receiver enables the navigation system to make
use of current traffic messaging. If necessary it can change your route
dynamically, for example in order to avoid a traffic jam.
Note: TMC is available free of charge in many European countries.
PremiumTMC, promising a faster and more up-to-date service, is
offered (exclusively or in addition) in some countries at a charge.
You can subscribe to PremiumTMC services on our website
www.navigon.com.
Useful functions
- 61 -
User's manual NAVIGON 42 Essential
9.10.1
Preview TMC
If a new traffic message concerning your route arises while navigation is
in progress, the Traffic Information button will appear at the right edge
of the screen.
Recalculate Route: Automatically
If you have selected Automatically for the Recalculate Route setting, the
button will not show a distance. The traffic obstruction will be avoided
automatically.
Recalculate Route: On Request
If you have selected On Request, then the distance to the reported
traffic obstruction will be indicated on the button. The button will turn red
if the distance is less than 50 km.
►
Tap on the
(Traffic Information) button.
The PREVIEW TMC window opens. It shows a map view with the
route section affected by the message. If the reported obstruction is
likely to involve a considerable loss of time, a possible detour will
also be shown.
Zoom Out: The map section shown becomes larger, but you will see
fewer details.
Zoom In: The map section becomes smaller, but you will see more
details.
Original map section: The original map section is shown again.
- 62 -
Useful functions
User's manual NAVIGON 42 Essential
►
Tap on the button of the route you want to follow.
-or-
►
Tap on the Details button.
The TRAFFIC INFORMATION window opens (refer to "Displaying traffic
information" on page 63).
Note: If you tap on a traffic symbol (in the display:
) in the map view
of the PREVIEW TMC, a window with detailed information about this
message will open (refer to "Showing a single message in detail" on
page 65).
Recalculate Route: On Request
If you have selected On Request, the button may also appear in green.
In this case there is no longer a traffic obstruction requiring a detour.
►
Tap on the
(Traffic Information) button.
The PREVIEW TMC window opens (see above). You can now have
yourself guided back to the original route or continue on the detour.
9.10.2
Displaying traffic information
Current traffic information is available via the options button in many
windows.
►
In the NAVIGATION window, tap on Options > Traffic.
The TRAFFIC INFORMATION window opens.
You can use the
of messages.
►
Useful functions
(Up) and
(Down) buttons to scroll in the list
Tap on
(Back) in order to close the TRAFFIC INFORMATION
window again.
- 63 -
User's manual NAVIGON 42 Essential
1
The Traffic Information button shows the type of traffic messaging listed
and how many messages of this type are in the list.
►
Tap on Traffic Information in order to select the messages you want
displayed.
2
This mark indicates that the message in question comes from a
PremiumTMC provider.
3
Here you can see how serious the obstruction is:
Red: The affected section of the route is fully blocked by the obstruction
or involves a considerable loss of time (more than 30 minutes) to pass
through. This can be the case for example when several lanes are
blocked due to an accident.
Yellow: The section is not fully blocked by the obstruction but there is a
threat of delays (10-30 minutes). This can be the case for example with
slow-moving traffic.
No colour: The obstruction is not classified as serious. This can be the
case for example when slow-moving traffic is reported on a very short
section, when SOS telephones are not working or when parking areas
are blocked off.
4
Here you can see how far you are from this obstruction. If the
obstruction does not lie on your route or if a detour route was already
calculated for this obstruction, then the distance as the crow flies will be
shown.
5
Here the reported obstruction is displayed as a traffic sign.
6
Here the affected road is indicated.
7
Here you can see on which section of the road the obstruction lies.
8
This symbol appears only when the reported obstruction affects your
route. Here you see how the obstruction is treated:
(Detour): An alternative route avoiding the traffic obstruction is
calculated.
(Ignore): This obstruction is ignored.
►
9
- 64 -
Tap on the button to select the alternative setting.
(Show on Map): This button is only available if at least one of the
indicated messages concerns your route. Tap on this button in order to
open the PREVIEW TMC window (refer to "Preview TMC" on page 62).
Useful functions
User's manual NAVIGON 42 Essential
9.10.3
Showing a single message in detail
►
Tap on a message to display this information in detail.
The navigation system announces the traffic message in question if the
detail view is open. The announcement of traffic messages is not
possible in every language however.
►
9.10.4
Tap on the
(Show on Map) button in order to view the section
concerned on the map.
TMC Settings
►
In the TRAFFIC INFORMATION window tap on Settings.
In the TMC SETTINGS window you can set the TMC traffic station and
configure whether the reception of a traffic message concerning your
route should affect your route planning and if so how.
Tuning Mode
Tap on Tuning Mode and select a method for selecting the TMC radio
station.
►
►
►
Automatic: You can use the arrow keys in the station area to select
another station. The system will search for another station if
reception becomes poor.
Hold station: You can use the arrow keys in the station area to
select another station. The system will search for the same station
on a different frequency if the signal becomes poor.
Hold frequency: You can use the arrow keys in the station area to
select another frequency. The system will not search for another
station if reception becomes poor.
Recalculate Route
Tap on Recalculate Route and select how new traffic messages
concerning your route are to be used.
►
►
Automatically: An alternative route will be calculated automatically.
The system will inform you on the recalculation.
On Request: An announcement from the navigation device tells you
that a traffic message concerns your route. On the screen the
Traffic Information box indicates the distance to the reported traffic
obstruction.
Tap on the Traffic Information box. You can then decide whether an
alternative route is to be calculated or not.
Useful functions
- 65 -
User's manual NAVIGON 42 Essential
9.11
Logbook
You can use your navigation device to record a logbook. The logbook is
recorded in the "Logbook.xls" file. You can open the file with Microsoft
Excel. Each recorded trip is added at the bottom of the table as a new
entry.
The first time a trip is recorded, the "Logbook.xls" file will be created in
the "NAVIGON\Logbook" folder. If you delete or move this file, a new
file will be created when you next record a trip.
Recording trips
You can have all trips recorded automatically.
1. In the NAVIGATION window tap on Options > Settings > Navigation.
2. Set Logbook to Yes.
3. Tap on OK.
Every trip from now on will be recorded until you reset Logbook to No. It
is possible, however, to exclude individual trips from the recording.
The navigation system also records trips when you are not navigating.
Of course this requires the navigation system to be switched on and
receiving GPS signals.
Before a trip
If your trips are recorded in the logbook, a window for entering the trip's
key data is opened before the trip begins. You can also decide,
however, not to record the trip in question.
►
If you don't want to record the trip in question, tap on
(Cancel).
-or-
1. In the Reason for the Trip box tap on one of the possible reasons
for the trip.
2. Enter a name for this entry, e.g. "Trip to customer X", in the
Logbook Entry box.
3. Tap on Mileage
4. Enter the mileage of your vehicle.
5. Tap on Start.
Navigation starts.
- 66 -
Useful functions
User's manual NAVIGON 42 Essential
10
Configuring the navigation system
The SETTINGS window is the starting point for customising the
navigation system to match your personal preferences.
Settings can be accessed via the options in the NAVIGATION window
and via the options in many windows of the navigation application.
►
Tap on Options > Settings.
The SETTINGS window of the navigation application has several buttons:
Navigation, Current Route Profile:, Map Display and General.
►
Tap on a button to open the corresponding settings window.
The settings of the individual windows are distributed over several
screen pages. You can use the
(To the Left) and
these pages.
(To the Right) buttons to toggle between
Some settings can have only one of two values. These settings can be
recognised by the
(Toggle) button. All possible values are visible.
The currently valid value is highlighted (in white).
►
Tap on
(Toggle) in order to switch between the possible values.
Some settings can adopt many different values. These settings can be
recognised by the
1. Tap on
(List) button. The current value is visible.
(List).
A list with all possible values opens. The currently valid value is
marked.
2. Tap on the value you want. It is now marked.
3. Tap on OK.
The list will close. The new value is indicated.
For each setting there is a
(Help) button. When you tap on it you
will see an exact definition of the setting in question.
You can close the settings windows in two ways:
►
Tap on OK.
Any changes you have made will be adopted.
►
Tap on Cancel.
Any changes you have made will not be adopted.
Configuring the navigation system
- 67 -
User's manual NAVIGON 42 Essential
11
Appendix
11.1
Technical data of the navigation device
Dimensions
Weight
Operating
conditions
Operating
temperature
Storage
temperature
Humidity
CPU
Operating system
Display
Memory
RAM
Flash
GPS
TMC
Device keys
I/O
Keyboard
Loudspeaker
Memory card
slot
USB
Power supply
Rechargeable
battery
Charging
Car charger
cable
- 68 -
120.5 x 75.5 x 16.0 mm
160 g
-10°C to 70°C (14°F to 158°F)
-30°C to 80°C (-22°F to 176°F)
0% to 90%, non-precipitating
SiRF ATLAS 5
Microsoft Windows CE
4.3” LCD colour display with
capacitive touch-panel, ≥ 350 cd/m²,
Contrast ratio: 300:1
480 x 272 pixel (WQVGA)
128 MB
2 GB
Yes
Built-in antenna
Yes
1 (On/Off)
Software keyboard
Yes
microSD
1 x USB 2.0
5V/1,0A = (direct voltage, DC)
Via mini-USB socket
Type
LiIon, 1050 mAh
Electronic
Input
Output
Integrated
10-24V = (direct voltage, DC)
5V/1,5A = (direct voltage, DC)
Appendix
User's manual NAVIGON 42 Essential
11.2
§1
NAVIGON Licensing Policy
Scope of Regulations
This Agreement regulates the relations between the user and
NAVIGON GmbH, Schottmuellerstrasse 20 A, 20251 Hamburg,
developer and proprietor of the exclusive utilisation rights to the
NAVIGON software (“Software”) as specified in the order. The subject
matter of this Agreement is copyright interests.
§2
Extent of Use
(1)
NAVIGON grants the user the non-exclusive right, unlimited by time and
location, to utilise the Software at a utilisation volume as specified in the
order. The licensing includes the right to install and use the Software in
accordance with the documentation and pursuant to these regulations.
(2)
NAVIGON expressly informs the user that complete utilisation of the
Software is not possible until after proper registration.
(3)
The user must ensure that the above mentioned restricted utilisation
rights are complied with.
(4)
Any kind of use which goes beyond the framework as stipulated in the
Agreement requires the written consent of NAVIGON. In the event that
such utilisation should be exploited without NAVIGON’s consent,
NAVIGON shall charge the amount accruing for this extended utilisation
in accordance with the valid price list at the time. NAVIGON shall
reserve the right to assert further reaching claims for compensation of
damages. The user shall have the right to prove lower damages.
(5)
All the above mentioned utilisation rights shall only be transferred to the
user after full and final payment of the license fee.
§3
(1)
Appendix
Copyright and Protection Rights
The user acknowledges the copyrights of NAVIGON and therewith its
exclusive utilisation and exploitation rights to the Software. Exclusive
utilisation and exploitation rights also exist with regard to extended
development of the Software or amendments thereto, which NAVIGON
has created for the user compliant with the order.
- 69 -
User's manual NAVIGON 42 Essential
(2)
Any kind of non explicitly authorised copying of the Software in its
entirety or partially, any kind of non expressly authorised passing on of
the Software and development of similar Software or segments of such
Software or utilisation of the contractual Software as a master template
shall in particular be deemed to be judicially and contractually
prohibited.
(3)
The user acknowledges the imprint, trademark, trade name and patent
rights of NAVIGON to the Software and the relevant appending
documentation. The user is forbidden to remove, change or in any other
way camouflage the copyright notices and identifications pertaining to
existing protection rights.
§4
Passing on the Software
(1)
The user is permitted to sell or give away the Software and the user
manual or any other accompanying materials on a permanent basis to
third parties, under the proviso that the acquiring third party agrees that
the contractual terms and conditions at hand shall henceforth also be
imposed on it.
(2)
In the event of passing on the Software, the user shall hand over to the
new user all copies of the program, including possible back-up copies
made, or destroy the copies not handed over. As a result of passing on
the Software, the former user’s utilisation rights to the program shall
extinguish.
(3)
The user is permitted to sell or give away the Software and the user
manual or any other accompanying materials to third parties on a
temporary basis, if this is not done within the framework of leasing or
renting out for gainful purposes, under the proviso that the acquiring
third party agrees that the contractual terms and conditions at hand
shall henceforth also be imposed on it. For the period of assignment of
the Software to third parties, the assigning user shall have no right to
any kind of utilization of the program. For the period of assignment of
the Software to third parties, the assigning user shall have no right to
any kind of utilisation of the program. Renting out or granting a lease for
gainful purposes shall be prohibited.
(4)
The user may not assign the Software to third parties if there should be
any justified suspicion that such third party could violate the contractual
terms and conditions, especially by making unlawful copies.
- 70 -
Appendix
User's manual NAVIGON 42 Essential
§5
Reproduction Rights and Access Security
(1)
The user may reproduce the Software if the respective copying should
be necessary for operation. Necessary reproduction shall be deemed to
be the installation of the program from the original data carrier to the
bulk memory of the hardware used as well as loading of the program
into random access memory.
(2)
Furthermore, the user is permitted to make copies for back-up
purposes. However, fundamentally, only one single back-up copy may
be made for safekeeping. The back-up copy has to be identified as
such.
(3)
If regular copying of the complete database, including computer
programs, is indispensable for reasons of data security or to ensure
speedy reactivation of the computer system after a total crash, then the
user is allowed to make back-up copies in the number specifically
required. The data carriers used in this case must be marked
accordingly. The back-up copies may only be used for purely archiverelated purposes.
(4)
Further reproductions, which also include release of the program code
on a printer as well as photocopying of the manual, may not be made
by the user. Any additional manuals required by employees have to be
obtained from NAVIGON.
§6
Multiple Deployment and Network Integration
(1)
The user may use the Software on any hardware available to it.
However, in the event that the user should replace the hardware, it is
obliged to delete the Software from the hardware utilised up till then.
Any isochronous storage, keeping in stock or operation on more than
only one hardware unit is not permissible.
(2)
The deployment of the entrusted Software within a network or any other
multiple workstation computer system is not permissible if thereby the
possibility of simultaneous multiple usage should be facilitated. Should
the user select to use the Software within network operations or any
other multiple workstation computer system, the user is obliged to
abstain from simultaneous multiple use by integration of access
protection devices or to compensate NAVIGON by payment of special
network license fees to an amount calculated on the basis of the
number of users linked up with the computer system. The user shall be
informed immediately by NAVIGON with regard to network license fees
to be raised in each individual case as soon as the user has informed
NAVIGON in writing of the intended network integration and the number
of integrated users. The implementation into such kind of network or
multiple workstation computer system shall only be permissible after full
and final payment of the network licensing fees.
Appendix
- 71 -
User's manual NAVIGON 42 Essential
§7
Third Party Software
The Software contains third party software products which have been
integrated into the contractual Software or supplied together with the
contractual Software. NAVIGON fundamentally only awards such rights
which are necessary for general use of the programs as components of
the contractual Software and which NAVIGON is authorised to grant.
No modification rights or further processing rights are incorporated
therein.
§8
Decompiling and Amendment of Programs
The user is forbidden to retranslate the entrusted program code into
other code configurations (decompiling) as well as any other kind of
inverted development of the diverse manufacturing phases of the
Software (reverse engineering) or to carry out program amendments of
any kind unless such actions should serve purposes of eliminating
serious defects, especially such defects which can not be avoided by
organisational or any other reasonable measure of remedy. Copyright
markings, serial numbers as well as other characteristics serving
purposes of identification of the program may not be eliminated or
changed. Any removal of copy protection or similar protective routine
measures is prohibited without the knowledge and co-operation of
NAVIGON.
§9
Final Clauses
(1)
In the event that any provision contained in this License Policy should
be determined to be invalid or become invalid, the effectiveness of the
other regulations shall not be affected thereby. The said invalid
provision shall be replaced by a valid provision within the context of the
remaining contractual interpretation, which comes as close as possible
to the intended economical purpose of such invalid provision.
(2)
Amendments and supplements to these regulations have to be in the
written form and have to be expressly identified as such. Verbal
ancillary agreements shall be deemed to be ineffective. This
requirement of written form may only be renounced by written
agreement.
(3)
If legally permissible, the Parties agree that the laws of the Federal
Republic of Germany shall apply to all legal relations arising from these
contractual relations, under exclusion of UN Purchase Law.
- 72 -
Appendix
User's manual NAVIGON 42 Essential
(4)
If the user should be a businessman within the meaning of the
Commercial Code, legal entity under public law or special assets under
public law, all disputes which may arise in connection with the
accomplishment of these contractual regulations shall fall under the
jurisdiction of Hamburg.
11.3
Declaration of Conformity
NAVIGON GmbH declares herewith that the devices described in the
manual are in conformance with the basic requirements and other
relevant provisions of EU Directive 1999/5/EC and the R&TTE
Directive.
The declaration of conformity can be viewed on the Internet at
www.navigon.com/ce-erklaerung.
12
Troubleshooting
In this chapter you will find solutions to problems which may arise
during use of the navigation system.
This list does not claim to be complete. Answers to many other
questions can be found on the NAVIGON website (refer to "Questions
about the product" on page 7).
I have connected a charger to the navigation device. A connection to a
computer is shown on the screen.
-orI have connected the navigation device to a computer but it is not
detected as a removable disc.
The USB connector of the charger is not fully inserted in the case.
-orThe USB connector is not connected correctly.
1. Unplug the connector.
The navigation device will carry out a new start. Wait for the
navigation software to be reloaded.
2. Insert the USB connector from the charger into the corresponding
socket of the navigation device swiftly as far as it will go (refer to
"Description of the navigation device" on page 8).
My navigation device makes no response any longer, the screen is frozen.
Perform a reset.
►
Use a thin object to press the Reset key (refer to "Description of the
navigation device" on page 8).
The software will be restarted. Your settings and your saved
destinations and routes will be retained.
Troubleshooting
- 73 -
User's manual NAVIGON 42 Essential
It seems to me that the battery of my navigation device becomes flat
relatively quickly when the device is not connected to an external power
supply.
Some settings can be configured so that energy consumption is
minimised.
1. In the NAVIGATION window tap on Options > Settings > General.
2. Set the values for Brightness Day and Brightness Night as low as
possible.
3. Tap on OK.
4. Tap on
(Back).
The NAVIGATION window is now open again.
I have accidentally activated demo mode.
If you have accidentally activated demo mode when you start the
navigation application for the first time, you can deactivate it again as
follows:
1. In the NAVIGATION window, tap on Options > Settings.
The SETTINGS window is opened.
2. Tap on Options > Stop Demo Mode.
You will be prompted to confirm that you want the device reset to
the as-delivered state.
3. Tap on the Yes button.
The software is re-started and behaves as if started for the first time
after being purchased (refer to "Switching on the navigation device"
on page 13).
Start the navigation software and set the Start in Demo Mode
setting to No (refer to "Starting the navigation application" on
page 21).
Note: Use only accessories that are recommended by NAVIGON
expressly for your navigation system. NAVIGON GmbH accepts no
liability for errors or damages resulting from the use of other
accessories.
For suitable accessories go to www.navigon.com or your authorised
dealer.
- 74 -
Troubleshooting
User's manual NAVIGON 42 Essential
13
Index
B
F
Block .......................................... 59, 61
Favourites ................................... 30, 34
C
G
Compass .......................................... 17
Configuration .................................... 67
Conventions followed in this
manual ............................................... 6
Current Position
Save............................................. 59
GPS
Faulty reception ............................21
Initialise ........................................ 22
Signals..........................................13
Symbols ........................................ 16
GPS Status ....................................... 59
D
H
Data entry......................................... 20
Destination
Direct Access ............................... 29
Enter Coordinates ........................ 25
Favourites .................................... 30
From Map..................................... 32
Home Address ....................... 32, 35
Imported Addresses
Outlook / Internet ..................... 31
Last Destinations.......................... 31
My Destinations............................ 23
New Destination ........................... 23
POI .............................................. 26
Direct Access ........................... 29
in a City ................................... 28
Nationwide ............................... 27
Nearby ..................................... 26
Save............................................. 34
Start Navigation............................ 33
Take Me Home....................... 32, 35
Turn-by-Turn List.......................... 33
Direct Help ....................................... 58
Home Address
Edit ............................................... 35
Home Address ............................ 32, 35
Hotline.................................................7
E
Energy ...................................12, 17, 74
Enter Coordinates............................. 25
Entering data .................................... 20
Index
I
Imported Addresses
Outlook / Internet ..........................31
K
Keyboard ..........................................18
L
Last Destinations......................... 31, 34
Logbook ............................................ 66
M
Manual
Conventions ....................................6
Symbols ..........................................6
Manual ..............................................16
- 75 -
User's manual NAVIGON 42 Essential
Map
Destination search ....................... 48
Preview ........................................ 44
Standard ...................................... 42
Vehicle ......................................... 45
Memory card .................................... 12
Menu ................................................ 21
Muting .............................................. 18
My Destinations ................................ 23
My POIs ........................................... 53
MyPOIs ............................................ 53
N
Navigation
Block ...................................... 59, 61
No GPS.................................. 34, 39
Route Profile .......................... 33, 39
Start ....................................... 33, 39
Start Navigation...................... 33, 39
Turn-by-Turn List.................... 33, 39
Unblock ........................................ 60
Navigation Application
Start ............................................. 21
Navigation system
Description ..................................... 8
Energy ......................................... 12
Installation .................................... 10
Memory card ................................ 12
Safety information .......................... 8
Scope of Delivery ........................... 7
Start ............................................. 13
Technical data.............................. 68
TMC antenna ............................... 12
TMS receiver................................ 12
Nearby.............................................. 56
New Destination ............................... 23
O
Options ..................................16, 21, 40
- 76 -
P
POI
Direct Access ................................29
in a City ........................................ 28
Nationwide ....................................27
Nearby ..........................................26
POI on Your Route........................56
POI on Your Route ............................56
Preview TMC ....................................62
R
Recalculate Route .............................65
Route Planning
Load ............................................. 38
Planning........................................ 35
Route Planning .................................35
Route points
Add ............................................... 36
Delete ........................................... 37
Order ............................................ 37
Starting Point ................................36
Route Profile ......................... 33, 39, 50
Routes
Load ............................................. 38
Manage ........................................ 37
Route points .................................36
Route Profile .................................39
Save ............................................. 37
Show ............................................ 38
Simulation .....................................38
Start Navigation ............................39
Starting Point ................................36
Turn-by-Turn List ..........................39
S
Safety information ...............................8
Scope of Delivery ................................7
Screenshots ...................................... 55
Service ................................................7
Settings
Configuration ................................67
Volume .........................................47
Index
User's manual NAVIGON 42 Essential
Simulation
Exit ............................................... 38
Start ............................................. 38
Software keyboard............................ 18
Support............................................... 7
Symbols used in this manual .............. 6
T
Take Me Home ........................... 32, 35
Technical data .................................. 68
TMC
Preview TMC ............................... 62
Recalculate Route ........................ 65
Show ............................................ 63
Symbols ....................................... 17
Tuning Mode ................................ 65
TMC Settings
Recalculate Route ........................ 65
TMC ............................................. 65
Traffic Information ........................ 65
Tuning Mode ................................ 65
Trade marks ....................................... 7
Index
Traffic Information
Preview TMC ................................62
Recalculate Route ........................65
Show ............................................63
Tuning Mode ................................. 65
Troubleshooting ................................73
Tuning Mode ..................................... 65
Turn-by-Turn List
Block............................................. 61
Show ................................ 33, 39, 60
U
Unblock ............................................. 60
V
Volume..............................................47
W
Warranty .............................................6
- 77 -