Transcript
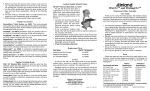
www.ufoalarm.com
Personal
Alarm
Snatcher
Alarm
Handy
Light
FUNCTION 2: Away Burglar Alarm (Door) Setup from the Outside
1. Use the screwdriver 20 to unscrew and open the bottom cover 4 , insert the insulation plug 12 (
the side with a red
line must be facing up and the opposite side with the two raised notches must be facing down) into the plug socket 11 on the
top cover 7 before installing the battery, otherwise the alarm will be immediately triggered. Insertion of the insulation plug 12
is directional (one side with a red line and the other with two raised notches), please ensure that it is inserted correctly. Fig. 1
PRODUCT ASSEMBLY DIAGRAM
NOTE : Do not insert the burglar alarm plug 17 into the plug socket 11 , otherwise the bottom cover 4 and top cover 7
cannot be disassembled or reassembled. Fig. 3
12
3
9
6
10
2. Install the battery 6 into the battery holder 10 (Make sure the polarity is correct).
13
3. Test the basic functions: Fig. 1
(1). Alarm Siren : Test 1 : Press the red button 8 (The alarm and handy light will be activated at the same time).
Test 2 : Remove the insulation plug 12 from the plug socket 11 and reinsert it.
(2). Handy Light: Press button 9 .
12
2
Fig. 1
7
11
14
5
9
3. Pull the door towards its frame with your other hand (the door is not completely closed yet), so that the closed v-shaped spring blades 25 together with the
soft sleeve 21 are clipped between the door and its frame. Before completely closing the door from the outside, pull the soft sleeve out of the gap.
Fig. 12 Fig. 13
4. After the door is completely closed, the closed spring blades are clipped in between the door and its frame and the burglar alarm setup is completed. Fig. 14
11
FUNCTION 3: Drawer Security
Place the alarm inside and against the
procedures in the instructions above
ANTI-SNATCH ALARM FUNCTION
(FUNCTION 2) to
1. When going out, attach the snap hook to the handle of your handbag and hold the loop
complete the burglar
strap 14 or slip it around your wrist. Fig. 6 Fig. 2
15
16
20
24
21
25
21
NOTE : When the burglar alarm kit is not in use, insert the closed v-shaped spring blades 25 into the retaining socket 19 of the
retaining holder 18 for storage (The same for the soft sleeve 21 ). Fig. 4 Fig. 3
3. Attach the door knob strap 1 to the snap hook. Fig. 3 Fig. 6
4. Select INSTANT or DELAY alarm mode on the burglar alarm plug 17 .
Fig. 5
Fig. 7
23
2
Fig. 8
23
■ B.
INSTANT MODE :
(switch flipped to the right for INSTANT)
When the door, window or drawer is opened, the alarm siren and strobe light will be activated instantly.
DELAY MODE :
(switch flipped to the left for DELAY)
When the door, window or drawer is opened, the alarm delay procedure is as follows (for 80 seconds):
First 10 sec
Mute
Strobe On
DELAY
DELAY
INSTANT
5 sec
Mute
Strobe On
20 sec
Siren On
Strobe On
5 sec
Mute
Strobe On
20 sec
Siren On
Strobe On
End of Alarm Delay Procedure
Mute
Flashing Strobe Continues
NOTE : If you want to change the alarm mode (Instant/Delay) while the alarm is triggered, you need to close the v-shaped spring
blades first and then flip the switch to the other alarm mode; otherwise the current alarm mode will continue to be active.
1 Door knob strap
6 Battery
11 Plug socket
16 Burglar alarm kit
21 Soft sleeve
2 Snap hook
7 Top cover
12 Insulation plug
17 Burglar alarm plug
22 Plastic handle
3 Connecting link
8 Alarm test button
13 Raised notch
18 Retaining holder
23 Opening end
4 Bottom cover
9 Handy light button
14 Loop strap
19 Retaining socket
24 Open spring blades
5 Recessed notch
10 Battery holder
15 Panic button
20 Screwdriver
25 Closed spring blades
■ C.
INSTANT
20 sec
Siren On
Strobe On
FUNCTION 1: Home Burglar Alarm (Door or Window) Indoor Setup
1. Hang the door knob strap (attached to the snap hook) around the door
handle (for window alarm setup, an appropriate hook next to the window
may be needed to hang the door knob strap or snap hook).
2. Insert the closed v-shaped spring blades into the gap between the door
and its frame (or window and its frame) to complete the burglar alarm
setup.
3. When the door/window is opened by an intruder, the v-shaped spring
blades will snap open and instantly activate the alarm siren and strobe
light, effectively alerting the intrusion and scaring off the burglar.
Fig. 13 Outside
Fig. 14 Inside
HANDY LIGHT
1. Press button 9 to project a bright beam
and use it as a handy flashlight. Fig. 2
2. When using the handy light in the dark,
the handy light button is located next to
the
mark on the bottom cover which
can be felt by your finger in the form of
raised printing.
1. Setting up the alarm from the outside is suitable for doors that open inwards and sliding doors only.
Doors that open outwards are not suitable for this setup. Fig. 15
● 2. Doors and frames that have square edges and a smooth gap are suitable for inserting the closed v-shaped
spring blades. If the door and frame has a particular design or dimension that doesn’t allow the opening end of
the plastic handle to be pulled firmly against it on the inside then it is not suitable for this setup.
● 3. Certain door frames that have decorative molding outlines or doors with grooved edges on the inside, may
Fig. 15 Outside
cause the plastic handle or the spring blades to be stuck in between the door and frame and may not be
suitable for setting up the Away Burglar Alarm. Fig. 16 Fig. 17
On doors and frames that have a narrow gap, pull out the soft sleeve before the door is completely closed,
otherwise the soft sleeve may get stuck in the gap.
On doors or front drawer panels that are slim, the front part of the closed v-shaped spring blades may protrude out
a bit after the alarm setup is completed. If so, push in the front tip of the spring blades.
The appropriate positions to insert the closed spring blades into the gap should not be higher then the door handle
otherwise the hanging weight of the harness and alarm could pull it out.
When the alarm volume becomes low, drags, not continuous or abnormal, please replace the battery, even if the
Fig. 16 Inside
handy light still functions because it consumes less power.
When testing the alarm, block the six holes on the top cover with the palm of your hand or a piece of cloth to muffle
the sound of the siren in order not to disturb your neighbors.
Displaying the UFO Burglar Alarm sticker visibly outside can have a similar effect as having a “Beware of the Dog”
sign.
This device is not water-proof; please prevent any fluids from contacting the interior of this device and causing
possible damage.
Limited Warranty Period: One Year, with the exception of the battery.
(Does not apply to damage caused by the user)
Fig. 17 Inside
●
2. When the burglar alarm kit v-shaped spring blades open 24 , the alarm siren and strobe light will activate immediately. Fig. 4
And when you close the v-shaped spring blades 25 with your fingers, the alarm siren and strobe light stops immediately. Fig. 7
22
Fig. 12 Outside
■ A. Please read the descriptions below regarding specific scenarios where the Away Burglar Alarm (FUNCTION 2) may
not be setup.
1. Replace the insulation plug 12 with the burglar alarm kit 16 by using the burglar alarm plug 17 . Fig. 3
18
Fig. 11 Outside
NOTES
BURGLAR ALARM
19
17
alarm setup.
2. If your bag is snatched while you are holding on to it, the insulation plug will be pulled out
of the plug socket (or you can also pull on the loop strap) to instantly activate the alarm
siren and strobe light to effectively startle the snatcher. This can also attract others’
attention and alert for help.
Fig. 3
Fig. 4
Fig. 10 Outside
front panel of the drawer and follow the
17
9
2
Inside
Fig. 9 Inside
When in threat, press the panic button 15 or pull the
insulation plug, on the bottom of the alarm, out of the plug
socket to instantly activate the high decibel alarm siren and
strobe light to effectively scare off the assailant. Fig. 2
Fig. 2
15
23
NOTE : The insulation plug can be pulled completely out of the plug socket by tugging on the loop strap and can be
reinserted by pushing it back in.
PERSONAL ALARM FUNCTION
12
Fig. 6
2. Stand outside the door Fig. 10 and hold the other end of the soft sleeve and make sure the opening end 23 of the plastic handle 22 Fig. 11 is against the
inside edge of the door frame.
5. Once reassembled and the alarm device is upside down, the side marked with a red line of the insulation plug should be
facing up
. Fig. 5
8
4
1
1. Slip the door knob strap around the inside door handle. Insert the front tip of the closed spring blades 25 into the soft sleeve 21 . Fig. 9 Fig. 7 Fig. 8
4. Place the connecting link 3 of the snap hook 2 into the recessed notch 5 inside the bottom cover 4 .
3
U.S. Pat : 6,831,559. TAIWAN Pat : 221045 ; D106241
GERMANY Pat : Nr. 20302252.1 CHINA Pat : ZL 03236994.8 ; ZL 200430103568.3
Patents of other courtries pending.
ASSEMBLY INSTRUCTIONS
Burglar
Alarm
■ D.
■ E.
■ F.
■ G.
■ H.
■ I.
USER MANUAL
For demonstrations of the various functions of this product, please visit our website at
www.ufoarlarm.com
Burglar
Alarm
Personal
Alarm
Snatcher
Alarm
Handy
Light