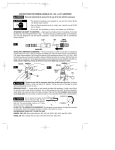
1
5. Remove and clean the reservoir every 4 hours of use, more often if grinding heavily. Remove the reservoir by first removing
any grinding bits. Lift off the grid surface and then lift the reservoir tray off the grinder body. Scrape the glass sludge into the
trash and rinse clean. Reassemble, referring to the Assembly
section.
6. The work surface is reversible. When one side becomes worn,
simply flip it over. Replacement grids are available.
7. Motor bearings are permanently sealed and lubricated.
Popular Accessories
TM
SecondStory Work Surface, no. 50001: This handy elevated
work surface sits on top of your existing work surface to make grinding with smaller bits easier. A self-contained coolant reservoir keeps
bits lubricated while you work.
FlexShaftTM, no. 50019: FlexShaft™ turns your grinder’s 5/16" motor shaft into a hand-held engraving, drilling, and shaping tool.
FaceShieldTM, no. 50017: A clear 8.5" x 10" acrylic shield for added
protection against grinding chips and spray.
MagnaShieldTM, no. 50018: This 8.5” x 10" acrylic shield has an
optical quality convex magnifying surface built in to reduce eye strain
and make detail work easier.
GrinderStationTM, no. 50014: This washable, folding vinyl backdrop
helps contain overspray, keeping your work area clean and dry.
MagnaLightTM, no. 76020: A combination magnifying glass and
worklight that makes all your work easier to see by providing light
exactly where you need it.
DiamondCoolantTM, no. 50011: Use this water soluble coolant to
grind faster and make your bits last longer by reducing grinding
friction.
Popular Grinding Heads
WB-1 3/4" Diamond Bits: Available in ultra fine, extra fine, fine,
standard, speed and super speed grits for every type of grinding
need. For use on both machines.
WB-8 1/4" Diamond Bits: Available in fine, standard, and speed
grits. Use for drilling holes and grinding intricate details and tight
curves. For use on both machines.
Jewelry Bits: Grind a 1mm (no. 40190) or 1.4mm (no. 40194) groove
around the outside of cabochons, fused pieces, beads, and more
for wire wrapping.
Drilling Heads: Sit on top of standard grinding bits and are useful
for drilling holes and creating intricate details. Available in 1/8" (no.
40318), 1/4" (no. 40314), and 3/8" (no. 40338) diameters and require the Drill Head Adapter (no. 40317).
Another Quality Inland Product
DB-100™ Diamond Band Saw, no. 91010
The DB-100 Diamond Band Saw is
engineered to run wet or dry and cuts
glass, stone, and a whole lot more! Make
those impossible cuts possible, save
glass, and cut that perfect piece on the
first try!
• Includes two diamond blades for
sawing glass, stone, ceramic, marble,
porcelain, shells, tile and more.
Optional wood and metal cutting
blades are available.
• It has a permanent magnet, high
torque motor with built in speed control for optimum cutting control, accuracy, and speed.
• Patented BladeSert™ blade guides make the most intricate cuts
simple and the upper blade guide adjusts to materials up 3” thick.
• Rigid and quiet. Structural plastic housing has extra thick walls
for strength and durability while deadening sound and making it
lightweight and easy to handle.
• 2 Year Full Confidence Warranty.
Replacement Parts
WizCGTM/WizlingCGTM
no. 50081
no. 90102
no. 40036
Part Name
Replacement Work Surface
Replacement Sponge
3/4” Standard BitSertTM
Service
So that we can offer you the highest level of service possible,
please take a moment to register your product by going to
www.inlandcraft.com or mailing in the registration card.
Questions about your grinder can be answered by visiting the
Inland Craft web site at www.inlandcraft.com, watching our online
videos at www.inlandcraft.com/videos, by emailing Customer
Service at [email protected] or by calling Inland Customer
Service at 1-800-521-8428 Monday through Friday, 9:00 am to 5:00
PM EST.
Inland Craft Products
32052 Edward Drive
Madison Heights MI 48071
www.inlandcraft.com
Rev No. 3
Stock No. 73861275
WizCGTM and WizlingCGTM
Diamond Glass Grinder
User Guide
Thank you for buying this Inland product. This booklet contains
instructions for set up and use of both the WizCGTM and WizlingCGTM
machines. Please take time to read all the instructions to understand
the correct components, set up, and use of the model you purchased.
Safety
• It is extremely important to wear proper eye protection when using any glass grinder. We highly recommend that you wear safety
goggles rather than safety glass. You can also use the Inland
FaceShieldTM or MagnaShieldTM in conjunction with proper eye
wear for added protection: A shield alone is not adequate eye
protection.
• DO NOT wear loose clothing or any accessories (long necklaces,
bracelets, shirts with long fringes, and similar) that might get
caught by the grinder head while using any Inland grinder.
• Use only in a properly grounded and tested outlet. Under NO
circumstances should you override the grounding system or
modify the plug.
• Set up your machine on a sturdy, level work surface that is water
tolerant and a comfortable height to work on.
• Do not sit your grinder in a pan, on a towel or carpeting.
Parts
Check and make sure that you have all the parts listed for your
particular machine before beginning assembly. The following are
standard parts and accessories for both the WizCG TM and
WizlingCGTM.
Part Number and Name
(A) Grinder body
(B) Coolant Reservoir Tray
(E) Open Grid Work Surface
(F) BitSertTM
(G) Coolant Feed Sponge
(H) 3/4" WB-1 Bit
(I) Allen Wrench
(J) Splash Guard
WizCGTM
Quantity/Color
(1) Black/White
(1) Black
(1) White
(1) White
(2) Yellow
(1) Brass
(2) Black
(1) White
WizlingCGTM
Quantity/Color
(1) Maroon/White
(1) Maroon
(1) White
(1) White
(2) Yellow
(1) Brass
(2) Black
(1) White
The following item(s) are standard with the WizCGTM and are available
as an optional item purchase for the WizlingCGTM:
1/4” WB-8 Grinding/Drilling Bit (1) Brass
(optional accessory)
Assembly
Refer to the exploded view diagram below. Place the Coolant
Reservoir Tray (B) on top of the white Grinder Body (A), inserting
the locator pegs on the reservoir bottom into the corresponding
holes in the grinder body. NOTE: The other hole in the top will be
covered by the coolant reservoir. Next place the Work Surface (E)
on the coolant reservoir and insert the white BitSertTM (F) into the
work surface. Insert the Splash Guard (J) behind the motor shaft
by inserting it into the holes in the BitSertTM (F).
of silver diamond is exposed above the grid work surface. Secure
the bit to the shaft by turning the set screw clockwise with the allen
wrench. IMPORTANT: Always secure the bit to the flat side of the
motor shaft. Tightening the bit to the rounded side can scar the shaft
and prevent bit removal!
Filling the Coolant Reservoir
A water/coolant mixture prevents airborne glass dust, increases
grinding speed, and prolongs the life of the diamond surface. Pour 12
ounces (1½ cups) of water into the reservoir tray. (DO NOT use antifreeze) This amount fills the reservoir to the coolant level indicator
located in the center of the reservoir tray. IMPORTANT: Never pour water
directly onto the grinding head or motor shaft! You can then add a
capful of Inland Diamond Coolant (no. 50011) to increase bit life and
grinding speed if desired. Replace the grid surface.
Sponge Placement
Coolant is fed up to the grinding bit through the yellow Coolant
Feed Sponge (G) held in place by the BitSertTM
(F). The bottom of the sponge contacts the coolant in the reservoir and the upper portion contacts the diamond surface of the grinding bit. Insert the sponge into the rectangular hole in the
back of the BitSertTM so that the bottom of the
sponge contacts the coolant in the reservoir and
the top of the bit is in contact with the diamond surface of the bit.
You may need to wet the sponge before grinding by pouring a small
amount of water onto it. The sponge must remain in contact with
the bit while grinding. If a white paste develops on the head or your
glass when grinding, either the sponge is not properly positioned
or the water/coolant level in the reservoir is low. Periodically rinse
out the sponge to remove accumulated grinding residue. When the
sponge becomes worn, replace it.
Installing the Grinding Bit
Apply a thin coating of Inland Motor Shaft LubricantTM (no. 50022)
to the motor shaft. Our Teflon based lubricant helps prevent the bit
from seizing on the shaft and seals out ground glass particles. In a
pinch, you can use a bit of Vaseline. Loosen the set screw on the
3/4" Grinding Head (H) by turning it counterclockwise with one of
the black Allen Wrenches (I). Slide the bit down onto the motor
shaft, positioning the set screw over the flat side of the motor shaft.
Bits should slide on easily. Do not force! Contact customer service if you have problems. Lower the bit down until just over an 1/8"
move the grinding head up on the shaft to
expose a new 1/8" section of diamond. Secure the bit back in place making sure to
tighten against the flat side of the motor shaft.
Reposition the sponge if needed. You have
up to 5, 1/8" sections of diamond on a standard grinding bit to use
before you need to consider replacing the entire head.
How To Drill A Hole
The WizCGTM comes with a 1/4" grinding/drilling head. WizlingCG owners will need to purchase
this bit. The 1/4" WB-8 bit is useful for both drilling holes and intricate grinding. The 1/4" WB-8 is
placed onto the motor shaft so it sits on top of the
1" WB-9 (or 3/4" WB-1) head. Loosen the set
screw and place the bit onto the shaft, securing it
to the flat side of the motor shaft like any other
bit.
You supply coolant to the head and glass while drilling by using
another sponge soaked in coolant. Begin drilling the hole by holding the front surface of the glass against the upper edge of the bit
at about a 45°- angle while you hold the coolant soaked sponge
against the bit and glass. (You may want to use two hands). Slowly
move the glass down on the bit to a horizontal position. Continue to
work the glass down and around the bit top in a circular motion,
making sure to keep the glass and diamond wet at all times; you
may need to stop and reload the sponge several times. Reduce the
pressure as you begin to see the bit come through the back of the
glass to help avoid chipping. Practice on a piece of scrap glass before you drill on your final project.
Maintenance
Grinding
Maintenance to your grinder is minimal but important to prolonging the life and performance of the machine.
Turn on the machine and start grinding a piece of scrap glass to
get a ‘feel’ for the grinding action. Begin by pushing the glass into
the grinding bit using light pressure and moving the glass back and
forth across the bit. Slowly increase the pressure until you feel comfortable with the grinding speed and your control. You’ll quickly learn
the optimum grinding pressure for the types of glass you use. When
grinding out deep cuts, use intermittent pressure to allow coolant
to rinse ground glass from the head. If you ever have a white paste
form on the bit, it is not getting enough coolant. Stop and check the
sponge placement and coolant level. Grinding without coolant
greatly reduces the life of your grinding heads.
As the diamond surface wears, you will feel it grind less effectively. When this happens, it is time to expose a new portion of the
diamond surface. Loosen the set screw using the allen wrench and
1. Apply Inland Motor Shaft Lubricant (no. 50022) to the shaft whenever changing or removing grinding heads. Remove the head if
you won’t be using the grinder for more than a week.
2. Tighten grinding head set screws ONLY to the flat side of the
motor shaft to prevent scaring the shaft which makes removing
the head nearly impossible. Never force a bit onto the shaft and
never pry off a bit. If the bit is stuck, contact Inland Customer
service for instructions at 1-800-521-8428, ext. 306.
3. It is very important not to overfill the water reservoir. Fill only until
the water is level with the fill line. Over filling can create an electrical shock and damage the motor.
4. After every hour of use you need to remove accumulated glass
residue from the sponge in the BitSert by removing it. Squeeze
several times while holding under running water to rinse it clean.