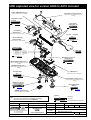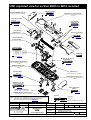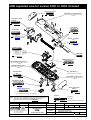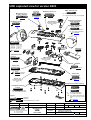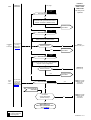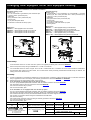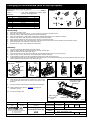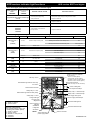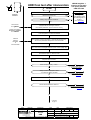
1
Repair data package Industrial enhanced-safety radio remote controls UD Series - Level 2 - Purpose of repair data package and product intervention sheet 1 Subfolder : DOSGEN R35 E00* Battery pack / Voltage adapter UDB-UBC 2 Subfolder: DOSGEN R25 E00* électronique Radio transmitter UDE n°9 n°10 n°7 n°8 électronique n°5 n°6 n°5 n°6 n°3 n°4 n°3 n°4 n°1 n°2 n°1 n°2 3 Subfolder: DOSGEN R26 E00* Radio receiver UDR 4 Subfolder: DOSGEN R27 E00* électronique * = Subfolder version Acknowledgement of receipt of documentation électronique UD repair data package v.3 Industrial enhanced-safety radio remote control UD series First name : Family name : - level 2 Company : This will acknoledge receipt of the following document(s) : CD-Rom with : • Purpose of UD repair data package subfolder ref: DOSGENR35 E001 version • UDB-UBC subfolder ref: DOSGENR25 E003 • UDE subfolder ref: DOSGEN R26 E003 • UDR subfolder ref: DOSGENR27 E003 Date : _____________ Signature: ) Please fill in and return (or fax) to : JAY électronique, Eric DECHAME - service documentation Address: 176, rue Lavoisier MONTBONNOT St MARTIN 38334 St ISMIER CEDEX - FRANCE Tel: Fax: +33.(0)4.76.41.44.00 +33.(0)4.76.41.44.44 e.mail : [email protected] Repair Da ta P ac ka ge Data Pac acka kag UD Series - level 2 - CONTENTS 1- Purpose of repair data package ......................................................................... p. 2 2- Product maintenance process ............................................................................ p. 2 3- Product diagnostic sequence to be observed...................................................... p. 2 4- Content and breakdown of repair data package .................................................. p. 3 5- Safety precautions when intervening on equipment ............................................. p. 4 6- Tools required for repair ..................................................................................... p. 5 Index Modif. No. Modification Name Date 00 T 727 First issue E.DECHAME 01.10.04 UD repair data package general information Format: A4 BP5 - 176, rue Lavoisier MONTBONNOT - St MARTIN - 38334 St ISMIER CEDEX Tél: (0)4.76.41.44.00 Fax: (0)4.76.41.44.44 Approved by: Tech: Filename: SN350100-00-EN.P65 DOC REF.: SN350100.00 Market: Page: This document is the property of Jay Electronique. Reproduction or disclosure prohibited without written authorization. 1/5 1- Purpose of repair data package You have just received a maintenance data package for a JAY électronique device. This data package contains all the information you will need to efficiently intervene when performing maintenance on our product. You will also find the necessary information to prepare a repair diagnostic and replace faulty subassemblies. The repair data package is intended for: - the JAY électronique maintenance department - Service Stations certified by JAY électronique - customers trained by JAY électronique. The contents of this data package are detailed in section 4. ) Do not forget to fill in and return the data package acknowledgment of receipt form in order to allow us to register, update and follow-up this data package. 2- Product maintenance process PROCEDURE DOCUMENTS SPECIAL TOOLS Diagnostic sheets YES Upgrade sheets NO Cost estimate preparation Intervention sheets (to be filled in) NO Customer approval Approved estimate NO Sub-assembly replacement procedure YES Final inspection sheet YES Fault isolation Product upgrade Replacement of sub-assemblies Repaired product inspection 3- Product diagnostic sequence to be observed Products Remarks UDB2+UBC UDE - The transmitter must be systematically returned (except where fault is clearly identified to other product(s)) UDR - Request return of receiver when fault is not clearly identified to other products SN350100.00 - 2/5 4- Content and breakdown of repair data package • The repair data package is formed by sub-packages corresponding to each of the sub-assemblies of the product: - one one one one sub-package sub-package sub-package sub-package for the General information, designated data package DOSGENR35 for the UDB and UBC, designated data package DOSGENR25 for the transmitter UDE, designated data package DOSGENR26 for the receiver UDR, designated data package DOSGENR27 • Each of these sub-packages comprises: - a table of contents (indicating the general revision index for the sub-package and its content) - an exploded view of the product with the spare parts references (numbered SE....) - an upgrade document of product evolutions (numbered SN...) - a fast test, technical diagnostic and final test (numbered SJ ..., except for the UDB-UBC data package, there is only one technical diagnostic) - repair procedures, numbered SN.... ) Repair data package 1 - General information - Blank intervention sheets 2 Repair data package for adapter/battery pack UDB-UBC - level 2 - 3 Repair data package for transmitter UDE UD series 4 Repair data package for receiver UDR 5 Installation and user technical manual (+ additive sheet(s) and corrective sheet(s)) Detail of contents of sub-packages: Data package version (incremented on each modification, E001, E002, E003....) Data package designation Additional remarks Document index (incremented on each modification) Nbr of documents An asterisk next to a document means that it has been modified or added with respect to the old version of the data package Document classification order Products family (*) Data package update: Technical documents are subject to change. Whenever applicable, we will systematically update you with the last versions and a new summary of the data packages. This condition is subject to your returning the acknowledgement of receipt provided , duly filled in. SN350100.00 - 3/5 5- Safety precautions when intervening on equipment Before intervening on equipment, be sure to observe the following precautions: A) Shut down the receiver before you change any sub-assemblies. B) Take all necessary precautions with respect to voltages present on control relay contacts. C) Ensure that all voltages at terminal strips are at 0 V. D) Use work stations equipped with protection systems against electrostatic discharges (conductors + bracelets) when handling electronic boards. E) To maintain system tightness after reassembly, perform work on a clean, spacious workstation. Ensure all seals and seal-bearing surfaces are clean when reassembling equipment. F) Store disassembled parts and spare parts to avoid deterioration: - seals - seal bearing areas - electronic components G) Ensure all personnel is protected when conducting tests. SN350100.00 - 4/5 6- Tools required for repair 6.1- Special test tools: électronique électronique E R Test UDE 5 rows BPDV (double speed pushbuttons) with IR option + Grey electronic key ref : UDE122222 010 Test UDR receiver 3+6 relays 230 VAC with IR and serial options ref : UDR1AB11 011 Set of button boards ref : PR0117 1 to E Test and programming tool ref : PO1527 Test transmitter radio module ref : PR0120 E Test battery pack réf : UDB2 + test V.adapter réf : UBC * Equipped cover kit for UDE v.D001 and higher (6 pushbuttons) ref : PR0209 6 Test receiver radio module ref : PR0120 R (UDR v.A001 to B002 incl.) and PR0208 R (UDR v.B003 and higher) Screws + supply kit for UDE ref : PR0141 (UDE v.A001 to C002 incl.) and PR0230 (UDE v.D001 and higher) Test IR module ref : UDF1 Test relay board ref : PR0122 (see doc.SE260310) DialogUD APPAREIL CONTROLE LE : PAR : Repair label (roller of 1000 labels) ref : PR0229 Spanners kit for receiver UDR : - Pg29 - serial option ref : PR0142 For UDE version from A001 to C002 included : Tool for assembly / disassembly the stop palmswitch button ref : PR0130 DialogUD software (version 5.1 or +) (with cable) ref : UDWR36 Serial link accessory ref : UDWR32 + PC micro-computer 486 DX4 100Mhz min., windows 95-98-Me-2000-XP 32MB RAM + serial port Connection kit ref : PR0116 (see doc.SE260310) 6.2- Standard tools : 6.3- Measures : 6.4- Power supplies : • Screwdriver, TORX No. 10 • Screwdriver, POSIDRIV No. 2 • Screwdriver, POSIDRIV No. 1 • 4mm tubular socket wrench • 2.5mm hex head wrench • 6mm flat tip screwdriver • 16mm box wrench • Electronics technician flat nose pliers • Cutter • Soldering iron • Digital multimeter • Battery test tool ref:PO1572 (only on JAY Electronique plant) • Stabilised power supply 0-24VDC / 1 A min. with fine voltage adjustment (tenth of a volt). • AC power supply 24-48 VAC / 1 A min. SN350100.00 - 5/5 Help to fill the UD intervention sheet 1- Terms used in maintenance interventions and invoicing 1.1- Type of intervention Repair (REP) : Return to serviceable condition following diagnostic, by replacement of sub-assembly(s). Overhaul (REV) : Upgrading of sub-assemblies to integrate product evolutions. Ex: replacement of wiring to prevent disconnection... Modification (TRA) : Modification of a product function subsequent to a customer request. Ex: Change of type of button... Preventive maintenance (MPR) : Proposal for replacement of sub-assembly(s) to prevent deterioration of a component, or a missing part. Ex: oxydised connector, housing which is no longer watertight, etc. 1.2- Type of invoicing Covered by warranty (SG) : The cost of the repair is covered by the company for the product warranty period. Covered by repair warranty (SGR) : The cost of the repair is covered by the company for the warranty period related to a repair already performed on a product. Not covered by warranty (HG) : The cost of repair, overhaul, preventive maintenance or modification of the product are for the customer's account. 2- Fault codes list to be put back on the intervention sheet Choose for each replaced parts the most significant default code among the following list: Fault codes A00 A01 A02 A03 A05 A07 A09 A10 A11 A13 A15 A16 A17 A18 B00 B01 B02 B04 B05 B07 B08 Description Mechanical part cracked Internal mechanical part broken Mechanical part deformed external mechanical part broken Housing not tight Button broken or cracked Poor tightness Damaged strap Faulty stop palmswitch Mechanical part uncoupled IR window broken Button contact fault Mechanical part very dirty Mechanical part modified by third party Wiring oxydised Wiring broken Wiring disconnected Cable oxydised Cable cut Battery worn out Wiring stripped Fault codes C01 C03 C04 C05 C06 C07 C08 C10 C16 D00 D01 D02 D03 E02 F00 F02 F03 F04 G00 G02 Description Malfunction Microswitch failure Power supply fault Detection (voltage level) fault Electronic board oxydised Electronic board modified by third party Electronic component deteriorated Relay contact failure Microswitch damaged Connector oxydised Connector deformed Connector broken Bad connector connection Label not legible Oxydised screws Broken screws Seal cut Seal cracked Fuse failure Missing fuse Index Modif. No. Modification Name Date 00 T 727 First issue E.DECHAME 07.06.04 Format: A4 BP5 - 176, rue Lavoisier MONTBONNOT - St MARTIN - 38334 St ISMIER CEDEX Tél: (0)4.76.41.44.00 Fax: (0)4.76.41.44.44 Help to fill UD intervention sheet Approved by: Tech: Filename: SN350110-00-EN.P65 DOC REF.: SN350110.00 Market: Page: This document is the property of Jay Electronique. Reproduction or disclosure prohibited without written authorization. 1/1 INTERVENTION SHEET - UDB2 - UDE - UDR Products Intervention ref: E-mail : [email protected] 176 rue Lavoisier - MONTBONNOT ST MARTIN 38334 ST ISMIER CEDEX - FRANCE Tel :+33.(0)4.76.41.44.00 - Fax: +33.(0)4.76.41.44.44 Diagnostic date : Web : Http://www.jay-electronique.fr Repair date : USER INTERVENTION Company / contact : Jay: Address: Name : Tel.: Fax: Agent : Tel.: Fax: Faults indicated by user: Intervention and invoicing information: Type of intervention: REP: Repair / REV: Overhaul / MPR: Preventive maintenance. / TRA: Modification. Type of invoicing: SG: covered by warranty / HG: not covered by warranty / SGR: covered by warranty after repair. Note: For a functional sub-assembly upgrade (REV) or a modification (TRA), enter code X99 in the fault code box for the part. For a missing part, please tick the fault code X97 and fill in the information for the corresponding sub-assembly. Return of complying product In the event of a product returned alone, or a system (example: transmitter, receiver, etc.), verified as compliant, tick fault code X95 (line ZCONF1). For a system (example: transmitter, receiver, …) for which only one part is compliant (example: transmitter), tick fault code X95 (line ZCONF2). Return of unrepairable product For a product returned which cannot be repaired, tick fault code X96 (line ZNOREP). él ect r oni que B9 B1 0 él ect r oni que B7 B8 B5 B6 B5 B6 B3 B4 B3 B4 B1 B2 B1 B2 Diagnostic result UDE - UDB2 - UBCx UDE _ _ _ _ _ _ Compl.ref : _ _ _ Intervention ref : Date of manufacture : Serial N° / OF : Date last repair / reference : Options list : Identity code : Radio channel nb : Dead man duration : date of diagnostic : date of repair : Type of intervention Reference (to be filled in) Fault code Description of spare part PR0057 BP Mechanical kit for pushbutton and BPTR PR0057 COM Mechanical kit for rotary switch PR0115 Stop palmswitch button for UDE version A001 to C002 included PR0116 Transmitter connection kit PR0117 _ Button board PR0117 _ Button board PR0117 _ Button board PR0117 _ Button board PR0120 E Radio module PR0141 Screws + supply for UDE version A001 to C002 included PR0230 Screws + supply for UDE from version D001 PR0143 Protective foams PR0148 Connector + cable for UBCU/UBCW PR0207 _ Transmitter Motherboard PR0212 _ Transmitter back housing PR0209 _ Equipped cover without IR option PR0210 _ Equipped cover with IR option PR0215 _ Equipped housing without IR option PR0217 _ Equipped housing with IR option UBC _ Adaptater (charging UDB2) / battery pack connector UDB2 Battery pack UDC1 Wall support UDP1 Shoulder strap UDWE22 _ Grey electronic key UWE102 Removable shoulder strap UWE202 Kit of 6 colored labels "movements" for pushbuttons UWE203 Kit of 18 b/w labels "special movements" UWE204 Kit of 30 b/w labels "special functions" n°1 UWE205 Kit of 48 blank labels "custmization" UWE206 Kit of 30 b/w labels "special functions" n°2 _______ Missing part _______ Missing part X97 ZCONF1 Functional check OK (product alone) X95 ZCONF2 Functional check OK (product associated) X95 ZNOREP Unrepairable product X96 REP REV MP TRA Type of invoice SG HG SGR Price (Tax-exc.) X97 Labour : Sub Total (TE.) 04.10.04 JAY ELECTRONIQUE SN350120.00 1/2 Diagnostic result UDR UDR _ _ _ _ _ Compl.ref : _ _ _ intervention ref. : Date of manufacture : Serial nb / OF : Date of last repair / reference : Option list (if exist) : Identity code : Radio channel nb : date of diagnostic : date of repair : Type of intervention Reference (to be filled in) Description of spare part Fault code PR0122 6 relays board PR0123 Fuse kit PR0124 _ Receiver motherboard PR0125 _ Receiver housing PR0127 Rubber cable gland kit PR0133 IR window for UDF module PR0134 IR module electronic board PR0138 Serial option PR0120 R Radio module for UDR version A001 to B002 included PR0208 R Radio module for UDR from version B003 UDF1 1 UDF IR module + 10m cable kit UDF2 2 UDF IR module + 10m cable kit UDWR _ 16 or 24 pin male connector + cable UDWR10 10 m cable extension kit for UDF IR module UDWR11 Plastic cable gland kit UDWR12 Common wiring accessory UDWR32 Serial link accessory VUB084 1/4 wave antenna 400 MHz VUB08 _ Other 400 MHz Antenna VUB1 _ _ Receiver antenna extension 5m + support VUB100 Receiver antenna extension 2m + support _______ Missing part _______ Missing part X97 ZCONF1 Functional check OK (product alone) X95 ZCONF2 Functional check OK (product associated) X95 ZNOREP Unrepairable product X96 REP REV MP TRA Type of invoice SG HG SGR Price (Tax-exc.) X97 Labour : Sub Total (TE.) 04.10.04 JAY ELECTRONIQUE SN350120.00 2/2 Tools required for diagnostic on battery pack and adapter Mechanical part: No special tools required Measurement and test part: Multimeter equipped with test points Battery test tool ref : PO1572 (Only for JAY Electronique plant) UBCU - UBCW test adapter or Stabilised power supply, 0-24VDC / 1 A min. + UBC1. Approved by: Index Modif. No. Modification Name Date 02 T 727 PO1572 Battery test tool E.DECHAME 01.10.04 Tech: Market: 01 T 727 Update for UDB2 E.DECHAME 05.09.01 Tech: Market: 00 T 727 First issue E.DECHAME 24.01.01 Tech: Format: A4 BP5 - 176, rue Lavoisier MONTBONNOT - St MARTIN - 38334 St ISMIER CEDEX Tél: +33.(0)4.76.41.44.00 Fax: +33.(0)4.76.41.44.44 List of tools UBC - UDB2 DPO Filename: SN250040-02-EN.P65 DOC REF.: SN 250040.02 Market: GR Page: 1/1 This document is the property of Jay Electronique. Reproduction or disclosure prohibited without written authorization. Battery pack UDB2 Adapter 230VAC (Euro. plug) / 12 VDC UBCU Connector + cable for UBCU and UBCW PR0148 Adapter 230VAC (english plug) / 12 VDC UBCW 10 - 30VDC Battery connector (vehicle plug) UBC1 Black/white wire = + Index Modif. No. Modification Name Date 02 T 727 PR0148 added E.DECHAME 10.06.04 Format: A4 Products references BP5 - 176, rue Lavoisier MONTBONNOT - St MARTIN - 38334 St ISMIER CEDEX Tél: +33.(0)4.76.41.44.00 Fax: +33.(0)4.76.41.44.44 UBC - UDB2 Approved by: Tech: Filename: SE250020-02-EN.P65 DOC REF.: SE 250020.02 Market: Page: This document is the property of Jay Electronique. Reproduction or disclosure prohibited without written authorization. 1/1 Changes and upgrades - Battery pack UDB2 Table of changes : UDB Réf: UDB «UDB» version number N° : A00 * UDB Battery pack version number Change description Dates A001 1st version 04/2000 - 09/2000 A002 Pack tightness improved 09/2000 - 10/2000 A003 Shock resistance improved 10/2000 - 11/2000 A004 or A005 Polyswitch on electronic circuit eliminated 11/2000 - 02/2001 / A00 * Réf: UDB2 Changing the product reference UDB -> UDB2 UDB2 «UDB2» version number UDB2 Battery pack version number Change description Dates A001 Major change Increase autonomy by NiMH technology 02/2001 - 01/06/2001 A002 Connexion improved (Golden contacts) board re-routing 01/06/2001 - 15/06/2001 A003 Contact improved with transmitter housing contact-pins 15/06/2001 - 12/2002 A004 minor change 12/2002 - 01/2004 A005 minor change since 01/2004 Obligatory upgrade : Battery pack «UDB» must be systematically replaced by «UDB2» A003 min. version. Approved by: Index Modif. No. Modification Name Date 02 T 727 Updates for UDB2 E.DECHAME 28.06.04 Changes to battery packs Format: A4 Filename: SN250050-02-EN.P65 UDB2 DOC REF.: SN 250050.02 BP5 - 176, rue Lavoisier MONTBONNOT - St MARTIN - 38334 St ISMIER CEDEX Tél: +33.(0)4.76.41.44.00 Fax: +33.(0)4.76.41.44.44 Tech: Market: Page: This document is the property of Jay Electronique. Reproduction or disclosure prohibited without written authorization. 1/1 TECHNICAL DIAGNOSTIC: UBC-UDB2 PRODUCT INTERVENTION SHEET - For preparation of estimate Tools (TO BE COMPLETED) Additional information sub-assy to be replaced START Check of changes to battery packs Check compliance of battery pack See document "Changes to battery packs" SN250050 Battery pack complies with respect to technical changes table? no UDB2 Battery pack no UBC• adapter or PR0148 connector + cable (P.M.) no UBC• adapter or PR0148 connector + cable (P.M.) no UDB2 Battery pack (P.M.) no UDB2 Battery pack yes Visual inspection of adapter Check condition of adapter, connector, jack and wires Adapter in good condition ? yes Functional check of adapter Multimeter in voltmeter mode Multimeter in ohmmeter mode UBCU - UBCW UBC1 Connect the adapter to the mains and measure the output voltage Check continuity of wiring Voltage output is 12 volts ? no Wiring continuity OK? yes yes Visual inspection of battery pack Check condition of seal, shell and strength of pack once inserted in back of transmitter Battery pack in good condition yes Test UBC• adapter or stabilised power supply set for 12vdc Functional check Connect battery pack to adapter or power supply using Jack cable Check if battery pack red LED comes on Battery pack red LED comes on ? yes Continued on page 2 Index Symbols/abbreviations : : Continue Diagnostic : Stop Diagnostic P.M. : Preventive Maintenance Modif. No. Modification Name Date T 727 PR0148 Added Specific tool : PO1572 E.DECHAME 04.10.04 02 BP5 - 176, rue Lavoisier MONTBONNOT - St MARTIN - 38334 St ISMIER CEDEX Tél: +33.(0)4.76.41.44.00 Fax: +33.(0)4.76.41.44.44 Technical diagnostic UBC - UDB2 Format: Approved by: Tech: Market: A4 Filename: SJ250020-02-EN.VSD DOC REF.: SJ 250020.02 Page: This document is the property of Jay Electronique. Reproduction or disclosure prohibited without written authorization. 1/2 Tools PRODUCT INTERVENTION SHEET Additional information (TO BE COMPLETED) Continued from page 1 Multimeter in voltmeter mode see document SN250060 sub-assy to be replaced Measure voltage across battery pack pins Voltage between 3 and 3,8 volts ? UDB2 Battery pack no yes Mutimeter in voltmeter mode Disconnect battery pack from adapter or power supply and measure the voltage across its pins Voltage less than 3 volts ? UDB2 Battery pack yes no Jay Electronique special test instrumentation ref : PO1572 Do you have the means to measure the battery pack characteristics? no yes Test battery pack using test bench Client has reported UDE lower autonomy ? Battery pack performance sufficient ? yes yes UDB2 Battery pack (M.P.) UDB2 Battery pack no no Voltage between 3 and 3.6 volts ? yes Charge the battery pack no END Battery pack is functional Symbols / abbreviations : : Continue Diagnostic : Stop Diagnostic SJ250020.02 - 2/2 Stabilised power supply 12.00 V Multimeter Connect to main 12 Vdc Vdc + - white/black wire UBCU or UBCW UBC1 Vdc + COM. UDB2 + - Approved by: Index Modif. No. Modification Name Date 01 T 727 Update for UDB2 E.DECHAME 06.09.01 Tech: 00 T 727 First issue E.DECHAME 25.01.01 Tech: Battery pack test procedure Format: A4 BP5 - 176, rue Lavoisier MONTBONNOT - St MARTIN - 38334 St ISMIER CEDEX Tél: +33.(0)4.76.41.44.00 Fax: +33.(0)4.76.41.44.44 UDB2 Market: DPO Filename: SN250060.P65 DOC REF.: SN 250060.01 Market: GR Page: 1/1 This document is the property of Jay Electronique. Reproduction or disclosure prohibited without written authorization. List of tools required for repair of transmitter UDE Mechanical part: All UDE versions : No. 10 Torx screwdriver (for housing screws) No. 1 Posidriv screwdriver (for button board and mechanical kit) 2.5mm Allen wrench (for motherboard / radio module mounting screws) Cutter (to unfasten function labels) Flat angled plier (for assembly/disassembly of IR Otption) + UDE version A001 to C002 only : No. 2 Posidriv screwdriver (for housing screws) 4mm tubular socket wrench (for power supply connection pins and electronic key) Tool PR0130 (for assembly/disassembly of stop palmswitch button) Measurement and test part: All UDE versions : 0-24VDC / 1 A min. stabilised power supply with fine adjustment to 1/10th of a Volt Digital multimeter PC micro-computer with serial port Serial link accessory, ref. UDWR32 «Dialog UD» software (version 5.1 minimum), ref. UDWR36 Programming tool, ref.PO1527 Test battery pack, charged, ref. UDB2 Test receiver, ref : UDR1AB11 011 Test UDF ref : UDF1 Screws + supply kit : PR0230 (from D001) or PR0141 (version A001 to C002 included) Test function button boards, ref : PR0117 1 to E Test blank grey electronic key, ref : UDWE22 V Test radio module, ref : PR0120 E Index Modif. No. Modification Name Date 02 T 727 New spare parts and accessories E.DECHAME 10.06.04 Format: A4 List of tools BP5 - 176, rue Lavoisier MONTBONNOT - St MARTIN - 38334 St ISMIER CEDEX Tél: +33.(0)4.76.41.44.00 Fax: +33.(0)4.76.41.44.44 UDE Approved by: Tech: Filename: SN260220-02-EN.P65 DOC REF.: SN 260220.02 Market: Page: This document is the property of Jay Electronique. Reproduction or disclosure prohibited without written authorization. 1/1 Determine version of UDE transmitter The version number is indicated on the nameplate, fastened to the back of the transmitter where the battery pack is located. The number identifies the UDE version and therefore its various technical changes. The table of technical changes (doc. SN260230) indicates all the upgrades which you need to perform on the UDE transmitter in accordance with its version number. Back of transmitter Labels for UDE vers. A001 to B010 électronique Ref : UDE . . . . . - . . . F 38330 Montbonnot-St-Martin Code : . . . . Freq : 433,050 .. 434,790MHz Serie : .../xxxx Date : .. / .. IP65 Baumuster geprüft 0165 ! UDE Version number (i.e : C001) Labels for UDE vers. from C001 électronique F 38330 Montbonnot Ref : UDE . . . . . Freq : 433,050 .. 434,790MHz Serie : .../xxxx Date : .. / .. IP65 Approved by: Index Modif. No. Modification Name Date 00 T 727 first issue E.DECHAME 10.06.04 Determine the version of transmitter Format: A4 Filename: SN260225-00-EN.P65 UDE DOC REF.: SN 260225.00 BP5 - 176, rue Lavoisier MONTBONNOT - St MARTIN - 38334 St ISMIER CEDEX Tél: +33.(0)4.76.41.44.00 Fax: +33.(0)4.76.41.44.44 Tech: Market: Page: This document is the property of Jay Electronique. Reproduction or disclosure prohibited without written authorization. 1/1 UDE exploded view for version A001 to A005 included Note : The figure below shows a transmitter with 6 function buttons (1) Plug-in EEPROM memory Transmitter housing bottom (reference PR0113 no more available) (1) (references PR0131 6 and PR0131 10 no more available) Transmitter radio module PR0120 E Transmitter connection kit doc. SN260360 PR0116 doc.SE260310 for contents Transmitter motherboard (1) (reference PR0119 no more available) Screws + supplies kit IR transmission sub-assembly (1) PR0141 doc.SE260310 for contents (reference PR0121 no more available) Button board PR0117 * *= 1 2 3 4 5 6 : : : : : : BPSV-BPSV BPDV-BPDV BPSV-COM2 BPSV-COM3 COM2-COM2 COM2-COM3 7 8 9 A B C : : : : : : UDE strap COM3-COM3 BPSV-COM3R COM2-COM3R COM3-COM3R COM3R-COM3R Covers UDP1 Ribbon cable (1) (spare part no more available) doc. SN260320 Non IR UDE housing cover (1) (references PR0114 6 and PR0114 10 no more available) IR UDE housing cover Mechanical kit for 10 pushbuttons (1) PR0057 BP (references PR0132 6 and PR0132 10 no more available) doc. SN260290 Function label kits IHM board (1) (reference PR0118 no more available) UDWE ** ** = see doc.SE260300 for contents Transmitter housing seal (1) (references PR0129 6 and PR0129 10 no more available) Mechanical kit for 5 rotary switches Stop palmswitch button PR0057 COM doc. SN260300 PR0115 doc. SN260310 GREEN electronic key (1) (reference UDWE21 no more available) Legend : (1) : This part has undergone major technical changes; the transmitter must therefore be upgraded accordingly. Refer to instructions in document SN260230 X Description Y Reference assembly/disassembly procedure doc. Z Approved by: Index Modif. No. Modification Name Date 00 T 727 first issue E.DECHAME 10.06.04 Exploded view Format: A4 UDE Filename: SE260201-00-EN.P65 version A001 to A005 DOC REF.: SE260201.00 BP5 - 176, rue Lavoisier MONTBONNOT - St MARTIN - 38334 St ISMIER CEDEX Tél: +33.(0)4.76.41.44.00 Fax: +33.(0)4.76.41.44.44 Tech: Market: Page: This document is the property of Jay Electronique. Reproduction or disclosure prohibited without written authorization. 1/1 UDE exploded view for version A006 to A010 included Note : The figure below shows a transmitter with 6 function buttons (1) Plug-in EEPROM memory Transmitter housing bottom (reference PR0113 no more available) (1) (references PR0131 6 and PR0131 10 no more available) Transmitter radio module PR0120 E Transmitter connection kit doc. SN260360 PR0116 doc.SE260310 for contents Transmitter motherboard (1) (reference PR0119 no more available) Screws + supplies kit PR0141 IR transmission sub-assembly (1) doc.SE260310 for contents (reference PR0121 no more available) Button board PR0117 * *= 1 2 3 4 5 6 : : : : : : BPSV-BPSV BPDV-BPDV BPSV-COM2 BPSV-COM3 COM2-COM2 COM2-COM3 7 8 9 A B C : : : : : : UDE strap COM3-COM3 BPSV-COM3R COM2-COM3R COM3-COM3R COM3R-COM3R Covers UDP1 doc. SN260320 Mechanical kit for 10 pushbuttons PR0057 BP Non IR UDE housing cover (1) doc. SN260290 (references PR0114 6 and PR0114 10 no more available) IR UDE housing cover (1) (references PR0132 6 and PR0132 10 no more available) Function label kits IHM board (1) (reference PR0118 no more available) UDWE ** ** = see doc.SE260300 for contents Transmitter housing seal (1) (references PR0129 6 and PR0129 10 no more available) Mechanical kit for 5 rotary switches Stop palmswitch button PR0057 COM doc. SN260300 PR0115 doc. SN260310 GREEN electronic key (1) (reference UDWE21 no more available) Legend : (1) : This part has undergone major technical changes; the transmitter must therefore be upgraded accordingly. Refer to instructions in document SN260230 X Description Y Reference assembly/disassembly procedure doc. Z Approved by: Index Modif. No. Modification Name Date 00 T 727 first issue E.DECHAME 10.06.04 Exploded view Format: A4 UDE Filename: SE260202-00-EN.P65 version A006 to A010 DOC REF.: SE260202.00 BP5 - 176, rue Lavoisier MONTBONNOT - St MARTIN - 38334 St ISMIER CEDEX Tél: +33.(0)4.76.41.44.00 Fax: +33.(0)4.76.41.44.44 Tech: Market: Page: This document is the property of Jay Electronique. Reproduction or disclosure prohibited without written authorization. 1/1 UDE exploded view for version B001 to B004 included Note : The figure below shows a transmitter with 6 function buttons Protective foams Plug-in EEPROM memory PR0143 (1) (reference PR0113 no more available) Transmitter housing bottom doc. SN260265 (1) (references PR0131 6 and PR0131 10 no more available) Transmitter radio module PR0120 E doc. SN260360 Transmitter connection kit PR0116 Transmitter motherboard (1) doc.SE260310 for contents (reference PR0119 no more available) IR transmission sub-assembly (1) Screws + supplies kit (reference PR0121 no more available) PR0141 doc.SE260310 for contents Button board PR0117 * *= 1 2 3 4 5 6 : : : : : : BPSV-BPSV BPDV-BPDV BPSV-COM2 BPSV-COM3 COM2-COM2 COM2-COM3 7 8 9 A B C : : : : : : COM3-COM3 BPSV-COM3R COM2-COM3R COM3-COM3R COM3R-COM3R Covers UDE strap UDP1 doc. SN260320 Mechanical kit for 10 pushbuttons Non IR UDE housing cover (1) PR0057 BP (references PR0114 6 and PR0114 10 no more available) IR UDE housing cover doc. SN260290 (1) (references PR0132 6 and PR0132 10 no more available) Function label kits IHM board (1) (reference PR0118 no more available) UDWE ** ** = see doc.SE260300 for contents Transmitter housing seal (1) (references PR0129 6 and PR0129 10 no more available) Mechanical kit for 5 rotary switches PR0057 COM doc. SN260300 Stop palmswitch button GREEN electronic key PR0115 (1) (reference UDWE21 no more available) doc. SN260310 Legend : (1) : This part has undergone major technical changes; the transmitter must therefore be upgraded accordingly. Refer to instructions in document SN260230 X Description Y Reference assembly/disassembly procedure doc. Z Approved by: Index Modif. No. Modification Name Date 00 T 727 first issue E.DECHAME 10.06.04 Exploded view Format: A4 UDE Filename: SE260203-00-EN.P65 version B001 to B004 DOC REF.: SE260203.00 BP5 - 176, rue Lavoisier MONTBONNOT - St MARTIN - 38334 St ISMIER CEDEX Tél: +33.(0)4.76.41.44.00 Fax: +33.(0)4.76.41.44.44 Tech: Market: Page: This document is the property of Jay Electronique. Reproduction or disclosure prohibited without written authorization. 1/1 UDE exploded view for version B005 to B010 included Note : The figure below shows a transmitter with 6 function buttons Protective foams Plug-in EEPROM memory PR0143 (1) (reference PR0113 no more available) Transmitter housing bottom doc. SN260265 (1) (references PR0131 6 and PR0131 10 no more available) Transmitter radio module Transmitter connection kit PR0120 E doc. SN260360 PR0116 doc.SE260310 for contents Transmitter motherboard (1) Screws + supplies kit (reference PR0119 no more available) PR0141 doc.SE260310 for contents IR transmission sub-assembly (1) (reference PR0121 no more available) Since B008 version Button board PR0117 * *= 1 2 3 4 5 6 : : : : : : BPSV-BPSV BPDV-BPDV BPSV-COM2 BPSV-COM3 COM2-COM2 COM2-COM3 7 8 9 A B C : : : : : : COM3-COM3 BPSV-COM3R COM2-COM3R COM3-COM3R COM3R-COM3R Covers UDE strap UDP1 doc. SN260320 Mechanical kit for 10 pushbuttons Non IR UDE housing cover PR0057 BP (1) doc. SN260290 (references PR0114 6 and PR0114 10 no more available) IR UDE housing cover (1) (references PR0132 6 and PR0132 10 no more available) Function label kits IHM board (1) (reference PR0118 no more available) UDWE ** ** = see doc.SE260300 for contents Transmitter housing seal (1) (references PR0129 6 and PR0129 10 no more available) Mechanical kit for 5 rotary switches PR0057 COM doc. SN260300 GREEN electronic key Stop palmswitch button (1) PR0115 (reference UDWE21 no more available) GREEN specific electronic key doc. SN260310 (1) (reference UDWE21 M/X no more available) Legend : (1) : This part has undergone major technical changes; the transmitter must therefore be upgraded accordingly. Refer to instructions in document SN260230 X Description Y Reference assembly/disassembly procedure doc. Z Approved by: Index Modif. No. Modification Name Date 00 T 727 first issue E.DECHAME 16.11.04 Exploded view Format: A4 UDE Filename: SE260204-00-EN.P65 version B005 to B010 DOC REF.: SE260204.00 BP5 - 176, rue Lavoisier MONTBONNOT - St MARTIN - 38334 St ISMIER CEDEX Tél: +33.(0)4.76.41.44.00 Fax: +33.(0)4.76.41.44.44 Tech: Market: Page: This document is the property of Jay Electronique. Reproduction or disclosure prohibited without written authorization. 1/1 UDE exploded view for version C001 to C002 included Note : The figure below shows a transmitter with 6 function buttons Protective foams PR0143 Transmitter housing bottom doc. SN260265 (1) (references PR0131 6 and PR0131 10 no more available) Transmitter radio module PR0120 E doc. SN260360 Transmitter connection kit PR0116 Transmitter motherboard doc.SE260310 for contents PR0207 * * = 0 : without IR 1 : with IR doc. SN260350 (w/out IR) doc. SN260355 (with IR) Screws + supplies kit PR0141 doc.SE260310 for contents Button board PR0117 * *= 1 2 3 4 5 6 : : : : : : BPSV-BPSV BPDV-BPDV BPSV-COM2 BPSV-COM3 COM2-COM2 COM2-COM3 7 8 9 A B C : : : : : : COM3-COM3 BPSV-COM3R COM2-COM3R COM3-COM3R COM3R-COM3R Covers UDE strap UDP1 doc. SN260320 Mechanical kit for 10 pushbuttons Non IR UDE housing cover (1) PR0057 BP (references PR0114 6 and PR0114 10 no more available) IR UDE housing cover doc. SN260290 (1) (references PR0132 6 and PR0132 10 no more available) Function label kits IHM board (1) (reference PR0118 no more available) UDWE ** ** = see doc.SE260300 for contents Transmitter housing seal (1) (references PR0129 6 and PR0129 10 no more available) Mechanical kit for 5 rotary switches PR0057 COM doc. SN260300 GREY electronic key Stop palmswitch button UDWE22 * PR0115 * = V : Blank e.key, to program X : programmed key (n°key to be supplied) doc. SN260310 Legend : (1) : This part has undergone major technical changes; the transmitter must therefore be upgraded accordingly. Refer to instructions in document SN260230 X Description Y Reference assembly/disassembly procedure doc. Z Approved by: Index Modif. No. Modification Name Date 00 T 727 first issue E.DECHAME 16.11.04 Exploded view Format: A4 UDE Filename: SE260205-00-EN.P65 version C001 to C002 DOC REF.: SE260205.00 BP5 - 176, rue Lavoisier MONTBONNOT - St MARTIN - 38334 St ISMIER CEDEX Tél: +33.(0)4.76.41.44.00 Fax: +33.(0)4.76.41.44.44 Tech: Market: Page: This document is the property of Jay Electronique. Reproduction or disclosure prohibited without written authorization. 1/1 UDE exploded view for version D001 to D002 included Note : The figure below shows a transmitter with 6 function buttons Mechanical kit for 5 rotary switches PR0057 COM doc. SN260300 GREY electronic key Function label kits Mechanical kit for 10 pushbuttons UWE*** UDWE22 * * = V : Blank e.key, to program X : programmed key (n°key to be supplied) PR0057 BP *** = see doc.SE260301 for contents doc. SN260290 Protective foams Equipped transmitter cover without IR Stop palmswitch (included in equipped cover and housing kits) PR0143 doc. SN260265 PR0209 * Equipped transmitter cover with IR PR0210 * * = 6 : 6+2 buttons transmitter 10 : 10+2 buttons transmitter doc.SN260260 Button board PR0117 * *= 1 2 3 4 5 6 7 BPSV-BPSV BPDV-BPDV BPSV-COM2 BPSV-COM3 COM2-COM2 COM2-COM3 COM3-COM3 8 9 A B C D E BPSV-COM3R COM2-COM3R COM3-COM3R COM3R-COM3R Covers BPSV-BPTR COM2-BPTR UDE Strap UDP1 doc. SN260320 Transmitter radio module IHM Board (included in equipped cover and housing kits) PR0120 E doc. SN260360 Screws + supplies kit Transmitter motherboard PR0230 See doc.SE260310 for contents PR0207 * * = 0 : without IR 1 : with IR doc. SN260350 (w/out IR) doc. SN260355 (with IR) Transmitter connection kit PR0116 Housing seal (included in equipped cover and housing kits) doc.SE260310 for contents Equipped transmitter housing without IR Transmitter housing bottom PR0215 * PR0212 * with IR PR0217 * * = 6 : 6+2 buttons transmitter 10 : 10+2 buttons transmitter * = 6 : 6+2 buttons transmitter 10 : 10+2 buttons transmitter 10T : 10+2 buttons transmitter with electronic switch at location nb.8. Legend : X Description Y Reference doc.SN260260 assembly/disassembly procedure doc. Z Approved by: Index Modif. No. Modification Name Date 00 T 727 first issue E.DECHAME 16.11.04 Exploded view Format: A4 UDE Filename: SE260206-00-EN.P65 version D001 to D002 DOC REF.: SE260206.00 BP5 - 176, rue Lavoisier MONTBONNOT - St MARTIN - 38334 St ISMIER CEDEX Tél: +33.(0)4.76.41.44.00 Fax: +33.(0)4.76.41.44.44 Tech: Market: Page: This document is the property of Jay Electronique. Reproduction or disclosure prohibited without written authorization. 1/1 UDE exploded view for version D003 Note : The figure below shows a transmitter with 6 function buttons Mechanical kit for 5 rotary switches PR0057 COM doc. SN260300 GREY electronic key Function label kits Mechanical kit for 10 pushbuttons UWE*** UDWE22 * * = V : Blank e.key, to program X : programmed key (n°key to be supplied) PR0057 BP *** = see doc.SE260301 for contents doc. SN260290 Protective foams Equipped transmitter cover without IR Stop palmswitch (included in equipped cover and housing kits) PR0143 doc. SN260265 PR0209 * Equipped transmitter cover with IR PR0210 * * = 6 : 6+2 buttons transmitter 10 : 10+2 buttons transmitter doc.SN260260 Button board PR0117 * *= 1 2 3 4 5 6 7 BPSV-BPSV BPDV-BPDV BPSV-COM2 BPSV-COM3 COM2-COM2 COM2-COM3 COM3-COM3 8 9 A B C D E BPSV-COM3R COM2-COM3R COM3-COM3R COM3R-COM3R Covers BPSV-BPTR COM2-BPTR UDE Strap UDP1 doc. SN260320 Transmitter radio module IHM Board (included in equipped cover and housing kits) PR0120 E doc. SN260360 Screws + supplies kit Transmitter motherboard PR0230 See doc.SE260310 for contents PR0207 * * = 0 : without IR 1 : with IR doc. SN260350 (w/out IR) doc. SN260355 (with IR) Transmitter connection kit PR0116 Housing seal (included in equipped cover and housing kits) doc.SE260310 for contents Equipped transmitter housing without IR Transmitter housing bottom PR0215 * PR0212 * with IR PR0217 * * = 6 : 6+2 buttons transmitter 10 : 10+2 buttons transmitter * = 6 : 6+2 buttons transmitter 10 : 10+2 buttons transmitter 10T : 10+2 buttons transmitter with electronic switch at location nb.8. Legend : X Description Y Reference doc.SN260260 assembly/disassembly procedure doc. Z Approved by: Index Modif. No. Modification Name Date 00 T 727 first issue E.DECHAME 16.11.04 Exploded view Format: A4 UDE Filename: SE260207-00-EN.P65 version D003 DOC REF.: SE260207.00 BP5 - 176, rue Lavoisier MONTBONNOT - St MARTIN - 38334 St ISMIER CEDEX Tél: +33.(0)4.76.41.44.00 Fax: +33.(0)4.76.41.44.44 Tech: Market: Page: This document is the property of Jay Electronique. Reproduction or disclosure prohibited without written authorization. 1/1 Label kits for UDE version A001 to C002 included Caution, these label kits will become obsolescent in the near future and are only valid for transmitters UDE version A001 to C002 included; the housings for these versions have not yet been changed (transition to version D001 and higher) Reference : UDWE10 Kit comprising 10 colored labels for single speed movement pushbuttons Background color : black white brown green blue yellow grey grey grey grey Reference : UDWE11 Background color : black Kit comprising 10 colored labels for double speed movement pushbuttons white brown green blue yellow grey grey grey grey Reference : UDWE12 Kit comprising 20 b/w labels for pushbuttons «numbering» Background color : grey Reference : UDWE13 Kit comprising 6 grey labels for pushbuttons «customization» (6 grey marking labels) (6 transparent protection labels) Reference : UDWE14 Kit comprising 12 b/w labels for rotary switches Background color : grey (4 customizable labels) (4 transparent protection labels) Reference : UDWE15 Kit comprising 6 colored labels for pushbuttons «customization» white white green brown yellow blue (6 transparent protection labels) Approved by: Index Modif. No. Modification Name Date 00 T 727 first issue E.DECHAME 10.06.04 Label kits Format: A4 UDE Filename: SE260300-00-EN.P65 version A001 to C002 DOC REF.: SE260300.00 BP5 - 176, rue Lavoisier MONTBONNOT - St MARTIN - 38334 St ISMIER CEDEX Tél: +33.(0)4.76.41.44.00 Fax: +33.(0)4.76.41.44.44 Tech: Market: Page: This document is the property of Jay Electronique. Reproduction or disclosure prohibited without written authorization. 1/1 Label kits for UDE version D001 and higher Representation scale : 70% Reference : UWE202 6 colored labels «movements» for double speed pushbuttons Reference : UWE206 Reference : yellow 30 B/W labels «Special functions» nb.2 for pushbuttons and rotary switches 30 B/W labels «Special functions» nb.1 for pushbuttons and rotary switches Reference : UWE205 E S T 2 1 • • 4 3 4 • 3+4 1 2 3 4 S U D 1 2 3 3 N O R D O U E S T • 3+4 E A S T • 4 W E S T • 3 2 1 N O R T H R I G H T 1 S O U T H L E F T • 1+2 F O R W A R D + R P M 2 R E V E R S E R P M 1 U P • GATE 2 D O W N 4 5 6 7 8 9 ON OFF 1 18 B/W labels «Special movements» for pushbuttons S H U N T 1 2 Reference : UWE203 3 blue 3 white brown green 2 black UWE204 1+2 48 white labels «Customization» + 48 transparent protecting labels, can be used with laser printer or marker. Approved by: Index Modif. No. Modification Name Date 00 T 727 first issue E.DECHAME 04.10.04 Label kits Format: A4 UDE Filename: SE260301-00-EN.P65 version D001 and + DOC REF.: SE260301.00 BP5 - 176, rue Lavoisier MONTBONNOT - St MARTIN - 38334 St ISMIER CEDEX Tél: +33.(0)4.76.41.44.00 Fax: +33.(0)4.76.41.44.44 Tech: Market: Page: This document is the property of Jay Electronique. Reproduction or disclosure prohibited without written authorization. 1/1 Screws + supply kits and accessories for UDE transmitter Reference : PR0116 Transmitter connection kit Power supply connection assembly only for UDE version number A001 to C002 included UDE 10+2 buttons 12-pin ribbon cable UDE 6+2 buttons 12-pin ribbon cable Reference : PR0141 Screws + supply kit for UDE version number A001 to C002 included EEPROM memory suring band Power supply contact pins + seals + nuts Electronic key contact pins + seals Transmitter housing screws (N.2 Pozidriv) Transmitter fastening Battery pack spring (mounted on transmitter housing back) Reference : PR0230 Screws + supply kit for UDE version number D001 and higher IHM board power supply pins seals Screws for button boards and IHM board Transmitter housing screws (N.10 Torx) Reference : UWE102 Reference : UDC1 Shoulder strap Battery pack spring (mounted on transmitter housing back) Transmitter fastening Wall support for binding the transmitter on rest and refilling the battery pack to UBC• adapter UDB2 battery pack UDE transmitter Approved by: Index Modif. No. Modification Name Date 00 T 727 first issue E.DECHAME 30.07.04 Screws + supply kit and accessories Format: A4 Filename: SE260310-00-EN.P65 UDE DOC REF.: SE260310.00 BP5 - 176, rue Lavoisier MONTBONNOT - St MARTIN - 38334 St ISMIER CEDEX Tél: +33.(0)4.76.41.44.00 Fax: +33.(0)4.76.41.44.44 Tech: Market: Page: This document is the property of Jay Electronique. Reproduction or disclosure prohibited without written authorization. 1/1 Upgrading the transmitter according UDE version number Subsequent to major technical and mechanical changes starting with version No. D001, for any fault observed on a UDE transmitter having a version No. lower than D001, the transmitter must be upgraded. The table below indicates the parts to be kept and those to be replaced in accordance with the version No., and the assembly procedures for upgrading the transmitter. Part(s) to be used for the upgrade Part(s) to be kept UDE version number Description Description - Radio module A001 to A010 - BPDV function board included - Protective foams (if present) - Radio module - Button boards B001 to B010 - Mechanical pushbutton kit - Mechanical rotary switch kit included - Mother board/IHM board ribbon - Protective foams - Motherboard - Grey electronic key - Radio module - Button boards - Mechanical pushbutton kit - Mechanical rotary switch kit C001 to C002 - Mother board/IHM board ribbon included - Protective foams Assembly / disassembly procedure Reference Equipped housing kit PR0215 * or PR0217 * Motherboard PR0207 0 (w/out IR) PR0207 1 (with IR) GREY electronic key UDWE22 * / Mechanical pushbutton kit PR0057 BP SN260290 Mechanical rotary switch kit PR0057 COM SN260300 Screws + supply kit PR0230 SE260310 Button boards PR0117 1,3,4,5,6,7,8,9,A,B SN260320 Protective foams (if missing) PR0143 SN260265 Labels kit UWE *** SE260301 Equipped housing kit PR0215 * or PR0217 * SN260260 Motherboard PR0207 0 (w/out IR) PR0207 1 (with IR) GREY electronic key UDWE22 * Labels kit UWE *** SE260301 Equipped housing kit PR0215 * or PR0217 * SN260260 UWE *** SE260301 + Update the UDE internal software if UDE version is "C001" and UDE is equipped with Labels kit IR option (follow procedure SN260045) (only in JAY electronique plant) SN260260 SN260350 (w/out IR) SN260355 (with IR) SN260350 (w/out IR) SN260355 (with IR) / Upgrade D001 date : 01/2004 to 15/06/2004 Updates : New transmitter housing, new stop palmswitch button, new IHM board D002 date : 15/06/2004 to 11/10/2004 Updates : Transmitter internal software update authorizing the use of an electronic key with a button configuration different from that physically present on the transmitter (The update D001 > D002 can be realized only in JAY electronique plant) D003 Last version number date : since 11/10/2004 Updates : New protective foams with insert to ensure a strengthened holding of the superior foam. These new protective foams are not nay more "pinched" between the cover and the bottom of the housing. New protective foams can be installed instead of the former protective foams version. Index Modif. No. Modification Name Date 02 T 727 Update UDE since v.D003 E.DECHAME 16.11.04 Format: A4 Upgrading the transmitter BP5 - 176, rue Lavoisier MONTBONNOT - St MARTIN - 38334 St ISMIER CEDEX Tél: +33.(0)4.76.41.44.00 Fax: +33.(0)4.76.41.44.44 UDE Approved by: Tech: Filename: SN260230-02-EN.P65 DOC REF.: SN260230.02 Market: Page: This document is the property of Jay Electronique. Reproduction or disclosure prohibited without written authorization. 1/1 UDE quick test before intervention électronique n°9 n°10 n°7 n°8 électronique n°5 n°6 n°5 n°6 n°3 n°4 n°3 n°4 n°1 n°2 n°1 n°2 START Key: no Fit a charged battery pack in the back of the UDE = Refer to various chapters of transmitter technical diagnosis (document SJ260050) Unlock the stop palmswitch button Additional information Green LED of transmitter comes on steady? If the two indicator lights on the transmitter flash regularly, refer to the probable faults table on page 2,3 and 4 yes no On transmitter, press "on" button no Transmitter green LED flashes? (go to UDE functional check in document SJ260050) yes Tools : Press the stop palmswitch button Test UDR + Programming tool PO1527 + "Dialog UD" software v5.1 minimum ref.: UDWR36 + Test blank electronic key UDWE22 V no Green LED goes off? (go to UDE sub-assembly test in document SJ260050) yes Program the test key with UDE button configuration, and UDR channel / Identity code Go to "Test" function in the DialogUD software and switch on the receiver Unlock the transmitter stop palmswitch button and press the "on" button no Check that radio quality rate = 100% (go to UDE radio module check in document SJ260050) yes no Receiver safety and horn relays pull in ? (go to UDE radio module check in document SJ260050) yes Actuate one of the function buttons and switches one by one no All actions transmitted ? (go to UDE button state check in document SJ260050) yes no IR startup option present ? yes Equip the test receiver with a UDF and program it with the IR startup option Test UDF Press the green "on" button while pointing the UDE toward the test receiver (3m min. between UDE and UDF) no Receiver safety and horn relays pull in ? (go to IR startup option test in document SJ260050) yes Repeat test at distance of around 20m (range test) no Receiver safety and horn relays pull in ? See technical diagnostic SJ260050 in section "UDE visual inspection" (go to IR startup option test in document SJ260050) yes Press the stop palmswitch button. Visually inspect transmitter, check condition of housing, seal, function buttons and function labels Perform transmitter upgrade check See document SN260230 END Index Modif. No. Modification Name Date 02 T 727 Update since D002 version E.DECHAME 29.06.04 Format: A4 BP5 - 176, rue Lavoisier MONTBONNOT - St MARTIN - 38334 St ISMIER CEDEX Tél: +33.(0)4.76.41.44.00 Fax: +33.(0)4.76.41.44.44 Transmitter quick test UDE Approved by: Tech: Filename: SJ260040-02-EN.P65 DOC REF.: SJ 260040.02 Market: Page: This document is the property of Jay Electronique. Reproduction or disclosure prohibited without written authorization. 1/4 Transmitter indicator light functions UDE version A001 to B001 included Error messages Transmitter state (trans. Stop plamswitch button is unlocked) Red indicator light Green indicator light Possible causes of fault Corrective actions - Ribbon cable connecting motherboard to IHM board and to stop palmswitch button is disconnected - Power supply wires disconnected - IHM board faultly - Stop palmswitch button faulty - Check connection of ribbon cable linking motherboard to IHM board and connection of power supply wires. - Replace stop palmswitch button - Proceed by test IHM board substitution > proceed an upgrade to D001 version* Before or after "ON" button pressed OFF Before or after "ON" button pressed 2 flashes - Electronic key absent - Bad electronic key connection - Electronic key faulty - Check if transmitter needs a key to operate (read key No.). If so, replace key > proceed an upgrade to D001 version* Before "ON" button pressed 3 flashes - Error on electronic key number - Electronic key faulty - Read electronic key No. programmed in transmitter EEPROM memory 4 flashes - Transmitter locked (flashes during programming attempt) - Button board faulty - Ribbon cable linking last button board to motherboard is disconnected - Ribbon cables linking button boards are disconnected - Before any programming, start by checking that transmitter is unlocked (see installation manual) - Check connection of all ribbon cables in transmitter. Before "ON" button pressed 5 flashes - Momentary disconnection of battery pack - Power supply connector of IHM board is faulty - Stop palmswitch button faulty - Check that battery pack is securely mounted in UDE back. If necessary, replace contact pins. - Check connection of power supply connector to IHM board - Test stop palmswitch button Before "ON" button pressed 6 flashes - Stop palmswitch button faulty - Test stop palmswitch button Before "ON" button pressed 7 flashes - Disconnection of EEPROM memory - Bad contact on EEPROM receptacle - EEPROM memory is faulty - Check that EEPROM memory is properly placed in its housing and securing band is in place - Tighten EEPROM receptacle contacts Before "ON" button pressed 8 flashes - Motherboard faulty - Replace motherboard > proceed an upgrade to D001 version* Before or after "ON" button pressed * = This part has undergone major technical changes; the transmitter must therefore be upgraded accordingly. Refer to instructions in document SN260230. Programming modes Transmitter state Red indicator light Green indicator light Function or message Flashes according to number of tens of parameter configured Flashes according to number of units of parameter configured indicates tens and units Procedure : locking - unlocking access to programming ON Steady OFF Transmitter is locked Procedure : locking - unlocking access to programming ON Steady ON Steady Transmitter is unlocked Red indicator light Green indicator light Function or message OFF ON Steady Battery pack charge > 90% Flashes SLOW ON Steady 90% > Battery pack charge >LOW BATT level Before "ON" button pressed Flashes FAST ON Steady Battery pack charge < or = LOW BATT level After "ON" button pressed OFF Flashes Radio transmission Battery pack charge > 90% After "ON" button pressed Flashes FAST Flashes Radio transmission Battery pack charge < or = LOW BATT level (trans. Stop plamswitch button is unlocked) Programming Mode: channel No., dead man time, key No. Battery pack charge states Transmitter state (trans. Stop plamswitch button is unlocked) Before "ON" button pressed Before "ON" button pressed LOW BATT level = battery level low (battery pack charge < 10%) SJ260040.02 - 2/4 Transmitter indicator light functions UDE version C001 to D001 included Error messages Transmitter state (trans. Stop plamswitch button is unlocked) Red indicator light Before or after "ON" button pressed Green indicator light OFF Possible causes of fault Corrective actions - Ribbon cable connecting motherboard to IHM board and to stop palmswitch button is disconnected - Power supply wires disconnected - IHM board faultly - Stop palmswitch button pins faulty - Check connection of ribbon cable linking motherboard to IHM board - Proceed by test motherboard substitution - Electronic key absent - Bad electronic key connection - Electronic key faulty - Motherboard faulty - IHM board faulty - Check connection of ribbon cable linking motherboard to IHM board - Proceed by test motherboard substitution - Proceed by test elec. key substitution Before or after "ON" button pressed Both ON Steady When programming radio channel No, Dead man duration, or ID code copy Flash in alternation - Transmitter is locked - Transmitter is locked', see UD installation manual to unlock the access to programming Before "ON" button pressed 3 flashes - Error on ID code - Electronic key faulty - Copy ID code in UDE (see procedure in installation manual) - Proceed by test elec. key substitution 4 flashes - Button configuration of the electronic key is different than transmitter button configuration - Button board faulty - Ribbon cable linking last button board to motherboard is disconnected - Ribbon cables linking button boards are disconnected - Check that configuration button is the same between electronic key and transmitter - Check connection of all ribbon cables in transmitter - Proceed by test button boards substitution Before "ON" button pressed 5 flashes - Momentary disconnection of battery pack - Stop palmswitch button pins faulty - Motherboard faulty - Check that battery pack is securely mounted in UDE back. If necessary, replace contact pins. - Check stop palmswitch button pins - Proceed by test motherboard substitution Before "ON" button pressed 6 flashes - Momentary disconnection of battery pack - Stop palmswitch button pins faulty - Motherboard faulty - Check stop palmswitch button pins - Proceed by test motherboard substitution Before "ON" button pressed 7 flashes - Electronic key faulty - Proceed by test elec. key substitution Before "ON" button pressed 8 flashes - Motherboard faulty - Proceed by test motherboard substitution Before or after "ON" button pressed Programming modes Transmitter state Red indicator light Green indicator light Function or message Flashes according to number of tens of parameter configured Flashes according to number of units of parameter configured indicates tens and units Procedure : locking - unlocking access to programming ON Steady OFF Transmitter is locked Procedure : locking - unlocking access to programming ON Steady ON Steady Transmitter is unlocked Red indicator light Green indicator light Function or message OFF ON Steady Battery pack charge > 90% Flashes SLOW ON Steady 90% > Battery pack charge >LOW BATT level Before "ON" button pressed Flashes FAST ON Steady Battery pack charge < or = LOW BATT level After "ON" button pressed OFF Flashes Radio transmission Battery pack charge > 90% After "ON" button pressed Flashes FAST Flashes Radio transmission Battery pack charge < or = LOW BATT level (trans. Stop plamswitch button is unlocked) Programming Mode: channel No., dead man time, key No. Battery pack charge states Transmitter state (trans. Stop plamswitch button is unlocked) Before "ON" button pressed Before "ON" button pressed LOW BATT level = battery level low (battery pack charge < 10%) SJ260040.02 - 3/4 Transmitter indicator light functions UDE version D002 and higher Error messages Transmitter state (trans. Stop plamswitch button is unlocked) Red indicator light Before or after "ON" button pressed Green indicator light OFF Possible causes of fault Corrective actions - Ribbon cable connecting motherboard to IHM board and to stop palmswitch button is disconnected - Power supply wires disconnected - IHM board faultly - Stop palmswitch button pins faulty - Check connection of ribbon cable linking motherboard to IHM board - Proceed by test motherboard substitution - Electronic key absent - Bad electronic key connection - Electronic key faulty - Motherboard faulty - IHM board faulty - Check connection of ribbon cable linking motherboard to IHM board - Proceed by test motherboard substitution - Proceed by test elec. key substitution Before or after "ON" button pressed Both ON Steady When programming radio channel No, Dead man duration, or ID code copy Flash in alternation - Transmitter is locked - Transmitter is locked', see UD installation manual to unlock the access to programming Before "ON" button pressed 3 flashes - Error on ID code - Electronic key faulty - Copy ID code in UDE (see procedure in installation manual) - Proceed by test elec. key substitution 4 flashes - Button board faulty - Ribbon cable linking last button board to motherboard is disconnected - Ribbon cables linking button boards are disconnected - Check connection of all ribbon cables in transmitter - Proceed by test button boards substitution Before "ON" button pressed 5 flashes - Momentary disconnection of battery pack - Stop palmswitch button pins faulty - Motherboard faulty - Check that battery pack is securely mounted in UDE back. If necessary, replace contact pins. - Check stop palmswitch button pins - Proceed by test motherboard substitution Before "ON" button pressed 6 flashes - Momentary disconnection of battery pack - Stop palmswitch button pins faulty - Motherboard faulty - Check stop palmswitch button pins - Proceed by test motherboard substitution Before "ON" button pressed 7 flashes - Electronic key faulty - Proceed by test elec. key substitution Before "ON" button pressed 8 flashes - Motherboard faulty - Proceed by test motherboard substitution Before or after "ON" button pressed Programming modes Transmitter state Red indicator light Green indicator light Function or message Flashes according to number of tens of parameter configured Flashes according to number of units of parameter configured indicates tens and units Procedure : locking - unlocking access to programming ON Steady OFF Transmitter is locked Procedure : locking - unlocking access to programming ON Steady ON Steady Transmitter is unlocked Red indicator light Green indicator light Function or message OFF ON Steady Battery pack charge > 90% Flashes SLOW ON Steady 90% > Battery pack charge >LOW BATT level Before "ON" button pressed Flashes FAST ON Steady Battery pack charge < or = LOW BATT level After "ON" button pressed OFF Flashes Radio transmission Battery pack charge > 90% After "ON" button pressed Flashes FAST Flashes Radio transmission Battery pack charge < or = LOW BATT level (trans. Stop plamswitch button is unlocked) Programming Mode: channel No., dead man time, key No. Battery pack charge states Transmitter state (trans. Stop plamswitch button is unlocked) Before "ON" button pressed Before "ON" button pressed LOW BATT level = battery level low (battery pack charge < 10%) SJ260040.02 - 4/4 PRODUCT INTERVENTION SHEET TO BE COMPLETED électronique n°9 n°10 n°7 n°8 électronique n°5 n°6 n°5 n°6 n°3 n°4 n°3 n°4 n°1 n°2 n°1 n°2 UDE Technical diagnosis sub-assy to be replaced Tool Start Additional information dialogUD software v5.1 minimum UDWR36 + Programming tool PO1527 - On the intervention sheet, write down the UDE reference - Read electronic parameters and following data (with DialogUD software and programming tool PO1527) : - radio channel - ID code - "Dead man" function duration Visual inspection of UDE n°10 Torx or n°2 posidriv screwdriver dialogUD software v5.1 minimum UDWR36 + Programming tool PO1527 Open the transmitter and separate the half-shells. See Upgrading UDE SN260230 + Updating UDE internal soft. (only for JAY electronique plant) SN260235 ****** Spare part or accessory for technical upgrade + internal software update (fault code X99) - Check the UDE version according exploded views (doc.SE260201 to SE260206) - Check UDE internal software if C001 version (only for JAY electronique plant) no Transmitter complies with respect to technical changes table ? PR0212 6/10 Housing bottom or PR0209 6/10 (no IR) PR0210 6/10 (IR) equipped cover or PR0215 6/10/10T (no IR) PR0217 6/10/10T (IR) equipped housing (P.M) yes Check for absence of grime or cracks on the half-shells n°10 Torx or n°2 posidriv screwdriver see housing replacement procedure SN260260 Housing in good condition ? no yes n°10 Torx or n°2 posidriv screwdriver see procedure SN260265 Protective foams in good condition ? PR0143 protective foams (P.M) no yes n°10 Torx or n°2 posidriv screwdriver see procedure SN260260 Housing seal in good condition ? PR0209 6/10 (no IR) PR0210 6/10 (IR) equipped cover (P.M) no yes Visual inspection of electronic key : Check condition of key; check that key is securely engaged in transmitter cover Electronic key in good condition ? UDWE22 V/X electronic key no yes Continued on page 2 Symbols : : Continue diagnosis : Stop diagnosis P.M. : Preventive maintenance Index Modif. No. Modification Name Date 02 T 727 Update since UDE vC001 and DialogUD v5.1 E.DECHAME 04.10.04 Format: A4 BP5 - 176, rue Lavoisier Transmitter technical diagnostic Filename: SJ260050-02-EN.P65 UDE DOC REF.: SJ 260050.02 MONTBONNOT - St MARTIN - 38334 St ISMIER CEDEX Tél: +33.(0)4.76.41.44.00 Fax: +33.(0)4.76.41.44.44 Approved by: Tech: Market: Page: This document is the property of Jay Electronique. Reproduction or disclosure prohibited without written authorization. 1/8 Additional information Tool PRODUCT INTERVENTION SHEET TO BE COMPLETED from page 1 sub-assy to be replaced n°10 Torx + n°1 Posidriv screwdrivers Check of function and "On/horn" buttons : Check condition of the capsules (tightness), push-in and rotary operation (check for automatic return on COM3R, if applicable). see procedures SN260290 SN260300 and for "on" button SN260260 Function buttons in good condition ? PR0057 BP PR0057 COM Mechanical kit no yes Or PR0209 6/10 (no IR) PR0210 6/10 (IR) equipped cover (for "On/horn" button) Check function labels : Check label readability and general condition -Cutter Labels kit SE260301 Labels in good condition ? no UWE20* Labels kits (P.M.) yes n°10 Torx screwdriver UDE strap, transmitter fastening and shoulder strap are in good condition ? Accessories SE260310 no yes Check of ribbon cable connections : Check ribbon cables are securely engaged in connectors on IHM board and motherboard. UDP1 Strap UWE102 Shoulder strap PR0230 fastening (P.M.) All ribbon cables properly connected ? no yes Record this information on the intervention sheet and correctly connect the ribbon cables Check of power supply contact pins : Check the condition of the 2 UDB2 connection pins, and the overall condition (oxydation) Power supply contact pins in good condition ? no yes see procedure for UDE version A001 to C002 SN260310 Mechanical check of stop palmswitch button Check that stop palmswitch locks and unlocks correctly Or see changing the equipped cover procedure SN260260 Stop palmswitch button in good condition ? no PR0209 6/10 (no IR) PR0210 6/10 (IR) equipped cover kit PR0209 6/10 (no IR) PR0210 6/10 (IR) equipped cover kit Or PR0115 for version A001 to C002 included yes See procedure SN260250 Electrical check of stop palmswitch button Electrical check is ok ? no PR0209 6/10 (no IR) PR0210 6/10 (IR) equipped cover kit Or PR0115 for version A001 to C002 included yes see changing the equipped cover procedure SN260260 Symbols : : Continue diagnosis : Stop diagnosis From D001 version, stop palmswitch pistons are in good condition ? no PR0209 6/10 (no IR) PR0210 6/10 (IR) equipped cover kit yes continued on page 3 SJ260050.02 - 2 / 8 Tool Additional information PRODUCT INTERVENTION SHEET TO BE COMPLETED from page 2 sub-assy to be replaced Functional check of UDE transmitter - Close the housing. - Lock the transmitter stop palmswitch button and install a charged battery pack Unlock the transmitter stop palmswitch button no Red and green leds off ? Stabilized power supply See procedure for connection of stabilized power supply to UDE SN260240 yes Lock the transmitter stop palmswitch button and supply the I.H.M. board with the power supply set for 4V (100mA mini) Unlock the transmitter stop palmswitch button Red and green leds still off ? yes Test subassemblies (page 7) no Green led on steady ? no Lock and unlock transmitter stop palmswitch button observing a stop period yes Press the "ON" button after 15s (after having unlocked the stop palmswitch) yes Green led on steady ? no Green led flashes ? no Test subassemblies (page 7) yes Test of "battery pack charge" detection thresholds oui If not already done, supply the transmitter using the variable power supply set for 4V (100mA mini). Gradually decrease the supply voltage while locking then unlocking the transmitter stop palmswitch button (check performed on each start-up). Decrease the voltage until the red led flashes slowly 2,5mm Allen wrench see procedure to change the motherboard SN260350 or SN260355 (IR) Symbols : : Continue diagnosis : Stop diagnosis Power supply voltage measured in this case is between 3,4V and 3,9V no PR0207 0 (w/out IR) PR0207 1 (with IR) motherboard continued on page 4 SJ260050.02 - 3 / 8 Tool Additional information PRODUCT INTERVENTION SHEET TO BE COMPLETED from page 3 Set the power supply voltage for 4V sub-assy to be replaced Re-start the transmitter (lock + unlock) and press the "on" button. Decrease the voltage until the red led flashes quickly. 2.5mm Allen wrench see procedure to change the motherboard SN260350 or SN260355 (IR) Power supply voltage is under < 3,40V ? no PR0207 0 (w/out IR) PR0207 1 (with IR) motherboard no PR0207 0 (w/out IR) PR0207 1 (with IR) motherboard no PR0207 0 (w/out IR) PR0207 1 (with IR) motherboard yes Decrease the voltage again until the red and green leds go off 2.5mm Allen wrench see procedure to change the motherboard SN260350 or SN260355 (IR) Power supply voltage is under < 3,30V ? yes Gradually increase the power supply voltage until the green and red leds come on (by flashing 5 times, indicating that there was a cut of supply) 2.5mm Allen wrench see procedure to change the motherboard SN260350 or SN260355 (IR) Power supply voltage is above > 3,4V ? yes Radio module check Stabilized power supply or charged UDB2 See procedure for connection of stabilized power supply to UDE SN260240 Use the charged battery pack or connect a stabilized power supply set for 4V to the IHM board Use the test UDR receiver dialogUD software v5.1 minimum UDWR36 + Programming tool PO1527 + Test electronic key UDWE22 Program an electronic key with receiver parameters (same ID code and same radio channel) Go to "Test" menu in DialogUD software (check of radio quality rate) Unlock the transmitter stop palmswitch button and press the "on" button Radio quality rate = 100 % ? no Install the transmitter test radio module in place of the radio module Test radio module ref: PR0120 E Unlock the transmitter stop palmswitch button and press the "on" button 2.5mm Allen wrench See procedure to change radio module SN260360 yes Radio quality rate = 100 % ? see procedure to change the motherboard SN260350 or SN260355 (IR) Symbols : : Continue diagnosis : Stop diagnosis no yes PR0120 E Transmitter radio module PR0207 0 (w/out IR) PR0207 1 (with IR) motherboard continued on page 5 SJ260050.02 - 4 / 8 Tool Additional information Jay électronique special test instrumentation 2.5mm Allen wrench PRODUCT INTERVENTION SHEET TO BE COMPLETED from page 4 Do you have the means to measure the radio module characteristics? See procedure to change radio module SN260360 no yes Radio module more than 5 y old? Test radio module using test bench no Customer has reported transmission cutouts? Radio module performance sufficient? yes PR0120 E Transmitter radio module yes PR0120 E Transmitter radio module PR0120 E Transmitter radio module no yes no sub-assy to be replaced no IR start-up option present? Check of the IR start-up option yes Switch off the receiver and connect the test IR module to the test receiver Set the serial option switch to "RS232" mode. Switch on the receiver. In the "Dialog UD" software, go to "UDR parameters" menu and tick the "IR startup" option. Set the serial option switch to "Nomal" mode. Place the key corresponding to test receiver on UDE. Unlock the stop palmswitch button and press the "on" button. Point the UDE toward the test UDF at a distance of around 3 meters. - POZIDRIV n°1 screwdriver - Flat angled plier See procedure to change IR motherboard SN260355 Test receiver safety relays pull in and red led of test UDF flashes? no PR0207 1 (with IR) Motherboard yes Test a range of 20 meters Repeat the transmitter start-up procedure (lock, unlock stop palmswitch button and press "on" button) Test receiver safety relays pull in and red led of test UDF flashes? no Clean the UDE IR transmission lens and repeat the test yes yes Test receiver safety relays pull in and red led of test UDF flashes? On intervention sheet, record "IR transmission lens soiled" - POZIDRIV n°1 screwdriver - Flat angled plier See procedure to change IR motherboard SN260355 Symbols : : Continue diagnosis : Stop diagnosis - Set serial option in "RS232" mode - de-program the IR start-up on receiver - Switch off receiver -Disconnect the test IR module from receiver Continued on page 6 no PR0207 1 (with IR) Motherboard SJ260050.02 - 5 / 8 Tool Additional information PRODUCT INTERVENTION SHEET TO BE COMPLETED from page 5 Check of button states sub-assy to be replaced Use test receiver and program the button/relay correspondence according to transmitter button configuration Unlock the transmitter stop palmswitch button, press the "on" button and actuate the function buttons one by one (1st, 2nd speed for BPDV) and any rotary switches which may be present. Check that actions on transmitter buttons/switches are transmitted to receiver relays Actions transmitted correctly ? no Proceed by a substitution of the faulty button See procedure to change button board SN260320 Problem stills here ? no PR0117 x Button board type x no PR0057 BP PR0057 COM Mechanical kit yes POZIDRIV N°1 screwdriver 2.5mm Allen wrench See procedures to change mechnical kits SN260290 SN260300 yes Button mechanical kit in good condition? see procedure to change the motherboard SN260350 or SN260355 (IR) yes PR0207 0 (w/out IR) PR0207 1 (with IR) motherboard END of diagnosis. After repair, perform final test : doc. SJ260060 Symbols : : Continue diagnosis : Stop diagnosis SJ260050.02 - 6 / 8 Tool Additional information Sub-assemblies test PRODUCT INTERVENTION SHEET TO BE COMPLETED Functional test of UDE sub-assemblies No led lit ? no yes sub-assy to be replaced Test the stop palmswitch button as instructed in SN260250 See procedure to change transmitter housing cover SN260260 PR0209 6/10 (w/out IR) Stop palmswitch button functionnal? no yes PR0210 6/10 (withIR) Equipped transmitter housing cover Substitute the motherboard and large ribbon cable (connected to IHM) by a test motherboard and test ribbon cable Leds still off ? PR00116 Transmitter connection kit no yes 2.5mm Allen wrench Copy electronic key ID code in test motherboard following procedure (see installation manual / or corrective-additive sheet) Unlock the transmitter stop palmswitch see procedure to change the motherboard SN260350 or SN260355 (IR) Leds still off ? no See procedure to change transmitter housing cover SN260260 PR0207 0 (w/out IR) PR0207 1 (with IR) Transmitter motherboard PR0209 6/10 (w/out IR) yes PR0210 6/10 (with IR) Equipped transmitter housing cover Stop button error Leds flash 5 or 6 times ? yes Check that battery pack is securely mounted in transmitter back. In the event of incorrect contact, these microcutouts will generate an "stop palmswitch button" error no Battery pack securely installed in the back of the transmitter ? Torx n°10 srcrewdriver no yes PR0212 6 / 10 Housing bottom or PR0230 (bat.pack spring) Test the stop palmswitch button as instructed in SN260250 PR0209 6/10 (w/out See procedure to change transmitter housing cover SN260260 IR) Stop palmswitch button functionnal? Green led on ? yes no PR0210 6/10 (with IR) Equipped transmitter housing cover yes Substitute the large ribbon cable by the test ribbon cable, lock then unlock the stop palmswitch button, and press the "on" button no Key absent See procedure to change transmitter housing cover SN260260 Red led off and green led flashes regularly ? Leds both on steady ? PR00116 Transmitter connection kit PR0209 6/10 (w/out no yes Proceed by a substitution of the electronic key Problem persists ? yes no no Symbols : : Continue diagnosis : Stop diagnosis yes IR) PR0210 6/10 (with IR) Equipped transmitter housing cover PR0207 0 (w/out IR) PR0207 1 (with IR) Transmitter motherboard UDWE22 V/X Electronic key continued on page 8 SJ260050.02 - 7 / 8 Tool PRODUCT INTERVENTION SHEET TO BE COMPLETED from page 7 Additional information Incorrect ID code sub-assy to be replaced Both leds flash 3 times ? yes Copy the electronic key ID code in transmitter UDE (procedure described in manual / corrective or additive sheet) Final test of subassemblies no Button board error Both leds flash 4 times ? yes Proceed by a substitution replacing one by one button board by test button board POZIDRIV n°1 screwdriver See procedure to change button board SN260320 Problem persists ? no PR0117 x Button board type x no yes Final test of subassemblies EEPROM error Both leds flash 7 times ? yes Change the electronic key by test electronic key with correct configuration Problem persists ? yes no 2.5mm Allen wrench see procedure to change the motherboard SN260350 or SN260355 (IR) UDWE22 V/X Electronic key no Final test of subassemblies µP error Both leds flash 8 times ? Final test of subassemblies yes PR0207 0 (w/out IR) PR0207 1 (with IR) Transmitter motherboard no Conclusion. All sub-assemblies operate correctly ? no PR0207 0 (w/out IR) PR0207 1 (with IR) Transmitter motherboard yes END of diagnosis. After repair, perform final test : doc. SJ260060 Symbols : : Continue diagnosis : Stop diagnosis SJ260050.02 - 8 / 8 UDE final test after intervention électronique n°9 n°10 n°7 n°8 électronique n°5 n°6 n°5 n°6 n°3 n°4 n°3 n°4 n°1 n°2 n°1 n°2 START Install a charged battery pack in the UDE back Unlock the stop palmswitch button Additional information no Transmitter green led comes on steady? yes Press transmitter "on" button no Transmitter green led flashes? (go to UDE functional check in document SJ260050) yes Press transmitter stop palmswitch button Tools: no Green led goes off? yes test UDR receiver + test electronic key (programmed with soft. DialogUD and programming tool PO1527) Test electronic key must be programmed with test UDR receiver parameters and placed in transmitter UDE housing. (go to UDE sub-assembly test in document SJ260050) Switch on test receiver Go to "Test" menu in DialogUD software. Unlock stop palmswitch button and press "on" button no Radio quality rate = 100 % ? (go to UDE radio module check in document SJ260050) yes Safety and horn relays pull in when transmitter "on" button is pressed? no (go to UDE radio module check in document SJ260050) yes Actuate the function buttons or switches one by one no All actions transmitted? (go to Button state check in document SJ260050) yes no IR start-up option present ? Test IR module yes (UDR must to be programmed with IR start-up option with soft. DialogUD and programming tool PO1527) Equip the test receiver with a UDF and program it as follows: IR start-up option Press green "on" button while pointing the UDE toward the test receiver (3m min. distance between UDE and UDF) no Receiver safety and horn relays pull in ? (go to IR start-up test in document SJ260050) yes Repeat the test at a distance of around 20 m (range test) no Receiver safety and horn relays pull in ? (go to IR start-up test in document SJ260050) yes Press the stop palmswitch button See document SN260380 Fill in the repair labels and fasten them to the transmitter, then fill in the intervention sheet END Key : no Index Modif. No. Modification Name Date = Test is negative, repeat technical diagnosis on product (doc.:SJ260050) 02 T 727 Update since UDE vC001 and DialogUD v5.1 E.DECHAME 29.06.04 Format: A4 BP5 - 176, rue Lavoisier MONTBONNOT - St MARTIN - 38334 St ISMIER CEDEX Tél: +33.(0)4.76.41.44.00 Fax: +33.(0)4.76.41.44.44 Transmitter final test UDE Approved by: Tech: Filename: SJ260060-02-EN.P65 DOC REF.: SJ 260060.02 Market: Page: This document is the property of Jay Electronique. Reproduction or disclosure prohibited without written authorization. 1/1 Upgrading transmitter internal program This update allows : - a bug fix on UDE in C001 version equipped with the option "startup by IR" (update C001 version to C002) - Authorization of the use of an electronic key with a button configuration different from that physically present on the transmitter (update D001 to D002). Important : this upgrade can only be performed by JAY Electronic personnel using specific tools. For this purpose, simply connect the grey programming key (connected to bench) to the UDE transmitter and modify the program using the DialogUD software. 1- Start the DialogUD software and go to the "key and UDE parameters" tab 2- To change the software version of the transmitter, simply click the "Change software version" button. The screen shown opposite is displayed. Click "Bootload UDE". fig.1 3- After clicking "Bootload UDE", a panel opens in order to select a file to be loaded. Select the file and click "select". The software upgrade is automatically run. fig.2 Once the upgrade is completed : > If the transmitter is a part of a complete upgrade passage of C001 version to D002 or if it is about the upgrade D001 to D002, please redo two UDE descriptive labels so that those contain the correct «D002» version number. > If the upgrade concerns only a bug fix on UDE C001 version + IR, please redo two descriptive labels UDE so that those contain the correct «C002» version number. Index Modif. No. Modification Name Date 00 T 727 First issue E.DECHAME 22.07.04 Format: A4 Upgrading transmitter program BP5 - 176, rue Lavoisier MONTBONNOT - St MARTIN - 38334 St ISMIER CEDEX Tél: +33.(0)4.76.41.44.00 Fax: +33.(0)4.76.41.44.44 UDE Approved by: Tech: Filename: SN260235-00-EN.P65 DOC REF.: SN260235.00 Market: Page: This document is the property of Jay Electronique. Reproduction or disclosure prohibited without written authorization. 1/1 Connecting a power supply to transmitter UDE + battery threshold test - Open UDE housing with TORX N°10 screwdriver and remove protective foams - Unlock the stop palmswitch button Stabilised power supply 4 Vdc Coarse adjustment Fine adjustment Vdc + + - - IHM board fig.1 Before pressing the «On/Horn» button Switched on (after pressing the «On/Horn» button) «Low battery» threshold : 3,4VDC < Vp.s. < 3,9VDC «Low battery» threshold : Vp.s. < 3,4VDC «RESET» threshold (Transmitter switched off) : Valim < 3,3VDC Approved by: Index Modif. No. Modification Name Date 02 T 727 Update, new IHM board, D001 v E.DECHAME 15.06.04 Connecting a power supply to transmitter Format: A4 Filename: SN260240-02-EN.P65 UDE DOC REF.: SN 260240.02 BP5 - 176, rue Lavoisier MONTBONNOT - St MARTIN - 38334 St ISMIER CEDEX Tél: +33.(0)4.76.41.44.00 Fax: +33.(0)4.76.41.44.44 Tech: Market: Page: This document is the property of Jay Electronique. Reproduction or disclosure prohibited without written authorization. 1/1 Test of UDE stop palmswitch button version A001 to C002 included : 1- Open the UDE housing using the No. 2 pozidriv screwdriver. 2- Disconnect the power supply wires. 3- Disconnect the ribbon cable linking the IHM board to the stop palmswitch button. 4- Lock the stop palmswitch button (down position). 5- Using a digital multimeter, measure the continuity across points 1 and 3, then 2 and 4: resistance should be infinite. 6- Unlock the stop palmswitch button (up position). 7- Using a digital multimeter, measure the continuity across points 1 and 3, then 2 and 4: the resistance should be null. 8- Reconnect the power supply wires. 9- Reconnect the ribbon cable linking the IHM board to the stop palmswitch button. 4 3 2 1 Fig.1 From version D001 : 1- Open the UDE housing using the No. 10 Torx screwdriver. 2- Disconnect the 12-pins ribbon cable linking the IHM board to motherboard. 10 12 3- Lock the stop palmswitch button (down position). 4- Check the condition of 3 pistons. 5- Using a digital multimeter, measure the continuity across points 12 and 11, then 12 and 10: resistance should be infinite. 6- Unlock the stop palmswitch button (up position). 7- Using a digital multimeter, measure the continuity across points 12 and 11, then 12 and 10: the resistance should be null. 8- Reconnect the 12-pins ribbon cable. 11 Fig.2 Index Modif. No. Modification Name Date T 727 Update, new IHM board from D001 vers. E.DECHAME 15.06.04 Format: A4 01 BP5 - 176, rue Lavoisier MONTBONNOT - St MARTIN - 38334 St ISMIER CEDEX Tél: +33.(0)4.76.41.44.00 Fax: +33.(0)4.76.41.44.44 Approved by: Tech: Test of palmswitch button Filename: SN260250-02-EN.P65 UDE DOC REF.: SN 260250.02 Market: Page: This document is the property of Jay Electronique. Reproduction or disclosure prohibited without written authorization. 1/1 Changing UDE equipped cover and equipped housing Tools : ............ n°10 Torx screwdriver, n°1 Pozidriv screwdriver Equipped housing cover : Housing cover + 6 or 10 mounted BPxx (pushbuttons) with mechanical part + "On/Horn" button (mechanical part) + IHM board + Stop palmswitch button (mechanical part) + Housing seal + 2 pre-print descriptive labels + IR window for UDE with IR start-up option References : PR0215 6 ........ UDE equipped housing 6+2 bt without IR PR0215 10 ...... UDE equipped housing 10+2 bt without IR PR0215 10T .... UDE equipped housing+BPTR 10+2 bt without IR PR0217 6 ........ UDE equipped housing 6+2 bt with IR PR0217 10 ...... UDE equipped housing 10+2 bt with IR PR0217 10T .... UDE equipped housing+BPTR 10+2 bt with IR References : PR0209 6 ..... UDE equipped cover 6+2 bt w/out IR PR0209 10 ... UDE equipped cover UDE 10+2 bt w/out IR PR0210 6 ..... UDE equipped cover UDE 6+2 bt with IR PR0210 10 ... UDE equipped cover UDE 6+2 bt with IR électronique Equipped housing : Housing cover + «6 mounted BP» or «10 mounted BP» or «9 mounted BP + 1 mounted BPTR (3 pos. elec. switch) at location nb.8 + label» (mechanical part) + «On/Horn» button (mechanical part) + IHM board + Stop palmswitch button (mechanical part) + Housing seal + 2 pre-print descriptive labels + IR window for UDE with IR start-up option + Housing bottom F 38330 Montbonnot électronique Ref : UDE . . . . . F 38330 Montbonnot Ref : UDE . . . . . Freq : 433,050 .. 434,790MHz électronique F 38330 Montbonnot Serie : .../.... : UDE . . . . . Date : .. / ..Ref IP65 Freq : 433,050 .. 434,790MHz Serie : .../.... Date : .. / .. IP65 Freq : 433,050 .. 434,790MHz électronique Serie : .../.... : UDE . . . . . Date : .. / ..Ref IP65 F 38330 Montbonnot Freq : 433,050 .. 434,790MHz Serie : .../.... Date : .. / .. IP65 Fig.1 (This figure shows a 6+2bt transmitter equipped housing cover) Fig.2 Disassembly : (This figure shows a 6+2bt transmitter equipped housing) If the transmitter version No. is lower than D001, perform the upgrade procedure given in document SN260230. Remove the parts to be kept using a POZIDRIV No. 1 and No. 2 screwdriver.. or For a transmitter version No. D001 or higher: use a Torx No. 10 and Pozidriv No. 1 screwdriver to remove and set aside the motherboard, the transmitter radio module, the button boards, the 12-contact ribbon cable (connecting motherboard and IHM board), the fastener, the battery pack and the electronic key.. Assembly : 123- If button configuration is incomplete or different from cover/housing kits, re-assembly original mechanical parts or install new mechanical kits (to upgrade the version for example), see assembly procedure from document SN260290 and SN260300. Replace and screw all original button boards in the housing. If the transmitter is equipped with the IR start-up option : 3.1- Fill in pre-printed descriptive labels and fasten them to locations indicated in document SN260380. 3.2- Assemble IR start-up option as instructed in document SN260355. 3.3- Insert the electronic key if present. 3.4- Connect the battery pack. If the transmitter is not equipped with the IR start-up option : 3.1- Fill in pre-printed descriptive labels and fasten them to locations indicated in document SN260380 3.2- Reconnect the ribbon cable linking the last button board to the motherboard (bottom connector). 3.3- Install the assembly formed by the motherboard/radio module in the elastic supports on the cover. 3.4- Connect 12-pins ribbon cables linking the motherboard to the IHM board. 3.5- Close the housing. 3.6- Install housing protective foams according to assembly procedure in document SN260265. 3.7- Insert the electronic key if present. 3.8- Connect the battery pack. Index Modif. No. Modification Name Date 02 T 727 Update, according to D001 version E.DECHAME 29.07.2004 Changing the equipped transmitter cover or equipped housing cover Format: A4 BP5 - 176, rue Lavoisier MONTBONNOT - St MARTIN - 38334 St ISMIER CEDEX Tél: +33.(0)4.76.41.44.00 Fax: +33.(0)4.76.41.44.44 UDE Approved by: Tech: Filename: SN260260-02-EN.P65 DOC REF.: SN 260260.02 Market: Page: This document is the property of Jay Electronique. Reproduction or disclosure prohibited without written authorization. 1/1 Changing the UDE protective foams Protective foams kit Reference : ................................................................................ PR0143 Tools : ........................... n°10 Torx screwdriver (UDE since v.D001) or Pozidriv n°2 (UDE v.A001 to C002), cutter. PR0143 B C Parts list : Item A B C Description Insert for upper foam Upper protective foam Lower protective foam Quantity 1 1 1 A Disassembly : 123- Fig.1 Disconnect the battery pack. Open the UDE housing with a n°10 Torx screwdriver (UDE since v.D001) or Pozidriv n°2 (UDE v.A001 to C002) and separate the cover and the housing back. Remove protective foams. Assembly : 1- (X) If transmitter was not equipped with foams before (UDE version lower than B001 i.e.), else go to point no 2 : 1.1- Cut the housing seal with scissors or cutter at points (X) (fig.2), as per the following drawings (fig.3) : Excess seal to be thrown away (X) (X) (X) Housing back Cover Upper part of the seal 3 + 1.5 cut short Housing seal Fig.3 Fig.2 2- Place insert through the upper protective foam and fasten it to the cover (fig.4) 3- Slide the housing back above the cover taking care to maintain the insert of the upper foam in the cover (if necessary, fold slightly the upper foam) (fig.5). (UDE version before 2004 : take care not to pinch the electric wire during this operation) Insert fastened in the cover Upper foam Insert Housing back Cover Fig.4 Fig.5 4- Close the housing (the lower foam may be placed after closing). 5- Place the lower foam on the lower part of housing back. Lower foam must correctly coat the stop palmswitch button, and the housing fastening must be inserted through the holes of protective foam. 6- Connect the battery pack. Index Modif. No. Modification Name Date T 727 new IHM board from D001 version new foams sinc v.D003 E.DECHAME 17.11.04 Format: A4 01 BP5 - 176, rue Lavoisier MONTBONNOT - St MARTIN - 38334 St ISMIER CEDEX Tél: +33.(0)4.76.41.44.00 Fax: +33.(0)4.76.41.44.44 Approved by: Tech: Changing the protective foams Filename: SN260265-01-EN.P65 UDE DOC REF.: SN 260265.01 Market: Page: This document is the property of Jay Electronique. Reproduction or disclosure prohibited without written authorization. 1/1 Changing pushbutton mechanical part (for BPSV, BPDV and BPTR) Pushbutton mechanical part kits : Reference : ........................................................................... PR0057 BP Tools : ...... n°10 Torx screwdriver and n°1 Pozidriv screwdriver Parts list : Item A Description Black capsule Quantity 10 B Self-tapping screw 1,8 x 6 10 C Capsule ring 10 D Button lever 10 +2 green capsules PR0057 BP A C B D +2 screws +2 rings +2 levers Fig.1 Note : The mechanical kit for the "On/Horn" pushbutton (green) is contained in the "equipped covers" and "equipped housings" kits (for UDE version D001 and higher). Disassembly : 1- Disconnect the battery pack. 2- Open the UDE housing using the No. 2 Pozidriv (UDE version A001 to C002 included) or n°10 Torx screwdriver (from UDE version D001), and remove protective foams. 3- The button card for the concerned button mechanical kit must be removed. Perform the button board disassembly procedure detailed in document SN260320. 4- Remove the screw securing the pushbutton mechanical kit using the No. 1 Pozidriv screwdriver and remove the assembly formed by the lever+ring+capsule. Assembly : 123456789- Insert the capsule in the housing cover through the inside (fig.2). Install the lever in the capsule ring (fig.3). Place the assembly formed by the lever + ring in the pushbutton mounting position in the housing (fig.4). Press on point P1 of the ring to engage it correctly in the pushbutton capsule. Screw in the assembly gently up to the stop (caution: ring body should not bend at points P2). Proceed to reinstall the button board according to document SN260320 Install protective foams (see doc. SN260265) and close the housing. Connect the electronic key if necessary. Connect the battery pack. P1 P2 mounting screw lever ring capsule Fig.2 Index Fig.3 Fig.5 Fig.4 Modif. No. Modification Name Date T 727 Button "On/Horn" was removed from kit E.DECHAME 15.06.04 Format: A4 02 BP5 - 176, rue Lavoisier Tech: Changing the pushbutton mechanical kit Filename: SN260290-02-EN.P65 UDE DOC REF.: SN 260290.02 MONTBONNOT - St MARTIN - 38334 St ISMIER CEDEX Tel: +33.(0)4.76.41.44.00 Fax: +33.(0)4.76.41.44.44 Approved by: Market: Page: This document is the property of Jay Electronique. Reproduction or disclosure prohibited without written authorization. 1/1 Changing rotary switch mechanical part (for COM2, COM3 and COM3R) Rotary switch mechanical kit : Reference : ....................................................................... PR0057 COM Tool : ................................. n°10 Torx and n°1 Pozidriv screwdriver, cutter and flat angled plier PR0057 COM A D Parts list : Item Description Quantity A B C D E Rotary switch Mounting screw Lip seal Cam Spring 5 5 5 5 10 B E C Fig.1 Disassembly : 1234- Disconnect the battery pack. Open the UDE housing using the No. 2 Pozidriv (V.A001 to C002) or n°10 Torx (from v.D001) screwdriver and remove protective foams. Remove the button board corresponding to the mechanical kit to be replaced; perform the procedure for disassembly of the button boards detailed in document SN260320. Remove the screw securing the kit using the No. 1 Pozidriv screwdriver and remove the rotary switch mechanical assembly (switch + seal, cam and spring if present). Assembly : 1- If the switch to be installed is a 3-position rotary switch, else go to point n°2: cut the pin on the cam (fig.2) using the cutter; no surplus thickness should remain. 4- cut with cutter Holding the cam in position (pin toward center of housing), turnover the housing and place the seal/switch assembly in position in the cam housing. Fit the seal/switch assembly so that the long part of the switch is pointing toward the top of the housing (fig.6) cam Top of housing Fig.2 2- Fit the cam in the switch hole as shown in fig.3 with the pin toward the center of the housing. short part of switch 56- Pins toward center 3- Install the mounting screw using the No. 1 Posidriv screwdriver. If the switch is a COM3R switch (3 positions with automatic return), else go to point n°7 : Insert 1st spring in rotary switch slot (see picture below), then turn the switch to the limit position in the other direction and install with a flat angled plier the other spring in the same way, compressing the first spring as much as possible. COM3R Insert springs Fig.4 Fig.3 Fig.6 Fit the lip seal on the switch observing the correct mounting direction. lip seal installed Fig.7 78Fig.5 9- Install the button board as instructed in document SN260320. Install protective foams (see doc. SN260265) and close the UDE housing. Connect the battery pack. Approved by: Index Modif. No. Modification Name Date 02 T 727 Pictures updated E.DECHAME 15.06.04 Changing the rotary switch mechanical kit Format: A4 Filename: SN260300-02-EN.P65 UDE DOC REF.: SN 260300.02 BP5 - 176, rue Lavoisier MONTBONNOT - St MARTIN - 38334 St ISMIER CEDEX Tél: +33.(0)4.76.41.44.00 Fax: +33.(0)4.76.41.44.44 Tech: Market: Page: This document is the property of Jay Electronique. Reproduction or disclosure prohibited without written authorization. 1/1 Changing the stop palmswitch button on UDE version A001 to C002 included Stoppalmswitch button : Reference : ................................................................................. PR0115 Tools : ............................. n°2 Pozidriv screwdriver and specific tool ref: PR0130. PR0115 C* A Parts list : Item Description Quantity A Stop palmswitch button 1 B Nut 1 C Seal 1 B * = inserted in stop palmswitch button Fig.1 Nota : From UDE version D001, the stop palmswitch is contained in the "equipped covers " and "equipped housings" kits, see doc. SN260260. Disassembly : 123456- Disconnect the battery pack. Open the UDE housing using the No. 2 Pozidriv screwdriver and remove protective foams. Disconnect the power supply wires from the UDE. Disconnect the ribbon cable linking the IHM board to the stop palmswitch button. Unscrew the stop palmswitch button locking ring using tool PR0130 and a screwdriver. Remove the stop palmswitch button assembly and its seal. insert a screwdriver PR0130 Tool locking ring UDE housing Assembly : 1- 234567- Insert the assembly formed by the stop palmswitch button + seal in the transmitter cover (paying attention to mounting direction; see fig. 2, locating pin). Screw in and block the locking ring using tool PR0130 and a screwdriver. Connect the ribbon cable linking the IHM board to the stop palmswitch button. Connect the power supply wires. Install protective foams (see doc. SN260265) and close the housing. Connect the battery pack. Proceeded to test, person protection must be assured during these. seal locating pin stop palmswitch button Fig.2 Index Modif. No. Modification Name Date T 727 Spare part only available for UDE version A001 to C002 included E.DECHAME 15.06.04 Changing the stop palmswitch button Format: A4 02 BP5 - 176, rue Lavoisier MONTBONNOT - St MARTIN - 38334 St ISMIER CEDEX Tél: +33.(0)4.76.41.44.00 Fax: +33.(0)4.76.41.44.44 UDE Filename: Approved by: Tech: Market: SN260310-02-EN.P65 SN 260310.02 DOC REF.: Page: version A001 to C002 This document is the property of Jay Electronique. Reproduction or disclosure prohibited without written authorization. 1/1 Changing the button board Button boards : References : ........................................................................... PR0117 * *= 1 2 3 4 5 6 7 BPSV-BPSV BPDV-BPDV BPSV-COM2 BPSV-COM3 COM2-COM2 COM2-COM3 COM3-COM3 8 9 A B C D E PR0117 * A BPSV-COM3R COM2-COM3R COM3-COM3R COM3R-COM3R Covers BPSV-BPTR COM2-BPTR Tools : ............................... n°10 Torx and screwdrivers. Parts list : n°1,n°2 Pozidriv Item Description Quantity A B Self-tapping screw 3x8 Button board type x 1 1 B Fig.1 Disassembly : 12345- Disconnect the battery pack. Open the UDE housing using the n°10 Torx or n°2 Pozidriv screwdriver, and remove protective foams. For UDE version lower than D001 : disconnect the power supply wires. Disconnect the ribbon cable linking the motherboard to the IHM board. Remove the screw securing the button board to be replaced. Button board to be replaced is connected to motherboard : 5.15.2- Pivot the button board and disconnect the ribbon cable connecting it to the lower button board. Remove the assembly formed by the radio module / motherboard + button board and disconnect the ribbon cable connecting them, go to point n°6 Button board to be replaced is located between other button boards : 5.15.2- Pivot the board and disconnect the ribbon cable linking it to the lower button board. Remove the screw securing the upper button board, pivot it and disconnect the ribbon cable linking it to the button board to be replaced, go to point n°6 Button board to be replaced is located above the IHM board : 5.1- 6- Remove the screw securing the upper button board, then pivot it and disconnect the ribbon cable linking it to the button board to be replaced. Remove the button board. Assembly : 1- Button board replaced is located just below the motherboard : 1.11.21.3- Connect the button board to the assembly formed by the radio module + motherboard Connect the ribbon cable from the lower button board to the button board replaced. Insert the assembly formed by the radio module + motherboard in the resilient mountings on the housing, go to point n°2 Button board replaced is located between other button boards : 1.11.2- Connect the ribbon cable from the button board replaced to the upper board. Connect the ribbon cable from the lower board to the button board replaced, go to point n°2 Button board replaced is located just above the IHM board : 1.123456- Connect the ribbon cable from the board replaced to the connector on the upper button board. Install the button boards in the cover and screw them to the housing. Connect the ribbon cable linking the motherboard to the IHM board. For UDE version lower than D001 : connect the power supply wires. Install protective foams (see doc. SN260265) and close the housing. Connect the battery pack. Approved by: Index Modif. No. Modification Name Date 02 T 727 Update since UDE vD001 E.DECHAME 29.06.04 Changing a function button board Format: A4 Filename: SN260320-02-EN.P65 UDE DOC REF.: SN 260320.02 BP5 - 176, rue Lavoisier MONTBONNOT - St MARTIN - 38334 St ISMIER CEDEX Tél: +33.(0)4.76.41.44.00 Fax: +33.(0)4.76.41.44.44 Tech: Market: Page: This document is the property of Jay Electronique. Reproduction or disclosure prohibited without written authorization. 1/1 Changing the motherboard (without IR start-up option) Motherboard (without IR start-up option) kit : Reference : ............................................................................. PR0207 0 Tools : ............................................ n°10 Torx, 2.5mm Allen wrench. PR0207 0 Parts list : Item A Description UDE motherboard no IR Quantity 1 B Allen screw 1 C Washer 1 D Spacer 1 B C D A Fig.1 Disassembly : 1234567- Disconnect the battery pack. Open the UDE housing using the No. 10 Torx screwdriver and remove protective foams. Disconnect the ribbon cable linking the motherboard to the IHM board. Grasp the assembly formed by the motherboard + radio module and gently disengage it from its resilient mountings. Disconnect the ribbon cable linking the motherboard to the last button board. Remove the Allen screw using the 2.5mm Allen wrench. Separate the two parts: radio module and motherboard. radio module 12-pins ribbon cable motherboard / IHM board Allen screw washer spacer motherboard ribbon cable from last button board IHM board Fig.2 Fig.3 Assembly : 12345678- Connect the replaced motherboard to the radio module. Install the spacer between the motherboard and the radio module (fig.2). Install the washer and the Allen screw (fig.2). Connect the ribbon cable from the last button board to the motherboard Install the assembly formed by the motherboard / radio module in the resilient mountings of the cover. Connect the ribbon cable linking the motherboard to the IHM board. Install protective foams (see doc.SN260265) and close the housing. Connect the battery pack. Index Modif. No. Modification Name Date T 727 New Motherboard since vers. C001 Spacer added to PR0207 * Adhesive tape removed E.DECHAME 29.06.04 Format: A4 02 BP5 - 176, rue Lavoisier MONTBONNOT - St MARTIN - 38334 St ISMIER CEDEX Tél: +33.(0)4.76.41.44.00 Fax: +33.(0)4.76.41.44.44 Approved by: Tech: Changing the motherboard (non IR) Filename: SN260350-02-EN.P65 UDE DOC REF.: SN 260350.02 Market: Page: This document is the property of Jay Electronique. Reproduction or disclosure prohibited without written authorization. 1/1 Changing the motherboard (with IR start-up option) Motherboard with IR start-up option kit : Reference : ............................................................................. PR0207 1 Tools : ............................. n°10 Torx screwdriver, 2.5mm Allen wrench, flat angled plier Parts list : Item A B C D E F G H Description Self-tapping screw 3x8 Allen screw Spacer Washer IR window Pins Mother equipped with IR start-up option Seal PR0207 1 E H Quantity 1 1 1 1 1 2 1 1 A C G F B D Fig.1 Disassembly : 123456789- Disconnect the battery pack. Open the UDE housing using the No. 10 Torx screwdriver, and remove protective foams. Disconnect ribbon cables linking the IHM board to the motherboard. Grasp the motherboard + radio module assembly and carefully disengage it from its resilient mountings. Disconnect the ribbon cable linking the motherboard to the last button board. Apply pressure between the LED circuit and the housing to compress the seal. While applying pressure using a flat angled plier, LED circuit and the IR window must be released from transmitter housing. Remove the Allen screw using the 2.5mm Allen wrench. Separate the two parts : radio module and motherboard. Assembly : 1234567- Connect the replaced motherboard to the radio module. Install the spacer between the motherboard and the radio module (fig.2). Install the washer and the Allen screw (fig.2). Insert the IR window on the LED circuit, observing the mounting direction given by the pins (see fig.3). Place the seal on the IR window with the flat part against the lens (see fig.3). Fit the assembly formed by the LED circuit/lens/IR window in the UDE housing (see fig.4). While applying pressure using a flat angled plier, insert the two pins in the housing ribs observing the mounting direction (see fig.5); the pin locators should clip into the holes in the circuit (see fig.6). Allen screw seal radio module LED circuit washer spacer Motherboard + LED circuit 8- 9- Fig.2 IR window Fig.3 Fig.4 Fig.5 Install the assembly formed by the IR motherboard + radio module in the transmitter inserts and connect the last button to this assembly. Fig.6 12-pins ribbon cable IR motherboard / IHM motherboard Connect the ribbon cable linking the motherboard to IHM board. 10- Install protective foam (see doc. 2600265) and close the transmitter housing. 11- Connect the battery pack. ribbon cable from last button board IHM board Fig.7 Approved by: Index Modif. No. Modification Name Date 00 T 727 First issue E.DECHAME 17.11.04 Changing the motherboard (with IR) Format: A4 Filename: SN260355-00-EN.P65 UDE DOC REF.: SN 260355.00 BP5 - 176, rue Lavoisier MONTBONNOT - St MARTIN - 38334 St ISMIER CEDEX Tél: +33.(0)4.76.41.44.00 Fax: +33.(0)4.76.41.44.44 Tech: Market: Page: This document is the property of Jay Electronique. Reproduction or disclosure prohibited without written authorization. 1/1 Changing the transmitter radio module Radio module kit : Reference : ............................................................................. PR0120 E Tools : ............................. n°10 Torx or n°2 Pozidriv screwdriver, 2.5mm Allen wrench. Parts list : Item A Description Allen screw Quantity 1 B Washer 1 C Spacer 1 D Radio module 1 PR0120 E A D B C Fig.1 Disassembly : 1- Disconnect the battery pack. 2- Open the UDE housing using the n°10 Torx (D001 vers. and higher) or n°2 Pozidriv screwdriver, and remove protective foams. 3- Grasp the assembly formed by the motherboard + radio module and gently disengage it from its resilient mountings. 4- Remove the Allen screw using the 2.5mm Allen wrench. 5- Disconnect and remove the radio module from motherboard. Assembly : 1- Connect the replaced radio module to motherboard. 2- Install the spacer between the motherboard and the radio module (fig.2). 3- Install the washer and the Allen screw (fig.2). 4- Install the assembly formed by the motherboard / radio module in the resilient mountings of the cover. radio module Allen screw washer spacer motherboard Fig.2 5- Install protective foams (see doc.SN260265) and close the housing. 6- Connect the battery pack. Approved by: Index Modif. No. Modification Name Date 02 T 727 Update, from D001 version E.DECHAME 15.06.04 Changing the radio module Format: A4 Filename: SN260360-02-EN.P65 UDE DOC REF.: SN 260360.02 BP5 - 176, rue Lavoisier MONTBONNOT - St MARTIN - 38334 St ISMIER CEDEX Tél: +33.(0)4.76.41.44.00 Fax: +33.(0)4.76.41.44.44 Tech: Market: Page: This document is the property of Jay Electronique. Reproduction or disclosure prohibited without written authorization. 1/1 Markings on repaired UDE transmitter 1- Repair label Two repair labels must be filled in and applied to the transmitter (see location in § 3). ! Repair labels must be applied after each intervention (under warranty or not) Repair labels can be ordered under reference : PR0229 (a roller of 1000 labels) by Product checked on : APPAREIL CONTROLE LE : Date of intervention day, month, year Name of certified repair center and technician initials PAR : 2- UDE transmitter, electronic key and appaired UDR receiver descriptive labels If the unit has been transformed, the information on the transmitter and receiver nameplates must be changed accordingly. To do so, use blank nameplates, filled in as follows: UDE main reference and complementary reference UDE labels (location on below) Old serial nb Old date UDR main reference and complementary reference UDR labels Old serial nb (see UDR data repair package) Old date Electronic key parameter labels (to be sticked on page n°2 of this document, and send to customer) électronique Ref : UDE . . . . . F 38330 Montbonnot Freq : 433,050 .. 434,790MHz Serie : .../.... Date : .. / .. IP65 électronique F 38330 Montbonnot Ref : UDR . . . . . - . . . Code : . . . . version number (product file version number) : If update, write the last version number. If repair without update, write the old version number. ID code Power supply voltage Freq : 433,050 .. 434,790MHz Serie : .../.... Alim : .....V.. Date : .. / .. IP65 Version number : (si comments upper, as UDE version nb) Associated UDE reference Key number Nr clé : . . . . . . Key ID code Code : . . . . Radio channel Canal : . . Coupled T.crane option : Associated receiver ID code (0000 if option not used) Code pont couplé : . . . . µSpeed option (Y/N) Masque : . . . . . . . . . . Masking (1111111111 if function not used) UDE Ass. : . . . . . . . . . HM : . . . µVitesse : . «Dead man» function duration Tout IR : . Old number Dossier : . . . . 3- Location of repair labels and descriptive labels on UDE transmitter housing UDE n°1 descriptive label UDE n°2 descriptive label UDE n°2 repair label UDE n°1 repair label Index Modif. No. Modification Name Date 02 T 727 New pictures and descriptive labels + electronic key label E.DECHAME 15.06.04 Format: A4 BP5 - 176, rue Lavoisier MONTBONNOT - St MARTIN - 38334 St ISMIER CEDEX Tél: +33.(0)4.76.41.44.00 Fax: +33.(0)4.76.41.44.44 Approved by: Tech: Markings on repaired transmitter Filename: SN260380-02-EN.P65 UDE DOC REF.: SN 260380.02 Market: Page: This document is the property of Jay Electronique. Reproduction or disclosure prohibited without written authorization. 1/2 UDE transmitter Grey key identification sheet KEEP THIS DOCUMENT Read and keep this document in a safe location. It contains important information concerning the key which you have just received For operation of your radio remote control, refer to the UD installation and user manual. An identification No. is engraved on the side of the electronic key. This key contains all the parameters of your transmitter, ensuring correct communication with the associated receiver (Frequency channel, identification code, dead man time ...) Please indicate this identification No. when ordering a new identical key. Please identify your electronic key using the label supplied with the key. Fill in the identification of the equipment controlled by this key. UDE transmitter electronic key Electronic key parameter label : (to be sticked by the repairman) xxxxxx (6-digit number engraved on electronic key) Equipment : (to be filled in by the customer) électronique BP5 - 176, rue Lavoisier MONTBONNOT - St MARTIN - 38334 St ISMIER CEDEX - FRANCE Phone: 04.76.41.44.00 / Fax: 04.76.41.44.44 www.jay-electronique.fr Doc : SN260380.02 List of tools required for repair of receiver UDR Mechanical part : 6mm flat-tip screwdriver (for fuse-holder) No.1 POSIDRIV screwdriver (for radio module mounting screws) No.2 POSIDRIV screwdriver (for screws securing housing,motherboard and IR module) No.10 TORX screwdriver (for screws securing IR module electronic board) 16mm box spanner (for BNC connector) 2.5mm Allen wrench (for antenna unit screw) Electronics flat noise pliers (for plastic spacers of housing) Kit of 2 spanners, ref : PR0142 comprising : - spanner for assembly / disassembly PG29 plastic cable gland - spanner for assembly / disassembly serial option Soldering iron (for UDF electronic board) Measurement and test part: Stabilised power supply 12-24VDC / 1 A min AC power supply, 24-48VAC / 20 VA Digital multimeter Test transmitter UDE, ref. : UDE122222 010 Test IR module, ref. : UDF1 Serial link accessory, ref. : UDWR32 «Dialog UD» software , v5.1 minimum, ref. : UDWR36 PC microcomputer equipped with a serial port COM Test receiver radio modules, ref. : PR0120 R (for UDR version A001 to B002 included) PR0208R (for UDR version B003 and higher) Test products and test accessories Test spare parts Test relay board, ref. : PR0122 Index Modif. No. Modification Name Date 02 T 727 Test UDE : UDE122222 010 DialogUD v5.1 minimum PR0208 R for UDR v.>B002 E.DECHAME 01.07.04 Format: A4 BP5 - 176, rue Lavoisier MONTBONNOT - St MARTIN - 38334 St ISMIER CEDEX Tél: +33.(0)4.76.41.44.00 Fax: +33.(0)4.76.41.44.44 Approved by: Tech: List of tools required for repair Filename: SN270070-02-EN.P65 UDR DOC REF.: SN 270070.02 Market: Page: This document is the property of Jay Electronique. Reproduction or disclosure prohibited without written authorization. 1/1 Determine version number of UDR receiver, receiver mother board and UDF IR module These version numbers identify product versions and therefore their various technical changes. The table of technical changes (doc.SN270080) indicates all the upgrades which you need to perform on the UDR receiver in accordance with its version number. 1- UDR receiver The version number is indicated on the nameplate, fastened to the receiver housing and inside receiver housing. Nameplate for UDR version A001 to B003 included électronique F 38330 Montbonnot-St-Martin Ref : UDR . . . . . - . . . Code : . . . . Freq : 433,050 .. 434,790MHz Serie : ......./xxxx Alim : ...V.. IP65 Date : .. / .. Baumuster geprüft Nameplate for UDR version C001 and higher UDR version number (example : C001) électronique F 38330 Montbonnot Ref : UDR . . . . . - . . . Code : . . . . Freq : 433,050 .. 434,790MHz Serie : .../xxxx Alim : . . . . .V. . Date : .. / .. IP65 2- Receiver mother board The version number is indicated on a label, fastened on PCB, close to power supply terminals strips. Receiver mother board version number E1898x .......................................... (example : E18980) 3- UDF IR module The version number is indicated on the nameplate, fastened to the UDF housing. France électronique électronique UDF IR module version number Ref : UDF . (example : A002) N° : ....... / xxxx Approved by: Index Modif. No. Modification Name Date 00 T 727 First issue E.DECHAME 01.07.04 Determine product version number Format: A4 Filename: SN270075-00-EN.P65 UDR DOC REF.: SN 270075.00 BP5 - 176, rue Lavoisier MONTBONNOT - St MARTIN - 38334 St ISMIER CEDEX Tél: +33.(0)4.76.41.44.00 Fax: +33.(0)4.76.41.44.44 Tech: Market: Page: This document is the property of Jay Electronique. Reproduction or disclosure prohibited without written authorization. 1/1 UDR exploded view for version A001 to B002 included Note 1 : The figure below shows a receiver with housing for serial link option. Serial link option Board with 6 function relays PR0138 PR0122 Auxiliary relay board for options : - Horn°2 - µSpeed - Coupled T.cranes - Transfer T.crane Receiver radio module UDWR35 PR0120 R doc. SN270110 Receiver motherboard Receiver fuse kit PR0124 * PR0123 * : 4 = 24-48 VDC A = 24-48 VAC B = 115 - 230 VAC doc. SN270100 Equipped receiver housing PR0125 = standard housing PR0125 1 doc. SN270090 = housing for serial link option (with hole for PR0138 option) Rubber cable gland PR0127 1/4 wave 400MHz antenna VUB084 Approved by: Index Modif. No. Modification Name Date 02 T 727 Decomposition following version E.DECHAME 01.07.04 Exploded view of receiver Format: A4 MONTBONNOT - St MARTIN - 38334 St ISMIER CEDEX UDR Filename: SE270020-02-EN.P65 Tél: +33.(0)4.76.41.44.00 Fax: +33.(0)4.76.41.44.44 version A001 to B002 DOC REF.: SE 270020.02 BP5 - 176, rue Lavoisier Tech: Market: Page: This document is the property of Jay Electronique. Reproduction or disclosure prohibited without written authorization. 1/1 UDR exploded view for version B003 and higher Note 1 : The figure below shows a receiver with housing for serial link option. Serial link option Board with 6 function relays PR0138 PR0122 Auxiliary relay board for options : - Horn°2 - µSpeed - Coupled T.cranes - Transfer T.crane Receiver radio module UDWR35 PR0208 R doc. SN270110 Receiver motherboard Receiver fuse kit PR0124 * PR0123 * : 4 = 24-48 VDC A = 24-48 VAC B = 115 - 230 VAC doc. SN270100 Equipped receiver housing PR0125 = standard housing PR0125 1 doc. SN270090 = housing for serial link option (with hole for PR0138 option) Rubber cable gland PR0127 1/4 wave 400MHz antenna VUB084 Approved by: Index Modif. No. Modification Name Date 00 T 727 First issue E.DECHAME 01.07.04 Exploded view of receiver Format: A4 MONTBONNOT - St MARTIN - 38334 St ISMIER CEDEX UDR Filename: SE270021-00-EN.P65 Tél: +33.(0)4.76.41.44.00 Fax: +33.(0)4.76.41.44.44 version B003 and higher DOC REF.: SE 270021.00 BP5 - 176, rue Lavoisier Tech: Market: Page: This document is the property of Jay Electronique. Reproduction or disclosure prohibited without written authorization. 1/1 Various accessories and spare parts for UDR receiver Antenna and cable extension 10m cable gland kit for UDF module UDWR10 1/4 wave antenna for vehicle + 5m 1/2 wave 400MHz staright/ offset antenna VUB150 VUB086 2m antenna extender + insulated bracket 5m antenna extender + insulated bracket VUB100 VUB120 2m antenna extender + non-insulated bracket 5m antenna extender + non-insulated bracket VUB105 VUB125 Directional arrow yellow Set of 4 colored directional arrows brown Set of 2 colored directional arrows green UWE002 UWE001 blue UDF IR module IR module electronic board Kit with 1 IR module + 10m cable PR0134 UDF1 changing procedure SN270095 électronique Kit with 2 IR modules + 10m cable IR window for UDF module UDF2 PR0133 électronique Monitoring and diagnostic accessories «Dialog UD» level 2 + RS232 cable UDWR37 Serial link accessory UDWR32 UD (version 5.1 minimum) Various spare parts 16-pin male connector + 2m cable Common wiring accessory UDWR13 UDWR12 24-pin male connector + 2m cable UDWR14 PG29 Plastic cable gland kit PG9 x 4 Spanners kit PR0142 Spanner for assembly/disassembly PG29 cable gland UDWR11 Spanner for assembly/disassembly serial link option (PR0138) Approved by: Index Modif. No. Modification Name Date 00 T 727 First issue E.DECHAME 24.06.04 Various accessories and spare Format: A4 parts Filename: SE270200-00-EN.P65 UDR DOC REF.: SE 270200.00 BP5 - 176, rue Lavoisier MONTBONNOT - St MARTIN - 38334 St ISMIER CEDEX Tél: +33.(0)4.76.41.44.00 Fax: +33.(0)4.76.41.44.44 Tech: Market: Page: This document is the property of Jay Electronique. Reproduction or disclosure prohibited without written authorization. 1/1 Upgrading UDR receivers according to version 1- Upgrading receivers : Part(s) to be used for the upgrade UDR version number Obligatory upgrade Description Assembly / disassembly procedure Reference Mother board have to be changed if its version nb is lower than E18982 If modification for using the "Horn n°2" PR0124 A (24-48VAC) function : UDR mother board PR0124 B (115-230VAC) Mother board have to be changed if its version PR0124 4 (12-24VDC) nb is lower than E18984 SN270095 A001 to A003 included If modification for using "micro-speed", "coupling cranes" or "transfer crane" functions : Mother board have to be changed if its version nb is lower than E18986 If UDR with IR start-up option, check of UDF IR module version number : IF UDF version number is < than A002, the UDF electronic board must be changed B001 UDF electronic board SN270100 PR0134 If modification for using "micro-speed", PR0124 A (24-48VAC) "coupling cranes" or "transfer crane" UDR mother board PR0124 B (115-230VAC) functions : Mother board have to be changed if its version PR0124 4 (12-24VDC) nb is lower than E18986 SN270100 No obligatory upgrade Since B002 (The last version on 07/2004 is C003) 2- UDR mother board / UDR radio module pairing in case of repair / exchange : UDR mother board with a version number E18980 to E18984 included, have to be paired with a PR0120 R radio module. UDR mother board with a version number E18985 and higher, have to be paired with a PR0208 R radio module. Index Modif. No. Modification Name Date 02 T 727 Update according new versions Pairing the mobo and radio module E.DECHAME 01.07.04 Format: A4 BP5 - 176, rue Lavoisier MONTBONNOT - St MARTIN - 38334 St ISMIER CEDEX Tel: +33.(0)4.76.41.44.00 Fax: +33.(0)4.76.41.44.44 Changes to receivers UDR Approved by: Tech: Filename: SN270080-02-EN.P65 DOC REF.: SN 270080.02 Market: Page: This document is the property of Jay Electronique. Reproduction or disclosure prohibited without written authorization. 1/1 Key START no = Refer to various chapters of receiver technical diagnosis (document SJ270050) Switch on the receiver Additional information no Receiver yellow led on? yes Safety microprocessor leds flash? yes See table of probable faults on page 3 no with DialogUD software, go to "receiver parameters" and read receiver EEPROM memory For receiver with IR start-up option, untick this option for continue UDWR36 DialogUD software v5.1 minimum + programming tool PO1527 Use repaired customer transmitter with its electronic key or Program a test electronic key with correct parameter (receiver to be tested) and place it on test transmitter. Go to "Test" menu in DialogUD software (check of radio quality rate) Checked customer transmitter or test transmitter Unlock stop palmswitch and press "On" button Radio quality rate is 100 % ? no (go to radio module check in document SJ270050) yes safety relays and horn relay are pulled in when "on" button is pressed ? no (go to radio module check in document SJ270050) yes Measure the safety relays, horn relay and auxiliary relay (if auxiliary board is present) contact resistance Digital multimeter relay contact resistance is R< 2 Ohms ? no (go to relay state chek in document SJ270050) yes Press one by one transmitter function buttons Actions are transmitted to function relays ? no (go to functional check in document SJ270050) yes Digital multimeter Function relay contact resistance is R< 2 Ohms ? no (go to relay state chek in document SJ270050) yes continued on page 2 Index Modif. No. 02 T 727 BP5 - 176, rue Lavoisier MONTBONNOT - St MARTIN - 38334 St ISMIER CEDEX Tel: +33.(0)4.76.41.44.00 Fax: +33.(0)4.76.41.44.44 Modification Name Update due to new DialogUD E.DECHAME 5.1 version Format: Approved by: Date 22.07.04 Tech: Market: A4 Quick test before intervention Filename: SJ270040-02-EN.P65 UDR DOC REF.: SJ270040.02 Page: This document is the property of Jay Electronique. Reproduction or disclosure prohibited without written authorization. 1/3 Information complémentaire from page 1 Press transmitter stop palmswitch button Safety relay contacts open ? no yes (go to relay state test in document SJ270050) IR startup option present on receiver ? yes Set serial option switch to "RS232" mode. In the Dialog UD level 2 software, under the "EEPROM Programming" menu, read the receiver EEPROM memory. Tick the IR startup option Save the new parameter Set the serial option switch to "Normal" mode Shut down the receiver Equip the receiver with one of the UDF units to be tested (repeat the operation for each UDF to be tested and IR connectors (3)) Switch on the receiver Checked customer transmitter or test transmitter no Unlock the stop palmswitch button on the test transmitter and press the green "on" button by pointing the UDE toward the UDF of the receiver to be tested (3meters mini between UDE and UDF). Receiver safety and horn relays pull in ? yes no (go to IR startup option test in documentSJ270050) Repeat the test at distance of around 20m (range test) Receiver safety and horn relays pull in? yes See technical diagnosis SJ270050 "visual inspection of UDR" no (go to IR startup option test in documentSJ270050) Visually inspect the receiver, check the condition of the housing, the cable glands, accessories, internal connectors and UDF units Check the receiver upgrade status See document SN270080 End SJ270040.02 - 2/3 UDR receiver indicator light functions UDR version A001 and higher Error messages generated by microprocessor indicator lights Safety Microproc. LED 1 - ORANGE - Safety Microproc. LED 2 - GREEN - Off Possible causes of fault Corrective actions - Fuses blown - Incorrect power supply wiring - Faulty transformer - Check condition of fuses and fuse rating - Check power supply wiring according to receiver model - Replace motherboard 2 flashes - Auxiliary board faulty - Replace auxiliary board - Replace motherboard 3 flashes - Safety relays faulty - Replace motherboard 4 flashes 5 flashes 6 flashes 7 flashes - Internal faults on memories and microprocessors - Replace motherboard (supplied but Yellow power indicator light also off) Other messages generated by receiver motherboard indicator lights LED name and color Mode Safety Microproc.1 LED (ORANGE) Normal Serial link Safety Microproc.2 LED (GREEN) Normal Indication Indicates validity of identity code All Horn relay state All Auxiliary relay state on auxiliary board (option) ON Power LED (YELLOW) All Safety relay LED (RED) All Function relay LED (RED) All OFF Message received with correct identity code OFF Message received with incorrect identity code Flashes regularly ON Indicates radio reception quality "RS232 mode" Auxiliary relay LED (RED) State "RS232 mode" Serial link Horn relay LED (RED) Message Message not received No radio reception OFF Poor radio reception Flashes Good radio reception ON OFF not activated (OFF) Indicates power supply State of safety relays State of function relay N OFF activated (ON) ON not activated (OFF) OFF activated (ON) ON Receiver shut down OFF Receiver powered up ON not activated (OFF) OFF activated (ON) ON not activated (OFF) OFF activated (ON) ON Auxiliary connector for additional function such as : - «Horn n°2» board (option) - «micro-speed» function (option) - «coupled T.cranes» function (option) - «transfer T.crane» function (option) RK relay «Horn» A Red indicator light state of Horn relay Relay board connector B (3 boards of 6 relays con be connected) "S1" button C RS232 board connector S1 Horn relay terminal strips RK Safety relay n°1 «On» Red indicator light state of safety relays Safety relay n°2 «On» UDR motherboard RESET : 1 - Switch on receiver 2 - press S2 button Receiver manual release : (for "Coupled travelling cranes", and "Travelling crane transfer" options) 1 - Switch on receiver 2 - press S1 button 3 - Maintain S1, and press S2 4 - release S1 5 - release S2 Orange indic.light, wrong ID code + diagnostic RS1 F3 RS2 F4 S2 F1 Safety relay n°1 terminal strips Safety relay n°2 terminal strips Power supply cable gland F2 Power supply terminal strips IR module cable glands Green indic.light, radio link established + diagnostic "S2" button RESET Yellow indic.light, power supply indic. "control" cable gland IR module terminal strips antenna connector SJ270010.02 - 3/3 PRODUCT INTERVENTION SHEET UDR TECHNICAL DIAGNOSIS (TO BE COMPLETED) - for preparation of an estimate - Sub-assy to be replaced Tool Additional information START Visual inspection of UDR POZIDRIV screwdriver No. 2 Open the receiver housing See "Receiver changes" document SN270080 Check the receiver version Receiver complies with respect to technical changes table? -POZIDRIV screwdriver No. 2, No. 1 - 16mm box spanner -2.5 mm Allen wrench -flat nose pliers no ****** Spare part or technical upgrade accessory (X99 fault code) (P.M.) no PR0125 PR0125 1 Receiver housing (P.M.) no PR0127 UDWR11 cable gland kits (P.M.) no UDF 1 / 2 PR0133 IR module (P.M.) yes See receiver housing replacement procedure SN270090 Housing in good condition? yes Cable glands in good condition? yes Torx screwdriver No. 10 If present, IR modules in good condition? yes If present, plug-in connectors in good condition? UDWR13 UDWR14 Connector (P.M.) no yes Antenna and extension in good condition -POZIDRIV screwdriver No. 2, No. 1 -16mm box spanner -2.5mm Allen wrench -flat nose pliers no VUB084-086 VUB105-125 Antenna / Extension (P.M.) yes PR0124 4/A/B Motherboard (P.M.) non PR0124 4/A/B Motherboard (P.M.) yes See motherboard replacement procedure SN270100 Receiver motherboard oxidised or modified by third party? non Spring terminal boards in good condition? yes Continued on page 2 Symbols/abbreviations : : Continue Diagnosis : Stop Diagnosis P.M. : Preventive Maintenance Approved by: Index Modif. No. Modification Name Date 02 T 727 Update since DialogUD 5.1 E.DECHAME 22.07.04 Receiver technical diagnosis Format: A4 Filename: SJ270050-02-EN.VSD UDR DOC REF.: SJ 270050.02 BP5 - 176, rue Lavoisier MONTBONNOT - St MARTIN - 38334 St ISMIER CEDEX Tel: +33.(0)4.76.41.44.00 Fax: +33.(0)4.76.41.44.44 Tech: Market: Page: This document is the property of Jay Electronique. Reproduction or disclosure prohibited without written authorization. 1/6 Tool PRODUCT INTERVENTION SHEET Continued from page 1 Additional information (TO BE COMPLETED) sub-assy to be replaced Power supply fuse ratings: 12VDC, F1=1A 24VDC, F2=1A 24VAC, F2=1,6A 48VAC, F1=0,8A 115VAC, F2=315mA 230VAC, F1=160mA Check of power supply fuses continuity test Fuses in good condition and compliant with respect to power supply voltage? 6mm flat tip screwdriver PR0123 Receiver fuse kit Replace fuses for subsequent part of diagnosis yes Safety relay fuse ratings: F3 & F4=5A no Check of safety relay fuses continuity test 6mm flat tip screwdriver Fuses in good condition and compliant ? no PR0123 Receiver fuse kit Replace fuses for subsequent part of diagnosis yes Check that all boards are properly connected in housing Boards properly connected? no yes Be carefull with power supply voltage and wiring; see receiver sales reference -POZIDRIV screwdriver No. 2, No. 1 - 16mm box spanner - 2.5mm Allen wrench - flat nose pliers See motherboard replacement procedure SN270100 Record this information on intervention sheet and reconnect the boards correctly Functional check of receiver UDR Switch on the receiver Yellow led on? no PR0124 4/A/B Receiver motherboard yes Continued on page 3 Symbols: : Continuee Diagnosis : Stop Diagnosis SJ270050.02 - 2 / 6 Tool Additional information PRODUCT INTERVENTION SHEET Cont. from page 2 (TO BE COMPLETED) sub-assy to be replaced no One or both leds (green or orange) flash? yes Serial link accessory ref.: UDWR32 + "Dialog UD" software v5.1minimum ref.: UDWR36 Connect the receiver serial link board and set the option switch to "RS232"; orange led should come on steady. In the "Dialog UD" software, read the receiver EEPROM memory no - Pozidriv screwdrivers No. 2 and No. 1 - 16mm box spanner, - 2.5mm Allen wrench - flat nose pliers Orange led on? yes See motherboard replacement procedure SN270100 RESET the motherboard : 1- Receiver switched ON 2- Press S2 button Serial link board present? no PR0124 4/A/B Receiver motherboard yes PR0124 4/A/B Receiver motherboard oui Set the RS232 switch to "Normal" and reset the motherboard no Orange led on? oui Remove the RS232 board and reset the motherboard Orange led on? no Checked customer transmitter or Test transmitter UDE PR0138 Serial link option Check of radio module Use the checked customer transmitter or test transmitter + serial link + PC and switch on the UDR in "RS232" mode In the "Dialog UD" software, go the "EEPROM programming" menu. Read the receiver EEPROM memory. For the receivers equipped with the IR startup function, untick this option to continue the diagnosis Save the new parameters in the receiver EEPROM memory. continued on page 4 Symboles : : Continue Diagnosis : Stop Diagnosis SJ270050.02 - 3 / 6 Additional information Tool Cont. from page 3 PRODUCT INTERVENTION SHEET (TO BE COMPLETED) Set the serial option switch to "Normal" mode and go to the "Remote control UD" function in the "Dialog UD" software Programm the electronic key with receiver parameters (ID code, radio channel) and place it on transmitter Go to "Test" menu in DialogUD software (check of radio quality rate) Unlock the stop palmswitch button of the transmitter and press the "on" button yes Radio quality rate = 100 % no Lock the test transmitter stop palmswitch button Test receiver radio module ref.:PR0120R - Pozidriv screwdrivers No. 2 and No. 1 - 16mm box spanner - 2.5mm Allen wrench - flat nose pliers Jay électronique specific test instrumentat. See receiver radio module replacement procedure SN270110 Install the test radio module in place of the radio module in the receiver Unlock the transmitter stop palmswitch button and press the "on" button See motherboard replacement procedure SN270100 Radio quality rate = 100% ? PR0120 R or PR0208R Receiver radio module yes PR0124 4/A/B Receiver motherboard no Do you have the means to measure the radio module characteristics See receiver radio module replacement procedure SN270110 no yes Radio module is older than 5 years ? Test the radio module on the test bench no Customer has reported transmission cutouts ? Radio module performance is satisfactory? no yes no yes PR0120 R or PR0208R Receiver radio module yes PR0120 R or PR0208R Receiver radio module PR0120 R or PR0208R Receiver radio module Check of relay states Safety and horn relays pull in when "on" button of UDE is pressed? no PR0124 4/A/B Receiver motherboard yes Digital multimeter Symbols : : Continue Diagnosis : Stop Diagnosis Measure the contact resistance of the safety relays, horn relay and auxiliary relay (if auxiliary board is present) Relay contact resistance is R<2Ω ? no PR0124 4/A/B Receiver motherboard UDWR35 Carte auxiliaire yes Continued on page 5 SJ270050.02 - 4 / 6 Tool PRODUCT INTERVENTION SHEET Continued from page 4 Additional information (TO BE COMPLETED) sub-assy to be replaced Press the stop palmswitch button of the UDE - Pozidriv screwdrivers See No. 2, motherboard No. 1 replacement - 16mm box procedure spanner, SN270100 - 2.5mm Allen wrench - flat nose pliers Safety contacts open? no PR0124 4/A/B Receiver motherboard no PR0124 4/A/B Motherboard yes Unlock stop palmswitch button and press "ON", then, press one by one transmitter function buttons yes Action are transmitted ? no Test relay board ref. :PR0122 - Pozidriv screwdrivers No. 2 , See No. 1 motherboard - 16mm box replacement spanner, procedure - 2.5mm Allen SN270100 wrench - flat nose pliers Digital multimeter Install the test relay board in place of the faulty relay boards Repeat the test Action are transmitted ? PR0122 Relay board yes Measure the contact resistance of the relays Contact resistance of each function relay is R<2Ω ? no PR0122 Relay board yes Test of IR start-up option IR start-up option present in receiver? no yes In the Dialog UD software, under the "UDR parameters" menu, read the receiver EEPROM memory. Tick the IR startup option Save the new parameter END of diagnosis. After repair, perform final test: doc. SJ270060 Set the serial option switch to "Normal" mode. Shut down the receiver Equip the receiver with one of the UDFs to be tested (repeat the operation for each UDF to be tested and IR connector (3). Symbols : : Continue Diagnosis : Stop Diagnosis Continued on page 6 SJ270050.02 - 5 / 6 Additional information Tool PRODUCT INTERVENTION SHEET Continued from page 5 (TO BE COMPLETED) sub-assy to be replaced Switch on the receiver Unlock the stop palmswitch button of the transmitter and press the green "on" button while pointing the UDE toward the UDF of receiver to be tested (at a minimum distance of 3m) Receiver safety and horn relays pull in and IR module led flashes? - Pozidriv screwdrivers No. 2 , No. 1 - 16mm box spanner, - 2.5mm Allen wrench - flat nose pliers Torx screwdriver No. 10 Connect test UDF to receiver and repeat the test See motherboard replacement procedure SN270100 See IR board replacement procedure SN270095 yes Receiver safety and horn relays pull in and IR module red led flashes? no PR0124 4/A/B Motherboard PR0134 UDF electronic board yes Repeat the test but at a distance of 20m between the UDE and the UDF Receiver safety and horn relays pull in and IR module red led flashes? Torx screwdriver No. 10 no no Use lens of test UDF Replace UDF lens and repeat the test See IR board replacement procedure SN270095 Receiver safety and horn relays pull in and IR module red led flashes? no PR0134 UDF electronic board yes Posidriv screwdriver No. 2 yes PR0133 Lens for IR module END of diagnostic. After repair, perform final test : doc. SJ270060 Symbols : : Continue Diagnosis : Stop Diagnosis SJ270050.02 - 6 / 6 NEW DialogUD 5.1 It allows to test radio link quality between UDE and UDR UDR final test after intervention START Key: Switch on the receiver Additional information Receiver led comes on? no yes Safety microprocessor leds flash? yes no = Test negative, repeat technical diagnosis on product (doc. SJ270050) Connect the receiver to a microcomputer equipped with the "DialogUD" software Go to "UDR parameters" and read receiver memory Serial link kit ref.: UDWR32 + "Dialog UD"software version 5.1 minimum ref.: UDWR36 For receivers equipped with IR startup function, untick this option to continue the final test Checked customer transmitter or test transmitter Use checked customer transmitter or program test electronic key with receiver parameters and place it on test transmitter Go to "Test" menu in DialogUD software (check of radio quality rate) Set serial link option on "Normal" mode Unlock the stop palmswitch button of the test transmitter and press the "on" button. Radio reception quality = 100% ? no (go to radio module check in document SJ270050) yes Safety and horn relays pull in when "on" button of UDE is pressed? no (go to radio module check in document SJ270050) yes Press each transmitter function buttons actions are transmitted to receiver ? no (go to receiver functional check in document SJ270050) yes Continued on page 2 Index Modif. No. Modification Name Date 02 T 727 Update with DialogUD v5.1 E.DECHAME 24.06.04 BP5 - 176, rue Lavoisier MONTBONNOT - St MARTIN - 38334 St ISMIER CEDEX Tel: +33.(0)4.76.41.44.00 Fax: +33.(0)4.76.41.44.44 Final test UDR Format: Approved by: Tech: Market: A4 Filename: SJ270060-02-EN.VSD DOC REF.: SJ 270060.02 Page: This document is the property of Jay Electronique. Reproduction or disclosure prohibited without written authorization. 1/2 Additional information Continued from page 1 Press the transmitter stop palmswitch button Safety relay contacts open? no yes (go to relay state check in document SJ270050) Receiver has IR startup option? yes Set serial option switch to "RS232". In the "DialogUD" software, go to the "Receiver parameters" menu. Read the receiver EEPROM memory. Tick the IR startup option Save the new parameter Set the serial option switch to "Normal" mode. Shut down the receiver Equip the receiver with one of the UDFs to be tested (repeat the operation for each UDF to be tested and IR connector (3)) Switch on the receiver Checked customer transmitter or test transmitter no Unlock the stop palmswitch button of the test transmitter and press the green "on" button pointing the UDE toward the UDF of the receiver to be tested (at a minimum distance of 3m). Receiver safety and horn relays pull in? yes no (go to IR startup option test in document SJ270050) Repeat the test at a distance of around 20 m (range test) Receiver safety and horn relays pull in? yes See repaired product marking procedure SN270120 no (go to IR startup option test in document SJ270050) Fill in the repair labels and fasten them to the receiver. Fill in the product intervention sheet End SJ270060.02 - 2 / 2 Changing the UDR receiver housing Receiver housing : References : PR0125 ....... Receiver housing without serial link option (cover+housing+cable gland+screws+1 pre-printed descriptive label) PR0125 1 .... Receiver housing with serial link option (cover+manufactured housing+cable glands+screws+1 pre-printed descriptive label) Tools : ............ n°2, n°1 Pozidriv screwdriver, 16mm box spanner, flat noze pliers, spanners kit PR0142 PR0125 kit PR0125 1 kit électronique Ref : UDR . . . . . - . . . Code : . . . . électronique Ref : UDR . . . . . - . . . Code : . . . . Freq : 433,050 .. 434,790MHz Serie : .../.... Alim : . . . . .V. . Date : .. / .. IP65 Freq : 433,050 .. 434,790MHz Serie : .../.... Alim : . . . . .V. . Date : .. / .. IP65 F 38330 Montbonnot F 38330 Montbonnot Fig.1 Fig.2 Disassembly: 1234- Open the UDR housing using the No. 2 Pozidriv screwdriver by loosening the quarter-turn screws. Disconnect the wires connected to the various receiver connectors taking care to carefully mark the wires. Remove the n°A relay board and the auxiliary board if present to access the motherboard mounting screws. Housing with serial option only, otherwise : go to step 5 4.1- Using the No. 1 Pozidriv screwdriver, remove the two screws securing the serial link board 4.2- Using spanner in PR0142 kit to remove the nut securing the serial link interface to the housing. 4.3- Remove the serial option from the receiver housing. 56789- Unscrew the outer nut of the BNC antenna connector using the 16mm box spanner. Remove the washer from the BNC connector and remove the connector from its housing. Remove the four screws securing the motherboard. Using the flat noze pliers, unclip the two white spacers on the housing. Remove the motherboard from the housing. Assembly: 1234567- Fit the new motherboard in the new housing by clipping the two spacers of the housing to the motherboard. Secure the motherboard with the 4 mounting screws. Engage the BNC connector in the housing with the connector flat aligned with the locator on the antenna plate. Fit the washer on the BNC. Secure the BNC connector with the nut using the 16mm box spanner. Install relay board No. A and the auxiliary board if used. Housing with serial option only, otherwise : go to step 8 7.1- Run the serial option board through the hole of the housing provided for this purpose and through the clamping nut. 7.2- Connect and secure the serial link board to the motherboard by its two mounting screws. 7.3- Tighten the interface nut on the housing with spenner in PR0142 kit. 8- Re-wire the customer wiring on the receiver if necessary. 9- Close the housing. 10- Fill in the pre-printed descriptive label and fasten it to location indicated in document SN270120 Index Modif. No. Modification Name Date T 727 Assembly/Disassembly procedures updated E.DECHAME 05.07.04 Format: A4 02 BP5 - 176, rue Lavoisier MONTBONNOT - St MARTIN - 38334 St ISMIER CEDEX Tel: +33.(0)4.76.41.44.00 Fax: +33.(0)4.76.41.44.44 Approved by: Tech: Changing the receiver housing Filename: SN270090-02-EN.P65 UDR DOC REF.: SN 270090.02 Market: Page: This document is the property of Jay Electronique. Reproduction or disclosure prohibited without written authorization. 1/1 Changing the UDF IR module electronic board UDF IR electronic board : Reference : PR0134 Kit PR0134 Tools : ............ n°2 Pozidriv screwdriver, n°10 Torx screwdriver, Soldering iron Parts list : Item Description Quantity A UDF IR electronic board 1 B Torx 10 screw 2 B A Fig.1 Disassembly : 123- Open the UDF housing using the no.2 Pozidriv screwdriver. Remove screws from the UDF electronic board. Unsolder UDR - UDF connection wires from the UDF electronic board. Electronic board Black wire White wire Blue wire Seal Lens UDF IR module Fig.2 Assembly : 123- Solder connection wires on electronic component side (pay attention to color and position see fig.2) Secure the electronic board on lens with 2 torx no.10 screws. Close UDF housing. Approved by: Index Modif. No. Modification Name Date 01 T 727 Minor update E.DECHAME 05.07.04 Changing the IR module electronic board Format: A4 Filename: SN270095-01-EN.P65 UDF DOC REF.: SN 270095.01 BP5 - 176, rue Lavoisier MONTBONNOT - St MARTIN - 38334 St ISMIER CEDEX Tel: +33.(0)4.76.41.44.00 Fax: +33.(0)4.76.41.44.44 Tech: Market: Page: This document is the property of Jay Electronique. Reproduction or disclosure prohibited without written authorization. 1/1 Changing the receiver motherboard Receiver motherboard kits : PR0124 * kit References : PR0124 A .... motherboard UDR 24-48VAC PR0124 B .... motherboard UDR 115-230VAC PR0124 4 .... motherboard UDR 12-24VDC électronique F 38330 Montbonnot Ref : UDR . . . électronique . . - . . . Code : . F.38330 . .Montbonnot Ref: 433,050 : UDR . .... 434,790MHz . . - . . . Code : . . . . Freq Tools : ............ n°2 n°1 Pozidriv screwdrivers, 16mm box spanner, electronic flat noze plier, 2.5mm Allen wrench, Spanner kit PR0142 Parts list : Item Description Quantity A Mounting screws 4 B Pre-printed descriptive labels 2 C UDR motherboard 1 Note : Serie : .../.... Alim : . . . . .V. . Freq : 433,050 .. 434,790MHz Date : ..:/.../.... .. IP65 Serie Alim : . . . . .V. . Date : .. / .. IP65 B C A Fig.1 Please refer to the instructions described in the document SN270080 for motherboard / radio module pairing, according to UDR version number. Disassembly: 1234- Open the UDR housing using the No. 2 Pozidriv screwdriver by loosening the quarter-turn screws. Disconnect the wires connected to the various receiver connectors taking care to mark the wires. Remove the auxiliary board if present and relay boards Housing with serial option only, go to step 5. Otherwise: 4.1Using the No. 1 Pozidriv screwdriver, remove the 2 screws securing the serial link board. 4.2Using the spanner from PR0142 kit, remove the nut securing the serial link interface to the housing. 4.3Pull out the serial link board through the housing. 5678910111213- Remove the nut securing the BNC using the 16mm box spanner. Remove the washer from the BNC and remove the BNC from its housing. Remove the screw securing the receiver radio module. Unplug the radio module and remove the assembly formed by the radio module + BNC connector from the motherboard. Remove the 4 screws securing the motherboard. Using the electronics flat noze pliers, unclip the two white spacers of the housing. Remove the motherboard from the housing. Remove the Allen screw from the antenna plate using the 2.5 mm Allen wrench. Remove the antenna plate. Assembly: 12345678910- Fit the motherboard in the housing by clipping the 2 spacers of the housing to the motherboard. Secure the motherboard with the 4 mounting screws. Install the antenna plate on the motherboard and secure it with the Allen screw. Carefully plug the radio module into the motherboard, running the antenna wire between the two IR connectors. Secure the radio module with its mounting screw to the motherboard using the No. 1 Pozidriv screwdriver. Engage the BNC connector in the housing with the connector flat aligned with the locator on the antenna plate. Fit the washer on the BNC. Secure the BNC with the nut using the 16mm box spanner. Install the relay boards and the optional board if used. Receiver with serial option only, go to step 11. Otherwise: 10.1- Run the serial option board through the hole in the housing provided for this purpose and through the clamping nut. 10.2- Connect and secure the serial link board to the motherboard by its two mounting screws. 10.3- Tighten the interface nut on the housing with spanner from PR0142 kit. 11- Re-wire the customer wiring to the receiver if necessary. 12- Fill in pre-printed descriptive labels and fasten them to locations indicated in document SN270120. 13- Close the housing. Index Modif. No. Modification Name Date T 727 Descr.labels added, note about mobo / radio module pairing E.DECHAME 06.07.04 Format: A4 02 BP5 - 176, rue Lavoisier MONTBONNOT - St MARTIN - 38334 St ISMIER CEDEX Tel: +33.(0)4.76.41.44.00 Fax: +33.(0)4.76.41.44.44 Approved by: Tech: Changing the receiver motherboard Filename: SN270100-02-EN.P65 UDR DOC REF.: SN 270100.02 Market: Page: This document is the property of Jay Electronique. Reproduction or disclosure prohibited without written authorization. 1/1 Changing the UDR receiver radio module Receiver radio module : References : PR0120 R .... Radio module for UDR version A001 to B002 included PR0208 R .... Radio module for UDR version B003 and higher PR0120 R or PR0208 R A Tools : ............ n°2 and n°1 Pozidriv screwdrivers, 16mm box spanner . Parts list : Item A B C D E Note : Description B Quantity 1 1 1 1 1 Mounting screw Receiver radio module Spacer BNC washer BNC nut D E C Fig.1 Please refer to the instructions described in the document SN270080 for motherboard / radio module pairing, according to UDR version number. Disassembly: 12345- Open the UDR housing using the No. 2 Pozidriv screwdriver by loosening the quarter-turn screws. Unscrew the outer nut on the BNC using the 16mm box spanner. Remove the washer from the BNC and remove the BNC from its housing. Remove the screw securing the receiver radio module with n°1 Pozidriv screwdriver. Unplug the radio module and remove the assembly from the motherboard. Radio module BNC plug (UDR represented with serial link option and auxiliary board) Assembly: 123456- Carefully connect the new radio module to the motherboard (see fig.2). Secure the radio module with its mounting screw to the motherboard using the No. 1 Pozidriv screwdriver. Engage the BNC connector in the housing with the connector flat aligned with the locator on the antenna plate. Fit the washer on the BNC. Secure the BNC connector with its nut using the 16mm box spanner. Close the receiver housing. Index Modif. No. Modification Name Date T 727 Note about mobo / radio module pairing E.DECHAME 06.07.04 Format: A4 02 BP5 - 176, rue Lavoisier MONTBONNOT - St MARTIN - 38334 St ISMIER CEDEX Tel: +33.(0)4.76.41.44.00 Fax: +33.(0)4.76.41.44.44 Approved by: Tech: Changing the receiver radio module Filename: SN270110-02-EN.P65 UDR DOC REF.: SN 270110.02 Market: Page: This document is the property of Jay Electronique. Reproduction or disclosure prohibited without written authorization. 1/1 Markings on repaired UDR receiver 1- Repair label Two repair labels must be filled in and applied to the receiver (see location in § 3). ! Repair labels must be applied after each intervention (under warranty or not) Repair labels can be ordered under reference : PR0229 (a roller of 1000 labels) by APPAREIL CONTROLE LE : Product checked on : Date of intervention day, month, year Name of certified repair center and technician initials PAR : 2- UDE transmitter, electronic key and appaired UDR receiver descriptive labels If the unit has been transformed, the information on the transmitter and receiver nameplates must be changed accordingly. To do so, use blank nameplates, filled in as follows: UDE main reference and complementary reference UDE labels (location on below) Old serial nb Old date UDR labels (see UDR data repair package) F 38330 Montbonnot Freq : 433,050 .. 434,790MHz Serie : .../.... Date : .. / .. IP65 UDR main reference and complementary reference électronique F 38330 Montbonnot Ref : UDR . . . . . - . . . Code : . . . . Old serial nb Freq : 433,050 .. 434,790MHz Serie : .../.... Alim : .....V.. Date : .. / .. IP65 Old date version number (product file version number) : If update, write the last version number. If repair without update, write the old version number. ID code Power supply voltage Version number : (si comments upper, as UDE version nb) Associated UDE reference Key number Nr clé : . . . . . . Key ID code Code : . . . . Radio channel Canal : . . Coupled T.crane option : Associated receiver ID code (0000 if option not used) Code pont couplé : . . . . µSpeed option (Y/N) Masque : . . . . . . . . . . Masking (1111111111 if function not used) electronic key para. labels (to be sticked on page n°2 of this document, and send to customer) électronique Ref : UDE . . . . . UDE Ass. : . . . . . . . . . HM : . . . «Dead man» function duration Tout IR : . µVitesse : . Dossier : . . . . Old number 3- Location of repair labels and descriptive labels on UDR n°2 UDR descriptive label n°1 UDR descriptive label n°2 UDR repair label n°1 UDR repair label Index Modif. No. Modification Name Date 02 T 727 New pictures and descriptive labels + electronic key label E.DECHAME 06.07.04 Format: A4 BP5 - 176, rue Lavoisier MONTBONNOT - St MARTIN - 38334 St ISMIER CEDEX Tél: +33.(0)4.76.41.44.00 Fax: +33.(0)4.76.41.44.44 Approved by: Tech: Markings on repaired receiver Filename: SN270120-02-EN.P65 UDR DOC REF.: SN 270120.02 Market: Page: This document is the property of Jay Electronique. Reproduction or disclosure prohibited without written authorization. 1/2 UDE transmitter Grey key identification sheet KEEP THIS DOCUMENT Read and keep this document in a safe location. It contains important information concerning the key which you have just received For operation of your radio remote control, refer to the UD installation and user manual. An identification No. is engraved on the side of the electronic key. This key contains all the parameters of your transmitter, ensuring correct communication with the associated receiver (Frequency channel, identification code, dead man time ...) Please indicate this identification No. when ordering a new identical key. Please identify your electronic key using the label supplied with the key. Fill in the identification of the equipment controlled by this key. UDE transmitter electronic key Electronic key parameter label : (to be sticked by the repairman) xxxxxx (6-digit number engraved on electronic key) Equipment : (to be filled in by the customer) électronique BP5 - 176, rue Lavoisier MONTBONNOT - St MARTIN - 38334 St ISMIER CEDEX - FRANCE Phone: 04.76.41.44.00 / Fax: 04.76.41.44.44 www.jay-electronique.fr Doc : SN270120.02