1
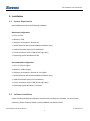
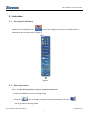
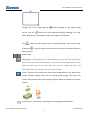
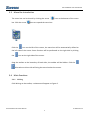
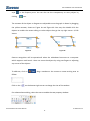
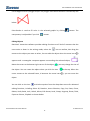
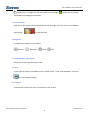
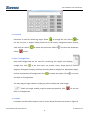
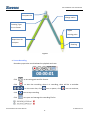
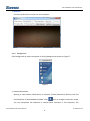
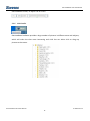
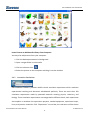
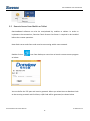
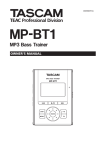
DonviewBoard v2.0 User Manual DonviewBoard SOFTWARE USER MANUAL V2.0 Document Released 5.1.2015 DonviewBoard v2.0 User Manual © 2015 Sonnoc 1 DonviewBoard v2.0 User Manual Content 1. FEATURES ........................................................................................................................ 4 2. INSTALLATION ................................................................................................................. 5 2.1 SYSTEM REQUIREMENT ............................................................................................................5 2.2 SOFTWARE INSTALLATION .........................................................................................................5 3. INSTRUCTION .................................................................................................................. 6 3.1 RUNNING THE SOFTWARE .........................................................................................................6 3.2 BASIC OPERATIONS..................................................................................................................6 3.2.1 Switch Writing Mode to Regular Computer Operations ............................................6 3.2.2 Exit the Software........................................................................................................7 3.2.3 Shortcuts ....................................................................................................................7 3.3 MENU BAR INTRODUCTION.......................................................................................................9 3.4 MAIN FUNCTIONS ...................................................................................................................9 3.4.1 Writing .......................................................................................................................9 3.4.2 Drawing....................................................................................................................11 3.4.3 Tools .........................................................................................................................19 3.4.4 Background ..............................................................................................................24 3.4.5 Page Management ..................................................................................................25 3.4.6 Multimedia...............................................................................................................26 3.4.7 Interactive Simulations ............................................................................................27 3.5 REMOTE ACCESS FROM MOBILE OR TABLET ................................................................................29 3.6 PAGE ZOOMING ....................................................................................................................31 3.7 FILE MANAGEMENT ..............................................................................................................31 3.8 AUTOMATIC RECOVERY AFTER ABNORMAL EXIT ..........................................................................33 DonviewBoard v2.0 User Manual © 2015 Sonnoc 2 DonviewBoard v2.0 User Manual Preface Donview Interactive Teaching System Donview Interactive Teaching System (hereinafter referred to as "DonviewBoard Software") is a powerful software which can operate with computers, projectors, electronic whiteboards and LCD flat panels, to implement an interactive conference system or teaching system. Users can write and draw on the whiteboards or flat panels, and access computer operations such as doing presentations or editing documents with the provided whiteboard pen instead of the traditional PC mouse or chalk. DonviewBoard Software is a great tool for many purposes such as teaching, remote access teaching, conferencing, speech lessons, training courses, product demonstrations, in many markets like education, business, government and military. DonviewBoard v2.0 User Manual © 2015 Sonnoc 3 DonviewBoard v2.0 User Manual 1. Features Straight-forward and user-friendly design software interface. Rich library of teaching tools and experiment simulations 11 pen styles are provided: Normal Pen, Smart Brush, Tool Pen, Highlighter, Emphasizer, Brush, Bamboo Pen, Combination Brush, Pen, Pencil, Texture Brush. Color selection, thickness, line styles are also adjustable. Powerful drawing functions allow users to draw geometric figures, change transparency percentages and color fill-in option. Multimedia library contains images and clip art covering different fields; including art, animals, finance, military, sport, science, travel, and more. Supports two students to write on the board simultaneously in Windows 7. Teaching tools provided: Screen Curtain, Magnifier, Searchlight, Screenshot, Soft Keyboard, Timer, Protractor, Ruler, Triangular Plate, Compass and much more. Camera screenshot can cut out an object or picture within the camera and insert into the software to edit. Screen record can record the teaching process to play and save. Support multimedia files: pictures, videos, audios and PowerPoint. Operating system: Windows XP / Windows Vista / Windows 7 / Windows 8. DonviewBoard v2.0 User Manual © 2015 Sonnoc 4 DonviewBoard v2.0 User Manual 2. Installation 2.1 System Requirement DonviewBoard requires the following hardware. Minimum Configuration CPU: 2.0 GHz Memory: 2GB Graphics card support: DirectX 9.0 2GB of free disk space (DonviewBoard software only) 10GB of free disk space (Full installation) Screen resolution 1024 × 768 (16 bit high color) Operating system Windows XP SP3 Recommended Configuration CPU: 2.0 GHz or higher Memory: 4GB or higher Graphics card support: DirectX 10.1 or higher 5GB of free disk space (DonviewBoard software only) 20GB of free disk space (Full installation) Screen resolution 1024 × 768 (16 bit high color) Operating system Windows 7 Ultimate 2.2 Software Installation Follow the DonviewBoard installation wizard while installing the software. For any further questions, please read the details in DonviewBoard Installation Guide. DonviewBoard v2.0 User Manual © 2015 Sonnoc 5 DonviewBoard v2.0 User Manual 3. Instruction 3.1 Running the Software Double-click the desktop icon: to start the program and then the toolbar will be switched to the writing mode as Figure 1. Figure 1 3.2 Basic Operations 3.2.1 Switch Writing Mode to Regular Computer Operations Start DonviewBoard to enter writing mode. Click the icon to change to regular computer operations, click the icon to go back to writing mode. DonviewBoard v2.0 User Manual © 2015 Sonnoc 6 DonviewBoard v2.0 User Manual In writing mode, right click the Double-click the small icon to select Hide item can hide the toolbar. icon in taskbar located in the bottom right corner to return to normal writing mode. 3.2.2 Exit the Software There are four ways to exit the software. 1. In writing mode, right click on icon and click Exit. 2. In computer mode, right click on icon and click Exit. 3. In minimized mode, right click on the small 4. Click main menu button icon on the taskbar and click Exit. select File → Exit. CAUTION: Make sure files are saved prior to using option 1 – 3 above. 3.2.3 Shortcuts The shortcut contains 9 icons. Create a blank page Go to previous page / next page Select objects and edit. A black border will show up on a selected object as below. DonviewBoard v2.0 User Manual © 2015 Sonnoc 7 DonviewBoard v2.0 User Manual Change the size by adjusting the corner. Click on symbol located at the bottom right button for more advanced editing including Cut, Copy, Paste, Delete, Lock, Show/Hide, Layer, Link, Export and Playback. The button on the top allow you to rotate the object. Click at the center of object a sign will appear, that allow you to move the selected object to other position. Undo / redo Writing pen. The writing pen will be enabled once you click the writing pen button. You may select the desired pen style from the Writing function in the Main Function area of the menu bar. Also you can change the color and thickness of pen in the Property area of the menu bar. Eraser. There are five eraser icons that will be dropped down. The upper three erasers without orange colors are for erasing hand writing. The lower two erasers with orange color are for erasing objects which are regular or irregular shapes. Drag function. This function can drag the entire page to any direction. DonviewBoard v2.0 User Manual © 2015 Sonnoc 8 DonviewBoard v2.0 User Manual 3.3 Menu Bar Introduction The menu bar can be shrunk by clicking the arrow bar. Click the arrow Click the icon at the bottom of the menu icon can expand the menu bar. icon on the left of the screen, the menu bar will be automatically shifted to the left side of the screen. Same function will be performed on the right side by clicking the icon on the right side of the screen. Drag the toolbar to the boundary of both sides, the toolbar will be hidden. Click the blue tabs on either side will bring the menu bar back to screen. 3.4 Main Functions 3.4.1 Writing Click Writing on the toolbar, a submenu will appear as Figure 2. DonviewBoard v2.0 User Manual © 2015 Sonnoc 9 DonviewBoard v2.0 User Manual Figure 2 Normal Pen For normal writing manipulations. Smart Brush Used on rectangle, ellipse, triangle, and polygon shapes to turn the drawing into a perfect shape. Tool Pen A tool pen can be used as a regular writing pen or a functional tool pen. When you draw an ellipse, the ellipse will become a searchlight function; if you draw a rectangle, the rectangle will become a magnifier; otherwise the pen will operate as a normal pen. Highlighter Highlight the area where you touch or swipe. Emphasizer Performs as a highlighter, plus blinking effect-five times. Brush Adjustable stroke size according to the writing speed. Bamboo Pen / Combination Brush Western style writing pen; calligraphy. DonviewBoard v2.0 User Manual © 2015 Sonnoc 10 DonviewBoard v2.0 User Manual Pen / Pencil Writing as regular pen and pencil. Texture Brush Fulfill images into the brush. Click more can customize the color and picture. After selecting pen style, you can click and To hide the writing pen figure (cursor), click the 3.4.2 icons to change color and thickness. icon. Drawing Click Drawing on the toolbar, there will be a list of geometric graphics shown as Figure 3. Figure 3 Select a graphic style to draw on the board. You can change the color, thickness and line DonviewBoard v2.0 User Manual © 2015 Sonnoc 11 DonviewBoard v2.0 User Manual style in the Property area. You can also set the transparency on every object by clicking icon. The vertexes of the object or diagram are adjustable once the graph is drawn by dragging the yellow vertexes, shown as Figure 4a and Figure 4b. You may also double click the objects to enable the vertex editing or select object then go the top right corner → Edit Vertex. Figure 4a Figure 4b Gusture recognition will be operationall when the whiteboard connects to a computer which supports multi-touch. Users can zoom the objects by using two fingers or adjusting any corner of the objects. To add text, click on , drag a textbox on the screen to create writing area as follow: Click on the on the bottom right corner to change the size of the textbox. For advanced text editing, select the text to enable the text property window. DonviewBoard v2.0 User Manual © 2015 Sonnoc 12 DonviewBoard v2.0 User Manual The soft keyboard will be enabled by clicking and allows users to input text, number, and symbols. Text color can be changed by clicking font color button . The table toolbar shown below allows you to insert tables in a textbox. DonviewBoard also features Character Recognition to indicate users’ hand writing and turn into the ideal vocabulary, shown as Figure 5a and Figure 5b. Figure 5a Figure 5b The Clear and Undo buttons are located at the bottom of the window above here. Hand writing recognition function supports English and Chinese. You can switch to soft keyboard mode by clicking DonviewBoard v2.0 User Manual © 2015 Sonnoc 13 DonviewBoard v2.0 User Manual Click to switch back to character recognition window. Click window. Click to minimize the to close the window. DonviewBoard provides plenty of sectors covering Finance, Electricity, Traffic, Daily Life, Public Safety, and Education. Click the icon more to manage the category: Select Polygon to draw polygon shapes. Set up the starting point in drawing area, drag stroke out to create the first edge of the polygon, repeat the same manipulation for the DonviewBoard v2.0 User Manual © 2015 Sonnoc 14 DonviewBoard v2.0 User Manual rest of edges to form a polygon shape. The polygon must be formed with a closed loop like below. Paint Bucket is used to fill color in the selected graphic by clicking transparency is adjustable if you click button. The button. Editing Objects Donview’s interactive software provides editing functions to all kind of contents that the users write or draw. In the writing mode, select the icon on toolbar, then drag the mouse to the object you want to select, You can edit the object when the move icon appears and a rectangular marquee appears surrounding the selected object, Move the cursor to the bottom right corner of the object . , you may change the size of the object. You can rotate the object when you click the icon cursor moves to the selected frame, it becomes the move icon on the top. When the , you can move the object. You can click on the icon and select options from the drop-down menu for advanced editing functions, including Select All, Deselect, Invert Selection, Copy, Cut, Paste, Clone, Delete, Undo, Redo, Lock, Unlock, Mirror, Edit Vertex, Level, Group, Ungroup, Show / Hide, Export as Picture, Playback as shown below. DonviewBoard v2.0 User Manual © 2015 Sonnoc 15 DonviewBoard v2.0 User Manual The following are instructions for all functions. Delete Remove the selected objects. Copy Duplicate the selected objects, a Paste action is required for show the copied objects. Cut Copy but also remove the selected objects. Paste Show the copied or cut objects, usually followed by a cut or copy action. DonviewBoard v2.0 User Manual © 2015 Sonnoc 16 DonviewBoard v2.0 User Manual Clone Copy and paste the selected objects simultaneously. Undo Cancel the operation of last step or cancel all the operations step by step. Redo Repeat an undo action Lock Fix the selected objects’ position and sizes. Unlock Release the locked objects. Layer Change layer priorities for objects. Export as Picture Export the selected drawing or images as a images file, available formats are JPEG, PNG, GIF and BMP. Linked You can insert audio files or hyperlinks to objects or pictures. DonviewBoard v2.0 User Manual © 2015 Sonnoc 17 DonviewBoard v2.0 User Manual Sound Choose an audio file and click the “Open” button, then on the bottom left of the selected object will show a small icon , you can play the audio file by clicking the icon. Hyperlink Hyperlink can be set and linked to a web link, Microsoft Office file or picture. The hyperlink window is shown below: Click button to choose a Microsoft Office file or picture in your computer or a web address, then click Open → Confirm. After finishing the operation, the bottom left corner of the selected object will show an icon according to the file type of the hyperlink. For example, if you select a picture as the hyperlink, the icon at the bottom left corner of the selected object will be , you can open the linked picture by clicking the icon. Mirror Clone the selected object and refer to left, right, up and down axial symmetry. Playback Record and replay the manipulation on the page. There are three options available. 1. Selected Objects (No Reference) Replay manipulation on selected objects only. DonviewBoard v2.0 User Manual © 2015 Sonnoc 18 DonviewBoard v2.0 User Manual 2. Selected Objects (With Reference) Replay manipulation on selected objects also show other objects on the page. 3. Current Page Replay all manipulation on current page including writing. Editing Vertex Edit the size, angle and shape of drawing. Group Select two or more objects, right click and select “Group” to merge them into a larger object. Ungroup Restore a merged object to individual entities. Show / Hide There are types for displaying image or object. Normal Display whole image or object without covering. Show as Icon Cover the image or object with a question mark. You can click to restore the item. Hidden (Scratch) Cover the image or object with a grey area. You can erase the grey area gradually to reveal the original item. 3.4.3 Tools DonviewBoard provides powerful tools for classes, such as Screenshots, Searchlight, DonviewBoard v2.0 User Manual © 2015 Sonnoc 19 DonviewBoard v2.0 User Manual Screen Curtain, Magnifier, Soft Keyboard, Hand Input, Timer, Calculator, Protractor, Ruler, Triangular Plate, Compass, Screen Recorder, WebCam, and Random Box. Screenshot Take screenshot on current screen by a regular shape Take screenshot on current screen by an irregular shape Screenshot the entire current screen Return to the desktop to capture any object by regular and irregular screenshot or full screenshot Searchlight When the icon appears, the searchlight can be moved to everywhere. The symbol DonviewBoard v2.0 User Manual © 2015 Sonnoc 20 DonviewBoard v2.0 User Manual allows you to change the size and shape of searchlight. allows you to change transparency of background and exit. Screen Curtain Click the arrow to pull curtain up and down, left and right. Click the icons at the bottom right corner to reset and exit. Magnifier To magnify the objects on the board. Zoom In Zoom Out Reset Exit Soft Keyboard / Hand Input Allow you to input text from the screen. Timer Three types of timer are available to use: System Clock, Timer, and Stopwatch. Click the icon to change settings. Calculator A convenient tool for the users to calculate on the screen. DonviewBoard v2.0 User Manual © 2015 Sonnoc 21 DonviewBoard v2.0 User Manual Protractor Protractor is used for measuring angle. Select to change the size, select to set the unit (arc or angle), shape (semicircle or full circle), background color, opacity, scale interval. Select Select to rotate the protractor. Select to move the protractor. to exit. Ruler / Triangle Plate Ruler and Triangle Plate can be used for measuring the length and drawing straight line. Click to set units (mm, cm, pixels), cursor, shape (with 45 degrees, 30 degrees triangle), auxiliary function (draw a straight line, adsorption angle), and the transparency of background. Click to rotate the object. Click to move the Ruler or Triangle Plate. You may drag the right side bar in light grey color to adjust the ruler length. Check the angle reading to get accurate perspective. Click to exit the Ruler or Triangle Plate. Compass A Compass can be used to draw a circle or sector. Detail functions are shown in Figure 6. DonviewBoard v2.0 User Manual © 2015 Sonnoc 22 DonviewBoard v2.0 User Manual Compass size Change radius Drawing Type: Arc or Sector Adjust starting point Reposition the compass Drawing Figure 6 Screen Recording Record any operation on whiteboard to playback and save. Click Click to set saving path and file format. to start the recording, when it is recording, there will be a reminder on the menu bar, click click Click icon to pause, click icon to continue, icon to stop recording. can open and manage the recording file list. DonviewBoard v2.0 User Manual © 2015 Sonnoc 23 DonviewBoard v2.0 User Manual WebCam Connect to the built-in camera on the computer. 3.4.4 Background Click Background to select the option of writing backgrounds shown as Figure 7. Figure 7 Desktop Annotation Writing in static (Word, PowerPoint) or dynamic (Video) documents directly with full functionalities of DonviewBoard toolbar. Click icon to change to selection mode, you can manipulate the software or control other functions in the computer. The DonviewBoard v2.0 User Manual © 2015 Sonnoc 24 DonviewBoard v2.0 User Manual toolbar will not be shrunk, and annotation will still show on current page. Click on icon to continue writing. Screenshot Capture and set the current desktop as the background. Commonly Used Background: White, Blackboard and Green. Workbooks: Text, Essay Book, Single Row, Double Row, Number Book, Mathematic, Small Square, Medium Square, Large Square, Stave. Customize the color or image of background. 3.4.5 Page Management Click the icon to open the page list of current documents. You can delete any page by clicking the icon on top right corner or change the page order by dragging page to different location. The zoom toolbar is located at the bottom of the DonviewBoard v2.0 User Manual © 2015 Sonnoc 25 DonviewBoard v2.0 User Manual DonviewBoard screen, to adjust size of screen. 3.4.6 Multimedia DonviewBoard software provides a large number of pictures in different areas and subjects, which will make the class more interesting and vivid. You can either click or drag any picture to the screen. DonviewBoard v2.0 User Manual © 2015 Sonnoc 26 DonviewBoard v2.0 User Manual Insert Pictures to Multimedia Library from Computer You may also add pictures from your computer. 1. Click the desktop annotation in Background 2. Open a target folder in multimedia 3. Click the selection icon 4. Select the picture on the computer and drag it into the window 3.4.7 Interactive Simulations DonviewBoard software provides middle school simulation experiment which combines experimental teaching and electronic whiteboards perfectly. There are more than 150 simulation experiments made by patented materials covering physics, chemistry, and biology. Those simulation experiments are categorized to different levels, each experiment also explains to students the experiment purpose, needed equipment, experiment steps, hints, and practice materials. Click “Experiment” on tool bar, the sub-menu will be shown DonviewBoard v2.0 User Manual © 2015 Sonnoc 27 DonviewBoard v2.0 User Manual as below. For example, click on “Physics” to open the list as below, and select the experiment from the left. To add more applications, click “Add Application” and select the applications in exe format. To Rename or Remove the application, right click to choose the application to rename or remove the applications as shown below. DonviewBoard v2.0 User Manual © 2015 Sonnoc 28 DonviewBoard v2.0 User Manual 3.5 Remote Access from Mobile or Tablet DonviewBoard software can also be manipulated by mobiles or tablets. In order to implement the connections, Donview Touch Screen Cast Server is required to be installed before the remote operation. Note: Both server and client ends must be connecting within same network. Double click on icon from desktop or menu bar to launch remote access program as below. You can define the TCP port and security protocol. When you select None or Random Code as the security protocol and click Start, a QR Code will be generated, as shown below. DonviewBoard v2.0 User Manual © 2015 Sonnoc 29 DonviewBoard v2.0 User Manual Click on the QR Code to enlarge the image. If you set security protocol as Manual Confirm, the progam will list all available devices for manual approval. DonviewBoard v2.0 User Manual © 2015 Sonnoc 30 DonviewBoard v2.0 User Manual Scan the QR Code with smartphones and tablets or type in IP address and launch in browser to implement remote access. Once the connection is establised, “Remote Control” and “Upload” options will be available on the top of the screen. Remote Control You can manipulate DonviewBoard functions via your smartphone once you check the “Remote Control” box. Upload You can take a picture with smartphone and upload to the server. You may also upload a document to the server, the document will be opened automatically by default program. Remote access also support multi-touch points. 3.6 Page Zooming You can zoom in to get a close-up view of your document or zoom out to see more of the page at a reduced size. At the bottom right corner of each page you can see the zooming slider like this: . Slide the percentage zoom as your need. Click the original size. Click the button the button to restore the page to , the entire page will fit into your screen. 3.7 File Management Click the File Management icon located the bottom left corner of the toolbar to access file management functions. DonviewBoard v2.0 User Manual © 2015 Sonnoc 31 DonviewBoard v2.0 User Manual New Create a new DonviewBoard Standard file (.donv), the file can only be opened in DonviewBoard software. Open Open an existing DonviewBoard Standard file (.donv) in DonviewBoard software. Save Save the operation in current DonviewBoard Standard file (.donv). Save As Save the current DonviewBoard Standard file to other formats. Supported formats include .doc, .ppt, .pdf and .exe. Import Open a PowerPoint file or image in DonviewBoard software Export Export the current page or all pages to graphics format. Supported formats include .jpg, .bmp, .gif, and .png Edit Edit the selected object. Insert Insert images, videos, audios into the page. The supported video formats are .wmv, .avi, .mov, .mp4, .mpg and .asf. Language Built-in multi language interfaces including Arabic, Zang language, Deutsch, English, Spanish, Farsi, French, Latin, Mongol, Dutch, Portugal, Russian, Ukrainian, Simplified Chinese, and Traditional Chinese. Help Get more information about the product. DonviewBoard v2.0 User Manual © 2015 Sonnoc 32 DonviewBoard v2.0 User Manual 3.8 Automatic Recovery after Abnormal Exit When the software is terminated abnormally due to computer crash or abnormal operation, it will automatically find the unsaved documents while re-launching the software and prompt a recovery option. Select Y to recover and N to exit. Sonnoc Inc. 11940 Goldring Road, Suite D Arcadia, CA 91006 www.sonnoc.com [email protected] DonviewBoard v2.0 User Manual © 2015 Sonnoc 33