1
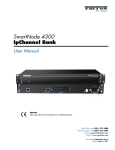
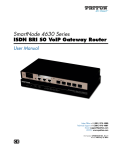
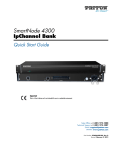
Cadi.Sense
Quick Start Guide
How to setup the SmartNode?
What do the icons mean?
How to paste the ThermoSensor?
Download the latest User Manual from:
www.cadisense.com
Support Hotline:
+65 6276 2676
Medical Device Safety Service GmbH
EC REP Schiffgraben 41 30175 Hannover Germany
Complies with
IDA Standards
DB 102490
CADI SCENTIFIC PTE LTD, 31 Ubi Road 1 #03-00, Singapore 408694, AZTECH
TECHNOLOGIES PTE LTD, 31 Ubi Road 1, Singapore 408694, SHANGHAI HUYOU
MEDICAL ELECTRODE LTD, 45 Lane 1398 Zhenchen Rd Baoshan Shanghai, China
v3.21.2
Cadi.Sense
Quick Start Guide
How to setup the SmartNode?
Before you start…
Please write down the info shown on your SmartNode
plug here:
S SID (e.g., CADI_XXXX):
PWD (8 chars):
SmartNode ID:
Step 1
Plug in SmartNode in the room where the patient will
be resting. Then switch it on.
(Note: SmartNode takes about 30 secs to start up.)
Step 2
Turn on WiFi on your mobile device. Then connect it
to SmartNode using the above S S ID and password
(PWD, 8 chars).
If you’d like to access Cadi.Sense outside your
home, please continue:
Step 4
Click the
icon ,
then click “Connect to
WiFi Router”.
You’ll see this
Click on your router’s
S SID, key in your router’s
password, then click
“Apply”.
(Please be patient
as it will take 2 mins.)
Step 5
Step 3
Go to www.cadisense.com, then click “Access
Cadi.Sense”. Key in your SmartNode ID (see before
Step 1), password is “cadi”, default port is “50000”,
then click “Login”.
Go to web browser
and enter:
or
http://10.10.10.10
You’ll see this
Quick setup is done!
If you are using a smartphone, download Cadi.Sense
app from iPhone App Store or Android Market. Click
“+” to create a new profile for your child. Then select
your child, click another “+” and select “Cadi.Sense
Monitoring”. Key in your ThermoSensor ID (shown
on the sensor), select “Monitoring”and you’re done!
Cadi.Sense
Quick Start Guide
What do the icons mean?
1. Go to Home Page (Temperature Monitoring)
10 11
1
2
3
4
5
7
2
8
9
12
6
Main Page
Sensor Selection
13
Home Page
Temperature Monitoring
14
15
Temperature Chart
2.
Refresh
3.
Advanced Settings
4.
Set Timezone, Date & Time
5.
Add / Remove Sensor
6.
Click to go Home Page
7.
Go to Main Page (Sensor Selection)
8.
Sensor Settings (enter name, choose ºC / F,
set temperature threshold, alert message)
9.
Temperature Chart / History (note: chart will
appear only after 15 mins; “Lo” means below
32.1 ºC; “Hi” means above 42.0 ºC)
10.
Toggle Sound Alert (only for iPhone / iPad)
11.
Help
12.
Sensor Battery Status
13.
Export Temperature History Data (only for
laptop)
14.
Shift Forward / Backward 12 Hours
15.
Jump To Date
Cadi.Sense
Quick Start Guide
How to paste the ThermoSensor?
Step 4
Step 1
Remove the rectangular backing liner.
Apply a small amount of body lotion onto the lower
abdomen area.
Step 2
Take a Stick On and peel off the round paper liner to
expose the adhesive.
Step 5
Paste the sensor by sticking the adhesive part to the
inside of the diaper/undergarment, so that the
sensor'
s metal part will touch the lower abdomen (left
or right) when the diaper/ undergarment is properly
worn.
Step 3
Paste the ThermoSensor on the adhesive, with the
metal part facing outward and away from the
adhesive.
(Note: ThermoSensor takes 10 mins to warm up,
temperature is wirelessly sent every 30 secs.)
Keeping the sensor
Please remember to keep your sensor back into the
storage case properly to switch off the sensor. This
will save battery power and make your sensor last
longer!