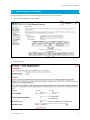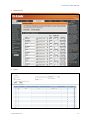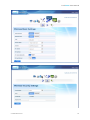
1
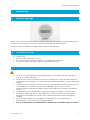
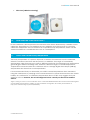
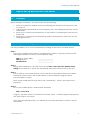
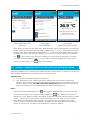
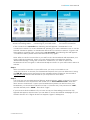
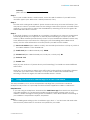
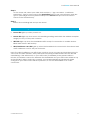
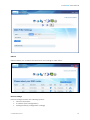
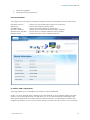
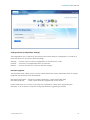
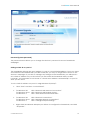
Cadi.Sense Wireless Thermometer User Manual v3.21.3 T-S1-800.900-I10-C01 Cadi.Sense User Manual Contents Introduction ........................................................................................................................ 3 1. 1.1 Welcome message ........................................................................................................... 3 1.2 User manual version.......................................................................................................... 3 1.3 Important safety information ........................................................................................... 3 1.4 Intended use ...................................................................................................................... 4 1.5 Package contents ............................................................................................................. 4 1.6 How does the Cadi.Sense work? .................................................................................... 5 1.7 Fever and normal body temperature ............................................................................ 5 2. How to set up and use the Cadi.Sense .......................................................................... 6 2.1 Overview............................................................................................................................. 6 2.2 Setup I – Performing a quick setup................................................................................. 6 2.3 Setup II – Setting up to access Cadi.Sense from outside your home ....................... 7 2.4 Setup III (Advanced) – Performing port forwarding to access your SmartNode from outside your home ................................................................................................... 9 2.5 Using your iPhone or Android app to access Cadi.Sense ........................................ 10 2.6 Understanding the SmartNode LEDs ............................................................................. 11 2.7 Understanding the Cadi.Sense icons on your SmartNode webpages ................... 12 2.8 How to attach the ThermoSensor.................................................................................. 14 2.9 How to clean and store the ThermoSensor and the SmartNode ............................. 16 3. Advanced features ......................................................................................................... 17 3.1 Changing the SmartNode password............................................................................ 17 3.2 Resetting the SmartNode ............................................................................................... 18 3.3 Upgrading the SmartNode firmware ............................................................................ 18 4. Others ................................................................................................................................ 19 4.1 Troubleshooting and frequently asked questions (FAQ)........................................... 19 4.2 Getting technical support .............................................................................................. 20 4.3 Standards compliance................................................................................................... 20 4.4 Specifications................................................................................................................... 21 4.5 More about port forwarding .......................................................................................... 23 4.6 More about the SmartNode........................................................................................... 27 T-S1-800.900-I10-C01 2 Cadi.Sense User Manual 1. Introduction 1.1 Welcome message Thank you for choosing the Cadi.Sense Wireless Thermometer. This thermometer allows you to monitor your loved ones’ temperature without disturbing their rest and play. Read this manual carefully and follow all instructions and warnings. 1.2 User manual version 1.3 Version: C01 Release date: November 19, 2012 This user manual is subject to change or upgrade without notice. To view the latest user manual, go to www.cadisense.com. Important safety information DO NOT use the Cadi.Sense or any electrical part that comes with the package if there is any visible damage. DO NOT force open or attempt to service the Cadi.Sense or any electrical part that comes with the package. If you encounter any technical problem, contact Technical Support. DO NOT use the Cadi.Sense on users who have an implanted cardiac device such as a pacemaker or an internal cardioverter-defibrillator (ICD). This is to avoid electromagnetic interference (EMI) between the ThermoSensor and the implanted device. DO NOT place the ThermoSensor or dressing over injured, broken, or scarred skin. DO keep the dressing and the ThermoSensor dry. This is because water trapped between the ThermoSensor and the skin or dressing may affect the temperature reading. DO NOT allow babies or young children to handle the loose or detached ThermoSensor, so as to prevent choking accidents. The use of this product is not intended as a substitute for consultation with your doctor. T-S1-800.900-I10-C01 3 Cadi.Sense User Manual 1.4 Intended use The Cadi.Sense wireless thermometer is intended for use in children for monitoring body temperature continuously and automatically. 1.5 Package contents ThermoSensor (with storage case) SmartNode (plug) T-S1-800.900-I10-C01 4 Cadi.Sense User Manual 1.6 Stick-Ons (adhesive dressing) How does the Cadi.Sense work? In the Cadi.Sense, skin temperature is measured at the lower abdomen by a wireless sensor called the ThermoSensor. The readings are sent wirelessly every 30 seconds to a receiver called the SmartNode and converted to an equivalent body temperature, which can be viewed via WiFi from a mobile device such as a smartphone. 1.7 Fever and normal body temperature The body temperature of a person depends on where it is measured, how it is measured, when it is measured and how old the person is. In addition, the range of normal body temperature varies from person to person. Different methods of measuring body temperature generally give different readings and, therefore, different ranges of normal temperature. Temperatures measured with the Cadi.Sense are on average higher than armpit (axillary) temperatures but lower than ear temperatures*. It is recommended that you determine your child’s normal temperature when measured using the Cadi.Sense, by carrying out the measurement for at least 24 hours when the child is healthy. As a reference, a Cadi.Sense temperature above 37.8°C may suggest that your child has a fever. However, do not self-diagnose but do consult your doctor for medical advice. *Ng K-G, Wong S-T, Lim S-M, Goh Z. Evaluation of the Cadi ThermoSENSOR wireless skin-contact thermometer against ear and axillary temperatures in children. Journal of Pediatric Nursing 2010; 25:176–186. [View abstract at http://www.ncbi.nlm.nih.gov/pubmed/20430278]. T-S1-800.900-I10-C01 5 Cadi.Sense User Manual 2. How to set up and use the Cadi.Sense 2.1 Overview Before using the Cadi.Sense, you will need to do the following: 1. Set up the system for wireless access, by following the instructions in Sections 2.2, 2.3, 2.4, and 2.5. 2. Understand the LED indicators and Cadi.Sense icons, by reading Sections 2.6 and 2.7 respectively. 3. Know how to attach the ThermoSensor to the patient, by following the instructions in Section 2.8. 4. Know how to clean and store SmartNode and the ThermoSensor after each use, by reading Section 2.9. 2.2 Setup I – Performing a quick setup This setup enables you to access temperature readings at home from a mobile device. Step 1: Get ready a mobile device (iPhone, Android phone, tablet, or laptop) and record the following information shown on your SmartNode plug: SSID (e.g., CADI_XXXX): PWD (8 chars): SmartNode ID: ____________________ ____________________ ____________________ Step 2: Plug in the SmartNode to a power socket in the same room where the patient will be resting. Then switch it on. (Note: The SmartNode takes about 30 seconds to start up.) Step 3: Turn on WiFi on your mobile device. Look for the above SmartNode SSID in the wireless network list. Then connect the mobile device to the SmartNode using the above password (PWD, 8 chars). Note: Some mobile devices may ask for the “network key”, which is the same as the password. Step 4: Go to your mobile device’s web browser and enter http://10.10.10.10 If Figure 1 appears, select your timezone and click “Save”. Otherwise Figure 2 will appear. The quick setup is now done! Note: After completing Setup I, you will need to proceed with Step II in order to access the Internet. T-S1-800.900-I10-C01 6 Cadi.Sense User Manual Figure 1. Setting date, time, and timezone. Figure 2. Main page (sensor details). Figure 3. Home page (temperature monitoring). Note: After you have set the date, time, and timezone, Figure 2 will appear. The sensor ID will be shown and the temperature will be displayed as “--” or “Lo”. If the sensor is still in its storage case, the reading will be displayed as “--”. If the sensor has been taken out from its storage case for more than 30 seconds, you may see “Lo” after clicking the “Refresh” . If you warm up the sensor by rubbing it in your hands for more than 1 minute icon and then click the “Refresh” icon, you may see a numerical temperature value. If you click the “Home page” icon 2.3 , Figure 3 will appear. Setup II – Setting up to access Cadi.Sense from outside your home This setup enables you to connect your mobile device to the Internet, so that you can access temperature readings from outside your home via the Internet. Requirements: 1. You must first complete Setup I in Section 2.2. 2. You will need to have a WiFi router that is already set up and connected to the Internet, and you will need to be physically at the place where your WiFi router is. You will also need to know your WiFi router’s SSID and password. Check with your Internet service provider if you do not remember the SSID and/or password. Step 1: Click the “Advanced Settings” icon and Figure 4 will appear (if you cannot see the “Advanced Settings” icon, click the “Main Page” icon first). Click the “Connect to WiFi Router” icon. When a screen (see Figure 5) appears and asks “Please select your WiFi router”, look for your router’s SSID. If your router’s SSID does not show up on the screen, click “Refresh” repeatedly until it appears. Then click your router’s SSID, type in your router’s password, and then click “Apply”. Be patient as the SmartNode needs about 1 minute to connect to your WiFi router and about 1 minute to reboot. T-S1-800.900-I10-C01 7 Cadi.Sense User Manual Figure 4. Advanced settings menu. Figure 5. Connecting to your WiFi router. Figure 6. Successful connection. If the connection is successful, the following text will appear: “SmartNode is now connected to xxxxxx. To access SmartNode, please go to www.cadisense.com or use the LAN URL. Please be patient as SmartNode needs about a minute to reboot.” Figure 6 will then appear. However if the connection is not successful, the following text will appear: “Connection failed, please reboot SmartNode and try again”. Note: After successful connection to your WiFi router, the SmartNode will remember your router’s SSID and password, unless you have intentionally unmarked the default “Remember Settings” during the connection. Therefore, if you were to switch the SmartNode off and on again, it will automatically reconnect to your WiFi router in about 2 minutes. Step 2: After successful connection to your WiFi router, you may not be able to use “http://10.10.10.10” to access your SmartNode anymore, but you can still access it using the LAN URL displayed on the screen (in the example shown in Figure 6, the LAN URL is http://10.0.0.84). Record this LAN URL as you may need to use it later. Step 3: You may now use a mobile device (iPhone, Android phone, tablet or laptop) to access your Cadi.Sense from anywhere in the world! Go to “www.cadisense.com”, and then click “Access Cadi.Sense”. Type in your SmartNode ID (which can be found on your SmartNode; you should have written it in Step 1 of Section 2.2). The password is “cadi”, and the default port is “50000”. Then click “Login”. If your router is UPnP-enabled or if you have set up port forwarding (see Section 2.4), Figure 8 will appear, which means you are able to access SmartNode webpages as you would in Section 2.1. If Figure 8 does not appear, Figure 7 will appear. T-S1-800.900-I10-C01 8 Cadi.Sense User Manual Figure 7. Cadi.Sense page without UPnP/port forwarding setup. Figure 8. Cadi.Sense page with UPnP/port forwarding setup. 2.4 Setup III (Advanced) – Performing port forwarding to access your SmartNode from outside your home This setup enables you to view your SmartNode webpages from outside your home via the Internet. Note: You do not need to perform this setup if you have been able to see Figure 8 in the previous setup. Note: This section is for advanced users only. DO NOT PROCEED IF YOU ARE NOT FAMILIAR WITH PORT FORWARDING. Requirements: 1. You must first complete Setup 1 in Section 2.2 and Setup II in Section 2.3. 2. You will need to be physically at the place where your WiFi router is, and you will also need to know your WiFi router’s admin password, if any. Check with your Internet service provider if you do not remember the password. Step 1: (You may skip this step if you already know the LAN IP address of your WiFi router.) Go to your mobile device’s web browser and enter the LAN URL (see Section 2.3, Step 2). Click , “MENU” icon, “More Settings” icon, and then the “IP the “Advanced settings” icon Settings” icon. Record the following information shown on the screen: T-S1-800.900-I10-C01 9 Cadi.Sense User Manual Gateway: (this is the LAN IP address of your WiFi router) Step 2: Go to your mobile device’s web browser, enter the LAN IP address of your WiFi router, and then type in your WiFi router’s admin password, if any. Step 3: Find the UPnP setting and enable it. (Note: Some routers may not have this feature.) You may have to reboot your WiFi router for the setting to take effect (check your WiFi router’s manual). You may have to reboot the SmartNode by switching it off and on again; this reboot will take about 1 minute. Step 4: If the UPnP feature is not available or not working, you will have to carry out manual port forwarding. Basically, the objective of manual port forwarding is to instruct your WiFi router to allow external (outside home) access of your SmartNode. Different routers may have different ways and names for carrying out port forwarding (also called virtual server), but the main information to be keyed into your WiFi router is similar: (1) Device IP Address (also called Local IP): the LAN URL (see Section 2.3, Step 2), which is the LAN IP address of the SmartNode (2) Public Port (also called external port): 50000 (3) Private Port (also called internal port, local port, or host port): 80 (4) Protocol: TCP (5) Enable: Yes Note (a): See Section 4.5 (“More about port forwarding”) for details on several different WiFi routers. Note (b): You may have to reboot your WiFi router for the settings to take effect (please check with your WiFi router’s manual). You may have to reboot the SmartNode by switching it off and on again; this reboot will take about 1 minute. 2.5 Using your iPhone or Android app to access Cadi.Sense This setup enables you to access temperature readings from your iPhone or Android smartphone by means of a specially created software application called “Cadi.Sense”. Requirements: If you are using a smartphone, download the Cadi.Sense app from the iPhone App Store or Android Market. It is an electronic health journal that helps to keep track of your children’s health throughout their growth. In addition, it also allows wireless monitoring of your children’s temperature anytime, anywhere. Step 1: After installing and setting up the Cadi.Sense app, click “+” on the home tab and enter the necessary information to create a new profile for your child. T-S1-800.900-I10-C01 10 Cadi.Sense User Manual Step 2: On the home tab, select your child, click another “+” sign, and select “Cadi.Sense Monitoring”. Type in some notes in the Description field for your own reference and also type in your 8-digit sensor ID (serial number) in the Sensor field (the sensor ID can be found on the ThermoSensor). Step 3: Select the monitoring tab and you are done! 2.6 Understanding the SmartNode LEDs Power LED: lights up when power is on. Sensor LED: lights up when sensor is transmitting readings and within the wireless reception range (3 to 5 m) for the past 5 minutes. WiFi LED: lights up when the SmartNode WiFi is ready for connection to mobile devices. Blinks when there is WiFi activity. WPS/CadiSense.com LED: lights up when the SmartNode is connected to the Internet and www.cadisense.com for the past 5 minutes. Note: The WPS/CadiSense.com LED is also a button. Once you press and hold the button for 5 seconds and then release it, WPS (WiFi Protected Setup) will be initiated and the LED will start blinking. If the WPS button on your WiFi router (if available) is also pressed within 2 minutes, the wireless connection between the SmartNode and your WiFi router will be set up automatically in about 3 minutes. However, your SmartNode SSID and password will be changed to your WiFi router's SSID and password, so it is NOT ADVISABLE to do a WPS connection. T-S1-800.900-I10-C01 11 Cadi.Sense User Manual 2.7 Understanding the Cadi.Sense icons on your SmartNode webpages Go to home page (temperature monitoring page): View a single sensor temperature in large font size. Refresh: Manually refresh the current page to get the latest temperature. The page will actually refresh automatically every 5 minutes. Advanced settings: View a list of all advanced settings, including connecting to your WiFi router. Set timezone, date & time: Manually set the timezone, date, and time if necessary. Add ThermoSensor: Add a new sensor. Concurrent monitoring of several persons at the same time is possible, so long as each person wears a sensor and the sensors are within the wireless reception range (3 to 5 m) of the SmartNode. Remove ThermoSensor: Remove a sensor. All data associated with the sensor will be deleted. So before deleting, you may want to export the data using the “Export Temperature History Data” icon that will be available only in laptop’s web browser. Go to main page (sensor details page): View a list of all registered sensors. Sensor settings: (1) Type in the name/nickname of the person wearing the sensor (default: empty). (2) Set the temperature scale to ºC (degree Celsius, default) or ºF (degree Fahrenheit). (3) Set the “High Temperature Threshold” (default: 37.8 ºC). For some countries, this threshold is fixed at the default value and cannot be changed. (4) Turn on/off the “Message Alert” (default: OFF). If this alert is turned on, a message will be displayed whenever the temperature exceeds the threshold. For some countries, this feature is turned off permanently and cannot be turned on. Temperature chart: View the temperature graph. The chart will appear only 15 minutes after the first record is stored. Temperature history: View a list of temperature records. The records will appear in about every 15-minute interval. Readings below 32.1 ºC will be shown as “Lo”, and readings above 42.0 ºC will be shown as “Hi”. Export temperature history data: Export data (temperature and date-time) in “.csv” format for your further analysis on spreadsheets. This feature is available only from a laptop’s web browser. Shift forward 12 hours: Shift the temperature chart/history forward by 12 hours. Note that the temperature chart/history will show a 24-hour period, with the default period being the current day from 00:00 to 23:59. Shift backward 12 hours: Shift the temperature chart/history backward by 12 hours. Jump to date: Shift the temperature chart/history to a date of your choice. Audio Alert OFF: Press this icon to turn on the “Audio Alert” (default: OFF). If this alert is turned on, a sound will be played whenever the temperature exceeds the threshold. For some countries, there is no audio alert. This icon appears only on iPhones. Audio Alert ON: Press this icon to turn off the “Audio Alert”. For some countries, there is no audio alert. This icon appears only on iPhones. T-S1-800.900-I10-C01 12 Cadi.Sense User Manual Click these icons and you will see the following screens: Main page (sensor details) Home page (temperature monitoring) Advanced settings menu Setting date, time, and timezone Add sensor (by entering sensor ID) Remove sensor (by clicking inside the red box) T-S1-800.900-I10-C01 13 Cadi.Sense User Manual Temperature chart 2.8 Temperature history Sensor settings (name, alert, °C or °F, temperature threshold) How to attach the ThermoSensor Step 1: Apply a small amount of body lotion on the left or right side of the lower abdomen. Step 2: Take a Stick-On and peel off the round paper liner to expose the adhesive. Step 3: Stick the ThermoSensor on the adhesive, with the metal part facing outward and away from the adhesive. T-S1-800.900-I10-C01 14 Cadi.Sense User Manual Step 4: Remove the rectangular backing liner to expose the adhesive. Step 5: Stick the exposed adhesive to the inside of the diaper/undergarment in such a position that the sensor's metal part will touch the lower abdomen (left or right) when the diaper/undergarment is properly worn. Note: For accurate temperature readings, the sensor must touch the left or right side of the lower abdomen at all times during monitoring. T-S1-800.900-I10-C01 15 Cadi.Sense User Manual The ThermoSensor may take about 30 minutes to warm up from room temperature to body temperature. A temperature reading is sent wirelessly every 30 seconds to your SmartNode, and this reading will be converted into an equivalent body temperature, which will appear on your mobile device or computer. 2.9 How to clean and store the ThermoSensor and the SmartNode Step 1: After each use, peel the Stick-On off the diaper/undergarment and then peel the StickOn off the sensor. Step 2 (important): Clean the sensor with a soft cloth moistened with alcohol, and put the sensor back into the storage case to switch off the sensor. The metal part of the sensor should face down and the barcode side should face up. Make sure that the sensor fits nicely into the storage case and you are able to close the cap of the case. This step will ensure that the sensor switches off completely, saving battery power and making your sensor last longer! T-S1-800.900-I10-C01 16 Cadi.Sense User Manual Step 3: Clean the SmartNode with a soft cloth moistened with alcohol. Step 4: Place both the SmartNode and the ThermoSensor with its storage case in the original package, and store the package in a cool, dry place and keep it out of reach of babies and young children. Note: When the SmartNode is not being used for temperature monitoring, you may wish to use it as a wireless extender. See Section 4.6 (“More about the SmartNode”) for more details. 3. Advanced features 3.1 Changing the SmartNode password If you have completed both Setup 1 (Section 2.1) and Setup II (Section 2.3), go to your mobile device’s web browser and enter the LAN URL which you recorded in Step 2 of that section. Click the “Advanced Settings” icon, “MENU” icon, “More WiFi Settings” icon, and then the “Security” icon. Type the new password in the “WPA Passphrase” box, and then click “Apply”. The password change should complete within 1 minute. If you have completed only Setup 1 (Section 2.1), go to your mobile device’s web browser and enter “http://10.10.10.10/main.asp”. Click the “Advanced Settings” icon, “MENU” icon, “More WiFi Settings” icon, and then the “Security” icon. Type the new password in the “WPA Passphrase” box, and then click “Apply”. The password change should complete within 1 minute. Note: After you have changed the SmartNode password, your mobile device will not be connected directly to your SmartNode anymore. However, you will still be able to access your SmartNode via your WiFi router by using the LAN URL which you recorded in Step 2 of Section 2.3. If you wish to connect your mobile device directly to the SmartNode, you will need to perform Setup I (Section 2.1) again. T-S1-800.900-I10-C01 17 Cadi.Sense User Manual 3.2 Resetting the SmartNode Warning: All data will be deleted after this hardware reset. Therefore, before resetting, you may want to export the data using the “Export temperature history data” icon that will be available only from your laptop’s web browser. Step 1: Make sure the SmartNode is switched on for at least 1 minute. Take a paperclip and bend the tip outwards. Use the tip to press down and hold for 10 seconds the small round “hole” situated just next to the LAN socket on the SmartNode, and then release it. You will know that the resetting process has been activated when all the LED lights, except the Power light, go off about 20 seconds after you release the paperclip. The SmartNode will reset and reboot in about 1 minute. Note: Resetting the SmartNode will restore all settings and configuration to the factory defaults, except that: 3.3 any upgraded firmware will stay and not revert to the previous version; and any registered sensor will be deleted, so you will need to manually add the sensor using the “Add ThermoSensor” icon after performing this hardware reset. Upgrading the SmartNode firmware Note: This upgrading is for advanced users only. DO NOT PROCEED IF YOU ARE NOT FAMILIAR WITH FIRMWARE UPGRADING. Warning: All data may be deleted after this firmware upgrade. Therefore, before upgrading, you may want to export the data using the “Export temperature history data” icon that will be available only from your laptop’s web browser. Requirement: You will need a laptop that is connected to the Internet. Step 1: Go to www.cadisense.com, click “FAQ”, and download the latest firmware. The firmware typically appears as a file with extension “.img”. Note: The webpage from which you download the firmware provides alternative instructions for resetting the SmartNode, so it is advisable to keep this page open. Step 2: Connect your laptop to the SmartNode physically using a LAN cable, which is provided in your Cadi.Sense package. Step 3: Go to your laptop’s web browser and enter “http://10.10.10.10/main.asp”. Click the “Device Settings” icon. In the second row of the menu bar, click the forth icon named “Firmware Upgrade”. Click the “Browse” button and select the filename of the firmware that you have downloaded in Step 1. Then click “Apply”. Note: The SmartNode may take about 5 minutes to upgrade the firmware. T-S1-800.900-I10-C01 18 Cadi.Sense User Manual Step 4: Reset the SmartNode (this is important!), by following the instructions in Section 3.2 or those on the webpage from which you downloaded the firmware. Step 5: Reboot the SmartNode by switching it off and on again. The reboot will take about 1 minute. Step 6: Remove the LAN cable. 4. Others 4.1 Troubleshooting and frequently asked questions (FAQ) Concerning the ThermoSensor 1. Why do we place the ThermoSensor on the left or right side of the lower abdomen and not elsewhere? It is well known that the temperature of blood in a major artery closely reflects body temperature, so measuring temperature from an area close to a major artery will give readings that are more accurate than those measured from an area far from a major artery. We recommend measuring temperature from the middle of the left or right lower abdomen because that area is near a major artery called the external iliac artery. 2. How do I know whether the ThermoSensor is working? Once the ThermoSensor is removed from its storage case, the LED light will blink about every 5 seconds. If it is not blinking, the sensor is likely to have run out of battery or to be faulty. In that case, contact Technical Support to purchase a replacement. 3. The ThermoSensor is in the correct position but the temperature seems to be lower than expected. Why? Whenever a ThermoSensor is in contact with the skin, it will take about 30 minutes to give an accurate temperature reading. If the ThermoSensor is not held closely against the skin, the temperature reading will generally be lower than normal. Do ensure that the sensor is properly in contact with the skin. If the ThermoSensor is not correctly positioned, the temperature reading will generally be lower than normal. The ThermoSensor may give lower readings for obese people because the thicker layer of tissue between the iliac artery (see FAQ #1) and the skin surface may affect the transmission of heat from the artery to the skin surface. If you suspect this is happening, we recommend that you check your child’s temperature with an ear thermometer, note the difference between the ear reading and the ThermoSensor reading, and then lower the ThermoSensor fever threshold of 37.8 °C by this difference. T-S1-800.900-I10-C01 19 Cadi.Sense User Manual If the above instructions do not answer your concerns, please contact Technical Support for assistance. Concerning the Cadi.Sense software application 4. I am unable to log in to http://www.cadisense.com. Why? Make sure you are connected to the Internet. Try to access other websites (e.g., www.google.com) to check your Internet connection. 5. Why is there no current temperature on the Cadi.Sense website? Click the “Refresh” icon, and check the “Last Refreshed Time” to ensure that the Cadi.Sense web page has really been refreshed. Note that both the times, stated below the temperature and last refreshed time, are based on our server time. Two dashes for temperature reading means that no readings have been recorded for the past 30 minutes. Note that the Temperature History will show the highest reading received for each 15-minute interval, so if all the readings are received, you should see 4 readings for each hour. If the above does not work, ensure that the SmartNode is plugged near the person wearing the ThermoSensor, so that the ThermoSensor is within the wireless reception range (3 to 5 m) of the SmartNode. If you still cannot see the current temperature reading, please contact Technical Support for assistance. 6. Can I monitor my child’s temperature from more than one mobile device or computer? Yes, as long as you have Internet access you can monitor your child’s temperature from any mobile device or computer anytime, anywhere. See Section 2 for appropriate setup. 4.2 Getting technical support To contact Technical Support, please call Cadi.Sense Support Hotline at or send e-mail to 4.3 +65 62762676 [email protected] Standards compliance The Cadi.Sense meets the following standards: ISO 13485 EN 60601-1 EN 60601-1-2 EN 12470-4 ISO 14971 EN 980 EN 1041 T-S1-800.900-I10-C01 (Quality management system) (Electrical safety) (Electromagnetic compatibility) (Thermometer performance) (Risk management) (Symbols for labelling) (Information supplied by manufacturer) 20 Cadi.Sense User Manual EC REP Complies with IDA Standards DB 10249 Medical Device Safety Service GmbH Schiffgraben 41 30175 Hannover, Germany CADI SCENTIFIC PTE LTD 31 Ubi Road 1 #03-00 Aztech Building Singapore 408694 www.cadi.com.sg Note: The stick-on dressing is supplied by Shanghai Huyou Medical Electrode Ltd, 45 Lane 1398, Zhenchen Road, Baoshan, 200435 Shanghai, China. 4.4 Specifications ThermoSensor specifications Temperature Measuring range 32.0 ºC to 42.0 ºC Out-of-range indications <32.0 ºC: LO >42.0 ºC: HI Accuracy ±0.20 ºC (32.0 ºC to 42.0 ºC) Resolution 0.10 ºC Radio Radio frequency (short range device) 868.4 MHz , 919.8 MHz, or 925 MHz, depending on countries Rate of transmission Sends temperature data approximately every 30 seconds Transmission distance between ThermoSensor and SmartNode SMN-801 3 to 5 m (typical) Power Internal battery (non-replaceable) Battery life 3V 60 days of continuous use, OR 3 years of intermittent use, based on the following conditions: (a) 5 days of use every 3 months (b) ThermoSensor is kept properly in storage case when not in use Mechanical Dimensions 36.8 mm (DIA) x 12.2 mm (HT) Weight 12 g Environment Operating ambient temperature range 20.0 ºC to 35.0 ºC Storage ambient temperature range 10.0 ºC to 50.0 ºC Relative humidity 15% to 95% (non-condensing) T-S1-800.900-I10-C01 21 Cadi.Sense User Manual SmartNode specifications Radio Radio frequency (short range device) 868.4 MHz , 919.8 MHz, or 925 MHz, depending on countries WLAN WiFi 802.11b/g/n Interface Ethernet 1 x 10/100 Auto MDI/MDIX Ethernet Port Power Input voltage 100–240 VAC, 50–60 Hz Maximum current: 0.12 A Mechanical Dimensions 57 mm x 104 mm x 55 mm Weight 165 g Environment Operating ambient temperature range 0 ºC to 40 ºC Storage ambient temperature range –25 ºC to 70 ºC Relative humidity 30% to 90% (non-condensing) T-S1-800.900-I10-C01 22 Cadi.Sense User Manual 4.5 More about port forwarding Port forwarding screens for the following WiFi routers are shown below: 1. Aztech DSL1015EW(S) or DSL1000ER 2. 2WIRE 5012NV T-S1-800.900-I10-C01 23 Cadi.Sense User Manual 3. 2WIRE 2701HGV-E 4. Linksys E2000 T-S1-800.900-I10-C01 24 Cadi.Sense User Manual 5. Dlink DIR 655 6. ZyXel T-S1-800.900-I10-C01 25 Cadi.Sense User Manual 7. ASUS-RTN16 8. EnGenius ESR9850 T-S1-800.900-I10-C01 26 Cadi.Sense User Manual 4.6 More about the SmartNode The SmartNode supports wireless 802.11b/g/n standards with one 10/100Base-T Ethernet port. It is designed with MIMO technology to extend the reach of any existing wireless router/AP to maximize the coverage in your home or office. It basically receives the signal from your wireless router/AP and repeats it to extend the range to farther locations that are previously unreachable. The device is equipped with 64/128-bit WEP, WiFi Protected Access (WPA), and the latest WPA2 encryption with TKIP and AES algorithm to protect your wireless network from unauthorized access. MAC Address Filtering for wireless links provides an additional layer of security for your wireless network. The device comes with 1 x 10/100M Auto MDI/MDIx Ethernet port that can be used to connect to an existing wired network to serve as a wireless access point (AP) or wireless bridge. It can also be used to configure the device via its webbased GUI, or upgrade the firmware when connected to the Network Interface Card of your PC. Minimum system requirements Your computer must meet the following minimum requirements: 233 MHz processor Web browser WiFi or Ethernet network adapter Tips for placing the SmartNode Before proceeding to configure your SmartNode, it is a good idea to identify the areas where you have good WiFi reception and weak or no WiFi signal at all. After this assessment, you may place the SmartNode between a location where you have good WiFi reception and a location where you have poor WiFi coverage. You will need to ensure that the SmartNode is placed in the same room where the patient will be resting, to ensure reception of temperature readings transmitted wirelessly by the ThermoSensor. Placement of the SmartNode is crucial to getting the best possible results for extending your existing WiFi signal and, at the same time, ensuring wireless temperature readings are well received. It is desirable to place the SmartNode in a location where it can receive good WiFi signal from the WiFi router/access point (AP), so as to avoid disconnection and packet loss. Configuring the SmartNode to connect to your WiFi router Ensure to disable the WiFi connection on the PC or laptop used for configuring the SmartNode. Please note that your WiFi router/AP and the SmartNode must be on the same WiFi channel. To configure the SmartNode to connect to your WiFi router: Plug in the SmartNode to a power socket and switch it on. (Note: The SmartNode takes about 30 seconds to start up.) Connect the SmartNode to your PC/laptop using an Ethernet cable. Once a connection is established, your PC/laptop will receive an IP address and you can start the configuration using your PC/laptop’s web browser, by entering: “http://10.10.10.10/main.asp”. You will see the following screen: T-S1-800.900-I10-C01 27 Cadi.Sense User Manual Click the “Connect to WiFi Router” icon. When a screen appears and asks “Please select your WiFi router”, click your router’s SSID, type in your router’s password, and then click “Apply”. Be patient as the SmartNode needs about 1 minute to connect to your WiFi router and about one minute to reboot. Click “Refresh” if you do not see your router’s SSID on the list. Note (a): After successful connection to your WiFi router, the SmartNode will remember the router’s SSID and password, unless you have intentionally unmarked the default “Remember Settings” during the connection. So if you were to switch the SmartNode off and on again, it will automatically reconnect to your WiFi router in about 2 minutes. Note (b): After successful connection to your WiFi router, you may not be able to use “http://10.10.10.10” to access your SmartNode anymore. Nonetheless you can still access it using the IP address assigned by your router. Note (c): You may need to reboot your PC/laptop, or unplug the Ethernet cable and then plug it in again, to connect to the SmartNode. For certain brands of WiFi routers, you may need to enable “Enhanced Compatibility” if you are using Windows 7. Using the SmartNode as a WiFi repeater Once the WiFi connection between the SmartNode and your main router/AP is established, you can connect your WiFi devices like laptops and smartphones through the SmartNode SSID. These devices will obtain an IP address from the main AP/router and should be able to access the Internet from farther locations previously unreachable by your WiFi signal. Configuring the SmartNode for use as a WiFi AP The SmartNode can also be configured as a WiFi access point (AP) to turn a regular modemrouter into a WiFi-capable networking device to connect WiFi-enabled devices such as laptops and smartphones. T-S1-800.900-I10-C01 28 Cadi.Sense User Manual To configure the SmartNode for use as a WiFi AP: Plug in the SmartNode to a power socket and switch it on. (Note: The SmartNode takes about 30 seconds to start up.) Connect the SmartNode to your modem-router using an Ethernet cable. You are now ready to access internet on your laptops and smartphones via WiFi. Simply turn on WiFi on your device and then connect it to the SmartNode using its SSID and password (PWD 8 chars), both of which can be found on the label on the SmartNode. Changing WiFi settings To change WiFi settings: Open your PC/laptop’s web browser and enter “http://10.10.10.10/main.asp”. Click the “More WiFi Settings” icon and you can change the settings as preferred. Click “Apply” to commit the changes. Click the “More WiFi Settings” icon and then the “Security” icon in the second row, and change the settings as preferred. Click “Apply” to commit the changes. Note: If necessary, you may need to adjust the wireless profile on your computer to match the new settings. T-S1-800.900-I10-C01 29 Cadi.Sense User Manual T-S1-800.900-I10-C01 30 Cadi.Sense User Manual Using WPS (WiFi Protected Setup) WPS is an alternative and easier way to connect the SmartNode to your WiFi router or a wireless client. To connect the SmartNode to your WiFi router/AP via WPS: Press the WPS button on the SmartNode for 5 seconds to activate WPS Enrollee mode. Press the WPS button on your WiFi router/AP within 2 minutes. The 2 devices should then associate with each other automatically within 2 minutes. To connect a wireless client to the SmartNode via WPS: Press the WPS button on the SmartNode for 2 seconds to activate WPS Registrar mode. Press the WPS button on your wireless client within 2 minutes. The 2 devices should then associate with each other automatically within 2 minutes. Configuring wireless MAC filtering Wireless MAC Filtering allows you to select which wireless clients to allow or deny access to the Wireless-N Range Extender. To configure wireless MAC filtering: Open your PC/laptop’s web browser and enter http://10.10.10.10/main.asp. o T-S1-800.900-I10-C01 Click the “More WiFi Settings” icon and then the “MAC Filter” icon in the second row, and you can select “Allow” or “Deny” from the “Policy” drop-down box and enter the MAC address of the wireless client you wish to allow/deny access to the SmartNode. Click “Apply” to commit the changes. 31 Cadi.Sense User Manual Reboot Reboot allows you to reboot the device for new settings to take effect. Device settings Device Settings includes the following options: Device information IP address (LAN configuration) Settings backup (configuration settings) T-S1-800.900-I10-C01 32 Cadi.Sense User Manual Firmware upgrade Password (system password) Device information This page shows the device information. Below is the list of information shown in this menu. Firmware Version Build Date Serial Number ETH MAC Address Wireless MAC Address Wireless Status – Shows the current firmware version of the device – Shows the firmware release date – Shows the serial number of the device – Shows device’s Ethernet interface MAC address – Shows device’s wireless interface MAC address – Shows the status of the wireless interface. IP address (LAN configuration) This page allows you to change the IP address of the SmartNode. NOTE: You may change the IP address of the SmartNode to an IP address within the same subnet of your existing network. This will allow you to access SmartNode webpages even after the SmartNode is associated with your WiFi router/AP. Just remember to reserve the assigned IP address on your router’s DHCP server to prevent any IP conflict on your network. T-S1-800.900-I10-C01 33 Cadi.Sense User Manual Settings backup (configuration settings) This page allows you to back up and restore the current device configuration, as well as to reset the device to its factory default settings. Backup – To back up the current configuration of the device to a file Update – To restore a configuration file to the device Restore – To reset the device to factory default settings Firmware upgrade The firmware menu allows you to see the current firmware version and build date, as well as upgrade the firmware of the SmartNode. Firmware Information – Shows the current firmware’s version and build date Firmware Upgrade – Load a new firmware upgrade file to the device NOTE: Make sure you connect to the device via Ethernet cable when upgrading the firmware, so as to avoid corruption during the firmware upgrade procedure. T-S1-800.900-I10-C01 34 Cadi.Sense User Manual Password (system password) The password menu allows you to change the device’s password to access SmartNode webpages. Setting a static IP on your PC The SmartNode will only give an IP address to your PC upon initial installation. Once you have associated the SmartNode with your WiFi router/AP, you may no longer have access to the device’s webpages. If you wish to change any settings on the SmartNode, you will need to set a Static IP address on your PC before you associate the SmartNode with your WiFi router/AP. Just remember to set it back to “Obtain an IP address automatically” on your PC after you are done. To set a static IP address on your PC using Windows XP/Vista/7: Click “Start” and then “Control Panel”. For Windows XP: click “Network and Internet Connections” For Windows Vista: click “Network and Sharing Center” For Windows 7: click “View Network Status and Tasks” For Windows XP: click “Network Connections” For Windows Vista: click “Manage Network Connections” For Windows 7: click “Change Adapter Settings” Right-Click the Network Adapter you will use to configure the SmartNode, and click “Properties”. T-S1-800.900-I10-C01 35 Cadi.Sense User Manual Click to select Internet Protocol Version 4 (TCP/Ipv4) (“TCP/IP” for Windows XP), and then click “Properties”. Select “Use the following IP address:” and type in “10.10.10.20” as the IP address and “255.255.255.0” for the subnet mask. Leave the other fields blank. Click “OK” to commit the settings. Note: Please remember to revert to “Obtain an IP address automatically” on your PC after you are done with changes to the SmartNode. T-S1-800.900-I10-C01 36