1
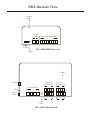
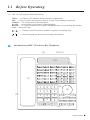
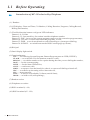
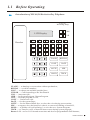
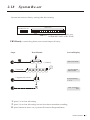
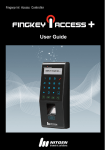
Advanced Key Telephone System
's
Please read this manual before
use the advanced Hybrid System
MODEL
MC-208K / MC-416K
System Components
Model Number
Descriptions
Service Unit
MC-208K
MC-416K
MC-824K
Analog Hybrid Key Phone System (Main Unit)
Telephone
MC-1
MC-3
MC-40
MC-50
MC-3100S
32 Programmable button Key Telephone Set
32 Programmable button Key Telephone Set
21 Programmable button Key Telephone Set
21 Programmable button Key Telephone Set
6 Fixed function button Regular Telephone Set
Optional
Equipment
MC-010DR
Universal Door Phone & Opener
WARNING
CHECK THE POWER SUPPLY OF THE PBX BEFORE CONNECTION, MAKE SURE
IT IS SAME AS LOCAL VOLTAGE
DO NOT PLUG IN OR PLUG OUT THE ADD-ON CARD OR OTHER EQUIPMENT
WHEN PBX IS POWER ON.
MAKE SURE TO CONNECT WITH GROUND FOR LIGHTNING PROTECTION
IF PBX FAILS PLEASE DO NOT MOVE OR TOUCH ANY COMPONENTS IN PBX
JUST CONTACT YOUR LOCAL DEALER FOR REPAIR
DO NOT EXPOSE THE SYSTEM TO RAIN OR MOISTURE SITUATION.
Table of Contents
Section 1
Operation................................................................................1
Before Operating the Telephones ........................................................................... 1
What’s difference between Key Telephone and Regular Phone.................................... 1
Can we use PBX without the Exclusive Key Telephone...............................................1
Introduction of MC-1 Exclusive Key Telephone........................................................ 2
Introduction of MC-3 Exclusive Key Telephone........................................................ 3
Introduction of MC-40,50 Exclusive Key Telephone..................................................5
1.2 Making Calls......................................................................................................... 6
1.2.1 Basic Calling......................................................................................................... 6
Intercom Call ……………………............................................................................ 6
Call Operator ………………………………………………......................................... 7
Call Outside ………………… ……………........................................................................ 7
1.2.2 Hotline Dialing ………………………………………………………………………........8
1.2.3 Last Number Redial ...............................................................................................9
1.2.4 When the Dialed Line is Busy or There is No Answer ................................................10
Automatic Callback on Busy……….........................................................................10
Call Override……… …....................................…………….............................................. 11
Call Cut-off…………………....................................……..................................…..12
1.2.5 Calling Through DISA - outside to extension .......................................................... 12
1.2.6 Calling With Account PIN Code..................…………………………........................ 13
1.3 Receiving Calls .....................................................................................................14
1.3.1 Answering Calls ...................................……................................................................... 14
Answering Call by Lift Handset……....................................…….....................,.......14
Answering Call by Hand-free……....................................……................................ 14
Answering Call by MUTE auto-answer……....................................…….................. 15
1.3.2 Call Pickup............................................................................................................15
Randomly Pickup...........................……....................................……......................16
Directed Pickup……....................................……....................................…............16
Call Pickup Group ……………………………....................................……............... 17
1.3.3 Do Not Disturb (DND) .........................……....................................……................17
1.4 During a Conversation ......................................................................................... 18
1.4.1 Call Transfer.............……........................................…….......................................18
One-touch Transfer...........……....................................……....................................18
1.4.2 Call Hold ................……....................................……............................................ 19
Call Hold Retrieve……....................................……................................................19
1.4.3 Call Waiting..................……....................................…….......................................21
Disconnect Current & Talk to New Party .……..........................................................21
Hold Current & Talk to New Party ................…….................................................... 21
1.4.4 Call Splitting......................……....................................……................................. 22
1.4.5 Multiple-Party Conference....................……...........................................................23
1.4.6 Microphone Mute..........…..................................................................................... 24
1.5 When You Leave Desk ................................................................................ ........... 25
1.5.1 Call Forwarding to PBX Extension……....................................…….........................25
1.5.2 Day/Night Switch Manually...................…….......................................................... 27
1.1
Section 2: System Program........................................................................28
2.1 Disconnect Idle Outside Lines Port...........................................................................29
2.2 Record Welcome Message.........................................................................................30
Switch-on Auto-attendant Mode......……....................................……..................... ... 31
Record when-Busy Message..................................……..............................................32
Record no-Answer Message...............................……................................................. 33
2.3 Outside Line Selection -Day Time .....……..................................................................34
Table of Contents
2.4
2.5
2.6
2.7
2.8
2.9
Outside Line Selection -Night Time................……................................................... 36
Ringing Extension Selection -Day Time.................................................................... 38
Ringing Extension Selection -Night Time ...................……....................................... 40
Modify Extension Number...........……......................................................................42
Off-Hook Route Selection......................……........................................................... 43
Toll Restriction ........................……........................................................................44
How to set Restriction Code A ..……........................................................................45
How to set Restriction Code B .......……....................................……........................46
How to set Unrest Code C .......……....................................…….............................. 47
Comunres Code D Setting (emergency code) ......……...............................................48
2.10 Do-not-dial Switch to Operator..................……...................................................... 49
2.12 Walking Account PIN Setting..............…….............................................................50
2.13 3-minutes Conversation Alarm ..............…….......................................................... 51
2.14 Conversation Override & Cut-off..........……........................................................... 52
2.16 Call Pickup Group ................................................................................................. 53
2.17 Manager-Secretary Call Group............................................................................ ... 54
2.18 Modify System Program Password ..........……....................................................... 55
2.19 Set More Operators.............……............................................................................ 56
2.20 System Rest........................................……............................................................57
Section 3
Appendix.................................................................................58
3.1 System Factory Setting List .................................................................................... 59
3.2 Operation Quick Reference.....................................................................................60
3.3 PBX Feature/Specifications Compare List...............................................................62
3.5 System Program Code Reference (Program 01~29).................................................. 63
3.5.1 Program 01 (Outside Line Setting 01)...........……..................................................64
3.5.2 Program 02 (Outside Line Setting 02).................……............................................64
3.5.3 Program 03 (IP LCR Code Setting)....................……..............................................65
3.5.4 Program 04 (System Setting 01)...................……...................................................65
3.5.5 Program 05 (System Setting 02)...........……..........................................................65
3.5.6 Program 06 (System Setting 03)........…….............................................................66
3.5.7 Program 07 (System Setting 04).....……................................................................66
3.5.8 Program 08 (Timer & Sensitivity Setting).....……...................................................66
3.5.9 Program 09 (Outgoing Call Line Selection -Day Time). ........................................... 67
3.5.10 Program 10 (Outgoing Call Line Selection -Night Time)........................................67
3.5.11 Program 11 (Incoming Ringing Extension Selection -Day Time)............................ 67
3.5.12 Program 12 (Incoming Ringing Extension Selection -Night Time)..........................68
3.5.13 Program 13 (Incoming Call Ringing Time Delay Setting).......................................68
3.5.14 Program 14 (Toll Restriction Class) ..................……............................................68
3.5.15 Program 15 (Restriction Code A) .........……........................................................69
3.5.16 Program 16 (Restriction Code B) ...........……......................................................69
3.5.17 Program 17 (Non-restriction Code C)... ..........…….................................................... 69
3.5.18 Program 18 (Emergency Code D) ..........…….............................................................. 70
3.5.19 Program 19 (PBX Line Code) ............……...........................................................70
3.5.20 Program 20 (Walking Account PIN Setting) ........…….................................. .............. 70
3.5.21 Program 22 (Extension Setting 01)................……................................................71
3.5.22 Program 23 (Extension Setting 02) .. .........……........................................................... 71
3.5.23 Program 24 (Pickup Group) . ..............…….................................................................. 71
3.5.24 Program 25 (Manager/Secretary Call) . ........……........................................................ 72
3.5.25 Program 26 (System Password) . .........……................................................................. 72
3.5.26 Program 27 (Setting DISA Call Port & Operators)................................................ 72
3.5.27 Program 28 (System Re-set).....................…….................................................... 73
3.5.28 Program 29 (Modify Extension Number) .......……............................................... 73
PBX Outside View
Power
lamp
01-02
LINE
Power
Socket
001-008 Extension
MC-208K PBX Out-view
MOH
Lamp
S witch
0 09-0012
Extension
0 13-016
Extension
0 01-004
Extension
005-006
Extension
01-04 LINE
Fuse
Power
cable
MOH
MC-416K Main Board
Section 1
Operation
The chapter shows the steps how to operate
system by Key Telephone Set as well as the
Regular Phones
1.1
Before Operating
What’s difference between Miracall Exclusive Key Telephone & Regular
Telephone in the market?
Exclusive Key Telephone is the phone that you can
1. Use the simple button to dial for a whole feature, such as press simple Button 9 as to
dial whole extension number “8006” etc ; but if you use a regular phone, you need to
dial 4-digit ,8-0-0-6 .
2. Can physically see the System Program status at the LCD of the Key Telephone, just
like to see System Program in the Computer software intuitive graphic interface !
While at regular phone set, you can not see them.
3. At reception, Operator can view which extension or line is busy or free,from the color
of Key Telephone buttons. Such as Blue for outside line is busy, Red for extension
button isbusy. No color then no one use the line or extensions.
Can we use PBX without Exclusive Key Telephone ?
Yes, you can use both telephones to Program and connect our Hybrid PBX. You can buy
any brand regular phone in market to work and program .
Verzio Exclusive Key Telephone use 4-wire cable;
Regular Telephone use 2-wire cable;
USER’S MANUAL
1
1.1
Before Operating
Introduction of MC-1 Exclusive Key Telephone
Incoming Lamp
8
20
32
7
19
31
6
18
30
5
17
29
4
16
28
HOLD
3
15
27
MESS
2
14
26
1
13
25
FWDND
12
24
CONF
FLASH
11
23
EAR
REDIAL
10
22
MUTE
ICM
9
21
LCD
CHECK
CLEAR
↑
Handset
↓
RLS
ANS
PAGE
SPK
TRFR
(1) LCD display: Date and Time; Extension; Calling Duration; Program; Calling Record;
Billing Information;
(2) Flexible/function buttons: red/green LED indicators
Button 1~8: Outside CO line
Button 9~32: One touch key for station/ outside telephone number
(3) Function buttons:
CHECK ---- for System program, Button program;
CLEAR ---- to clear the System program code or exit from program;
ANS ---- answer a call in earphone mode;
RLS ---- hand up the conversation in hand-free, earphone mode etc;
HOLD ---- to hold a call (call splitting ) or save the new System program;
MESS ---- no use at present;
CONF ---- conference calls
PAGE ---- for the system paging;
EAR ---- switch to earphone pickup mode, no voice if pick up handset;
MUTE ---- Press it : when off-hook is microphone mute ; on-hook is auto-answer;
2
USER’S MANUAL
1.1
(3)
Before Operating
MC-1 Key Telephone Function buttons:
TRFR ---- to transfer call, when on-hook is switch to night mode;
SPK ---- to open or close the hand-free ,that is, to start a call dialing or hand-off;
FWDND ---- for call forward or do not disturb;
FLASH ---- to cut off the conversation without hand up;
REDIAL ---- to redial a number or for a pause during the time you are dialing the number;
ICM ---- intercom calls;
---- Volume control: hand-free, handset, earphone, incoming ring;
---- Check and page up /down the incoming call numbers;
Introduction of MC-3 Exclusive Key Telephone
(8)
(9)(10)
(2)
(3)
(1)
(7)
1
2
3
4
5
6
7
8
9
(4)
(5)
↓
↑
FLASH REDIAL
0
HOLD
LINE
﹟
PAGE
INT
TRF
CONF
MUTE
HSPKR
(6)
USER’S MANUAL
3
1.1
Before Operating
Introduction of MC-3 Exclusive Key Telephone
(1) Handset
(2) LCD display: Date and Time; CO Number; Calling Duration; Program; Calling Record;
Billing Information;
(3) Flexible/function buttons: red/green LED indicators
Button 1~8: CO line
Button 9~32: One touch key for station/ outside telephone number
Button 33: FNC - Access to the system program status or to the extension program status;
Button 34: CLEAR - to check and cancel the programs, or exit;
Button 35: DND - to set do not disturb or call forwarding or system speed dialing;
Button 36: SCROLL - to switch between the DSS Console(page up /down);
(4) Dial pad
(5) Panel display light switch
(6) Function buttons:
FNC ---- For entering System Program, Button Program,same as CHK (CHECK);
FLASH ---- to switch the COs for moment (transfer a call);
REDIAL ---- to redial a number or for a pause during the time you are dialing the number;
PAGE ---- for the system paging;
MUTE ---- for the mute of hand-free;
CONF ---- conference calls
SPKR ---- to open or close the hand-free ,that is, to start a call dialing or hand-off;
TRF ---- to transfer an incoming call or intercom call;
INT ---- intercom calls;
LINE ---- to choose an available CO lines(outside lines);
HOLD ---- to hold a call (call splitting );
(7) Handset socket
(8) Telephone set socket
(9) DSS1 terminal (1~64)
(10) DSS2 terminal (65~128)
4
USER’S MANUAL
1.1
Before Operating
Introduction of MC-40,50 Exclusive Key Telephone
Incoming lamp
CHK
LCD Display
CLR
1
2
3
4
5
6
7
8
9
10
11
12
13
14
15
16
17
18
19
20
21
LINE
Handset
FWDND
ICM
FLASH
REDIAL
CONF
PAGE
MUTE
SPK
HOLD
TRFR
FLASH ---- to hand up a conversation without put handset;
REDIAL ---- to redial a number;
LINE ---- to choose an available outside lines;
FWDND ---- Call forwarding or Do Not Disturb
ICM ---- intercom calls;
CHK---- for System Program , Button Program
CLR---- Clear the program or exit;
CONF ---- Conference calls
PAGE ---- for the system Page;
MUTE ---- for the Mute of hand-free; or close the voice during conversation;
SPK ---- to open or close the hand-free ,that is, to start a call dialing or hand-off;
HOLD ---- to Hold a call (call splitting ); or save the new System Program;
TRFR ---- to Transfer a call ;or transfer mouse curse during system program;
Button 1~21 : are for CO Line and extensions and also for programmable DSS buttons;
USER’S MANUAL
5
1.2
Make Calls
1.2.1 Basic Calling
- Intercom Call
- Call Operator
- Call Outside
Intercom Calling
The extension call to other extension.
Operate
Extension no.
or
( DSS)
Pick up
handset
Key Phone: Dial extension no. or DSS
Regular Phone: Dial extension no.
Talk
Extension no. : It means numbers 8001,8002,8003 ~8064 ;
DSS: the flexible programmable button at Key Telephone.
Example: Button 1 is CO1; Button 6 is Extension 8006 etc.
DSS button: Press CHK 2times, and then press DSS 1~21/ 32 . You can see the means
for each button in Key Telephone LCD
DSS button Program : Press CHK 2times + Program Button (1~21 or 32),then :
Press 2 + XXXX: to set Extension Number at the button;
Press HOLD to save the program.
6
USER’S MANUAL
1.2
Make Calls
Call Operator
The extension call to Operator /Reception extension.
Any Telephone
Off hook
Dial “0”
Talk
Call Outside
The extension call to outside telephone number .
Operate
or
30X
Outside no.
or
(DSS)
Off hook
Any Telephone: dial “9”
or 31~32
Key Phone : dial DSS button
Dial Outside
Telephone no.
Talk
Any Telephone: It refer to Regular Phone or Key Telephone;
Dial “9” : System will auto-select any idle free Outside Line;
Dial “31~32”: System will directly select desired Outside Lines 1~2;
Dial DSS : It can directly select the Outside Lines at Key Telephone.
USER’S MANUAL
7
1.2
Make Calls
1.2.2 Hotline Dialing
Hotline Dialing
Pick up the handset and you can call to a fixed extension without dial their number.
Regular Phone
Off hook
Talk after few seconds
Set up the hotline extension number.
Set Up
(ICM)
Off hook
8
USER’S MANUAL
or
Extension no.
Key Phone : input ICM +762
Regular Phone: dial #762
Input Extension
Number
On hook
1.2
Make Calls
Cancel the hotline extension number.
Cancel
(ICM)
or
Off hook
Key Phone : input ICM +760#
Regular Phone: dial #760#
On hook
The PBX should be in intercom status when pick up handset;
Can not set hotline ring to Outside number, only for intercom extension number.
This feature is very useful to use at Elevator or Massage room etc.
1.2.3 Last Number Redial
Last Number Redial
You can dial the last number again by quickly press Re-dial button.
Redial number
(REDIAL)
Off hook
dial REDIAL button
Talk
USER’S MANUAL
9
1.2
Make Calls
1.2.4 When Dialed Party is Busy or No-answer
- Automatic Callback on Busy
- Call Override
- Call Cut-off
Automatic Callback on Busy
You can set the telephone to receive callback ringing:
when a dialed extension becomes idle,
when your desired Outside Line that is in use by another extension becomes idle.
When you answer the callback ringing:
For an outside call: The line is seized.
For an intercom call: The called extension starts ringing automatically.
Set up call-back on busy for Extension-busy and Outside line -busy.
Set Up
Ext or Outside
Off hook
10
USER’S MANUAL
Dial extension or select Outside
Line and hear busy tone
Input “6”
On hook
1.2
Make Calls
When there’s call back ringing, simply pick up the extension to talk with back extension party,
or you will hear outside dialing tone when the busy outside line become idle.
Operate
When hearing a callback ringing:
Talk with Extension
or hear
Outside dialing tone
Off hook
Talk with extension
or dial the outside number
On hook
You can talk with the idle extension or use the idle outside line .
After 5 rings the ringing back call will be cut off if no one pick up it.
Call Override
You can insert into an Outside Line conversation to establish 3-party conference call.
Operate
All Telephone
Extension no.
or
30X
Off hook
Dial extension number
or 31~32 to select
Outside Line Number
Hearing busy tone
and input “1”
Insert into a
3-party call
3X: X=1~2, to use this code to select the Outside Line;
You can not insert into an Intercom conversation;
USER’S MANUAL
11
1.2
Make Calls
Call Cut-off
You can cut off an Outside Line conversation.
Operate
All Telephone
Extension no.
Off hook
Dial extension number
and hear busy tone
Input “*”
You can not insert into an Intercom conversation;
To enable extension (ABC) with Call Cut-off function:
by Key phone: CHK 3times > 1967590 > 22 > ABC- TRFR - 31010 - HOLD
by Regular phone: Hand-up > #787-1967590-22 ABC*31010 #
1.2.5 Direct Inward System Access (DISA)
Calling to Extension Through DISA
Through the DISA welcome message, the outside party can call to the desired extension
number without the transfer of Operator;
Outside Party to Extension:
Operate
Operate
Hello,this is xxxx
company,please dial
extension number
Extension no.
Your Office no.
Hear welcome message
Dial into
office no.
12
USER’S MANUAL
Dial extension number
Talk
1.2
Make Calls
1.2.6 Calling with Account PIN Code
Walking Account Code Call
After getting an account code from the manager, you can use this code to make long distance
call in any other extensions without the limitation of the Toll Restriction. All the cost will be
charged at this account code, not charged at the extensions.
Operate
( ICM)
Outside no.
Password no.
or dial
Password no.
Off hook
Outside no.
Key phone: ICM + ##** password + 9 + outside line number
Regular phone: ##** password + 9 + outside line number
You can assign total 255 password for different person.
To program password:
by Keyphone: CHK 3times > 1967590 > 20 > (001~255) > ABCDE# > Y > Z
001-255: selectable series number;
ABCDE: desired password;
Y = 1~6 ,means Toll Restriction Class 1~6;
Z = 1~4, means different group to use different outside line.
The cost will be charged at the account ABCDE, not at the extension;
Within 10 seconds after hand-on, you can still use the password to make long-distance
call.
USER’S MANUAL
13
1.3
Receiving Calls
1.3.1 Answering Calls
Answering Call by lift Handset
Simply pick up the ringing extension to answer the incoming call.
Operate
Operate
Ringing
Pick up
handset
Talk
Answering Call by Handfree
Without lift the handset to answer the incoming call.
Operate
Operate
(SPK)
or
(HANDFREE)
Ringing
14
USER’S MANUAL
Keyphone: press SPK or DSS
Regular phone: press HANDFREE
Talk
1.3
Receiving Calls
Answering Call by MUTE/ Auto-answer
You will automatically receive the call and hear Caller ‘s conversation in on-hook mode.
Operate
Operate
(MUTE)
On hook
Press MUTE button
If during conversation and press MUTE , then the Caller will not hear your voice;
To cancel: press MUTE again;
1.3.2 Call Pickup
You can answer an incoming call that is ringing at other extension:
- Randomly Pickup: pick up a ringing extension randomly;
- Group Pickup: pick up a ringing extension within same group,
System can set max. 2-group. Refer to System Program 24;
- Directed Pickup: pick up a specified ringing extension ;
USER’S MANUAL
15
1.3
Receiving Calls
Randomly Pickup
Can pick up the extension which firstly ring .
Operate
Operate
When extension is ringing:
or
( ICM)
or
Off hook
Key phone: ICM + 40 or simply dial “*”
Regular phone: # + 40 or simply dial “*”
Talk
Directed Pickup
Can pick up the specified ringing extension .
Operate
Operate
Operate
When extension ABC is ringing:
( ICM)
or
Off hook
16
USER’S MANUAL
Ext. ABC
Key phone: ICM + 4 + extension no.
Regular phone: # + 40 + extension no.
Talk
1.3
Receiving Calls
Group Pickup
You can only allow to pick up the ringing extension within your own group, can not pick up
extension outside or in another group (total 4 group max, use same code above to pick up) .
To set by Keyphone: CHK 3times > 1967590 > 24 > 1~4 TRFR - 001~064 - 1 or 0
1~4: selectable 1~4 pickup group;
001~064: extension numbers to join or exit from group;
1 or 0 : “1” means join the group, “0” means exit from the group;
1.3.3 Do Not Disturb (DND)
The call will not ring to your extension after set DND feature
Operate
Key Phone
(ICM)
(FWDND)
On-hook
Press FWDND
To cancel: Press ICM + 70#
Regular Phone
Off-hook
Off-hook
To Setup: Press #7110#
To Cancel: Press #70#
On-hook
On-hook
USER’S MANUAL
17
1.4
During a Conversation
1.4.1 Call Transfer
Call Transfer
You can transfer the conversation to other extension party.
Operate
Operate
During a conversation:
( DSS)
(TRFR)
Key phone
or
Extension no.
On hook
Extension no.
Regular phone
On hook
Hook-flash
Key phone: press TRFR + DSS or Extension no.
Regular phone: Flash + Extension no., Hand up
One-touch Transfer
By key phone,you can use only a single DSS button to transfer the call.
Operate
Key Phone
During a conversation:
( DSS)
Press DSS
18
USER’S MANUAL
Talk
On hook
1.4
During a Conversation
1.4.2 Call Hold
- Call Hold
- Call Hold Retrieve
Call Hold
You can hold the call party during conversation.
Operate
Operate
During a conversation:
(HOLD)
Key phone
On hook
Regular phone
Hook-flash
Press #4
On hook
Call Hold Retrieve
You take back the holding party and continue the conversation.
USER’S MANUAL
19
1.4
During a Conversation
Call Hold Retrieve
Operate
Key Phone
(ICM)
Retrieve from holding extension:
(ICM)
Retrieve from specified extension:
(ICM)
Retrieve from specified outside line:
Extension no.
Outside Line
port no.(1-8)
Operate
Regular Phone
Retrieve from holding extension:
20
Retrieve from specified extension:
Extension no.
Retrieve from specified outside line:
Outside Line
port no.(1-8)
USER’S MANUAL
1.4
During a Conversation
1.4.3 Call Waiting
During conversion, a call waiting tone occur when an outside call has been received or another
extension will remind you there’s a call waiting.
- To disconnect the current call and talk to the new party
- To Hold the current call and talk to the new party
Disconnect Current and Talk to New Party
Operate
All Telephone
On hook
Off hook
Talk to new Party
Operate
Hold Current and Talk to New Party
Operate
Key Phone
During a conversation:
( LINE)
(HOLD)
or
(ICM)
Press HOLD
Press LINE or ICM
Talk to new Party
USER’S MANUAL
21
1.4
During a Conversation
Hold by regular phone and talk to new party:
Operate
Regular Phone
During a conversation:
Hook-flash
Press #4
Talk to new Party
You can use Call Retrieve function to take back the holding calls. By these ways, you
can talk to different party alternately .
1.4.4 Call Splitting
You can talk to 2-party alternatively at same time.
Operate
Key Phone
During a conversation
( DSS)
(HOLD)
(TRFR)
or
Other party
Press HOLD
22
USER’S MANUAL
Dial DSS button
or other party’s number
Talk to new Party
Press TRFR
talk to original party
1.4
During a Conversation
1.4.5 Multi-party Conference Call
To Call For a Conference
During a 2-party conversation, you can add a third party or more parties join together for a
3-party or 8-party conference call.
Operate
Key Phone
During a conversation:
( CONF)
Extension no.
Extension no.
( CONF)
or
or
Outside no.
Press
CONF
Outside no.
Call for extension
or Outside party
to join
Talk to
new Party
Press
Call for new
extension or
outside party
again ...
CONF
Operate
Regular Phone
During a conversation:
Extension no.
or
Outside no.
Flash
Press #4
Hookswitch
Press extension or
Outside number
Flash
Hookswitch
Press #5
3-party
conference
USER’S MANUAL
23
1.4
During a Conversation
To leave a Conference
Operate
All Telephone
On hook
Max. 3-party conference for regular phone and max. 8 party for key phones(2lines +
6 extension party or all parties are 8 extension. ).
The attender only need to simply hand up the handset to exit from conference.
1.4.6 Microphone Mute
During a conversation ,you can quiet your voice and your environmental voice ,so that the
remote party can not hear what you are talking about.
Operate
Key Phone
During a conversation:
(MUTE)
Press MUTE
To enable conversation ,simply press MUTE button again.
You can see the MUTE button become Red and return to normal.
24
USER’S MANUAL
1.5 When You Leave Desk
1.5.1 Call Forwarding to PBX Extension
You can forward the incoming call to some specified extension before you leave.
-
Forwarding All Calls
Call Forwarding On-busy
Call Forwarding No-answer
Call Forwarding Busy & no-answer
Call Forwarding Cancel
Operate
Key Phone
Forward
All Calls:
(ICM)
Extension no.
Press ICM + 71 + extension no. + 1#
Forward
on busy:
(ICM)
Extension no.
Press ICM + 71 + extension no. + 2#
Forward
no answer:
(ICM)
Extension no.
Press ICM + 71 + extension no. + 3#
Forward on busy
and no answer:
(ICM)
Extension no.
Press ICM + 71 + extension no. + 4#
Cancel
To Cancel Call Forward at Key Telephone:
(ICM)
On-hook
Press ICM + 70#
USER’S MANUAL
25
1.5 When You Leave Desk
You can forward the incoming call to some specified extension before you leave.
Operate
Regular Phone
Forward
All Calls:
Extension no.
Off hook ,Press # 71 + extension no. + 1#
Forward
on busy:
Extension no.
Off hook ,Press # 71 + extension no. + 2#
Forward
no answer:
Extension no.
Off hook ,Press # 71 + extension no. + 3#
On busy
and no
answer:
Extension no.
Off hook ,Press # 71 + extension no. + 4#
To cancel Call forwarding at a Regular Phone.
To Cancel
Off hook
26
USER’S MANUAL
Press #70#
On hook
1.5 When You Leave Desk
1.5.2 Day/Night Switch Manually
Operated by hand, you can switch system to Night Time or Day Time at the 001 port.
To set Night or Day Time
Operate
Key Phone
(ICM)
or
Press ICM
Night Time: Press #782#
Day Time: Press #781#
On hook
Operate
Regular Phone
or
Off hook
Night Time: Press #782#
Day Time: Press #781#
On hook
This operate can only set at PBX extension port 001.
Key Telephone can set but can not be regarded as an alarm phone !
USER’S MANUAL
27
Section 2
Program
The chapter shows the steps how to program
system by Key Telephone Set as well as the
Regular Phones
28
USER’S MANUAL
2.1
Disconnect Idle Outside Line Port
When you have MC-416K at 4CO,16 extensions but office number only applied 3 numbers
from Telecom Carrier. Suppose these 3numbers connect CO1,2,3 while CO 4 is empty and
need to be closed .
Empty ,no connection
Outside CO
1
2
3
EXT 1~16
4
Key phone connect 01 port
Connected with external lines from local Telecom Provider
Steps
Press Button
Keyphone On-hook
CHK CHK CHK
Screen Display
(3 times)
INPUT SYS CODE
du
P assword
1 9 6 7 5 9 0
Program access no.
Outside Line
0 1
LINE SETTING1
1- 22030
4
LINE SETTING1
4- 22030
LINE SETTING1
4- 02030
TRFR 0
Save Program
Exit
SYS PRO MODE
INPUT CODE
du
HOLD
SYS PRO MODE
INPUT CODE
CLR
10/28 07:37AM 0
8001
LINE1~2 is factorily open ( display -22030)
Program by Regular phone: Extension Off-hook+ #787-1967590 -01-4 * 02030 # - on-hook
USER’S MANUAL
29
2.2
Record Welcome Message
The incoming caller will hear the welcome message and dial to you directly,so that no need
to assign someone staying at reception to pick up and transfer call by hand .
EXT 1~16
Outside CO Line
1
2
3
4
Keyphone connect only 01 port
for both MC-208K or MC-416K
Steps
Press Button
Keyphone off-hook
ICM
7 8 5 1 #
PLEASE DIAL
OGM RECORDING
Hello,this is xxx company
Please dial extension number,
8002 for sales,8003 for purchase
Begin to record
PLEASE DIAL
OGM RECORDING
End record
Test record
Screen Display
PLEASE DIAL
ICM
ICM
Press ICM or waiting 30seconds
7 8 6 1 #
PLEASE DIAL
OGM PLAYING
The total duration to record this welcome message is 15seconds. You can record
many time and cover the previous record automatically;
Message Record can be like this : “Welcome to xx company, we are professional in
PBX System, for sales please dial 8002, for financial please dial 8003, for purchase
please dial 8006,for technical please dial 8008, for fax. Please dial 8009, for reception
operator service please dial 0 ”
30
USER’S MANUAL
Switch-on Auto-attendant Mode
PBX from the factory is in Operator Manual Transfer Call mode, you need to switch on
the welcome message by System Program to change to Auto-attendant mode.
EXT 1~16
Outside CO Line
1
2
3
4
Keyphone connect only 01 port
for both MC-208K or MC-416K
Steps
Press Button
Keyphone On-hook
CHK CHK CHK
Screen Display
(3 times)
INPUT SYS CODE
du
P assword
1 9 6 7 5 9 0
Program access no.
LINE SETTING1
1- 22030
0 1
All outside Line
LINE SETTING1
- 22030
TRFR 2 2 1
Save Program
Exit
SYS PRO MODE
INPUT CODE
0
LINE SETTING1
- 22130
du
HOLD
CLR
SYS PRO MODE
INPUT CODE
10/28 07:37AM 0
8001
can be changed to 1~4 ,means which Outside Line enable welcome message.
USER’S MANUAL
31
Record when-Busy Message
The incoming caller can not reach to the desired extension, because the desired extension
is busy or occupied.
EXT 1~16
Outside CO Line
1
2
3
4
Keyphone connect only 01 port
for both MC-208K or MC-416K
Steps
Press Button
Keyphone off-hook
ICM
7 8 5 2 #
The extension you calling is busy
now, please try later or dial other
extension number
Begin to record
End record
Test record
Screen Display
PLEASE DIAL
OGM RECORDING
PLEASE DIAL
OGM RECORDING
PLEASE DIAL
ICM
ICM
Press ICM or waiting 30seconds
7 8 6 2 #
PLEASE DIAL
OGM PLAYING
The total duration to record this message is 15 seconds. You can record many time any
language and cover the previous record automatically;
Suggest to choose a good quality phone set and record in quiet place.
32
USER’S MANUAL
Record no-Answer Message
The incoming caller can not reach to the desired extension, because no one pickup the
ringing extension to answer it.When will hear the no-answer message to remind.
EXT 1~16
Outside CO Line
1
2
3
4
Keyphone connect only 01 port
for both MC-208K or MC-416K
Steps
Press Button
Keyphone off-hook
ICM
7 8 5 3 #
No one pick up the call, please
try later or dial other extension
number
Begin to record
End record
Test record
Screen Display
PLEASE DIAL
OGM RECORDING
PLEASE DIAL
OGM RECORDING
PLEASE DIAL
ICM
ICM
Press ICM or waiting 30seconds
7 8 6 3 #
PLEASE DIAL
OGM PLAYING
The total duration to record this message is 15 seconds. You can record many time any
language and cover the previous record automatically;
Suggest to choose a good quality phone set and record in quiet place.
USER’S MANUAL
33
2.3 Outside Line Selection - Day Time
Some outside lines can be assigned exclusively for some specific extensions to use only,
other extension can not select these lines. (Day Time)
EXT 1~16
Outside CO Line
1
2
3
4
Keyphone connect only 01 port
for both MC-208K or MC-416K
PBX Ready : connect key phone set at extension port 01 only;
Example : How to set line 2 as the exclusive line of extension 8002 (port 002)
Steps
Press Button
Keyphone On-hook
CHK CHK CHK
Screen Display
(3 times)
INPUT SYS CODE
du
P assword
1 9 6 7 5 9 0
Program access no.
All Lines
SYS PRO MODE
INPUT CODE
DAY LN OUT SET
001- 11111111
0 9
TRFR 1 0 1 1 1 1 1 1
LINE SETTING1
- 10111111
(All EXT can not select LINE2)
DAY LN OUT SET
001- 10111111
TRFR
0 0 2 TRFR 0 1 0 0 0 0 0 0
( EXT002 can select LINE2)
du
Save & Exit
34
USER’S MANUAL
DAY LN OUT SET
002-01000000
HOLD CLR
10/28 07:37AM 0
8001
2.3 Outside Line Selection - Day Time
Explain : more details in step 4 and step 5
Extension port
CO1
0 0 1 TRFR 1
CO2 CO3 CO4 CO5 CO6 CO7 CO8
0
1
1
1
1
1
1
001 : Extension port,You can select 001,002~016 , or select “***” mean all extensions;
TRFR: The button to jump mouse cursor
CO1~4: Outside Line, change to 0 means extension 001 can not use this line;
change to 1 means extension 001 can use this line;CO5-8 invalid;
1 : Means available for extension 001 to use Outside line 1;
0 : Means unavailable for extension 001 to use Outside line 2;
1 : Means available for extension 001 to use Outside line 3;
1 : Means available for extension 001 to use Outside line 4;
1 : invalid in model MC-208K or MC-416K;
1 : invalid in model MC-208K or MC-416K;
1 : invalid in model MC-208K or MC-416K;
1 : invalid in model MC-208K or MC-416K;
Extension port
CO1
0 0 2 TRFR 0
CO2 CO3 CO4 CO5 CO6 CO7 CO8
1
0
0
0
0
0
0
001 : Extension port,You can select 001,002~016 , or select “***” mean all extensions;
TRFR: The button to jump mouse cursor
CO1~4: Outside Line, change to 0 means extension 001 can not use this line;
change to 1 means extension 001 can use this line;CO5-8 invalid;
0 : Means unavailable for extension 001 to use Outside line 1;
1 : Means available for extension 001 to use Outside line 2;
0 : Means unavailable for extension 001 to use Outside line 3;
0 : Means unavailable for extension 001 to use Outside line 4;
0 : invalid in model MC-208K or MC-416K;
0 : invalid in model MC-208K or MC-416K;
0 : invalid in model MC-208K or MC-416K;
0 : invalid in model MC-208K or MC-416K;
USER’S MANUAL
35
2.4 Outside Line Selection - Night Time
Some outside lines can be assigned exclusively for some specific extensions to use only,
other extension can not select these lines.
EXT 1~16
Outside CO Line
1
2
3
4
Keyphone connect only 01 port
for both MC-208K or MC-416K
PBX Ready : connect key phone set at extension port 01 only;
Example : How to set line 2 as the exclusive line of extension 8002 (port 002)
Steps
Press Button
Keyphone On-hook
CHK CHK CHK
Screen Display
(3 times)
INPUT SYS CODE
du
P assword
1 9 6 7 5 9 0
Program access no.
All Lines
SYS PRO MODE
INPUT CODE
DAY LN OUT SET
001- 11111111
1 0
TRFR 1 0 1 1 1 1 1 1
LINE SETTING1
- 10111111
(All EXT can not select LINE2)
DAY LN OUT SET
001- 10111111
TRFR
0 0 2 TRFR 0 1 0 0 0 0 0 0
( EXT002 can select LINE2)
du
Save & Exit
36
USER’S MANUAL
DAY LN OUT SET
002-01000000
HOLD CLR
10/28 07:37AM 0
8001
2.4 Outside Line Selection - Night Time
Explain : more details in step 4 and step 5
Extension port
CO1
0 0 1 TRFR 1
CO2 CO3 CO4 CO5 CO6 CO7 CO8
0
1
1
1
1
1
1
001 : Extension port,You can select 001,002~016 , or select “***” mean all extensions;
TRFR: The button to jump mouse cursor
CO1~4: Outside Line, change to 0 means extension 001 can not use this line;
change to 1 means extension 001 can use this line;CO5-8 invalid;
1 : Means available for extension 001 to use Outside line 1;
0 : Means unavailable for extension 001 to use Outside line 2;
1 : Means available for extension 001 to use Outside line 3;
1 : Means available for extension 001 to use Outside line 4;
1 : invalid for model MC-208K or MC-416K;
1 : invalid for model MC-208K or MC-416K;
1 : invalid for model MC-208K or MC-416K;
1 : invalid for model MC-208K or MC-416K;
Extension port
CO1
0 0 2 TRFR 0
CO2 CO3 CO4 CO5 CO6 CO7 CO8
1
0
0
0
0
0
0
001 : Extension port,You can select 001,002~016 , or select “***” mean all extensions;
TRFR: The button to jump mouse cursor
CO1~4: Outside Line, change to 0 means extension 001 can not use this line;
change to 1 means extension 001 can use this line;CO5-8 invalid;
0 : Means unavailable for extension 001 to use Outside line 1;
1 : Means available for extension 001 to use Outside line 2;
0 : Means unavailable for extension 001 to use Outside line 3;
0 : Means unavailable for extension 001 to use Outside line 4;
0 : invalid in model MC-208K or MC-416K;
0 : invalid in model MC-208K or MC-416K;
0 : invalid in model MC-208K or MC-416K;
0 : invalid in model MC-208K or MC-416K;
USER’S MANUAL
37
2.5 Ringing Extension Selection - Day Time
Some outside lines can be assigned exclusively for some specific extensions to use only,
other extension can not select these lines .
EXT 1~16
Outside CO Line
1
2
3
4
Keyphone connect only 01 port
for both MC-208K or MC-416K
PBX Ready : connect key phone set at extension port 01 only;
Example : In Day Time ,how to set outside line no. 4 ringing to extension 002?
Steps
Press Button
Keyphone On-hook
CHK CHK CHK
Screen Display
(3 times)
INPUT SYS CODE
du
P assword
1 9 6 7 5 9 0
Program access no.
SYS PRO MODE
INPUT CODE
DAY LN IN SET
001- 11111111
1 1
0 0 1 TRFR 1 1 1 0 1 1 1 1
LINE SETTING1
001 - 11101111
(Line 4 not ring to 001)
DAY LN IN SET
001- 11101111
TRFR
0 0 2 TRFR 0 0 0 1 0 0 0 0
(Line 4 ring to 002)
du
Save & Exit
38
USER’S MANUAL
DAY LN IN SET
002-00010000
HOLD CLR
10/28 07:37AM 0
8001
2.5 Ringing Extension Selection - Day Time
Explain : more details in step 4 and step 5
Extension port
CO1
0 0 1 TRFR 1
CO2 CO3 CO4 CO5 CO6 CO7 CO8
1
1
0
1
1
1
1
001 : Extension port,You can select 001,002~016 , or select “***” mean all extensions;
TRFR: The button to jump mouse cursor
CO1~4: Outside Line, change to 0 means extension 001 can not use this line;
change to 1 means extension 001 can use this line; CO5-8 invalid;
1 : Means Outside CO Line 1 will ring to extension 001;
1 : Means Outside CO Line 2 will ring to extension 001;
1 : Means Outside CO Line 3 will ring to extension 001;
0 : Means Outside CO Line 4 will ring to extension 001;
1 : invalid in model MC-208K or MC-416K;
1 : invalid in model MC-208K or MC-416K;
1 : invalid in model MC-208K or MC-416K;
1 : invalid in model MC-208K or MC-416K;
Extension port
CO1
0 0 2 TRFR 0
CO2 CO3 CO4 CO5 CO6 CO7 CO8
0
0
1
0
0
0
0
002 : Extension port,You can select 001,002~016 , or select “***” mean all extensions;
TRFR: The button to jump mouse cursor
CO14: Outside Line, change to 0 means extension 001 can not use this line;
change to 1 means extension 001 can use this line; CO5-8 invalid;
0 : Means Outside CO Line 1 will Not ring to extension 002;
0 : Means Outside CO Line 2 will Not ring to extension 002;
0 : Means Outside CO Line 3 will Not ring to extension 002;
1 : Means Outside CO Line 4 will can ring to extension 002;
0 : invalid in model MC-208K or MC-416K;
0 : invalid in model MC-208K or MC-416K;
0 : invalid in model MC-208K or MC-416K;
0 : invalid in model MC-208K or MC-416K;
USER’S MANUAL
39
2.6 Ringing Extension Selection -Night Time
Some outside lines can be assigned exclusively for some specific extensions to use only,
other extension can not select these lines (Night Time).
EXT 1~16
Outside CO Line
1
2
3
4
Keyphone connect only 01 port
for both MC-208K or MC-416K
PBX Ready : connect key phone set at extension port 01 only;
Example : In Night Time ,how to set outside line no. 4 ringing to extension 002?
Steps
Press Button
Keyphone On-hook
CHK CHK CHK
Screen Display
(3 times)
INPUT SYS CODE
du
P assword
1 9 6 7 5 9 0
Program access no.
SYS PRO MODE
INPUT CODE
NGT LN IN SET
001- 11111111
1 2
0 0 1 TRFR 1 1 1 0 1 1 1 1
LINE SETTING1
001 - 11101111
(Line 4 not ring to 001)
NGT LN IN SET
001- 11101111
TRFR
0 0 2 TRFR 0 0 0 1 0 0 0 0
(Line 4 ring to 002)
du
Save & Exit
40
USER’S MANUAL
NGT LN IN SET
002-00010000
HOLD CLR
10/28 07:37AM 0
8001
2.6 Ringing Extension Selection -Night Time
Explain : more details in step 4 and step 5
Extension port
CO1
0 0 1 TRFR 1
CO2 CO3 CO4 CO5 CO6 CO7 CO8
1
1
0
1
1
1
1
001 : Extension port,You can select 001,002~016 , or select “***” mean all extensions;
TRFR: The button to jump mouse cursor
CO1~4: Outside Line, change to 0 means extension 001 can not use this line;
change to 1 means extension 001 can use this line;CO5-8 is invalid;
1 : Means Outside CO Line 1 will ring to extension 001;
1 : Means Outside CO Line 2 will ring to extension 001;
1 : Means Outside CO Line 3 will ring to extension 001;
0 : Means Outside CO Line 4 will ring to extension 001;
1 : invalid for model MC-208K or MC-416K;
1 : invalid for model MC-208K or MC-416K;
1 : invalid for model MC-208K or MC-416K;
1 : invalid for model MC-208K or MC-416K;
Extension port
CO1
0 0 2 TRFR 0
CO2 CO3 CO4 CO5 CO6 CO7 CO8
0
0
1
0
0
0
0
002 : Extension port,You can select 001,002~016, or select “***” mean all extensions;
TRFR: The button to jump mouse cursor
CO1~4: Outside Line, change to 0 means means CO Line do not ring to extension 002;
change to 1 means CO Line will ring to extension 002;CO5-8 invalid;
0 : Means Outside CO Line 1 will Not ring to extension 002;
0 : Means Outside CO Line 2 will Not ring to extension 002;
0 : Means Outside CO Line 3 will Not ring to extension 002;
1 : Means Outside CO Line 4 will Not ring to extension 002;
0 : invalid for model MC-208K or MC-416K;
0 : invalid for model MC-208K or MC-416K;
0 : invalid for model MC-208K or MC-416K;
0 : invalid for model MC-208K or MC-416K;
USER’S MANUAL
41
2.7 Modify Extension Number
You can change current extension numbers 8001~8064 to others like 18,209,8801etc.
Only allow prefixed numbers starting with “1” “2” “8”,and max. 2~4 digit-number.
EXT 1~16
Outside CO Line
1
2
3
4
Keyphone connect only 01 port
for both MC-208K or MC-416K
PBX Ready : connect key phone set at extension port 01 only;
Example : I want to modify 8001 to 11, 8002 to 202, 8003 to 8893,how to program?
Steps
Press Button
Keyphone On-hook
CHK CHK CHK
Screen Display
(3 times)
INPUT SYS CODE
du
P assword
1 9 6 7 5 9 0
Program access no.
PORT EXT NUMBER
001- 8001
2 9
1 TRFR
SYS PRO MODE
INPUT CODE
1 1 TRFR 0 0 2
TRFR 2 0 2 TRFR 0 0 3 TRFR
8 8 9 3
PORT EXT NUMBER
002 -
PORT EXT NUMBER
003 -
PORT EXT NUMBER
003 - 8893
du
Save & Exit
42
USER’S MANUAL
HOLD CLR
10/28 07:37AM 0
8001
2.8 Off-Hook Route Selection
Customer pick up handset and hear external line dial tone, can dial external numbers
directly without dial Route code “9”. (Factory is off-hook intercom route)
EXT 1~16
Outside CO Line
1
2
3
4
Keyphone connect only 01 port
for both MC-208K or MC-416K
PBX Ready : connect key phone set at extension port 01 only;
Example : I want to set extension 001 & 002 in direct dial out mode(no need to dial “9”).
Steps
Press Button
Keyphone On-hook
CHK CHK CHK
Screen Display
(3 times)
INPUT SYS CODE
du
P assword
1 9 6 7 5 9 0
Program access no.
D
001- 02000
2 3
0 0 1 TRFR
SYS PRO MODE
INPUT CODE
0 2 0 1 0
TRFR 0 0 2 TRFR 0 2 0 1 0
PORT EXT NUMBER
001 -02010
PORT EXT NUMBER
002 -02010
du
Save & Exit
HOLD CLR
10/28 07:37AM 0
8001
USER’S MANUAL
43
2.9
Toll Restriction
You can control the class of authority to make long-distance call .
EXT 1~16
Outside CO Line
1
2
3
4
Keyphone connect only 01 port
for both MC-208K or MC-416K
PBX Ready : connect key phone set at extension port 01 only;
Steps
Press Button
Keyphone On-hook
CHK CHK CHK
Screen Display
(3 times)
INPUT SYS CODE
du
P assword
1 9 6 7 5 9 0
Program access no.
SERVICE CLASS
001- 11
1 4
0 0 1 TRFR
SYS PRO MODE
INPUT CODE
1 1
SERVICE CLASS
001 -11
001 : can input 001~064 ,means which extension number for restriction;
1 : can input 1~6 ,means 1~6 Toll class in Day Time;
1 : can input 1~6 ,means 1~6 Toll class in Night Time;
44
USER’S MANUAL
2.9
Toll Restriction
List of Toll Restriction Class:
1- Class 1 : No restriction, can dial any number ,even international;
2- Class 2: Restrict the codes which stated in Restrict Code A (refer to next page);
3- Class 3: Restrict the codes which stated in Restrict Code B (refer to next page),but
enable the numbers programmed in Unrest Code C (refer to next page ).
4- Class 4: Restrict the codes which stated in Restrict Code A & B (refer to next page) , do not
enable the numbers in Unrest Code C (refer to next page );
5- Class 5: Can only dial the numbers in Comunres Code D (refer to next page);
6- Class 6: Only allow intercom calls;
HOW TO SET RESTRICT CODE A:
Steps
Press Button
Keyphone On-hook
CHK CHK CHK
Screen Display
(3 times)
INPUT SYS CODE
du
P assword
1 9 6 7 5 9 0
Program access no.
0 1 TRFR
1 5
0 0
SYS PRO MODE
INPUT CODE
RESTRICT CODE A
01- 00
RESTRICT CODE A
01- 00
01 : Group, can input 01~04 ,means you can set 1-4 group different numbers in
Restrict Code A;
00 : The numbers to be restricted in Restrict Code A, max. 8-digit;
Factory setting : 01-00; 02-168; 03-968; 04-969.
USER’S MANUAL
45
2.9
Toll Restriction
HOW TO SET RESTRICT CODE B:
Steps
Press Button
Keyphone On-hook
CHK CHK CHK
Screen Display
(3 times)
INPUT SYS CODE
du
P assword
SYS PRO MODE
INPUT CODE
1 9 6 7 5 9 0
Program access no.
0 1 TRFR
1 6
0
RESTRICT CODE B
01- 0
RESTRICT CODE B
01- 0
01 : Group, can input 01~20 ,means you can set 1-20 group different numbers in
Restrict Code B;
0 : The numbers to be restricted in Restrict Code B, max. 8-digit;
Factory setting : 01-0; 02-168; 03-968; 04-969.
46
USER’S MANUAL
2.9
Toll Restriction
HOW TO SET UNREST CODE C:
Steps
Press Button
Keyphone On-hook
CHK CHK CHK
Screen Display
(3 times)
INPUT SYS CODE
du
P assword
1 9 6 7 5 9 0
Program access no.
0 1 TRFR
1 7
A B C D E F GH
SYS PRO MODE
INPUT CODE
UNREST CODE C
01-
UNREST CODE C
01-
01 : Group, can input 01~12 ,means you can set 1-12 group different numbers in
Unrest Code C;
ABCEDFGH : The numbers to be restricted in Unrest Code C, max. 8-digit;
Factory setting : no setting;
USER’S MANUAL
47
2.9
Toll Restriction
COMUNRES CODE D SETTING (Emergency Code):
Steps
Press Button
Keyphone On-hook
CHK CHK CHK
Screen Display
(3 times)
INPUT SYS CODE
du
P assword
1 9 6 7 5 9 0
Program access no.
1 8
0 1 TRFR
A B C D E F GH
SYS PRO MODE
INPUT CODE
COMUNRES CODE D
01-110
COMUNRES CODE D
01-110
01 : Group, can input 01~04 ,means you can set 1-4 group different numbers in
Comunres Code D;
ABCEDFGH : The numbers to be restricted in Code D, max. 8-digit;
Factory setting : 01-110; 02-112; 03-119, This is to set emergency numbers;
48
USER’S MANUAL
2.10
Do-Not-dial Switch to Operator
The incoming Caller hear the welcome message in Auto-attendant mode, but do not
dial any number, the line will be cut off in factory setting, how to set Do Not Dial then
switch to Operator phone automatically?
EXT 1~16
Outside CO Line
1
2
3
4
Keyphone connect only 01 port
for both MC-208K or MC-416K
PBX Ready : connect key phone set at extension port 01 only;
Steps
Press Button
Keyphone On-hook
CHK CHK CHK
Screen Display
(3 times)
INPUT SYS CODE
du
P assword
1 9 6 7 5 9 0
Program access no.
0 5
TRFR 1 1 1 0 0
SYS PRO MODE
INPUT CODE
SYSTEM SETTING2
-01100
SYSTEM SETTING2
-11100
du
Save & Exit
HOLD CLR
10/28 07:37AM 0
8001
USER’S MANUAL
49
2.11
Walking Account PIN Setting
Your staffs in company can use assigned password account to make long-distance call
in other extensions, while the cost count on password account only, no related with the
extensions.
EXT 1~16
Outside CO Line
1
2
3
4
Keyphone connect only 01 port
for both MC-208K or MC-416K
PBX Ready : connect key phone set at extension port 01 only;
Steps
Press Button
Keyphone On-hook
CHK CHK CHK
Screen Display
(3 times)
INPUT SYS CODE
du
P assword
1 9 6 7 5 9 0
Program access no.
2 0
TRFR A B C D E F TRFR G
SYS PRO MODE
INPUT CODE
OVER CLASS CODE
001-1
OVER CLASS CODE
001- ABCDEF -G
du
Save & Exit
HOLD CLR
10/28 07:37AM 0
8001
001 - The series number, you can press 001~032,means you can set max. 32 passwords;
ABCDEF : 6-digit different password account;
G : Toll restriction class, can be from Class 1~ Class 6;
50
USER’S MANUAL
2.12
3-minute Conversation Alarm
System will send alarm tone to extension after talking 3minutes, then in additional 1.5
minutes later, the line will be cut off.
EXT 1~16
Outside CO Line
1
2
3
4
Keyphone connect only 01 port
for both MC-208K or MC-416K
PBX Ready : connect key phone set at extension port 01 only;
Steps
Press Button
Keyphone On-hook
CHK CHK CHK
Screen Display
(3 times)
INPUT SYS CODE
du
P assword
1 9 6 7 5 9 0
Program access no.
SYS PRO MODE
INPUT CODE
2 2
EXT SETTING1
001-31000
0 0 1 TRFR 3 1 1 0 0
EXT SETTING1
001-31100
du
Save & Exit
HOLD CLR
10/28 07:37AM 0
8001
001 - The selectable extension number, you can press 001~016 to set which extension;
31100 : input 31100 means the selected extension will hear alarm tone;
31000 : input 31000 means the selected extension will Not hear alarm tone,factory set;
USER’S MANUAL
51
2.13
Conversation Override & Cut-off
To enable which extension can override an existing conversation and cut off it.
EXT 1~16
Outside CO Line
1
2
3
4
Keyphone connect only 01 port
for both MC-208K or MC-416K
PBX Ready : connect key phone set at extension port 01 only;
Steps
Press Button
Keyphone On-hook
CHK CHK CHK
Screen Display
(3 times)
INPUT SYS CODE
du
P assword
1 9 6 7 5 9 0
Program access no.
SYS PRO MODE
INPUT CODE
2 2
EXT SETTING1
001-31000
0 0 1 TRFR 3 1 0 1 0
EXT SETTING1
001-31010
du
Save & Exit
HOLD CLR
10/28 07:37AM 0
8001
001 - The selectable extension number, you can press 001~064 to set which extension;
31010 : 31100 means the selected extension can override and cut off the conversation;
31000 : input 31000 means the selected extension can not override or cut-off;
Code to override an cut off conversation: refer to Operation part 1.4 ;
52
USER’S MANUAL
2.14
Call Pickup Group
To separate all extensions to different groups (max. 4 group). Can only pick up the ringing
extensions within same group.
EXT 1~16
Outside CO Line
1
2
3
4
Keyphone connect only 01 port
for both MC-208K or MC-416K
PBX Ready : connect key phone set at extension port 01 only;
Steps
Press Button
Keyphone On-hook
CHK CHK CHK
Screen Display
(3 times)
INPUT SYS CODE
du
P assword
1 9 6 7 5 9 0
Program access no.
2 4
1 TRFR 0 0 1 TRFR 1
SYS PRO MODE
INPUT CODE
PICKUP GROUP
1 -001 -1
PICKUP GROUP
X -ABC -Y
du
Save & Exit
HOLD CLR
10/28 07:37AM 0
8001
1 - The selectable pickup group, you can press 01-02 ,max. 2 groups;
001 : The selectable extensions001~016 within or outside the group;
1 : can be “1” means within group or “0” means out of the group;
Extension can only pick up the call in same group only;
USER’S MANUAL
53
2.15
Manger-secretary Call Group
All incoming call to Manager will firstly ring to secretary extension. After consulting,
secretary can decide whether to transfer the call to Manager or not.
EXT 1~16
Outside CO Line
1
2
3
4
Keyphone connect only 01 port
for both MC-208K or MC-416K
PBX Ready : connect key phone set at extension port 01 only;
Steps
Press Button
Keyphone On-hook
CHK CHK CHK
Screen Display
(3 times)
INPUT SYS CODE
du
P assword
1 9 6 7 5 9 0
Program access no.
2 5
1 TRFR 0 0 1 TRFR 0 0 2
SYS PRO MODE
INPUT CODE
EXEC/SEC PAIR
1 -
EXEC/SEC PAIR
X -ABC -abc
du
Save & Exit
HOLD CLR
10/28 07:37AM 0
8001
1 - Manager/secretary Call group, you can press 01-04 ,max. 4 groups call;
001 : The selectable extensions001~016 for Manager;
002 : The selectable extensions001~016 for Secretary;
After setting, Manager extension should press DND key;
54
USER’S MANUAL
2.16
Modify System Program Password
All incoming call to Manager will firstly ring to secretary extension. After consulting,
secretary can decide whether to transfer the call to Manager or not.
EXT 1~16
Outside CO Line
1
2
3
4
Keyphone connect only 01 port
for both MC-208K or MC-416K
PBX Ready : connect key phone set at extension port 01 only;
Steps
Press Button
Keyphone On-hook
CHK CHK CHK
Screen Display
(3 times)
INPUT SYS CODE
du
P assword
1 9 6 7 5 9 0
Program access no.
2 6
1 9 6 7 5 9 0
SYS PRO MODE
INPUT CODE
SYS SECRET CODE
-1967590-
SYS SECRET CODE
-abcdef-
du
Save & Exit
HOLD CLR
10/28 07:37AM 0
8001
1967590 - you can input any 7-digit numbers here as new password;
Please keep new password secretly; If lose password,you can use “2167715” to enter
into system and clear previous password.
USER’S MANUAL
55
2.17
Set more Operators
You can set more operators for incoming calls in case it is busy .
EXT 1~16
Outside CO Line
1
2
3
4
Keyphone connect only 01 port
for both MC-208K or MC-416K
PBX Ready : connect key phone set at extension port 01 only;
Steps
Press Button
Keyphone On-hook
CHK CHK CHK
Screen Display
(3 times)
INPUT SYS CODE
du
P assword
1 9 6 7 5 9 0
Program access no.
2 7
TRFR
TRFR
SYS PRO MODE
INPUT CODE
SPECIAL PORT
CONSOLE 1 :001-
SPECIAL PORT
CONSOLE 2: ABC
SPECIAL PORT
CONSOLE 3: ABC
A B C
du
Save & Exit
HOLD CLR
10/28 07:37AM 0
8001
ABC - The 2-3 operator, can be extension 002~016 ,you can set max. 3-operators;
56
USER’S MANUAL
2.18
System Re-set
System can return to factory setting after the resetting
EXT 1~16
Outside CO Line
1
2
3
4
Keyphone connect only 01 port
for both MC-208K or MC-416K
PBX Ready : connect key phone set at extension port 01 only;
Steps
Press Button
Keyphone On-hook
CHK CHK CHK
Screen Display
(3 times)
INPUT SYS CODE
du
P assword
SYS PRO MODE
INPUT CODE
1 9 6 7 5 9 0
Program access no.
2 8
SYSTEM RESET
1 /2 /0
1
10/28 07:37AM 0
8001
1 - press 1 is to clear all setting;
2 - press 2 is to clear all setting, but not clear Auto-attendant recording;
0 - press 0 mean do not re-set, system will return to Program Status;
USER’S MANUAL
57
Section 3
Appendix
The chapter shows the references of
program, operate and other useful
information you may need.
58
USER’S MANUAL
3.1 System Factory Setting List
Descriptions
Factory Setting Status
What you can do?
Modify extension
number refer to
Section 2, 2.18
Extension Number
MC-208K : From 8001,8002~8008
MC-416K : From 8001,8002 ~8016
Extension Number Modify
Prefixed new extension number must start Modify extension refer
from "1","2","8"
to Section 2.18
Operators
EXT8001, 1 operator
Set 3 Operator : 3.5.26
Outside Line Ports
1~2 ports enabled, 3~4 ports disabled
Refer to Program 01
Outside Line Selection
Dial "9" to select any idle line
Refer to Program 23
Call Receive Mode
By Operator Attendant, all calls ringing to By Auto-attendant
EXT8001
,refer to Program 01
Auto-attendant
1 channel, 15sec.-7.5sec.-7.5sec., 3-level
Toll Restriction Class
All extensions No restriction
Caller ID
Full CLID Enabled
3-minutes Alarm
Disabled
Enabled at Program 22
Call Pickup Group
All Extensions are in same Group 1
2-group: Program 24
Call Override & Cut Off
Disabled
Enabled at Program 22
Do-not-dial number when
Welcome message playing
Line will be cut off
Line route to
Operator,set at 2.10
Flash Time
600ms
Modify at 3.5.2
Multi-Route
Disabled, all outside line in same route
2-Route set at 3.5.5
Refer to 2.2
Refer to Program 1418
Walking Account Password Do not set
Set password at 3.5.20
System Program Password 1967590
Can modify at 3.5.25
Power Failure Port
Total 2ports:
Outside line 1 transfer to EXT8002
Outside line 2 transfer to EXT8003
Power Supply
220VAC, 50Hz
Change transformer
USER’S MANUAL
59
3.2 Operation Quick Reference
Features
By Key Phone
Intercom Call
ICM + Extension number
Off-hook + # + Extension number
Call Outside
Off-hook + Outside number
Off-hook + Outside number
Call Transfer
TRFR + Extension number
Flash HookSwitch + # + Ext. no.
Call on Hold
Press HOLD
Flash HookSwitch +
from holding ext.: ICM + 55
Off-hook + #
Call hold Retrieve
Call Pickup Directed
Auto Call-back on-busy
Walking Account PIN
Day/Night Switch
#4
from specified ext.:ICM + 5 + Ext. no.
55
Off-hook + # 5 + Extension number
from specified outside line.:
Off-hook + #
ICM + 53 + Outside Line Port no.
number
Call Pickup Randomly ICM + 40 or press
Off-hook + #
40 or press only
Off-hook + # 4 + Ringing Extension
Press " 6 " when Busy
only
4 + Ringing Extension
Press " 6 " when Busy
ICM +
ICM +##
+ password +
53 + Outside Line Port
9+
Off-hook + ##
+ password +
Outside number
+ Outside number
ICM + #
Off-hook + #
782 #
( Night ) ;
Off-hook + #
781 #
( Day )
782 # (Night);
ICM + # 781 # (Day)
9
Call Override
ICM +
Off-hook+ #3 + Outside Port no. + 1
Hotline Setting
ICM
Off-hook+ #762 + Extension no. +
Hotline Cancel
ICM
Call Cut-off
ICM + Extension number + *
Forward All Calls:
Call Forwarding
Do Not Disturb(DND)
60
By Regular Phone
3 + Outside Port no. + 1
+ 762 + Extension no. + #
+ 760 + #
Off-hook+ #760 +
Off-hook + # + Extension no. + *
ICM + 71 + Extension no. + 1
Forward on-Busy:
#
ICM + 71 + Extension no. + 2
Forward on No-answer:
#
ICM + 71 + Extension no. + 3
Forward on-busy & no-answer:
#
ICM + 71 + Extension no. + 4
#
Press FWDND
Off-hook + #
71 + Ext. no. + 1 #
Off-hook + #
71 + Ext. no. + 2 #
Off-hook + #
71 + Ext. no. + 3#
Off-hook + #
71 + Ext. no. + 4#
Off-hook +
# 7110 #
Cancel Call Forward &
ICM + 70#
Do Not Disturb
Off-hook + #
Key Phone Button
Usage Display
Unvalid
USER’S MANUAL
#
On-hook: ICM + DSS button (1~32)
70 #
3.2 Operation Quick Reference
Features
By Key Phone
By Regular Phone
1 + Outside Line Port Number +
Key Phone Button
HOLD
Program
On-hook : Press ICM
2times + desired DSS 2+ Extension Number + HOLD
button (1~32)
+ (press optional 1,2)
Press "1" is to set DSS button to new
Outside Line Port number
Talking with Boss +TRFR + Outside
Reserve a Outside
Phone number for Boss number + On-hook
Talking with Boss +Flash
HookSwitch + Outside number + Onhook
Conference Call
DISA CO-CO Call
Press "2" is to set DSS button to to
new Extension number
Talking + CONF + other party +
CONF + other party + CONF + other
party …
Hearing Welcome Message +
+
DISA password + Outside phone no.
Talking + Flash Hookswitch + #
4+
other party + Flash Hookswitch + #
5
Hearing Welcome Message +
+
DISA password + Outside phone no.
Remarks : in key phone MC-1 ,MC-40,MC-50, intercom button is ICM , while MC-3 is INT
in key phone MC-1 ,MC-40,MC-50, System Program button is CHK , while MC-3 is FNC
Features & Setting
Related with which System Programs (00~29)
Outside Line Connection
Program 01
Extension make outgoing
Call
Program 09,10,14,23
Auto-attendant
Operator Mode & Autoattendant auto-switch
Toll Restriction
PBX Line
Program 01 & Operation Quick Reference guide
Program 01,04,08
Program 14,15,16,18
Program 02,19
System Password Modify
Program 26
Call Override & Cut-off
Program 22 & Operation Quick Reference guide
Off-hook Route to Outside
Walking Account PIN
Program 23
Program 13,20 & Operation Quick Reference guide
Conversation Alert
Program 06, 22
Setting Operators
Program 27
System Re-set
Program 28
USER’S MANUAL
61
3.3 PBX Feature/Specification Compare List
Model
MC-416K
(MC-208K)
MC-824KA
MC-824KA+
MC-824KD
MC-824KD+
Basic Outside Lines
4 (2)
4
4
4
8
Basic Extensions
Max. Outside Lines
Max. Extensions
Max. Hybrid Ports
Max. Digital PRI
Operators
Abbreviation Dialing
Toll Restriction
SMDR
PC Program
Call Center
External Music
Power Fail Ports
External Pager
Doorphone,Opener
DSS Console
Outgoing DISA
Night Message
Backup Card
Backup Battery
Switch Power
Wake Up Call
Flash Time
Walking Account
Pickup Group
Hunting Group
Boss/secretary Call
Conference Party
Music on Hold
Caller ID
Call Forward Mobile
CO-CO Call
Intercom Channel
Ext. Numbering
Ext. Prefix Number
16 (8)
4 (2)
16 (8)
1 (1)
NO
2
50
6-level
NO
NO
NO
YES
2 (2)
NO
1~8
NO
30s,3-level
NO
NO
NO
NO
NO
300~900ms
255
4
1
4
3~8party*1
External
All CLID
NO
NO
7
2-4 digit
1,2 or 8
16 (4hybrid)
8
64
12
NO
2
50
6-level
YES
YES
NO
YES
4
YES
1~8
2*64keys
78s,6-level*2ch
12s*1 level*2ch
YES
1*24VDC
YES
YES
300~900ms
255
4
4
4
3~8party*1
External
All CLID
NO
YES
8
2-4 digit
1~8
16 (4hybrid)
12
112
12
NO
2
50
6-level
YES
YES
NO
YES
NO
YES
1~8
2*64keys
78s,6-level
12s*1level*2
YES
1*24VDC
YES
YES
300~900ms
255
4
4
4
3~8party*1
External
All CLID
NO
YES
25
2-4 digit
1~8
16 (4hybrid)
28
80
68
1
3
50
6-level
YES
YES
YES
YES
4
YES
1~8
2*64keys
78s,6-level*4ch
12s*1 level*4ch
YES
2*12VDC
YES
YES
60~800ms
255
8
8
8
3party*2
External & internal
All CLID
YES
YES
non-blocking
2-4 digit
1~8
16 (8hybrid)
32
144
80
1
3
50
9-level
YES
YES
YES
YES
NO
YES
1~8
2*64keys
75s,6-level*8
12s*1level*8
YES
2*12VDC
YES
YES
60~800ms
255
8
8
8
3~32
Ext.&Internal
All CLID
YES
YES
non-blocking
2-4 digit
1~8
Feature
PACKING DETAILS
62
Hybrid PBX
MC-208K KSU
MC-416K KSU
MC-824KA KSU
Carton Size(cm³)
52.5*27*21.5
64*36.5*35
82*50*35(cm³)
Pcs/Carton
10
5
5
Kgs/Carton
13kgs
13.5kgs
30~50kgs
MC-824KA+ KSU
MC-824KD KSU
82*50*35(cm³)
82*50*35(cm³)
5
5
30~70kgs
30~60kgs
MC-824KD+ KSU
82*50*35(cm³)
5
30~80kgs
MC-1 Keyphone
66*34*27(cm³)
5
13kgs
MC-50 Keyphone
65*29*28(cm³)
10
12kgs
MC-3 Keyphone
62*43*24(cm³)
10
12kgs
MC-3 DSS
62*43*24(cm³)
10
12kgs
USER’S MANUAL
Remarks
3.5 System Program Code List 01~29
How to Login into PBX System Program Status?
When login into System Program Status, 00,01,02~35,36 is the code list for different system
program purpose, you can change the system original setting by different programs. Within
each program, different digit stands for different PBX feature.
Example,
by key phone set MC-1 how to login into Program Status ?
1. On-hook > Press CHK 3 times > input “1967590 ” (hearing beep “du..”)
After this, you can input program code from “00”~ “36”;
by regular phone, how to login into Program Status?
1. On-hook > input “#787 1967590 ” (hearing dialing tone)
After this, you can input program code from “00”~ “36”;
Remarks:
1. Suggest to program system by Key Phone set, so user can see the program
change and set at phone LCD. It is easier way then to program by regular phone;
2. TRFR button isused to move mouse curse to different function digit & CLR
button is to exit or clear the setting. HOLD button is used for save the new programs.
USER’S MANUAL
63
3.5 System Program Code List 01~29
3.5.1 Program 01: Outside Line Setting 01
The upper row display: LINE SETTING 1
The lower row display: L-ABCDE
L: 1-4 (Outside CO line number, or press “ *” stand for all Outside lines)
A: 0-2 (Outside line connection & Caller ID: 0-Connect & do not enable CLID; 1-Connect &
Caller ID display number at 3-digit or above, 2-Connect & Caller ID display number
at 7-digit or above,
B: 0-3 (Caller ID mode: 0- Not receive CLID, 1/3- Receive only FSK CLID , 2- Receive both
FSK/DTMF CLID)
C: 0-1 (Incoming Call receive Mode :0- Operator mode, 1-Auto-Attendant DISA mode )
D: 0-3 ( Auto Attendant valid duration: 0- Invalid; 1- AA available Day Time, 2- AA available
Night Time 3- AA available Day/Night time)
E: 0-1 (Allow Toll Restriction : 0- Not allow , 1- Allow )
3.5.2 Program 02: Outside Line Setting 02
The upper row display: LINE SETTING 2
The lower row display: L- ABCDE
L: 1~4(Outside CO line port number or press “*” for all lines)
A: 0~3(Outside line type: 0- Normal line, 1-PBX Line ,means outside Line is extension of
second PBX, 2- PBX Line’s hunting mode, 3- Normal line hunting mode)
B: 1 or 3 (Centrex Line outgoing Call 1- No need dial “9” out; 3- No need dial “0” out)
C: 0~1(Call release time: 0-1.5 seconds; 1- 4 seconds)
D: 0~2 (Flash time setting: 0-300ms ; 1-600ms ; 2-900ms
E: 0 (Keep as “0”)
Remarks: PBX Line setting related with Program 19, Call hunting related with Program 24.
64
USER’S MANUAL
3.5 System Program Code List 01~29
3.5.3 Program 03: IP Least Cost Route Code Setting
The upper row display: ABBREVIATE CODE
The lower row display: SN--XXXX
SN: 00~03 (Auto IP Least Cost Route : 00- IP prefixed number for DDD; 01- IP prefixed number
for IDD; 02- IP prefixed number for Local call)
XXXX: (The prefixed number for Least Cost Route from different Telecom Carrier,max.20-digit)
3.5.4 Program 04:
System Setting 01
The upper row display: SYSTEM SETTING 1
The lower row display: ABCDE
A: 0 ( Keep it as “0”)
B: 0 ( Keep it as “0”)
C: 1~4(Incoming call ringing time delay:1-1 ring , 2- 2rings,3- 3rings,4- 4rings )
D: 0~1(Outgoing call decoder release time: 0-25seconds, 1- 10seconds)
E: 0~1(Caller can dial number during Auto-attendance playing. 0- invalid, 1- valid)
It is invalid dialing within the first 1 second message playing.
3.5.5 Program 05:
System Setting 02
The upper row display: SYSTEM SETTING 1
The lower row display: ABCDE
A: 0~1(No-dial number during DISA message playing : 0- do not switch to Operator , 1switch to Operator)
B: 0~1 (Select outside line in circle way, 0-disabled, 1- enabled )
C: 1 (Keep it “1”)
D: 0~7(Holding call remind tone duration: 1~8seconds)
E: 0~1(Multi Outside Routing out selection: 0- disabled, 1- enabled).
If enabled, then dial “9” or dial “3” to select outside lines route,
USER’S MANUAL
65
3.5 System Program Code List 01~29
3.5.6 Program 06:
System Setting 03
The upper row display: SYSTEM SETTING 3
The lower row display:-ABCDE
A: 2 (Keep it “2”)
B: 0 (Keep it “0” )
C: 0~4 (The duration for Call Back on-busy : “0”- do not ring back,“1”- after 30sec., “2”- after 1
min., “3”- after 1.5 min., “4”- after 2 min.)
D: 0~1(3-minute Conversation alarm mode: “0”-alarm for both incoming & outgoing call, “1”only alarm for outgoing call.)
E: 0 (Keep it “0”)
3.5.7 Program 07:
System Setting 04
The upper row display: SYSTEM SETTING 4
The lower row display:-ABCDE
A: 0 (Keep it “0”)
B: 0~1 ( IP Economical Code auto-route: 0-not allowed,1-allowed)
C: 0 (Keep it “0” )
D: 1 (Keep it “1”)
E: 0( Keep it “0”)
3.5.8 Program 08:
Timer & Sensitivity Setting
The upper row display:TIMER SETTING
The low row display: N-SC
N: 1~6 ( 1- Detect Caller ID number delay time; 2- The duration between Dial IP LCR Prefixed
code and Dial the actual Outside Number ; 3~6: The sensitivity of DISA Decoder of
Outside Line 1~4 )
SC : 00~99 ( Seconds : 0~9.9seconds)
SC : 01~15 (Sensitivity code, 01 means the most sensitive)
66
USER’S MANUAL
3.5 System Program Code List 01~29
3.5.9 Program 09:
Outgoing Call Line Selection -Day Time
The upper row display: DAY LN OUT SET
The low row display: ST- XXXXXXXX
ST: 001-016 (Extension port number, “***”represent all extensions)
XXXXXXXX: 0-1(the extension select which Outside Line to make outside call: “0”-Not allow;
“1” -Allow.)
Remarks: XXXXXXXX ,8digit means X(Line1)X(Line2)X(Line3)X(Line4)X(Line5)X(Line6)
X(Line7)X(Line8)
3.5.10 Program 10:
Outgoing Call Line Selection -Night Time
The upper row display: NGT LN OUT SET
The lower row display: ST-XXXXXXXX
ST: 001-016 (Extension port number, “***”represent all extensions)
XXXXXXXX: 0-1(the extension select which Outside Line to make outside call: “0”-Not allow;
“1” -Allow.)
Remarks: XXXXXXXX ,8digit means X(Line1)X(Line2)X(Line3)X(Line4)X(Line5)X(Line6)
X(Line7)X(Line8). Extension select within 001~016;
3.5.11 Program 11:
Ringing Extension Selection -Day Time
The upper row display: DAY LINE IN SET
The lower row display: ST-XXXXXXXX
ST: 001-016.(Extension port number,”***”represent all extensions)
XXXXXXXX: 0-1(the Outside Line will ring to which extensions: “0”-Not allow, “1” -Allow.)
Remarks: XXXXXXXX ,8digit means X(Line1)X(Line2)X(Line3)X(Line4)X(Line5)X(Line6)
X(Line7)X(Line8). Extension select within 001~016;Outside Line select from
XXXXXXXX, but for MC-208K is 2 Lines, MC-416K is 4Lines,other “X” invalid;
USER’S MANUAL
67
3.5 System Program Code List 01~29
3.5.12 Program 12:
Ringing Extension Selection -Night Time
The upper row display: NIGHT LINE IN SET
The lower row display: ST-XXXXXXXX
ST:
001~016(Extension port number, “***”represent all extensions)
XXXXXXXX: 0~1 (the Outside Line ring to which extensions: “0”-Not allow, “1” -Allow.)
Extensions select from 001~016, Outside Line select from XXXXXXXX.
3.5.13 Program 13:
Incoming Ringing Time Delay Setting
The upper row display: LINE RING DELAY
The lower row display: ST-XXXXXXXX
ST: 001-016.(Extension port number, “***”represent all extensions)
XXXXXXXX: 0-1(Incoming call ring to extension, the time to ring will postponed : 0- Now
allowed; 1- Allowed)
The Ringing delay duration is set at Program 04, item C.
3.5.14 Program 14:
Toll Restriction Class
The upper row display: SERVICE CLASS
The lower row display: ST-AB
ST: 001-016.(Extension port number, “***”represent all extensions)
A: 6-class of Toll Restriction service in Day Time
Class 1: No restriction ,free for any call.
Class 2: Do not allow to call the numbers set at Program 15;
Class 3: Can’t call numbers set at Program 16,but can call numbers at Program 17;
Class 4: Restrict the numbers set at Program 15 &16,and can’t call numbers at Program 17;
Class 5: Can only call numbers set at Program 18;
Class 6: Only intercom call allowed.
B: The class of service at Night Time (6-class same as “A”).
68
USER’S MANUAL
3.5 System Program Code List 01~29
3.5.15 Program 15
Restriction Code A
The upper row display: RESTRICT CODE A
The lower row display: SN-XXXXXXXX
SN: 01-04 (Series number, total you can set 4 different restriction codes)
XXXXXXXXX (Restrict codes selectable, 1~8 digits)
Remarks: This restriction code related with Class 2 or 4 at Program 14.
(Default: 01-00, 02-168, 03-968, 04-969)
3.5.16 Program 16
Restriction Code B
The upper row display: RESTRICT CODE B
The lower row display: SN-XXXXXXXX
SN: 01~20 (series number, total you can set 20 different restriction codes)
XXXXXXXX (Restriction code, 1~8 digits)
Remarks: This restriction code related with Class 3 or 4 at Program 14.
(Default: 01-0, 02-168, 03-968, 04-969)
3.5.17 Program 17
Non-restriction Code C
The upper row display: UNREST CODE C
The lower row display: SN-XXXXXXXX
SN:01~12(series number, total you can set 12 different un-restriction codes)
XXXXXXXX (1~8 digits un-restriction codes,can release the restricted numbers set at Class 3
in Program 14)
USER’S MANUAL
69
3.5 System Program Code List 01~29
3.5.18 Program 18
Emergency Code D
The upper row display: COMUNRES CODE D
The lower row display: SN-XXXXXXXX
SN: 01~04 (series number, total you can set 4 different emergency numbers)
XXXXXXXX (1~8 digits emergency call numbers )
(Default: 01-110, 02-112, 03-119: “110” for Police,“112” for Ambulance,“119” for Fire)
3.5.19 Program 19
PBX Line Code
The upper row display: PBX ACCESS CODE
The lower row display: SN-XX
SN:01~04 (series number, you can set total 4 different codes)
XXXXXXXX
(PBX restricted code, max 8 digits)
The program used when PBX outside line port connect with extension from second PBX
3.5.20 Program 20
Walking Account PIN Setting
The upper row display: OVER CLASS CODE
The lower row display: SN-XXXXXXXX- Y
SN: 001-032 (Account PIN series number, max. can set 32 numbers)
XXXXXX: ( PIN password number, 6-digit )
Y : 1~6 (Toll Restriction Class , total 6-class)
Remarks:
You can use the PIN password to call IDD in any extensions, the cost will charged at PIN
number,not at the extension.
The PIN number will be valid for 10seconds after goes on-hook.
70
USER’S MANUAL
3.5 System Program Code List 01~29
3.5.21 Program 22
Extension Setting 01
The upper row display: EXT SETTING1
The lower row display: ST-ABCDE
ST: 001-016 (Extension port number, “***”represent all extensions)
A:0~3 (Call Waiting alert switch for Intercom call or Incoming call : 0-OFF for intercom &
incoming;1- ON for intercom & OFF for incoming; 2- OFF for intercom &ON for
incoming; 3- ON for intercom & incoming)
B: 0~1 (Caller ID to extension: 0- off, 1- on)
C: 0~3 (3-minutes Conversation duration alert: “0”-no alert,“1”- 3min., “2”- 6min., “3”- 9min.)
The alert related with Program 06 & line being auto-released about 90seconds after alert.
D: 0~1 ( Call override and cut-off : 0-not allowed,1-allowed)
E: 0 (Keep it as “0” )
3.5.22 Program 23
Extension Setting 02
The upper row display: EXT SETTING 2
The lower row display: ST-ABCDE
ST: 001-016 (Extension port number,“***”represent all extensions)
A: 0~4 ( Off-hook to select Outside Line mode : 0- select any Outside Line. 1~4: to firstly
select specified Outside Line1~4. )
B: 0~2 (Do Not Disturb setting: “0”-DND disabled,“1”-DND for incoming call, “2”- DND for
call from both intercom and incoming)
C: 0~1 (Comply to call via IP Economical Code least cost route, “0”-off, “1”-on .)
D: 0~1 (Off-hookRroute to intercom or Outside : “0”- intercom, out by dial “9” ,“1”- Outside)
E: 0 (Keep it as “0” )
3.5.23 Program 24
Pickup Group
The upper row display: PICKUP GROUP
The lower row display: SN-ST-A
SN: 1~2 (Series number, can set max. 2 different pickup groups ;and groups 1is for normal
pickup group; group 2 is for Call Hunting group , related with Program 02)
ST : 001~016 (Extension port number, “***”represent all extensions)
A:0~1(Join the group or exit from the group: 1-Join in,0- exit)
Remarks: max. 16 extensions in same group. Extension can not be picked up in different group.
USER’S MANUAL
71
3.5 System Program Code List 01~29
3.5.24 Program 25
Manager/Secretary Call Group
The upper row display: EXEC/SEC PAIR
The lower row display: SN-ST-st
(Secretary pick up the incoming call instead of manager. System can set 8-group manager
secretary call group)
SN: 1~8 (Series number, max. can set 8 different Secretary manager pair group )
ST:001~016 (Extension port number for Manager ,“***”represent all extensions)
st: 001~016 (Extension port number for Secretary ,“***”represent all extensions)
After active this function, calls to Boss will automatically route to Secretary and then transfer
the calls to Boss by Secretary.
Remarks: Do Not Disturb function should be enabled at Manager extension.
3.5.25 Program 26
System Password
The upper row display: SYS SECRET CODE
The lower row display: -XXXXXXX-XXXXXXX- : (Password for System Program, 7-digit)
You can check or change the system program password, original is “1967590”
3.5.26 Program 27
Setting More Operators
The upper row display: SPECIAL PORT
The lower row display: CONSOLE 1: XXX
XXX : 001~016 (Extension number selectable for Operator phone)
Press TRFR to set Operator 2 & TRFR to set Operator 3
By Regular Phone you can only set Operator 1.
72
USER’S MANUAL
3.5 System Program Code List 01~29
3.5.27 Program 28
System Re-set
The upper row display: SYSTEM RESET
The lower row display: 1/2/0
(To set system to the factory default setting, including the system program password. )
1 or 2( to reset, 1-delete all ; 2- delete all but not DISA recording)
0- do not re-set
3.5.28 Program 29
Modify Extension Number
The upper row display: PORT EXT NUMBER
The lower row display: ST-XXXX
ST: 001-016.(Extension port number,”***”represent all extensions)
XXXX: It is the desired extension number from 2 to 4-digit number. The leading digit for the
desired new extension number start with “1” “2” or “8” in default.
Allowed number like “11,22,88, 100,288,800,1111,2999 or 8008” etc.
Extension number can't be repeated in same system.
Clear all previous extension numbers: Input “ *** ”, press “TRF” twice.
Clear the present extension number: Input extension number + “ TRF + CLEAR + TRFR or HOLD ”.
Delete all previous numbers : at program 29, input “ * * * * * ”.
USER’S MANUAL
73