1
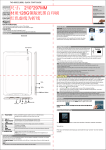
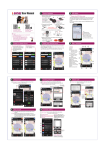
Network Camera
Android Installation Guide
IP Camera:
LAN
Wifi
3G
4G
Sensors: (For Kit pack only)
Door sensor
PIR
Gas Alarm
Flashing siren
Remote
controller
Smoke Alarm
IP Camera Color:
White
Black
Silver
Contents
Connect camera to router and
adaptor via cable -------------- 1
Register 51See account and
login
----------------- 2-3
Search cameras and set internet
connection ---------------- 4-14
Add the camera to registered
account
-------------- 14-15
View online video --------- 16-18
Other function setup ------ 19-27
Packing list:
Camera Main Unit X 1, Lan Cable X 1, Adaptor X 1 , CD x 1
Camera Installation:
Installation Notice
1. Make sure camera ,PC and Smart phone haveaccess to
internet.
2. Install APP and setup parameters before using it.
Installation Processes
(1) Connect camera to router and adaptor via cable
(2) Register 51See account and login
(3) Search camera and set internet connection
(4) Add the camera to registered account
(5) View online video
(6) Other function setup.
1) Connect camera to router and adaptor via cable
a. Camera connect with adaptor.
b. Connect camera with LAN cable when first setting ;
android phone access to same internet via wifi.
Home Wifi Router
ADSL Modem
ADSL/Internet
Adaptor
Camera
1
2) Register 51See account and login
APP install in Android Phone.
1.Click APP icon in android phone.
2.Click register .
3.Fill the register information and Click.
4.Fill in with registered account /password to login.
1.Click APP icon in
android phone
2.Click register
2
Account name
3.Fill the register infor
and Click ok
Password
4.Fill with register
account /password
to login.
3
3). Search cameras and set internet connection.
a) Search New Cameras.
1
4
2
5
3
6
4
7
b). Setting Wifi connection.
Choose camera UID, Setup wifi connection as below:
8
If need Lan connect select
this one
4
5
9
6
c). Set LAN cable connection : choose “connect to the network
through a network cable” and next, the camera will automatically
set as DHCP connect to the router.
10
d). Setup 3G/4G cameras.
Choose 3G/4G camera UID ,setup 3G/4G paras as below:
1.Choose UID number below.
2
11
3
12
4.Fill the 3G/4G setting Data.
5
13
The 3G/4G parameters please refer the local telcom carrier's
SIM card user manual , or refer to the following website:
http://wiki.apnchanger.org/Main_Page
Most Carrier's dial number is: *99#. if not , refer to the SIM card
user manual.
4). Add the camera to registered account
If internet connect ok,the LED light status as below:
PTZ model Led red light constant on( not flashing),
ePTZ model Led green light constant on ( not more red flashing),
it means camera network connection are ok.
Then you can add camera to the account now.
After internet in normal connection status, you can remove the
Lan if you already setup wifi or 3G/4G connect.
14
Click Done
to add
15
5)View Online Video
If the setting is successful, you can login and view the online
video on PC , android device and Iphone/Ipad.
Detail pls follow below picture :
1
16
2
Support multi device login ,multi users view same account
at the same time.
17
3.View Live video
18
6) Other Function Setup :
a)Alarm and PIR Setting (Model: cameras with PIR)
1
2
19
3
20
4.Select the related function
5
21
b) Setting the RFID
Add RFID sensors to system by scanning QR code with android
mobile :
All sensors will have a UID number and QR code label , add this
sensors to ip camera system by scan the QR codeDetail method
as below :
1
22
2
23
3
4
24
5. Scan the barcode to add
25
6
7.show sensor quantity if add ok
26
8.Name the sensor
and click ok
27