1
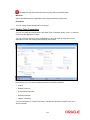
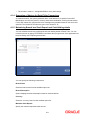
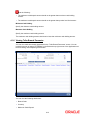
Retail Teller Oracle FLEXCUBE Universal Banking Release 12.0 [May] [2012] Oracle Part Number E51527-01 Retail Teller Table of Contents 1. ABOUT THIS MANUAL................................................................................................................................ 1-1 1.1 1.2 1.3 1.4 1.5 2. RETAIL TELLER MODULE – AN OVERVIEW ....................................................................................... 2-1 2.1 3. INTRODUCTION ........................................................................................................................................... 1-1 AUDIENCE .................................................................................................................................................. 1-1 ORGANIZATION .......................................................................................................................................... 1-1 RELATED DOCUMENTS ............................................................................................................................... 1-1 GLOSSARY OF ICONS .................................................................................................................................. 1-2 INTRODUCTION ........................................................................................................................................... 2-1 MAINTAINING RETAIL TELLER PRODUCTS ...................................................................................... 3-1 3.1 INTRODUCTION ........................................................................................................................................... 3-1 3.1.1 Specifying Product Preferences ......................................................................................................... 3-2 4. MAINTAINING ACCOUNTING DETAILS................................................................................................ 4-1 4.1 INTRODUCTION ........................................................................................................................................... 4-1 4.1.2 Viewing Teller Transactions .............................................................................................................. 4-8 4.1.3 Generating Transaction Sequence Number ..................................................................................... 4-10 4.1.4 Generation of Advices for Retail Teller Transactions ..................................................................... 4-11 4.1.5 Maintaining Branch level Cash Deposit and Cash Holding details ................................................ 4-11 4.1.6 Viewing Teller Branch Parameter ................................................................................................... 4-12 5. REPORTS ........................................................................................................................................................ 5-1 5.1 INTRODUCTION ........................................................................................................................................... 5-1 5.2 BATCH JOURNAL REPORT ........................................................................................................................... 5-1 5.2.1 Contents of the Report ....................................................................................................................... 5-3 5.3 CASH POSITION BRANCH WISE................................................................................................................... 5-4 5.3.1 Contents of the Report ....................................................................................................................... 5-4 5.4 TELLER TRANSACTION BRANCH WISE ....................................................................................................... 5-5 5.4.1 Contents of the Report ....................................................................................................................... 5-6 5.5 OVERAGE AND SHORTAGE REPORT ............................................................................................................ 5-6 5.5.1 Contents of the Report ....................................................................................................................... 5-7 5.6 INSTRUMENT DETAILS REPORT .................................................................................................................. 5-8 5.6.1 Contents of the Report ....................................................................................................................... 5-9 5.7 AUTHENTICATION REPORT ....................................................................................................................... 5-10 5.7.1 Contents of the Report ..................................................................................................................... 5-12 5.8 CHEQUES DEPOSITED TODAY REPORT ..................................................................................................... 5-13 5.8.1 Contents of the Report ..................................................................................................................... 5-14 5.9 CHEQUE PURCHASED REPORT .................................................................................................................. 5-15 5.9.1 Contents of the Report ..................................................................................................................... 5-17 5.10 CHEQUE PURCHASED RETURNED TODAY REPORT ................................................................................... 5-18 5.10.1 Contents of the Report ..................................................................................................................... 5-19 5.11 DRAWER-WISE RETURNED CHEQUES REPORT .......................................................................................... 5-20 5.11.1 Contents of the Report ..................................................................................................................... 5-21 6. ANNEXURE – A .............................................................................................................................................. 6-1 6.1 7. MAPPING ORACLE FLEXCUBE BRANCH FUNCTIONS TO RETAIL TELLER PRODUCTS............................... 6-1 ANNEXURE – B .............................................................................................................................................. 7-1 7.1 DEBIT AND CREDIT ADVICES FOR RETAIL TELLER MODULE ...................................................................... 7-1 7.1.1 7.1.2 7.1.3 7.1.4 7.1.5 7.1.6 7.1.7 7.1.8 7.1.9 8. RETAIL TELLER GLOSSARY .................................................................................................................... 8-1 8.1 9. Debit Advice Format (Retail Teller Module) ..................................................................................... 7-1 Credit Advice Format (Retail Teller Module) .................................................................................... 7-2 Fixed Deposit Confirmation Advice ................................................................................................... 7-3 Collection Cheque Credit Advice....................................................................................................... 7-4 Collection Cheque Return Advice ...................................................................................................... 7-5 Accounting Entries for Loan Repayment by Cash: ............................................................................ 7-6 Accounting Entries for Loan Disbursement by Cash: ........................................................................ 7-7 Accounting Entries for FX Sale through the Account ........................................................................ 7-7 Accounting Entries for FX Purchase against the Account ................................................................. 7-7 LIST OF IMPORTANT TERMS........................................................................................................................ 8-1 SCREEN GLOSSARY .................................................................................................................................... 9-1 9.1 FUNCTION ID LIST...................................................................................................................................... 9-1 1. 1.1 About this Manual Introduction This manual explains the features of the Retail Teller module of Oracle FLEXCUBE which enables you to enter and process retail teller transactions entered through an Oracle FLEXCUBE retail branch. 1.2 Audience This manual is intended for the Customer Service Representatives (CSRs) and staff in charge of setting up new products in your bank. 1.3 Organization This manual is organized as follows: Chapter 1 About this Manual gives information on the intended audience. It also lists the various chapters covered in this User Manual. Chapter 2 The Retail Teller Module – an Overview gives you an overview of the retail teller module. Chapter 3 Maintaining Retail Teller Products describes the procedure to create retail teller products for the specific services your bank offers. Chapter 4 Maintaining Accounting Details explains how to set up accounting details for retail teller products in Oracle FLEXCUBE. Chapter 5 Reports provides a list of reports that can be generated in this module and also explains their contents. Chapter 6 Annexure A lists the inbuilt retail teller products provided for the retail teller module and the association of these products with their appropriate functions in the Retail Branch. Chapter 7 Annexure B contains samples of the various types of advices and notices generated at each stage for the type of contract that the retail teller module handles. Chapter 8 Retail Teller Glossary – gives a list of important terms used in the module. Conventions used in this Manual Important information is preceded with the 1.4 symbol. Related Documents The Procedures User Manual 1-1 1.5 Glossary of Icons Icons Function Exit Add row Delete row Option List 1-2 2. 2.1 Retail Teller Module – An Overview Introduction Teller transactions entered through an Oracle FLEXCUBE branch are stored in the Oracle FLEXCUBE database, in the Retail Teller module. The Retail Teller module of Oracle FLEXCUBE provides for the maintenance of appropriate reference information, which would enable entry of teller transactions from an Oracle FLEXCUBE branch, and also enable you to view and enrich transactions that have been entered through an Oracle FLEXCUBE branch. In order to facilitate the entry of teller transactions through the Retail Branch, the following reference information needs to be maintained at the host Oracle FLEXCUBE installation: Products in the Retail Teller module that would be used to process retail teller transactions entered through the Branch Accounting and charges details for combinations of product, customer, branch and currency, that will be applicable for retail teller transactions Oracle FLEXCUBE provides inbuilt products in the Retail Teller module for retail teller transactions entered through an Oracle FLEXCUBE branch. These products and their associations with the corresponding functions in the Oracle FLEXCUBE Retail branch should be maintained as per Annexure – A of this User Manual. No new products other than these need be maintained for such retail teller transactions. You can, however, make changes to these inbuilt products, to suit your requirements, and specify any exchange rate parameters and any MIS details. The accounting and charges details for combinations of product, customer, branch and currency, that will be applicable for retail teller transactions, must be maintained in the host Oracle FLEXCUBE installation, through the ARC Maintenance. Refer the head ‘Maintaining Accounting Details for Retail Teller Transactions’ in this chapter for information about the ARC Maintenance. 2-1 3. 3.1 Maintaining Retail Teller Products Introduction To process different teller transactions, you must maintain appropriate products. You can maintain products using the ‘RT Product Definition’ screen, which you can invoke from the Application Browser. You can invoke this screen by typing ‘DEDRTPRM’ in the field at the top right corner of the Application tool bar and clicking on the adjoining arrow button. In this screen, you can enter basic information relating to a retail teller product such as the Product Code, the Description, etc. For any product you create in Oracle FLEXCUBE, you can define generic attributes by clicking on the appropriate icon in the horizontal array of icons in this screen. For a retail teller product, in addition to these generic attributes, you can specifically define other attributes. These attributes are discussed in this chapter. You can define the attributes specific to a retail teller product in the RT Product Definition Main screen and the Retail Teller Product Preferences screen. In these screens, you can specify the product type and set the product preferences respectively. 3-1 For further information on the generic attributes that you can define for a product, please refer the Products Oracle FLEXCUBE User Manual. Specifying the Product Type Indicate if the product that you are creating is cash based or non-cash based. From the drop down list in the Product Type field, select ‘Cash’ from the list to indicate a cash type product, or select ‘Others’ to indicate a non-cash type product. 3.1.1 Specifying Product Preferences You can maintain preferences for teller products from the Product Definition Main screen. Click ‘Preferences’ button to invoke the ‘Retail Teller Product Preferences’ screen. Track Receivable During liquidation of teller transactions, if the system detects insufficient funds in the account, then you can choose to block the subsequent credit that happens to the settlement account. In other words, the system will track the account for receivables. As and when a credit happens, the funds will be allocated to the teller entry depending on the product sequence that you specify at the account class level. Refer to the Core Entity User Manual for details on maintaining funds allocation sequence. When you post a teller transaction to an account and there are insufficient funds in the account, then the system will save the contract but the contract remains uninitiated. Accounting entries will not be posted for this contract. During EOD processing of these contracts, when the full balance becomes available in the account, the system will post the necessary accounting entries and mark the contract as liquidated. Your specification for this field will default to all contracts involving the product. However, you are allowed to modify it at the contract level also. 3-2 Retail Lending Product Check this option to allow a retail lending loan account in the transaction. Only products marked as ‘Retail Lending Product’ will allow a retail lending loan account in the transaction. PC Transaction Check this box to generate the PC transaction for the branch transaction under this RT product. 3-3 4. 4.1 Maintaining Accounting Details Introduction After you have maintained the requisite products for retail teller transactions, you must maintain the accounting information that will be used by the system to process such transactions involving the product. In the Account, Rates and Charges (ARC) screen, you can maintain accounting information that will be used to Identify the transaction account and offset account to which accounting entries arising from a retail teller transaction using the product will be posted Identify whether the offset account or the transaction account must be considered to be the debit account in a retail teller transaction using the product Identify whether any applicable charges in a retail teller transaction using the product must be paid out from the offset account or the transaction account Compute the applicable charges that would be levied Identify the transaction codes to be used for the accounting entries In the ARC Maintenance screen, you maintain accounting and charges information that would be applicable for processing retail teller transactions involving a specific branch, retail teller product and specific currency combination. You can invoke the ‘ARC Maintenance’ screen from the application browser. You can invoke this screen by typing ‘IFDATMMN’ in the field at the top right corner of the Application tool bar and clicking on the adjoining arrow button. 4-1 In the ARC Maintenance screen, you maintain accounting and charges information (known as ARC details) that would be applicable when processing retail teller transactions involving a specific branch, retail teller product and specific currency combination. It is recommended that you maintain ARC details for all possible combinations of retail teller branch, product, offset currency, transaction currencies, customer and customer group. If you do not maintain specific records for each currency, customer and branch combination, you can use the ‘*.* ‘ option. Product Type While maintaining the ARC details, you have to indicate the retail teller product, transactions involving which the details would apply. Each product in Oracle FLEXCUBE is identified with a unique four character alphanumeric code. You can indicate the appropriate product. It is recommended that you maintain ARC details to be applicable for each retail teller product that you set up. You can select CCDM (Cash and Cheque Deposit Machines) product to indicate that as soon as cash is deposited it will be reflected in the customer’s account. A separate GL is created to differentiate this CCDM transaction. Currency You must indicate the currency, transactions involving which the ARC details would be applied. 4-2 For each currency in which retail teller transactions would be processed involving the selected product, you can maintain a separate set of ARC details in this screen. You can also choose the “ALL” option under currency, which the system, will use if no specific record for a currency is available. Customer Group Specify the customer group to define charges. This adjoining option list displays all valid customer groups maintained in the system. You can choose the appropriate one. Input to this field is mandatory. 4.1.1.1 Identifying Offset Account You can specify the offset account or GL into which offset entries are to be booked, as a result of the teller transaction involving the product, branch and currency. You can also indicate the branch in which the offset account resides. You can also choose the “ALL” option, which the system interprets as the branch in which the transaction is being input. Indicating the offset account as the debit account You could indicate that the offset account is to be the debit account for the transaction, in teller transactions involving the product, branch and currency combination. To indicate this, select the ‘Offset Account’ option in the Debit Account field on this screen. Indicating the offset account as the default charge account You could indicate that the offset account is to be the default charge account for the transaction, in teller transactions involving the product, branch and currency combination. This means that the charges would be recovered from this account. To indicate this, select the ‘Offset Account’ option in the Charge From Account field on this screen. If the offset account you have specified uses an account class that is restricted for debit or credit transactions for the product, an override is sought when you attempt to save the contract. 4.1.1.2 Identifying Transaction Account You must specify the transaction account for the retail teller transaction, as well as the branch in which this account resides. The branch information you specify here could also be used in the case of an inter-branch transaction. If you wish to maintain ARC details for a specific customer, you can specify a valid customer account here. In such a case, the ARC record will be applicable to all retail teller transactions involving the customer, product, branch and currency combination that you have specified in this record, in this screen. Indicating the transaction account as the debit account You could indicate that the transaction account is to be the debit account for the transaction, in teller transactions involving the product, branch and currency combination. To indicate this, select the ‘Transaction Account’ option in the Debit Account field on this screen. 4-3 Indicating the transaction account as the default charge account You could indicate that the transaction account is to be the default charge account for the transaction, in teller transactions involving the product, branch and currency combination. This means that the charges would be recovered from this account. To indicate this, select the ‘Transaction Account’ option in the Charge From Account field on this screen. Typically for a “Cash Deposit” type of a transaction, in which the customer account will be specified when the transaction is entered, the same account would also be used to debit the charges. If the transaction account you have specified uses an account class that is restricted for debit or credit transactions for the product, an override is sought when you attempt to save the contract. 4.1.1.3 Identifying Offset and Debit Transaction Codes In addition, you have to also identify the transaction codes against which offset and debit related entries for the transaction ought to be tracked. For instrument-based products (such as check deposit / check withdrawal products) you must ensure that you specify a transaction code for which check numbers are mandatory. Generate Transaction Advices You can indicate that advices must be generated for retail teller transactions involving the product, branch and currency combination. The advice types that are available for the Retail Teller module are the debit and credit advices generated for the debit or credit entries that would be passed to customer accounts, namely, “DR ADVICE” and “CR ADVICE”. For further information on the debit and credit advices, please refer the Annexure –B. 4.1.1.4 Indicating Service Charges for Inter-branch Transactions In a transaction, if the account branch of the teller transaction is different from the transaction branch, then charges maintained by inter-branch product will be applied to the transaction. If the IB checkbox is checked for a product, then the system will pick up and process the charge entries maintained at the IB product level. During a transaction, If IB product is not maintained and if the transaction branch is different from account branch, then charges maintained in non-IB product will be applied to the transaction. IB Transaction Check this box if you want the system to pick up the product, for inter-branch transactions. Example Try setting up two different product set up for same type of product, one for which IB transaction check box is checked and the other for which IB transaction check box is unchecked as shown below: Normal Setup for cash withdrawal: Product name: CHWL IB transaction: N CHARGE 1 : 5 USD 4-4 IB Setup for cash withdrawal: Product name: CHWL IB transaction: Y CHARGE 1 : 7 USD You will notice the difference in the service charges processed for two transactions with same kind of product. Netting Charge You have the option to net the accounting entries for the debit leg of the charges along with the main transaction entries. Check this box to indicate that the debit leg of the charges is to be netted before passing the accounting entries. Leave the box unchecked to pass the entries without netting the charges of the debit leg. End Point In case of Outward Clearing, Clearing House is derived based on the End Point maintained for the ARC combination. Description End Point Description (Display Only field). Bank Float Days In case Bank Float Days is not maintained at the Clearing Bank/Branch level, it is picked up from here. Customer Float Days In case Customer Float Days is not maintained at the Clearing Bank/Branch level, it is picked up from here. Float Days Basis Whether to consider the Calendar Days or Working Days for computing the Value Date based on the Floats maintained. 4.1.1.5 Indicating Exchange Rate Revaluation You can specify the following details: Profit Revaluation GL Specify the profit revaluation GL details. Loss Revaluation GL Specify the loss revaluation GL details. Exchange rate values are maintained at CCDRATES. Rate type and Rate code preferred is maintained at product level and Negotiated cost rate is maintained at transaction level. 4-5 The Revaluation amount = (Transaction amount/exchange rate) - (Transaction amount/negotiated rate), Where, Exchange rate is picked for the rate type and rate code maintained at Product level. The system will display an override message if the negotiated rate is not within the exchange rate variance maintained at the product. 4.1.1.6 Defining Charge Details You can define a maximum of five charges. A charge can be computed based either on the transaction amount or on an earlier charge amount As part of defining the Charge details for each charge, you need to capture the following details in the corresponding charge tabs: Charge Type The Charge Type that should be applied on the transaction. It could either be a Percentage of the transaction amount or a Flat Charge. Slab type Select whether the Charge computation has to be over different Amount Slabs or Tiers (0-100 @ 10, 101-500 @ 15 etc.). Basis You can indicate the basis amount on which the charge is to be computed. Since you can maintain five different charge amounts, the basis amount that you enter could either be the transaction amount or any of the earlier charge amounts. For example, let us assume you are maintaining Charge 1. The only basis for charge 1 can be the transaction amount. While defining Charge 2 you can choose either the transaction amount or Charge 1 as the basis. Similarly while defining Charge 3, you can choose the transaction amount or Charge 1 or Charge 2 as the basis. Currency You can indicate the currency in which the charge amount would be expressed. If the transaction currency is different from the charge currency, a conversion would be done, using the rate code and rate type that you specify for each charge. Charge Account You can specify the charge account (income / expense account) into which charge related entries are to be posted. The other leg of the charge is posted either to the transaction or the offset account, as specified in the ARC record. Netting If two or more accounting entries, for the same event, are to be passed to the same account, on the same Transaction Date, these entries can be netted. You can choose to net the charge leg of the Transaction Account (debit) entry with the main leg of the customer accounting entry. 4-6 Transaction Code You can indicate the code using which the accounting entries would be booked, for each charge. Rate Code and Rate Type While settling charges for cross currency transactions, you can choose to debit the customer by applying the mid rate, buy rate or by using the buy/sell spread over the mid-rate. Therefore you need to specify the Exchange Rate details for each ARC definition record that you maintain in the system. Firstly, indicate the Rate Code for which different rates can be maintained. A list of all the rate codes maintained in the Floating Rates Maintenance screen is displayed in the list. You can choose the appropriate code. In addition to specifying the Rate Code you have to indicate the Rate Type which should be picked up for exchange rate conversions involving settlement of charges for cross currency transactions. You can maintain any one of the following as the Rate Type: Buy Mid Sell After identifying the Rate Code and Rate Type you can indicate the basis amount on which charges are to be computed. Amount You have to specify the flat amount only when the charge type is a Flat Amount. The flat amount will be collected in the currency that you have specified in the Currency Code field. Rate If you have indicated that the charge should be a percentage of the transaction amount, you have to necessarily capture the rate that is to be applied on the transaction amount. The rate that you specify will be applied after converting the amount into the Account Currency. Interest Basis Interest Computation basis (360 days, 365 days etc.). Minimum and Maximum Charge Amount When the charge type applicable on the transaction is a percentage of the transaction amount you have to capture the minimum and maximum charge amounts that should be applied on the transaction. If the charge percentage involving a particular transaction is less than the minimum charge the system will by default debit the customer account with the minimum charge amount. Similarly, when the charge percentage exceeds the maximum amount, the system will debit the customer account with the maximum charge amount. 4-7 The charge amount will be deducted in the currency that you specified earlier. MIS Head Specify the MIS Head that is applicable for the charge-related accounting entry. Description You can indicate a short description for the charge. 4.1.2 Viewing Teller Transactions You can view retail teller transactions in the ‘Retail Teller Transaction Query’ screen. Invoke this screen from the application browser. You can invoke this screen by typing ‘DEDQUERY’ in the field at the top right corner of the Application tool bar and clicking on the adjoining arrow button. In this screen, you can view the following details for each teller transaction: Product Related Customer User Reference Number Reference Number Tanked Transaction For more information on Tanked Transaction, refer Branch Parameters chapter under Core Services module. 4-8 4.1.2.1 Viewing Transaction Leg Details Here you can view the following details: Transaction Currency Transaction Branch Transaction Account Transaction Amount Transaction Code 4.1.2.2 Specifying Offset Leg Details Offset Currency Offset Account Branch Offset Account Offset Amount Transaction Code 4.1.2.3 Viewing Instrument Codes You can view the following details here. Value Date Exchange Rate Local Currency Exchange Rate Local Currency Amount Narrative Track Receivable 4-9 4.1.3 Generating Transaction Sequence Number The system generates a unique transaction sequence number and displays a message indicating the generated transaction number after completion of each teller transaction INPUT stage. The generated transaction sequence number is also displayed at the following levels of ‘Work Flow’: Completed Reversed Pending Assigned Query option in ‘Search Task’ Note the following: This sequence number would be reset on every date change during Mark BOD. The sequence number after date change always starts from 1. 4-10 The number is reset to ‘1’ during Mark BOD for every date change. 4.1.4 Generation of Advices for Retail Teller Transactions As mentioned earlier, the system generates debit / credit advices if so specified in the ARC Maintenance record for the product, currency and branch combination involving the transaction. For an ODC transaction, payment and cover messages are generated based on the route code specified. The formats for the same are given in the Annexure –B. 4.1.5 Maintaining Branch level Cash Deposit and Cash Holding details You can maintain branch level cash deposit and cash holding details of Retail Teller. You can invoke this screen by typing ‘STDTBRAN’ in the field at the top right corner of the Application tool bar and clicking on the adjoining arrow button You can specify the following in this screen: Branch Code Select the branch code from the available option list. Branch Description System displays the branch description based on selected branch. Currency Select the currency code from the available option list.. Maximum Cash Deposit Specify the maximum deposited cash amount. 4-11 Note the following : The maximum cash deposit amount should not be greater than maximum cash holding amount. The maximum cash deposit amount should not be greater than product level limit amount. Minimum Cash Holding Specify the minimum cash holding amount. Maximum Cash Holding Specify the maximum cash holding amount. The maximum cash holding amount should not be less than minimum cash holding amount. 4.1.6 Viewing Teller Branch Parameter You can view retail teller branch parameters in the ‘Teller Branch Parameter’ screen. You can invoke this screen by typing ‘STSTBRAN’ in the field at the top right corner of the Application tool bar and clicking on the adjoining arrow button. You can view the following details here: Branch Code Currency Maximum Cash Deposit 4-12 Minimum Cash Holding Maximum Cash Holding 4-13 5. 5.1 Reports Introduction The report programs available under the Retail Teller (RT) module are explained in this chapter. All activities that are performed by the RT module are recorded. The inputs you have made at different stages are pieced together and can be extracted in the form of meaningful reports as and when you may require them. Every day teller doing the financial transactions, print hard copy of the reports. The reports that can be generated for the RT Module are as follows: Batch Journal Report Cash Position Branch Wise Teller Transaction Branch Wise Overage and Shortage Report Instrument Details Report Authentication Report Cheques Deposited Today Report Cheque Purchased Report Cheque Purchased Returned Today Report Drawer-wise Returned Cheques Report 5.2 Batch Journal Report In this BIP report you can verify the transactions done by tellers and also for tallying purpose. This report lists the transactions done by a user in a day and sums up the debits and credits for the user and for reconciliation with the vouchers and cheques for onward submission. This report is generated for the current branch. 5-1 You can invoke ‘Batch Journal Report’ screen by typing ‘RTRPBJRN’ in the field at the top right corner of the Application tool bar and clicking on the adjoining arrow button. You can specify the following parameters here: Product Type Select product type for which you wish to generate the report from the options. The following values are available for selection: Cash – Select to generate report if the product type is cash. Others – Select to generate report for the product types other than cash. Both – Select to generate report for all product types. Report Format Select the format in which you need to generate the report from the adjoining drop-down list. This list displays the following values: HTML – Select to generate report in HTML format. RTF – Select to generate report in RTF format. PDF – Select to generate report in PDF format. EXCEL – Select to generate report in EXCEL format. Report Output Select the output in which you need to generate the report from the adjoining drop-down list. This list displays the following values: Print – Select to print the report. View – Select to print the report. Spool – Select to spool the report to a specified folder so that you can print it later. 5-2 Printer At Select location where you wish to print the report from the adjoining drop-down list. This list displays the following values: Client – Select if you need to print at the client location. Server – Select if you need to print at the server location Printer Select printer using which you wish to print the report from the adjoining option list. Click ‘OK’ button to generate the Batch Journal report, click ‘Exit’ to return to the Reports Browser. 5.2.1 Contents of the Report The contents of the report are discussed under the following heads: Header The Header carries the Branch of the report, information on the branch and date, the ID of the user who generated the report, the date and time at which it was generated, the module of the report and product type. Body of the report The generated report will be ordered by the Teller Id. Field Name Field Description Teller ID This indicates the teller ID. Currency This indicates the currency. Product This indicates the product. Account Number with Customer Name This indicates the account number with customer name. Credited amount for the transaction This indicates the credited amount for the transaction. Debited amount for the transaction This indicates the debited amount for the transaction. Commission charged for the transaction This indicates the commission charged for the transaction. Transaction Date and Time This indicates the transaction date and time. Transaction Number This indicates the transaction number. Authorizer ID This indicates the authorizer ID. Sum of Credits, Debits and This indicates the sum of the credits, debits and 5-3 5.3 Field Name Field Description Teller ID This indicates the teller ID. Commission amount of transactions, Teller wise commission amount of transactions, teller wise. Cash Position Branch Wise This BIP report lists the cash position for all tellers under each currency. You can invoke ‘Cash Position Branch Wise’ screen by typing ‘RTRPCCY’ in the field at the top right corner of the Application tool bar and clicking on the adjoining arrow button. The screen is as shown below: Click ‘OK’ button to generate the Batch Journal report, click ‘Exit’ to return to the Reports Browser. 5.3.1 Contents of the Report The contents of the report are discussed under the following heads: Header The Header carries the Branch of the report, information on the branch and date, the ID of the user who generated the report, the date and time at which it was generated and the module of the report. 5-4 Body of the report The generated report will be ordered by the Currency, Teller ID. 5.4 Currency This indicates the currency. Till ID This indicates the till Id. Teller ID This indicates the teller Id. Cash position for Teller, Currency wise This indicates the cash position for teller, currency wise. Sum of the Cash Position for the Currency This indicates the sum of the cash position for the currency. Teller Transaction Branch Wise This BIP report lists the transactions done by tellers under each product for a currency. Then the sums for each currency are listed. You can invoke ‘Teller Transaction Branch Wise’ screen by typing ‘RTRPTRN’ in the field at the top right corner of the Application tool bar and clicking on the adjoining arrow button. Specify the transaction date. Click ‘OK’ button to generate the Batch Journal report, click ‘Exit’ to return to the Reports Browser. 5-5 5.4.1 Contents of the Report The contents of the report are discussed under the following heads: Header The Header carries the Branch of the report, information on the branch and date, the ID of the user who generated the report, the date and time at which it was generated and the module of the report. Body of the report The generated report will be ordered by the Teller ID. 5.5 Currency This indicates the currency. Teller ID This indicates the teller Id. Product with description This indicates the product with the description. Number of transactions by teller for the product This indicates the number of transactions by teller for the product. Total amount This indicates the total amount. Total Commission charged This indicates the total commission charged. Overage and Shortage Report This report lists the overage/shortage cash transactions performed during the day for a branch. 5-6 You can invoke ‘Overage/Shortage Report’ screen by typing ‘TPROSREP’ in the field at the top right corner of the Application tool bar and clicking on the adjoining arrow button. Specify the following details here: From Date Specify the Overage/shortage transactions From Date here in the format YYYY-MM-DD. Alternatively, you can also select the date from the adjoining calendar button. By default the current application date is displayed here. To Date Specify the Overage/shortage transactions To Date here in the format YYYY-MM-DD. Alternatively, you can also select the date from the adjoining calendar button. By default the current application date is displayed here. Branch Code Select the branch code from the adjoining option-list. The list displays all valid branch codes. The list will not include any closed branches. Click ‘OK’ button to generate the report. Click ‘Exit’ to return to the Reports Browser. 5.5.1 Contents of the Report The contents of the report are discussed under the following heads: Header The Header carries the Bank, Branch, Run date, User ID and the period for which the report is generated, 5-7 Body of the report The generated report will have the following information: 5.6 Posting Date Overage/Shortage for that date User ID User who has done the overage/shortage transaction. CD/TC Cash / Traveler’s Cheque Currency Currency of the transaction Overage Overage amount for the currency Shortage Shortage amount for the currency Instrument Details Report When branches issue various instruments, they are subsequently paid and reconciled. You can generate ‘Instruments Details Report’ for a given day to list details of instruments based on the instrument status. The instrument details are grouped based on instrument and currency type. You can invoke ‘Instruments Details Report’ screen by typing ‘RTRINSDT’ in the field at the top right corner of the Application tool bar and clicking on the adjoining arrow button. You can specify the following parameters here: Branch Code Specify a valid code of the Branch in which report is being generated, from the adjoining option list. 5-8 Date Specify a valid date for which you wish to generate instrument details report, from the adjoining calendar. Status Specify instrument status based on which you wish to generate the report, from the adjoining option list. Report Format Select the format in which you need to generate the report from the adjoining drop-down list. This list displays the following values: HTML – Select to generate report in HTML format. RTF – Select to generate report in RTF format. PDF – Select to generate report in PDF format. EXCEL – Select to generate report in EXCEL format. Report Output Select the output in which you need to generate the report from the adjoining drop-down list. This list displays the following values: Print – Select to print the report. View – Select to view the report. Spool – Select to spool the report to a specified folder so that you can print it later. Printer At Select location where you wish to print the report from the adjoining drop-down list. This list displays the following values: Client – Select if you need to print at the client location. Server – Select if you need to print at the server location Printer Select printer using which you wish to print the report from the adjoining option list. 5.6.1 Contents of the Report The parameters specified while generating the report are printed at the beginning of the report. Other content displayed in the Instruments Details Report is as follows: Header The following details are displayed in the header section: Field Name Field Description Bank Indicates Bank code and Bank Name 5-9 Field Name Field Description Branch Indicates Branch Code and Branch Name Run Date Indicates Date on which report is generated User ID Indicates User ID For Period Indicates Period for which report is generated. Body of the Report The following details are displayed as body of the generated report: 5.7 Field Name Field Description Instrument Type Indicates Instrument Type Issuer Short Name Indicates Issuer Short Name Instrument No. Indicates Instrument Number Instr CCY Indicates Instrument Currency Instr Amt Indicates Instrument Amount Payable Branch Indicates Payable Branch Instrument Status Indicates Instrument Status Teller ID Indicates Maker ID Authentication Report There is a variation in the access rights, privileges, and transaction limits for each of your staff. Few transactions have to be revalidated and authorized by the supervisor before committing to the record. Also, few transactions have to be authorized by a supervisor due to legal/regulatory repercussions. You can generate ‘Authentication Report’ which lists the authorizations provided on transaction. 5-10 You can invoke ‘Authentication Report’ screen by typing ‘STRBRNAU’ in the field at the top right corner of the Application tool bar and clicking on the adjoining arrow button. You can specify the following parameters here: Branch Code Specify a valid code of the Branch in which report is being generated, from the adjoining option list. Posting Date Specify a valid Posting date of the transaction for which you wish to generate authentication details report, from the adjoining calendar. Report Format Select the format in which you need to generate the report from the adjoining drop-down list. This list displays the following values: HTML – Select to generate report in HTML format. RTF – Select to generate report in RTF format. PDF – Select to generate report in PDF format. EXCEL – Select to generate report in EXCEL format. Report Output Select the output in which you need to generate the report from the adjoining drop-down list. This list displays the following values: Print – Select to print the report. View – Select to print the report. Spool – Select to spool the report to a specified folder so that you can print it later. 5-11 Printer At Select location where you wish to print the report from the adjoining drop-down list. This list displays the following values: Client – Select if you need to print at the client location. Server – Select if you need to print at the server location Printer Select printer using which you wish to print the report from the adjoining option list. 5.7.1 Contents of the Report The parameters specified while generating the report are printed at the beginning of the report. Other content displayed in the Authentication Report is as follows: Header The following details are displayed in the header section: Field Name Field Description Bank Indicates Bank code and Bank Name Branch Indicates Branch Code and Branch Name Run Date Indicates Date on which report is generated User ID Indicates User ID For Period Indicates Period for which report is generated. Body of the Report The following details are displayed as body of the generated report: Field Name Field Description Supervisor ID Indicates Checker ID User Id Indicates Maker ID Account Number Indicates Account Number Transaction Description Indicates Transaction Description Currency Indicates Transaction Currency Transaction Amount Indicates Transaction Amount Date Indicates Authorization Date Authorization comments Indicates Authorization comments 5-12 5.8 Field Name Field Description Account Description Indicates Account Description Cheques Deposited Today Report During a day Bank receives various clearing cheques from customers, which have to be credited in to the respective accounts. To clear the settlement few details have to be furnished. You can generate ‘Cheques Deposited Today Report’, which lists cheques deposited to the accounts on the current day and their complete details. You can invoke ‘Cheques Deposited Today Report’ screen by typing ‘STRCHDEP’ in the field at the top right corner of the Application tool bar and clicking on the adjoining arrow button. You can specify the following parameters here: Branch Code Specify a valid code of the Branch in which report is being generated, from the adjoining option list. Date Specify the date for which you wish to generate the report from the adjoining calendar. End Point Specify cheque number which you wish to maintain as an end point to generate the report, from the adjoining option list. Clearing Branch Specify code of the branch clearing the cheques, for which the report is generated, from the adjoining option list. 5-13 Report Format Select the format in which you need to generate the report from the adjoining drop-down list. This list displays the following values: HTML – Select to generate report in HTML format. RTF – Select to generate report in RTF format. PDF – Select to generate report in PDF format. EXCEL – Select to generate report in EXCEL format. Report Output Select the output in which you need to generate the report from the adjoining drop-down list. This list displays the following values: Print – Select to print the report. View – Select to print the report. Spool – Select to spool the report to a specified folder so that you can print it later. Printer At Select location where you wish to print the report from the adjoining drop-down list. This list displays the following values: Client – Select if you need to print at the client location. Server – Select if you need to print at the server location Printer Select printer using which you wish to print the report from the adjoining option list. 5.8.1 Contents of the Report The parameters specified while generating the report are printed at the beginning of the report. Other content displayed in the Cheques Deposited Today Report is as follows: Header The following details are displayed in the header section: Field Name Field Description Bank Indicates Bank code and Bank Name Branch Indicates Branch Code and Branch Name Run Date Indicates Date on which report is generated User ID Indicates User ID For Period Indicates Period for which report is generated. 5-14 Body of the Report The following details are displayed as body of the generated report: Field Name Field Description Payee Brn Indicates Payee Branch Payee Account Indicates Payee Account number Txn No. Indicates Xref Instrument No. Indicates Cheque Number Customer short name Indicates Customer short name Customer value date Indicates Value Date Cheque amount Indicates Cheque amount Transaction currency Indicates Instrument Currency Routing number Indicates Routing number Currency Indicates Currency End Point Indicates End Point Clearing type Indicates Clearing Type If the cheques deposited are from a different bank, then the customer and remitter names are displayed in the report. 5.9 Cheque Purchased Report A teller purchases both the local and outstation cheques deposited by the customers, to credit on the day of deposition of cheques into the accounts. The balance available in the customer’s CASA account is updated for successful transaction. 5-15 During EOD, you can generate ‘Cheque Purchased Report’ with Teller and Authorizer ID details for reconciliation. The details of the report are grouped based on the product and currency type. You can invoke ‘Cheques Purchased Report’ screen by typing ‘STRCHPUR’ in the field at the top right corner of the Application tool bar and clicking on the adjoining arrow button. You can specify the following parameters here: Branch Code Specify a valid code of the Branch in which report is being generated, from the adjoining option list. Purchase Date Specify purchased date of the cheques for which the report is generated from the adjoining calendar. Report Format Select the format in which you need to generate the report from the adjoining drop-down list. This list displays the following values: HTML – Select to generate report in HTML format. RTF – Select to generate report in RTF format. PDF – Select to generate report in PDF format. EXCEL – Select to generate report in EXCEL format. Report Output Select the output in which you need to generate the report from the adjoining drop-down list. This list displays the following values: Print – Select to print the report. View – Select to print the report. 5-16 Spool – Select to spool the report to a specified folder so that you can print it later. Printer At Select location where you wish to print the report from the adjoining drop-down list. This list displays the following values: Client – Select if you need to print at the client location. Server – Select if you need to print at the server location Printer Select printer using which you wish to print the report from the adjoining option list. 5.9.1 Contents of the Report The parameters specified while generating the report are printed at the beginning of the report. Other content displayed in the Cheques Purchased Report is as follows: Header The following details are displayed in the header section: Field Name Field Description Bank Indicates Bank code and Bank Name Branch Indicates Branch Code and Branch Name Run Date Indicates Date on which report is generated User ID Indicates User ID For Period Indicates Period for which report is generated. Body of the Report The following details are displayed as body of the generated report: Field Name Field Description Product Indicates PDC Product Currency Indicates Currency of the Cheque Account Indicates Beneficiary Account Account Title Indicates Beneficiary Account Description Txn. reference no. Indicates Transaction Reference Number Purchase Margin Indicates Cheque Amount-Amount Purchased Amount Purchased Indicates Amount Purchased/discount 5-17 Interest Amount Indicates Sum of Interest Amount Service Charge Amount Indicates Sum of Charge Amount Maker ID Indicates Maker ID of the Transaction Checker ID Indicates Checked ID of the transaction If the purchase date and value date are same, then the Interest and SC amount are ‘0’. 5.10 Cheque Purchased Returned Today Report If the instruments which were purchased by the branch to credit the customer accounts are returned by other banks due to valid reasons; then the customer accounts are reversed. During EOD, you can generate ‘Cheque Purchased Returned Today Report’ which lists all the cheques which were purchased and returned on the specified day, for effective follow-up by the branches. You can invoke ‘Cheques Purchased Returned Today Report’ screen by typing ‘STRCHPRE’ in the field at the top right corner of the Application tool bar and clicking on the adjoining arrow button. You can specify the following parameters here: Branch Code Specify a valid code of the Branch in which report is being generated, from the adjoining option list. Returned Date Specify returned date of the cheques for which the report is generated from the adjoining calendar. 5-18 Report Format Select the format in which you need to generate the report from the adjoining drop-down list. This list displays the following values: HTML – Select to generate report in HTML format. RTF – Select to generate report in RTF format. PDF – Select to generate report in PDF format. EXCEL – Select to generate report in EXCEL format. Report Output Select the output in which you need to generate the report from the adjoining drop-down list. This list displays the following values: Print – Select to print the report. View – Select to print the report. Spool – Select to spool the report to a specified folder so that you can print it later. Printer At Select location where you wish to print the report from the adjoining drop-down list. This list displays the following values: Client – Select if you need to print at the client location. Server – Select if you need to print at the server location Printer Select printer using which you wish to print the report from the adjoining option list. 5.10.1 Contents of the Report The parameters specified while generating the report are printed at the beginning of the report. Other content displayed in the Cheques Purchased Returned Today Report is as follows: Header The following details are displayed in the header section: Field Name Field Description Bank Indicates Bank code and Bank Name Branch Indicates Branch Code and Branch Name Run Date Indicates Date on which report is generated User ID Indicates User ID For Period Indicates Period for which report is generated. 5-19 Body of the Report The following details are displayed as body of the generated report: Field Name Field Description Payee A/C No. Indicates Beneficiary Account Number Cheque No Indicates Instrument Number Local Currency Indicates Local currency of the Branch Amount Txn (LCY) Indicates Cheque Amount in LCY Routing No. Indicates Routing No. Txn Currency Indicates Currency Code of the transaction Amount Txn (TCY) Indicates Amount in Transaction Currency Reject Reason Indicates Remarks of the Cheque Transaction 5.11 Drawer-wise Returned Cheques Report Cheques are credited and discounted to the customer accounts, based on the purchase limit, margin and so on. Subsequently these cheques realized or dishonored and the corresponding details are entered. You can generate ‘Drawer-wise Returned Cheques Report’ which lists details of the cheques returned by the correspondent bank or branch on a specified day. The report also provides details about the income earned through interest. Details in the report are grouped based on the Drawer. You can invoke ‘Drawer-wise Returned Cheques Report’ screen by typing ‘STRDRRET’ in the field at the top right corner of the Application tool bar and clicking on the adjoining arrow button. You can specify the following parameters here: 5-20 Branch Code Specify a valid code of the Branch in which report is being generated, from the adjoining option list. Returned Date Specify returned date of the cheques for which the report is generated from the adjoining calendar. Report Format Select the format in which you need to generate the report from the adjoining drop-down list. This list displays the following values: HTML – Select to generate report in HTML format. RTF – Select to generate report in RTF format. PDF – Select to generate report in PDF format. EXCEL – Select to generate report in EXCEL format. Report Output Select the output in which you need to generate the report from the adjoining drop-down list. This list displays the following values: Print – Select to print the report. View – Select to print the report. Spool – Select to spool the report to a specified folder so that you can print it later. Printer At Select location where you wish to print the report from the adjoining drop-down list. This list displays the following values: Client – Select if you need to print at the client location. Server – Select if you need to print at the server location Printer Select printer using which you wish to print the report from the adjoining option list. 5.11.1 Contents of the Report The parameters specified while generating the report are printed at the beginning of the report. Other content displayed in the Drawer-wise Returned Cheques Report is as follows: Header The following details are displayed in the header section: Field Name Field Description Bank Indicates Bank code and Bank Name 5-21 Field Name Field Description Branch Indicates Branch Code and Branch Name Run Date Indicates Date on which report is generated User ID Indicates User ID For Period Indicates Period for which report is generated. Body of the Report The following details are displayed as body of the generated report: Field Name Field Description Drawer ID Indicates Drawer party ID Account No Indicates Beneficiary Account Number Customer Name Indicates Customer Name Cheque Date Indicates Cheque Date Cheque No Indicates Cheque Number Routing No Indicates Routing Number Purchase Date Indicates Purchase Date Purchase Limit Indicates Limit Linked Amount Instrument Amount Indicates Cheque Amount Instrument CCY Indicates Instrument Currency Interest Amount Indicates Interest Amount SC Amount Indicates Service Charge Amount Cheque Return Count Indicates Cheque Return Count Purchase Srl No Indicates Purchase Serial Number Account Description Indicates Account Description 5-22 6. 6.1 Annexure – A Mapping Oracle FLEXCUBE Branch Functions to Retail Teller Products Oracle FLEXCUBE provides inbuilt retail teller products in the Retail Teller module for retail teller transactions entered through a Oracle FLEXCUBE branch. These products are factory shipped, and no new products other than these need be maintained for such retail teller transactions. You can, however, make changes to these inbuilt products, to suit your requirements, and specify any exchange rate parameters and any MIS details. An exhaustive list of these products and their associations with the corresponding functions in the Oracle FLEXCUBE branch are given below. Branch Transaction Fast Path Function Description Retail Teller Module Product Code 1001 Cash Withdrawal CHWL 1009 TC Sale (Against A/C) TCSN 1013 Check Withdrawal CQWL 1060 Miscellaneous GL Debit MGLD 1401 Cash Deposit CHDP 1409 TC Purchase (Against A/C) TCPN 1460 Miscellaneous GL Credit MGLC 8205 TC Sale (Against GL) TCSG 9009 Buy Cash From Central Bank BCCB 9010 Sell Cash To Central Bank SCCB 9011 Buy TCs From AGENT BTAG 9015 Buy TCs from HO BTHO 9016 Sell TCs from HO STHO 1005 Miscellaneous GL Transfer MSGL 1006 Funds Transfer Request FTRQ 6-1 Branch Transaction Fast Path Function Description Retail Teller Module Product Code 1008 Miscellaneous Customer Debit MSCD 1015 Funds Transfer Request-NoCOT FTNT 1018 Miscellaneous Customer DebitNoCOT CDNT 1408 Miscellaneous Customer Credit MSCC 8301 BC Issue Walk-In BCIW 8302 BC Issue Against GL BCIG 8305 DD Issue Walk-In DDIW 8306 DD Issue against GL DDIG 8307 BC Liquidation Walk-In BCLW 8308 BC Liquidation Against GL BCLG 8309 BC Liquidation Against Account BCLA 8310 DD Liquidation Walk-In DDLW 8311 DD Liquidation against GL DDLG 8312 DD Liquidation Against Account DDLA 1010 BC Sale against Account BCSA 1014 DD Sale against Account DDSA 8003 TC Purchase (Walk-In) TCPW 8004 FX Purchase (Walk-in) FXPW 8203 FX Sale (Walk-in) FXSW 8204 TC Sale (Walk-In) TCSW 6-2 Branch Transaction Fast Path Function Description Retail Teller Module Product Code 7551 Book Shortage BKSG 7552 Book Overage BKOG 1300 Close Out Withdrawal by Bankers Cheque CWBC 1301 Close Out Withdrawal COWL 1320 Close Out Withdrawal FTRQ 8301 BC Issue Walk-In BCIW 8302 BC Issue Against GL BCIG 8305 DD Issue Walk-In DDIW 8306 DD Issue against GL DDIG 8311 DD Liquidation against GL DDLG 8312 DD Liquidation Against Account DDLA 5001 Manual Loan Disbursement by Cash LDCH 5401 Manual Loan Repayment by Cash LRCH 6-3 7. 7.1 Annexure – B Debit and Credit Advices for Retail Teller Module The advice types that are available for the Retail Teller module are the debit and credit advices generated for the debit or credit entries that would be passed to customer accounts, namely, “DR ADVICE” and “CR ADVICE”. The formats for these advices are given below. 7.1.1 Debit Advice Format (Retail Teller Module) #RH DEBIT ADVICE DATE: _BRN-DATE_ PAGE: _PG_ #SC _CUSTOMER-NAME_ _CUSTADDR1_ _CUSTADDR2_ _CUSTADDR3_ _CUSTADDR4_ #EC #EH #PH PAGE: _PG_ #EH #B CUSTOMER ID: _CUSTOMER_ ACCOUNT No: _ACCOUNT_ OUR REFERENCE NO: _CONTRACTREFNO_ USER REFERENCE NO: _USERREFNO_ WE HAVE EXECUTED THE FOLLOWING TRANSACTION ON YOUR BEHALF ON ------------------------------------------------------------------VALUE DATE CCY AMOUNT ------------------------------------------------------------------_VALDT_ _CCY_ _AMOUNT_ 7-1 _TRNDT_: ------------------------------------------------------------------DETAILS OF CHARGES FOR THE ABOVE TXN ARE: CHARGE AMOUNT 1: _CHGAMT1_ -CHGCCY1_ CHARGE AMOUNT 2: _CHGAMT2_ -CHGCCY2_ CHARGE AMOUNT 3: _CHGAMT3_ -CHGCCY3_ CHARGE AMOUNT 4: _CHGAMT4_ -CHGCCY4_ CHARGE AMOUNT 5: _CHGAMT5_ -CHGCCY5_ THE ACCOUNT BALANCE AFTER THE TXN IS: _ACCBAL_ #EB #RF AUTHORIZED SIGNATORY #EF 7.1.2 Credit Advice Format (Retail Teller Module) #RH CREDIT ADVICE DATE: _BRN-DATE_ PAGE: _PG_ #SC _CUSTOMER-NAME_ _CUSTADDR1_ _CUSTADDR2_ _CUSTADDR3_ _CUSTADDR4_ #EC #EH #PH PAGE: _PG_ #EH #B _DEPSLIPNO_ 7-2 _UNITID_ CUSTOMER ID ACCOUNT : _CUSTOMER_ : _ACCOUNT_ OUR REFERENCE NO : _CONTRACTREFNO_ USER REFERENCE NO : _USERREFNO_ WE HAVE EXECUTED THE FOLLOWING TRANSACTION ON YOUR BEHALF: ------------------------------------------------------------------VALUE DATE CCY AMOUNT ------------------------------------------------------------------_VALDT_ _CCY_ _AMOUNT_ ------------------------------------------------------------------#EB #RF AUTHORIZED SIGNATORY #EF 7.1.3 Fixed Deposit Confirmation Advice Field Tags Description Branch Branch Code Date Account Opening Date Time of Transaction Checker Date-TimeStamp Customer Name - Customer No. - Teller MakerId TD account number - TD amount - TD amount in words - TD tenor (in days) Number of days between Maturity Date and StartDate. 7-3 Start date - Maturity date - Interest rate - Interest amount Projected interest amount at the time of maturity. TD Ccy Currency of the TD 7.1.4 Collection Cheque Credit Advice System would support the below mentioned advice field tags: For BC/DD: Field Tags Description Account number - CCY - Cheque amount - Charges - Amount credited Net of charges Paying bank - Date sent Date of issue Date realized Liquidation date Cheque number - amount in words - Branch name - Customer name - For Cheques: Field Tags Description Account number - CCY - Cheque amount - Charges - 7-4 Amount credited Net of charges Paying bank - Date sent Instrument date Date realized Clearing date Cheque number - amount in words - Branch name - Customer name - 7.1.5 Collection Cheque Return Advice System would support the below mentioned advice field tags: For BC/DD: Field Tags Description Account number - CCY - Cheque Amount - Return Charges - Returning bank - Date sent Date of issue Date returned Liquidation date Branch name - Teller number MakerId Amount in words - Time Checker Date-TimeStamp Customer name - customer address Return reason Reject Reason Cheque number 7-5 For Cheque: Field Tags Description Account number - CCY - Cheque Amount - Return Charges - Returning bank - Date sent Date of issue Date returned Liquidation date Branch name - Teller number MakerId Amount in words - Time Checker Date-TimeStamp Customer name - customer address Return reason Reject Reason Cheque number 7.1.6 Accounting Entries for Loan Repayment by Cash: Following are the accounting entries passed for the manual repayment of loan by cash: EVENT Dr/Cr ACCOUNTING ROLE AMOUNT TAG INIT Dr OFFSET_ACCOUNT(The GL for Cash) OFS_AMT INIT Cr DR_SETTL_BRIDGE TXN_AMT 7-6 7.1.7 Accounting Entries for Loan Disbursement by Cash: Following are the accounting entries passed for the manual repayment of loan by cash: EVENT Dr/Cr ACCOUNTING ROLE AMOUNT TAG INIT Dr CR_SETTL_BRIDGE TXN_AMT INIT Cr OFFSET_ACCOUNT(The GL for Cash) OFS_AMT 7.1.8 Accounting Entries for FX Sale through the Account Following are the accounting entries passed for the sale of foreign currency to the CASA account holder: EVENT DR/CR ACCOUNTING ROLE AMOUNT TAG INIT DR TXN_ACCOUNT(CASA) TXN_AMT INIT CR OFFSET_ACCOUNT(ASSET) OFS_AMT 7.1.9 Accounting Entries for FX Purchase against the Account The system passes the following accounting entries for FX purchase against account: EVENT DR/CR ACCOUNTING ROLE AMOUNT TAG INIT DR OFFSET_ACCOUNT(ASSET) OFS_AMT INIT CR TXN_ACCOUNT(CASA) TXN_AMT 7-7 8. 8.1 Retail Teller Glossary List of Important Terms This section gives a list of important terms used in this manual. Account Statement This specification indicates whether the transaction (posted using data entry module) must be made available while the statement for the account is generated. Amount Item This indicates the amount entry that is passed into a general ledger / sub ledger in the chart of accounts for each transaction. Authorization A facility provided for the purpose of cross-checking and verifying a transaction to ensure that it conforms to the parameters maintained for the branch. After authorization, the transaction comes into effect and will be processed by the system. Authorization Amount Limit This indicates the maximum amount of a transaction that can be authorized by an authorizer user in the system. Authorizer This indicates a user who authorizes maintenance information records or transactions in Oracle FLEXCUBE. The authorizer cannot be the same user who created the record. Batch This indicates a group of transactions of a particular type. All transactions of a particular type can be authorized on a business day by authorizing the batch into which they have been grouped. Branch Parameters Static information maintained for a branch, containing mandatory operations and default parameters that would be specific to the branch. They are also known as branch conditions. Clearing Bank Codes This indicates unique identifiers maintained in Oracle FLEXCUBE for banks that are participants in a clearing house. Currency Denominations This indicates discrete lots in which paper currency is available. Each lot may contain one or more units of currency. Customer Category This indicates a group of customers with logically similar features or attributes. 8-1 Default Charge Collection Account The account to which the charges for the transaction will be charged. This account can be defined at the product level as “Transaction” account or “Offset” account. Denomination Tracking This indicates tracking currency denominations for teller type transactions at a branch. Exchange Rate Type This indicates the type of exchange rate that you can specify for a product. Exchange Rate Variance This indicates the difference between the default value and the changed value of an exchange rate employed for currency conversion. Limits can be set for the variance. Maximum Variance This indicates the limit beyond which an exchange rate cannot be changed over and above the default value and an override is not possible. MIS Code This indicates a unique grouping of MIS (Management Information System) details such as Transaction MIS, Composite MIS, Cost MIS and so on, maintained for management reporting purposes. Normal Variance This indicates the limit within which exchange rates are allowed to be changed over and above the default value, without requiring an override. This limit corresponds to the minimum variance. Overdraft This indicates the amount by which an account has been overdrawn. Product This indicates an identifier, in Oracle FLEXCUBE, for any type of service that a bank offers its customers. It represents a set of attributes and preferences are maintained for the product, which will apply to the processing of any contracts, transactions or deals involving the product (service). Shortage/Overage GL This indicates the general ledger used for posting accounting entries related to differences between actual transaction amounts and amounts available in denominations. Signature Verification This indicates the process of authentication of a customer’s signature. It is typically enforced for transactions involving amounts exceeding a certain specified limit. Teller Till Balancing This indicates the task of reconciling the physical balance in a till with the balance according to the system records. The operator performs this activity during the Beginning of Day process. 8-2 Teller Type Transaction This indicates the transaction performed by a teller. Cash deposits and withdrawals, sale and purchase of traveler checks and clearing checks are all teller type transactions. Till A cash register used by a teller for the purpose of disbursing withdrawals and receiving deposits. A till is usually linked to a safe or a vault. Transaction Account This indicates the account of the customer involved in a transaction. For transactions in respect of which internal entries are passed, it could also be a general ledger. Transaction Amount Limit This is the maximum and minimum limits which represent the allowable range for the amount of a transaction. Transaction Codes These indicate unique identifiers maintained in Oracle FLEXCUBE for different types of cash transfers (transactions) within the branch. A transaction code is also an identifier for each accounting entry that describes the nature (i.e., debit or credit) of the entry. Transaction Limits These are limits placed on the size of a transaction that a teller is allowed to input. Vault This is a safe where the physical cash assets of a bank (or branch) are kept. A bank may maintain one or more vaults. 8-3 9. Screen Glossary 9.1 Function ID List The following table lists the function id and the function description of the screens covered as part of this User Manual. Function ID Function Description DEDQUERY Retail Teller Transaction Query DEDRTPRM Retail Teller Product Maintenance IFDATMMN ARC Maintenance RTRINSDT Instruments Details Report RTRPBJRN Batch Journal Report RTRPCCY Cash Position Branch Wise RTRPTRN Teller Transaction Branch Wise STDTBRAN Teller Branch Parameter STRBRNAU Authentication Report STRCHDEP Cheques Deposited Today Report STRCHPRE Cheque Purchased Returned Today Report STRCHPUR Cheques Purchased Report STRDRRET Drawer-wise Returned Cheques Report STSTBRAN Teller Branch Parameter Summary TPROSREP Overage shortage report 9-1 Retail Teller [May] [2012] Version 12.0 Oracle Corporation World Headquarters 500 Oracle Parkway Redwood Shores, CA 94065 U.S.A. Worldwide Inquiries: Phone: +1.650.506.7000 Fax: +1.650.506.7200 www.oracle.com/ financial_services/ Copyright © [2012] Oracle Financial Services Software Limited. All rights reserved. No part of this work may be reproduced, stored in a retrieval system, adopted or transmitted in any form or by any means, electronic, mechanical, photographic, graphic, optic recording or otherwise, translated in any language or computer language, without the prior written permission of Oracle Financial Services Software Limited. Due care has been taken to make this document and accompanying software package as accurate as possible. However, Oracle Financial Services Software Limited makes no representation or warranties with respect to the contents hereof and shall not be responsible for any loss or damage caused to the user by the direct or indirect use of this document and the accompanying Software System. Furthermore, Oracle Financial Services Software Limited reserves the right to alter, modify or otherwise change in any manner the content hereof, without obligation of Oracle Financial Services Software Limited to notify any person of such revision or changes. All company and product names are trademarks of the respective companies with which they are associated.