1
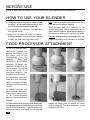
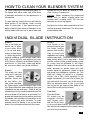
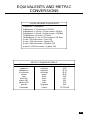
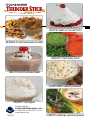
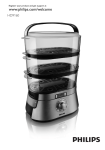
8 inAppliances
ONE!
n
n
n
n
n
n
n
n
Blends
Chops
Grinds
Whips
Mixes
Purees
Processes
Juices
GRINDS coffee beans!
GREAT applesauce!
SALSA in seconds!
PLEASE READ CAREFULLY
BEFORE USING THE APPLIANCE.
INTRODUCTION
Your new blender system purees and blends foods
quickly and easily. Use it to make sauces, soups, salad
dressings and mayonnaise, dietary and baby foods,
beverages (such as milkshakes, eggnog, cocktails,
etc.), batter for waffles, pancakes and Yorkshire
puddings, and chopping nuts or grinding coffee beans.
The blender system is designed for use with its mixing
container; however it can be used in a saucepan, bowl
or other container.
Note: Always remember to leave enough space for
the movement of food to prevent spill-over from
the container.
Caution: When using your blender in a saucepan, the saucepan must not be on or
over a heat source.
IMPORTANT SAFEGUARDS
PLEASE READ CAREFULLY
When using electrical appliances, especially when
children are present, basic safety precautions
should always be followed including the following:
READ ALL INSTRUCTIONS BEFORE USING.
DANGER – To reduce the risk of electrocution.
1. Read all instructions before using the appliance.
2. To protect against risk of electric shock, do not
put motor end of the appliance in water or
other liquid.
3. Do not place appliance where it can fall or be
pulled into water or other liquid.
4. Do not reach for an appliance that has fallen
into water. Unplug immediately!
WARNING – To reduce the risk of burns,
electrocution, fire, or injury to person:
1. This appliance should not be used by children.
Close supervision is necessary when this
product is used near children or invalids.
2. Use this appliance for its intended use as
described in this brochure. Do not use any other
accessories or attachments not recommended
by the manufacturer. They may result in fire,
electrical shock, or personal injury.
3. Never operate this appliance if it has a
damaged cord or plug, if it is not working
properly, if it has been dropped or damaged,
or dropped into water. Return the appliance
to an authorized customer service center for
inspection, repair, or adjustment.
4. Keep the cord away from heated surfaces.
5. Always grab by the plug to remove from outlet.
DO NOT pull on cord.
6. Never force the plug into an outlet.
7. Do not use outdoors or operate where aerosol
(spray) products are being used or where
oxygen is being administered.
8. Do not let cord hang over edge of table or
counter, or touch hot surface.
9. Do not place on or near a hot gas or electric
burner or in a heated oven.
10. Unplug from outlet when not in use, before
putting or taking off parts, and before
cleaning.
11. Keep hands and utensils out of the container
while blending to prevent the possibility of
severe injury to persons or damage to the unit.
A scraper may be used but must be used only
when the unit is not running.
12. Blades are sharp, handle carefully.
13. Do not use on stove.
14. When mixing liquids, especially hot liquids,
use a tall container or make small quantities at
a time to reduce spillage.
15. To reduce the risk of injury never place cutting
blade or discs on base without first putting
bowls properly in place.
16. Save these instructions.
The appliance has a polarized plug (one blade is wider than the other). To reduce the risk of electric shock,
this plug will fit in a polarized outlet only one way. If the plug does not fit fully in the outlet, reverse the
plug. If it still does not fit, contact a qualified electrician. Do not modify the plug in any way.
SAVE THESE INSTRUCTIONS
1
BEFORE USE
Rinse all parts which come into contact with food (see cleaning and maintenance).
HOW TO USE YOUR BLENDER
1. Place food in the mixing bowl or other suitable
container. For the most consistent results, food
should be processed in small quantities.
2. Insert blender into container. Plug appliance
into the wall outlet.
3. Grasp unit in hand and press the control.
Guide the blender through the food, moving
it slowly up, down and from side to side.
Note: The unit should not be operated for more
than one minute without stopping.
When pureeing food, it is important to use
enough liquid (juice, milk or cream, broth, etc.) to
have a smooth mixture. Adjust the consistency of
the mixture by adding more liquids or soft solids.
Caution: Always unplug the blender after use.
Keep the blender out of the reach of children.
FOOD PROCESSOR ATTACHMENT
To use the food processor
attachment remove the
blender attachment from
the motor unit of the
Thunderstick Pro by
grasping it firmly and
twisting in a clockwise
direction. To attach the
motor unit to the top of the
food processor, line up the
arrows and twist in a
clockwise direction. See
the pictures on the right.
To remove the motor unit
from the food processor,
twist in a counter-clockwise
direction and lift the motor
unit off.
To reattach the motor unit
with the blender attachment,
line up the arrows and twist
in an counter-clockwise
direction. See the pictures to
the right.
For best results when using the food attachment
cut up larger pieces of food before processing and
only fill to the line shown. Pulse the motor until
the desired result is achieved. You should not
2
operate for longer than 30 seconds at a time
without stopping. The food attachment is not
suitable for hot food.
HOW TO CLEAN YOUR BLENDER SYSTEM
For initial cleaning of the detachable parts, fill
the beaker with warm water and a few drops
of detergent and switch on the appliance for a
few seconds.
To clean after use, unplug the unit and hold the
blade portion of the blender under running
water to rinse clean. If food particles are not
easily rinsed off, place a drop of detergent in the
mixing beaker with one cup of warm water and
operate the unit for about 60 seconds, or until
clean. Unplug, rinse and dry.
Caution: Never immerse the motorized
power unit in water; simply wipe the
outside with a damp cloth. Do not use
abrasive or scouring agents.
Pay attention that no water penetrates the lid of
the food processor attachment. The other parts
are dishwasher safe.
INDIVIDUAL BLADE INSTRUCTION
Blade A
This is the blade you
would use in place
of your mixer. Move
in an up and down
motion to draw the air
in. Whips egg whites,
frostings, puddings, chiffon recipes, cream, skim
milk, non-fat dry milk, and anything you want
fluffy. Move in a flowing, up and down motion to
draw the air in. Skim milk, cream, egg whites,
etc. work much faster in a cylinder container.
Blade B
This blade will take
lumps out in seconds,
for gravies, mashed
potatoes, sauces and
all wet batters, like
cake mixes, pancakes,
etc. Makes regular malts and shakes right in the
cup. Mayonnaise and salad dressings from raw
ingredients are fast and easy. • Blade B will be
moved around in the container depending on the
size and shape of the food to be processed. For
gravies and sauces use the low setting and move
the blender from one side of the container to the
other, covering the entire container. To mash
potatoes move the blender in an up and down
motion like a plunger and blend out the lumps.
Blade C
This blade is for
working heavy doughs
like bread, cookies,
pastries, and noodles.
Chop or puree fruits,
vegetables and cooked
meat for baby food. • Chop cooked meats for ham
salad, turkey salad, tuna or egg salad. • Bread
crumbs, cracker crumbs, graham cracker crumbs
for crusts, may be processed in stiff Ziploc
baggies. Grate carrots for carrot cake and raisin
salad, potatoes for potato cakes and hash
browns, apples for applesauce, cheese for tacos
and pizzas, and cabbage for coleslaw, etc. This
blade will always be moved in a chopping
motion. Use a light touch especially in the
baggie. Remember, you have a lot of power, let
the machine do the work, you do the moving.
With ice, add some water to mix. If you flood
the ice you will get large chunks. Water to the
level of the ice will give you shaved.
Raw Meat
Grinder Blade
All meats can be
chopped: chicken,
beef, turkey, pork,
veal, etc. As you chop,
in an up and down motion, you will notice the
fats and veins all wrap around the wand, leaving
you with the pure protein.
3
INDIVIDUAL BLADE INSTRUCTION(cont.)
Dry Grinder Attachment
Straight blade – Blade D
Use for grinding coffee beans,
spices, orange, lemon and lime
peels, corn, wheat, barley, oats,
chocolate, and coconut.
Dry grinder attachment
Grating blade – Blade E
Use for slightly softer ingredients
such as cheese, chocolate, cereals,
beans etc.
Note: Better results are obtained
by cutting the ingredients into
small pieces before grating.
The dry grinder attachment
works with blades D and E.
STORING YOUR BLENDER
The stand unit can be wall mounted, using the
screws and wall plugs provided. Leave one
quarter inch of the screw exposed; slide holder
over the screws. The stand should fit snugly to
the wall, tighten the screws if necessary.
Stand
Motor unit &
blender
attachment
Food processor
attachment
4
Mixing Container
HOW TO ADJUST BLADES
If an accessory does not fit snugly, you can
adjust it by gently squeezing with a pair of
pliers as shown.
HOW TO INSERT THE BLADES
Insert the blade directly into the base of the
shaft ensuring that the groove on the blade
lines up with the notch on the blender shaft.
(See picture, right).
Caution: Always ensure that the appliance
is disconnected from the wall outlet when
changing a blade.
HOW TO REMOVE BLADES
Hold the blade removal tool firmly and position
it above the stem of the blade and use as a lever
to release the blade. (See picture, right).
Blade removal tool
5
HELPFUL HINTS:
With regular use you will quickly realize the
potential and versatility of your BLENDER
SYSTEM eventually creating your own recipes
and finding new ones.
The correct use of the BLENDER SYSTEM is
based on two principles:
1. The way the appliance is held.
2. The way in which you operate
your appliance.
The shape of the appliance is designed to have a
precise balance, allowing you to hold the unit
with minimum effort, operating the safety switch
with forefinger or middle finger.
The choice of the container is very important in
achieving the best results. Remember that the
chrome shaft of the mixer must be placed in the
container before you switch the appliance on.
When chopping fruits or vegetables, your
container should be tall and slim. When
chopping, partially cover the opening of the
container with your free hand.
After use unplug the appliance, remove any food
scrap particles and rinse clean.
6
Keep your appliance clean and in good
condition. Follow these simple cleaning
guidelines:
• After use always rinse the shaft and blade
in warm water and wipe clean
• Wipe the plastic housing unit with a
damp cloth.
NOTE: Do not immerse the plastic housing of
the unit in liquid or water.
NOTE: Some units may vary slightly in their
appearance.
This appliance is made for short term operation.
After one minute of operation, stop to allow the
unit to cool down.
Only switch on the Thunderstick Pro when the
blender is in the food. Wait for the mixer to stop
rotating before taking it out.
Let boiling liquids cool to 80ºF before using the
Thunderstick Pro. There is the danger of
scalding when dealing with hot liquids and care
should be taken.
RECIPES - APPETIZERS
Guacamole Dip
Salsa
2 small avocados, peeled, mashed
1 tomato, diced
1/4 onion, chopped
1 tbsp. lemon juice
1 clove garlic, minced
2 tsp. Worcestershire sauce
Dash cayenne pepper
Dash pepper
Dash sea salt
4 ripe tomatoes, quartered
1 medium onion, peeled and quartered
1 red pepper, seeded and chopped into pieces
1 clove garlic
2 tsp. lemon juice
jalapeno (1/3 for mild flavor, a whole for spicy)
dash of Worcestershire sauce
Blade C
Chop tomato, onion, and garlic.
Blade C
Place all ingredients into the food processor and
pulse until the desired consistency is achieved.
Serve with chips or use as a condiment.
Mash avocado and stir in lemon juice
immediately. This prevents discoloration. Add
remaining ingredients. Mix well. Cover
with thin layer of mayonnaise to prevent
discoloration. Chill.
* You may add some crumbled bacon, if desir ed.
Special Blend Salsa Dip
Catalina Dip
2 medium tomatoes, diced
1 large onion, diced
3 tbsp. green chilies, canned, diced
4 tsp. distilled white vinegar
1 tbsp. fresh cilantro (coriander), chopped
Sea salt, optional
1 cup peeled tomatoes
1 clove garlic
1/2 tsp. salt
1/4 tsp. pepper
1/4 tsp. dry mustard
2 tbsp. lemon juice
4 or 5 sprigs parsley
1 cup cottage cheese
1/4 cup dill pickles, finely chopped
1 cooked egg, finely chopped
Blades C & D
Chop tomatoes and cilantro.
Dice onion.
Mix all ingredients together.
Cover and refrigerate.
Blade C
In a jar, combine 1st seven ingredients.
Mix well.
Blade B
Add remaining ingredients to jar and blend well.
7
Mushroom Pate
Waldorf Salad
12 oz. mushrooms
1 onion
4 oz. butter
4 tbsp. sherry
chopped parsley to garnish
1 cooked breast of chicken, cut into pieces
2 sticks celery, cut into pieces
1 apple, quartered with the core removed
2 tbsp. mayonnaise
1 oz. walnuts
Finely chop the onion and mushrooms
using the food processor attachment. Melt
half the butter in a pan and gently fry the
vegetables for a few minutes to soften. Stir
in the sherry and cook, stirring, until all the
liquid has evaporated. Season and leave
until cold. Place in the food processor with
the remaining butter and process until
smooth. Spoon into dishes and garnish
with parsley. Serve with toast.
Place all ingredients in the food processor
and pulse until roughly chopped. Serve on
a bed of fresh lettuce leaves.
DRESSINGS AND SAUCES
Cucumber Dressing
Sour-Cream Salad Dressing
1/2 medium cucumber
2 tbsp. lemon juice
1 cup yogurt
2 packets artificial sweetener
1 cup sour cream
2 tbsp. vinegar
1 1/2 tsp. artificial sweetener
2 tbsp. onion juice
1 tsp. fresh parsley, finely chopped
1/4 tsp. garlic powder
Blade C
Chop parsley
Blade C
Finely chop cucumber. Add remaining
ingredients. Mix until blended.
Blade B
Blend all ingredients together and refrigerate
for several hours to let flavors merge together.
8
French Dressing
Mayonnaise
This recipe makes about 3 cups and takes about
5 minutes.
In an old mayonnaise or mason jar, add
ingredients as follows:
1 1/2 cups light olive or safflower oil
3/4 cup tomato juice
3/4 cup tarragon vinegar
2 tsp. onion powder
1 1/2 tsp. seasoning salt
1 tsp. freshly ground pepper
1/4 tsp. dry mustard
1 clove garlic, mashed
1/4 tsp. artificial sweetener (more, if you like;
taste after you shake)
1 egg
1 tsp. lemon
1 tsp. dry mustard
1 1/2 cups (375ml) no cholesterol oil
Blade B
Put all ingredients in quart jar.
Blend until creamy.
Seal with tight lid.
Refrigerate.
Fat-Free
Thousand Salad Dressing
1 cup peeled tomatoes
1 clove garlic
1/2 tsp. salt
1/4 tsp. pepper
1/4 tsp. dry mustard
2 tbs. lemon juice
4 or 5 sprigs parsley
1 cup cottage cheese
1/4 cup dill pickle juice
2 tbs. dill pickles, finely chopped
1 cooked egg, finely chopped
Blade C
In jar, combine first seven ingredients.
Mix well.
Blade B
Pour no cholesterol oil to the curve in the jar,
add lemon, mustard and egg. Place the wand on
the bottom of the jar, turn on, but do not move
for about 10 seconds or until egg is beaten. Now
slowly move up and down and fold in the oil.
Cover and refrigerate.
Blue Cheese Mayonnaise
1 egg at room temperature
1 tsp. dry mustard
1 tsp. vinegar
1 tsp. lemon juice
1/2 cup low-fat cottage cheese
1/4 cup fresh blue cheese
Canola oil to curve of jar (1/4 cup)
Blade B
Place ingredients in a pint size jar in order as
listed above. Hold blade on bottom of jar for 20
seconds. Then slowly lift up wand and blend in
a folding motion until well blended.
Blade B
Add remaining ingredients to jar and blend well.
9
Cottage Cheese Mayonnaise
Teriyaki Sauce
1 egg
2 egg whites or substitute
1 tsp. dry mustard
1 tsp. vinegar
1 tsp. lemon juice
1 cup low-fat cottage cheese
1/4 cup canola oil or low cholesterol oil
Make a double recipe and refrigerate. Marinate
steaks, Barbecue, etc.
1 cup soy sauce
1/2 tbsp. artificial sweetener
2 cloves garlic, crushed
1 tsp. dry mustard
1 tsp. MSG
1 tsp. grated fresh ginger (1 tsp. powdered)
Blade B
Place ingredients in a pint size jar in order as
listed above.
Hold blade on bottom of jar for 20 seconds. Then
slowly lift up wand and blend in a folding motion.
Blade B
Put all ingredients in quart jar. Mix and
refrigerate. This makes a little more than one
cup of sauce.
For variety: Add small amounts of celery,
garlic, or onions.
Tartar Sauce
Tomato Sauce
1/2 cup (125ml) mayonnaise
8 green olives
1 tsp. parsley
2 pickled gherkins
1 tsp. tarragon
1 tsp. shallot
1 tsp. mustard
Pepper to taste
6 tbsp. tomato paste
2 1/4 cups hot water
1/2 tsp. onion powder
Pinch marjoram, thyme or basil
1 bay leaf (essential)
Salt and pepper
Artificial sweetener to taste (after cooking)
Blade C
Using Blade C chop olives, gherkins,
parsley, shallot, and tarragon.
Blade B
Blend mayonnaise, mustard, pepper and all of
the chopped ingredients.
10
Blade B
Put tomato paste in saucepan. Measure water.
Add the rest of ingredients. Stir well. Simmer,
stirring occasionally, without lid for 45
minutes, or until you have 1 1/2 cups left.
Hollandaise Sauce
Catsup
1/2 cup (112g) butter
3 egg yolks
2 tbsp. lemon juice
1/2 tsp. prepared mustard
Dash white pepper
6 tbsp. tomato paste
1 1/2 cups hot water
3 tbsp. vinegar
1/2 tsp. sweetener (of choice)
1 tsp. salt
Pinch cayenne pepper
Pinch cinnamon
Blade B
In saucepan heat butter, until bubbly,
not browned. In separate bowl blend remaining
ingredients, until smooth.
Slowly drizzle butter into mixture,
until desired consistency.
Blade B
Put tomato paste in saucepan. Add water and
blend. Stir in remaining ingredients. Simmer
for one hour. Mixture will be quite thick.
SOUPS
Cauliflower Soup
Gazpacho
1 Cauliflower
1 pt. stock
1/2 pt. milk
4 oz. cheddar cheese
pinch dried marjoram
pinch nutmeg
knob of butter
6 to 8 tomatoes
1 medium onion
handfull of parsley
1 tbsp. soy sauce
1/4 cup rice vinegar
Roughly chop the cauliflower then place in the
food processor and pulse until it resembles
breadcrumbs. Melt the butter in a pan and sauté
the cauliflower. Add stock, milk and marjoram.
Bring to a boil, reduce the heat and simmer for
a few minutes stirring frequently. Add the grated
cheese and nutmeg and stir them in well. Season
and serve.
To vary, use blue cheese instead of cheddar.
Garnish
red, yellow, green peppers
onion
cucumber
Blade C
Combine tomatoes, onion, parsley, soy sauce,
and rice vinegar in a large juice container or
cylinder container and process to a puree.
Dice red, yellow, green peppers, onions, and
cucumbers. This is to garnish the top then serve.
11
Raw Vegetable Soup
Country Cream Soup
1/4 cup celery
1/4 cup carrots
2 tbsp. onions
1 tomato
1/2 cup cabbage
1 tbsp. boullion
1 pt. or 1-1/2 pt. boiling water
1 onion
1 potato
1 turnip
1 carrot
2 sticks celery
1 pt. stock
1/4 pt. milk
Blade C
In a large cup or container, cube celery, carrots,
onions, tomatoes and cabbage. Chop in an up
and down motion until fine or puree. Add
one tablespoon boullion. Add boiling water,
or microwave.
Prepare the vegetables, cut into pieces and
place in the food processor. Pulse until coarsely
chopped. Heat a little oil in a pan and sauté
until soft. Add the stock and bring to a boil.
Reduce heat and simmer with the lid on for a
few minutes. Stir in the milk and serve with
warm bread.
Mix with blade C to smooth.
Variation: Chop the first five ingredients and
add to mashed potatoes.
ENTREES
Pepper Steak
1 tbsp. margarine
1 1/2 lb. round steak
1/3 cup onion, chopped
1 1-lb. can stewed tomatoes
1/4 cup water
2 tsp. instant beef bouillon
1/8 tsp. garlic powder
2 tbsp. soy sauce
3 tbsp. cornstarch
1 green pepper, thinly sliced
Cooked rice, optional
Blade D
Slice green pepper and round steak
Blade C
Chop onions
Melt margarine in frying pan.
Brown steak and onions.
Add tomatoes, water, bouillon, and
garlic powder.
Cover and simmer for one hour or until beef
is tender.
12
Blade B
Blend soy sauce and cornstarch.
Add to beef mixture; stirring constantly until
mixture thickens. Add green pepper and
simmer 10 minutes, stirring constantly.
Serve over rice if preferred.
Stuffed Flank Steak
Holiday Turkey
Blade C
1 onion, chopped
Blade D
1/2 lb. fresh mushrooms, cleaned, sliced
Blade C low
2 cups dried bread, crumbled
1/2 tsp. poultry seasoning
Salt to taste
Pepper to taste
1 1/2 lb. flank steak
1 tbsp. canola oil
1 cup beef stock
1 to 2 cups turkey stock made from giblets
and neck
Blade D
1 lb. fresh mushrooms, cleaned and sliced
Blade C
1 onion chopped
Blade C
4 cups crumbled dried bread
1 1/2 tsp. poultry seasoning
1 8-oz can water chestnuts, drained and cut up
Blade D
3/8 cup chopped pecans
1 tsp. salt
1 12 to 14 lb. fresh turkey
Simmer onion and mushrooms in a 1/2 cup
beef stock until 1/2 cooked. Toss together with
bread and poultry seasoning, add salt to taste.
Let sit 1/2 hour and check for moisture. Should
be moist, since there is no fat in flank steak
to moisten it. Add additional beef stock if
necessary. Spread dressing over flattened steak,
leaving about 1/2 inch around edges. Roll up
like jelly roll, and fasten edges with toothpicks.
Lace heavy thread through and around
toothpicks. Hold with fingers and push any
dressing back in. Salt and pepper meat, and
brown, on all sides, in oil on high heat. Put 1/2
cup beef stock in heavy pan. Put meat in. Cover.
Bake at 325º for 1 1/2 hours.
Heat one cup of the stock to a simmer in a large
saucepan; add the mushrooms and onions and
simmer for 5 minutes. Let it cool so you can
handle it.
Mix up all the other dressing ingredients and
the liquid with the mushrooms and onions. Mix
well with your hands: ten fingers do a much
better job than a couple of spoons. Add more
stock if necessary, taste for seasoning.
Set aside for a while to make sure it is not too dry.
Add stock if necessary. Pull the big fat pads out
from inside the turkey’s pelvic opening, wash the
inside and pat dry. Spoon in the dressing. Sew the
opening together with a large needle and thread
so the dressing does not fall into the juice while
it cooks. Don’t use skewers. Put the extra
dressing in the large cavity between the neck skin
and breast and sew it also. Tie the legs together
and tie down the wing.
Rub the turkey with safflower oil, generously
salt it, lightly pepper it, and sprinkle one tbsp.
of MSG on it. Place turkey breast side down, on
a rack, in a roasting pan. Heat the oven to 325º
and roast 20 minutes per pound.
13
SIDE DISHES
Mashed Potatoes
Stuffed Mushrooms
Blade B
Cube and cook the potatoes. Drain. In the pot
move the machine in a mashing motion, up and
down. Add milk and butter. For a delightful
treat try adding finely chopped garlic and
parsley. The vegetable mixture in the raw
vegetable soup is also a nice mixture to add for
a potato surprise.
4 large flat mushrooms, peeled,
with stems removed
1 large onion
1 sweet potato
2 carrots
2 oz. bread crumbs (prepared using blade C)
1 oz. chopped mixed nuts
1/2 tsp. tomato puree
Stock cube made up with 1fl. oz. water
1/4 tsp. mixed herbs
dash of Worcestershire sauce
Blade B is perfect to smooth, blend, or take out
lumps.
Place the mushrooms, gill side up on a baking
tray. Prepare the other vegetables and cut into
pieces, place in the food processor and pulse until
coarsely chopped. Heat a little oil in a pan and
gently sauté the vegetables, adding in the
breadcrumbs, stock, tomato puree, herbs and
Worcestershire sauce. Add the mixed nuts. Pile
stuffing onto the mushrooms, top each with a
little grated cheese and bake in a preheated oven
(375°F / 190°C) for 20 minutes until golden.
14
DESSERTS
Skim Milk
Whipped Topping
Whip Fruit Pie
Graham Cracker Crust
THIS IS VERY IMPORTANT! Put the milk
on ice before starting recipe. The milk
must be skim milk and ice cold. 1%, 2%, and
whole milk will not thicken.
1/2 cup diet margarine, melted
1 1/2 cups graham crackers
3 tbsp. artificial sweetner
Blade A
In a tall cylinder container, pour 1/4 to 1/2 cup
iced cold skim milk. Place the wand on the
bottom of the container. Move wand from side to
side in an up and down motion. You are pulling
air in a very high rate of speed. When it peaks, add
1/2 tsp. vanilla and sweetener of your choice.
To make topping into a diet dessert, just add
cold fruit of your choice – strawberries,
blueberries, peaches, apples, pears, bananas,
etc. Serve immediately.
To make your skim milk topping last to use for
desserts, pre-mix gelatin, add one tbsp. to milk
and chill, then whip.
Use plain topping on coffee for a diet cappuccino.
Blade B
Mix well.
Press firmly into 9 inch pie plate
Fruit Whip
2 cups skim milk
2 pkgs. flavored gelatin (your choice)
2 cups fruit, of choice
Blade B
Dissolve Gelatin according to package instructions.
Combine with milk. Put in freezer for 40 minutes.
Blade A
Remove from freezer and move in up and down
motion until mixture is thick and 2 qt.
container is full. Add 1/2 cup fruit and blend.
Add remaining fruit and gently mix. Pour into
shell and refrigerate until firm.
Makes one pie.
Pumpkin Whip Pie
1 8 inch baked pie crust
1/2 cup milk
1 pkg. vanilla instant pudding
1 cup pumpkin
1 1/2 tsp. allspice
Blade B
Combine milk, pudding, and allspice. Fill baked
8” pie crust or graham cracker crust. Top with
whipped topping and serve.
15
Raspberry Bavarian Mold
Cherry Cheesecake
1 1/4 cups (150g) red raspberries
1 pkg. sugarfree red raspberry flavored gelatin
1 cup (250ml) hot water
1 tbsp. lemon juice
1 6 oz. (185g) can evaporated milk, freezer cold
1 1/2 cups (375g) graham cracker crumbs
1/2 cup (112g) diet margarine (of choice)
1 envelope gelatin
2 packets artificial sweetener
2 pkgs. cream cheese
1 tbsp. vanilla
1/4 cup (60ml) cold water
Dissolve gelatin in hot water.
Add lemon juice and chill until partially set.
Blade B
Add milk and beat until fluffy and soft peaks
form. Fold in raspberries. Tint pink with red
food coloring. Pour into 1 qt. (1 litre) mold.
Trim with whipped dessert topping.
• For extra fluffy, beat longer and use
1 1/2 qt. (1 1/2 litre) container.
• Substitute with any flavor gelatin and fruit.
Blade B
Using low speed blend 1/4 cup (60ml) water and
gelatin. Let stand 1 minute. Blend over low heat
until dissolved. In large bowl, blend cream
cheese, vanilla, and sweetener. Gradually blend
gelatin mixture in until smooth.
Graham Cracker Crust
Blend graham crackers and margarine. Press
into 8” pie pan. Pour cheese mixture into shell.
Chill until firm.
Cherry Glaze (Optional)
Ice Cream Dessert
2 cups skim milk
1 pkg. unflavored gelatin
3 packets artificial sweetener
1 tsp. vanilla
Your choice of ice cold fruit
Blade A
Combine skim milk, gelatin, sweetener, and
vanilla in 2 quart container. Move in up and down
motion until thick. Add ice cold fruit (of choice).
Continue up and down motion until blended.
Place in freezer.
16
3 cups (375g) cherries (or berries of choice)
1 cup (250ml) water
1 1/2 tbsp. cornstarch
2 packets artificial sweetener
Blade B
Cook one third cherries, water, cornstarch and
sweetener. Bring to boil, stirring constantly,
until thick. Food coloring (optional). Cool at
room temperature. Put remaining cherries over
cheesecake. Pour glaze on top.
Banana Freeze Pie
Lemon Pie
1/3 cup butter
3 tbsp. artificial sweetener
1/2 tsp. cinnamon
1 cup corn flake crumbs
8 oz. cream cheese, softened
1 can unsweetened condensed milk
1/3 cup lemon juice
1 tsp. vanilla
3 bananas, sliced
2 egg yolks
1 can condensed milk
1/2 cup fresh lemon juice
1 tbsp. artificial sweetener
1 tbsp. lemon peel, grated
Blade B
Using low speed, in a small saucepan, blend butter,
artificial sweetener and cinnamon until bubbles
form. Remove from heat. Mix in corn flake
crumbs. Press into, 8” pie pan to form crust. Chill.
Beat cream cheese until fluffy. Blend in milk.
Add lemon juice, and vanilla. Line crust with
sliced bananas. Turn filling into crust.
Refrigerate for two to three hours or until firm.
Blade D
Slice two bananas, very thin. Dip into lemon
juice. Place them on top of pie.
Blade B
Beat egg yolks. Mix in milk, lemon juice,
artificial sweetener, and lemon peel. Stir well:
the filling will thicken. Pour into graham
cracker crust. Cover with meringue.
Meringue
2 egg whites
2 tbsp. artificial sweetener
Blade A
Beat until stiff peaks form. Spread over pie.
Bake at 325º for 12 to 15 minutes or until peaks
turn a light golden brown.
17
BEVERAGES AND PUNCHES
Tropical Star
Orange-Strawberry Sparkle
3 cups cold water
1/2 cup lime juice
1/2 cup lemon juice
2 1/2 to 3 tbsp. liquid diet sweetener
1 qt. sugar-free lemon-lime carbonated beverage
Chilled orange slices
1 tsp. liquid sweetener
1 pt. fresh strawberries, cut in half
1 cup (250ml) diet orange soda, chilled
Blade C
Juice lemon and lime.
Blade D
Slice orange.
Blade B
Combine in punch bowl: water, lime juice,
lemon juice, and liquid sweetener.
Blade C
Just before serving, add carbonated beverage
and crushed ice. Garnish with orange slices.
18
Blade C
Combine sweetener and strawberries. Pour
orange soda over mixture just before serving.
Sweetheart Punch
2 qts. low-cal cherry soda
1 qt. orange juice
1 qt. low-cal lemon-lime soda
Blade D
1 orange or lemon, thinly sliced. Freeze 1 qt.
cherry soda for beverage cubes. Chill remaining
soft drinks. When ready to serve: Shake or crack
beverage cubes. Place in punch bowl. Add other
soft drinks slowly. Garnish with orange or lemon
slices.
Straw “Berry” Shake
Lemonade
2 cups (450g) fresh or frozen whole strawberries
1 1/2 cups (375ml) skim milk
2 packets artificial sweetener
Dash of cinnamon, ground
3 tbsp. lemon juice
3/4 cup (175ml) water
3/8 tsp. liquid sweetener
Blade A
In 2 qt. (2 litre) container add ice cold skim milk.
Aerate until thick. Add strawberries, sweetener,
and cinnamon. Mash on bottom of container.
Then continue aerating. Serve immediately in
small glasses.
Cranberry Sparkle
2 cups ice water
1/2 cup lemon juice
2 cups low-cal lemon juice
1 tbsp. liquid sweetener
2 cups low-cal ginger ale or club soda
1 cup cranberry juice
Blade B
Combine all ingredients.
Garnish with lemon or lime slices.
Blade C
Juice Lemon.
Blade B
Combine lemon juice, water and sweetener. Pour
over crushed ice. Garnish with lemon slice.
Protein Breakfast
or Summer Juice Drink
Blade C
To the orange, add bananas, strawberries, or fruit
of your choice. Add protein if desired. For a fruit
drink add ice and skim milk. This will make it
thick like a shake.
Cappuccino
Blade D
Fill the grinder with coffee of your choice.
Grind down to a powder. Using a fine strainer or
cheese cloth for straining, pour boiling water
through into your coffee cup.
Add skim milk topping for a low-cholesterol,
low calorie delight.
19
Juicing
Hot Spiced Fruit Tea
Blade C
Hint: When juicing pulp add a small amount of
a base liquid such as water or juice.
1 18-oz can unsweetened pineapple juice
2 cups orange juice
2 tbsp. instant tea powder
1 tsp. whole allspice
3 inch sticks cinnamon, broken up
Orange Juice
Blade D
Break up cinnamon sticks
Blade C
Peel oranges. Place in large cup or pitcher if
making a large amount. Chop in an up and down
motion until smooth. Add water or base liquid.
Continue processing until desired consistency.
Mocha
Blade A
In a 6 oz. cup or jar add 1/4 cup water and one
tbsp. instant coffee and 1/2 teaspoon cocoa (or to
taste). Place wand on the bottom of cup and start
to move in an up and down motion pulling the
air in. Make a great drink or a very nice dessert.
Crushed Ice
Blade C
In a cup, jar, or pitcher add ice. Cushion with a
small amount of water, or when making a
drink, add fruit to the top. Move machine in a
chopping motion until done.
20
Blade B
In saucepan mix 2 cups water, pineapple juice,
orange juice, tea powder, and spices. Bring to
boil; reduce heat. Simmer, covered for 15
minutes. Strain to remove spices. Serve hot.
EQUIVALENTS AND METRIC
CONVERSIONS
LIQUID MEASURE EQUIVALENTS
3 teaspoons = 1 tablespoon
2 tablespoons = 1 fluid ounce = 29.57ml
4 tablespoons = 1/4 cup = 2 fluid ounces = 59.14ml
8 tablespoons = 1/2 cup = 4 fluid ounces = 118.28ml
12 tablespoons = 3/4 cup = 177.44ml
16 tablespoons = 1 cup = 8 fluid ounces = 236.59ml
2 cups = 16 fluid ounces = 1 pint (US)
4 cups = 32 fluid ounces = 1 quart (US)
8 cups = 64 fluid ounces = 1/2 gallon (US)
4 quarts = 128 fluid ounces = 1 gallon (US)
To change
METRIC CONVERSION TABLE
To
Multiple by
teaspoons
tablespoons
fluid ounces
ounces
cups
pints (US)
quarts (US)
gallons (US)
pounds
Fahrenheit
milliliters
milliliters
milliliters
grams
liters
liters
liters
liters
kilograms
Celsius
4.93
14.79
29.57
28.35
0.24
0.47
0.95
3.79
0.45
(ºF-32)x.56
21
HEALTHY CHOICES
Every penny you spend on food should be an
investment in good health.
If you understand your body’s food needs, and
food’s contribution to good health, you can put
your food dollar to its best use.
When planning your own healthy, economic
meals, you should choose a variety of foods from
the four basic food groups, and avoid foods with
too much salt, sugar and fat.
When in season, fresh fruits and vegetables
are a good buy, and they have little to no fat, and
no sugar or salt added. Most canned and
seasoned frozen vegetables have salt added, and
some frozen and canned fruits have sugar added.
Plan to have about four servings of vegetables
per day and two servings of fresh fruit. One
serving is one half cup of fruit or vegetables.
Food in this group gives you most of your
vitamin A and C. Vitamin A is needed for healthy
skin and vitamin C helps you resist infection and
keeps your gums healthy. Vegetables that are
dark green and deep yellow in color and citrus
fruits are healthy choices.
Whole grain and enriched breads, cereals,
rice, and grains are good sources of vitamin B,
which help your body use the food you eat for
energy. Breads and cereals also provide Iron and
Protein and whole grain products provide fiber.
To stretch your food dollar use whole
grain products as side dishes. Plan to use
seven servings per day from the bread and
cereal group.
The milk and cheese group is an important
source of calcium, the nutrient that keeps bones
strong. Have two servings of milk or cheese a
day. One serving is an eight ounce cup of milk or
one and one third ounce of natural cheese.
To make your food dollar go further, try less
expensive forms of milk, skim milk or non-fat
dry are usually less expensive, and they have no
fat. Many cheeses, yogurts, ice cream, and ice
milk are high in fat or have sugar in them.
22
The meat group includes red meats, fish,
poultry, dried peas and beans, soybeans, seeds,
nuts, peanut butter and eggs. These foods
provide protein, which helps build and repair
skin, bones, hair, blood and muscles. They are
also good sources of Vitamin B6. To lower the
amount of fat, choose lean meats. Having peanut
butter and dried beans and peas will add variety
to your meal and are most often less expensive.
To avoid too much fat, salt and sugar, know
where to look. Fats are found naturally in some
foods like poultry, fish, and chocolate. Fats that
are added to your diet are butter, margarine,
salad dressings, mayonnaise, gravies and
shortening.
To cut down on fat levels choose foods low in
fat, and prepare foods the low-fat way: trim fats
from meats, and remove skin from poultry.
Instead of frying, bake, broil or boil. Season with
herbs and spices, instead of butter or margarine.
Sugar can be found in many forms, such as
syrups, molasses, and honey. Soft drinks are also
mostly sugar. Sugar is high in calories. In most
cases, sugar in baked products can be cut in half
without a noticeable difference in texture and in
some recipes sugar can be cut out completely.
In place of sugar, use a substitute such as
aspartame.
The best way for you to be sure you’re eating
healthy is to use fresh fruits and vegetables,
whole grain breads, low-fat milk and lean meats
and to prepare food from scratch. Pre-made
foods always contain salt, sugar, fats and
preservatives.
While there is not an ideal diet, healthy
choices are using the four basic food groups.
Avoiding sugar, salts and fats can also improve
your eating habits for a healthy diet, and that
makes good sense.
BABY FOOD
CANNING
AND FREEZING
Your Thunderstick Pro is ideal for making
healthy and nutritious baby food. It’s easy. It’s
fast. And the love that goes into every spoonful
will make it taste better then anything you
can buy!
CANNING METHODS – COLD PACK (RAW)
This method involves packing the food firmly
into clean, hot jars and adding boiling liquid
(syrup, water, or fruit juice), leaving some space
between the packed food and the jar lid.
The variety of meats, fruits, vegetables, beans,
rice, noodles and their endless combinations
means that your baby will eat balanced meals.
Most raw fruits and vegetables shrink during
processing, so 1/2 inch space is usually sufficient.
Exceptions are corn, lima beans, and peas which
expand during processing. These should be
packed loosely with 1 inch space allowed at top of
jar. Enough boiling liquid should be added to
completely cover the food.
Blade C is the blade you will use for making
all baby food. You don’t need any special
equipment other than your Thunderstick Pro.
Bowls, cups, measuring cups, old baby food
jars, mason jars, and, zip lock baggies all work
for making baby food.
Using a stiff freezer baggie, use the small or
quart size, place the machine into the baggie
then turn it on low. The first step is to break up
and process the food. This is done by using a
light touch in a tapping motion. Once that is
accomplished, move the machine around in the
baggie. This will do the blending.
Air bubbles are released from filled jars before
adjusting lids. Follow manufacturer’s directions
for the type of jars (mason jars) and lids being
used. The food is then cooked and sterilized
simultaneously by processing in boiling water or
in steam.
Fruits (except apples, pears and pineapples)
and tomatoes may be canned using the
cold-pack method.
For infants, you will change to Blade B. This
will change the blending to puree.
Vegetables are packed raw into cans only if
they are to be processed in a pressure canner.
Some suggestions. Give the baby some
variety. Mix and match your fruits. Do the same
with the vegetables. If you are feeding the baby
meats then mix in some of the baby’s favorite
fruit. Try to keep it as natural as possible.
Remember raw foods and foods cooked on low
and covered maintain most of the nutrients, as
well as Mother Nature’s sweeteners.
CANNING METHODS – HOT PACK
This method involves pre-cooking the product
a short time before packing it. Pack it very hot
into clean hot jars. Then add hot cooking liquid
(or hot syrup or hot water), releasing air bubbles
to seal jars for processing.
Pre-cooking food before packing causes it to
shrink. This allows for slightly more food to be
packed into jars, than when food is packed raw.
Pack pre-cooked food loosely and allow about 1/2
inch head-space.
Floating – the rising of food to the top of jar
during processing. This can often be prevented by
pre-cooking food before packing.
The hot-pack method is used for both
vegetables and fruits.
23
Notes:
24
WHIPS cream or non-fat milk!
BLENDS homemade peanut butter!
HEALTHY fresh baby food!
DELICIOUS chocolate shake!
LUMP-FREE mashed potatoes!
PERFECT meringue!
Distributed By:
THANE INTERNATIONAL, INC.
LA QUINTA, CA 92253 U.S.A.
www.thane.com
TSP-2/02
CREAMY dressings, sauces & gravies!