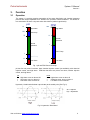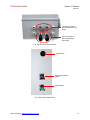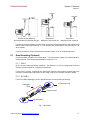
1
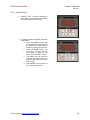
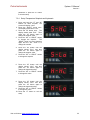
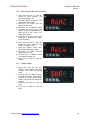
User Manual System 11 www.pulseinstrument.com © Copyright 2007 Pulse Instruments All Rights Reserved 943 Flynn Road, Camarillo, CA 93012 Phone: (800) 462-1926 Fax: (800) 878-9172 SYSTEM 11 Water Disinfection Monitor and Control System User Manual Pulse Instruments www.pulseinstrument.com 943 Flynn Road, Camarillo, CA 93012 Phone: (800) 462-1926 Fax: (800) 878-9172 Pulse Instruments System 11 Manual Version 1 Table of Contents 1.1 INTRODUCTION ............................................................................................................... 3 1.2 FEATURES ...................................................................................................................... 3 2. SPECIFICATIONS ................................................................................................. 4 3. FUNCTION ............................................................................................................. 6 3.1 OPERATION .................................................................................................................... 6 3.2 CONTROL ....................................................................................................................... 7 3.2.1 3.2.2 3.3 pH / PPM ................................................................................................................................. 7 Consent ................................................................................................................................... 7 SAFETY ALARM ............................................................................................................... 7 3.3.1 3.3.2 3.3.3 3.3.4 3.3.5 3.3.6 Alarm Contact .......................................................................................................................... 7 Alarm Silence .......................................................................................................................... 8 Pump ON Too Long ................................................................................................................ 8 Power ON Delay ...................................................................................................................... 8 Water Fault .............................................................................................................................. 8 System Alarm Delay ................................................................................................................ 8 3.4 THERMAL FLOW SWITCH ................................................................................................. 8 3.5 DATA RECORDING (OPTIONAL) ........................................................................................ 8 4. SYSTEM COMPONENTS ...................................................................................... 9 5. SYSTEM LAYOUT ............................................................................................... 10 6. INSTALLATION ................................................................................................... 13 6.1 INSTRUMENT CONTROL PANEL .......................................................................................13 6.1.1 6.1.2 6.1.3 Mounting and Location .......................................................................................................... 13 Electrical and Power .............................................................................................................. 14 Terminal Strip Wiring ............................................................................................................. 14 6.2 MANIFOLD .....................................................................................................................14 6.3 SENSOR INPUT CONNECTION ..........................................................................................14 6.4 TEMPERATURE CONTROLLER CONNECTION (OPTIONAL)...................................................14 6.4.1 Connect RTD Temperature Sensor ............................................................................................ 14 6.4.2 Terminal Description ............................................................................................................. 15 6.5 THERMAL FLOW SWITCH ................................................................................................16 6.5.1 Thermal Flow Switch ............................................................................................................. 16 6.6 CHEMICAL METERING PUMPS .........................................................................................16 6.7 DATA RECORDING (OPTIONAL) .......................................................................................17 6.7.1 6.7.2 DL011 .................................................................................................................................... 17 DL-USB-4 .............................................................................................................................. 17 Visit us Online at www.pulseinstrument.com 1 Pulse Instruments System 11 Manual Version 1 7. CONFIGURATION / SETUP ................................................................................ 18 7.1 POWER UP ....................................................................................................................18 7.2 PH AND PPM CONTROL SET POINTS ...............................................................................18 7.2.1 7.2.2 7.3 pH Set Points......................................................................................................................... 19 ppm Set Points ...................................................................................................................... 20 TEMPERATURE (OPTIONAL) ............................................................................................21 7.3.1 7.3.2 7.3.3 7.3.4 7.3.5 7.3.6 Setup Temperature Unit ........................................................................................................ 21 Setup Temperature Sensor Type .......................................................................................... 21 Setup Analog Output Mode ................................................................................................... 21 Setup Temperature Setpoints and Hysteresis ...................................................................... 22 Setup Analog High and Low Range ...................................................................................... 23 Change Offset ....................................................................................................................... 23 7.4 CHEMICAL METERING PUMP CONTROL ............................................................................24 7.5 DATA RECORDING (OPTIONAL) .......................................................................................24 7.5.1 7.5.2 8. DL011 .................................................................................................................................... 24 DL-USB-4 .............................................................................................................................. 24 MAINTENANCE ................................................................................................... 26 8.1 ELECTRODE CLEANING...................................................................................................26 8.2 CALIBRATION .................................................................................................................26 8.2.1 8.2.2 pH Calibration ........................................................................................................................ 27 PPM Calibration..................................................................................................................... 28 8.3 CHEMICAL METERING PUMP ...........................................................................................28 8.4 DATA RECORDING (OPTIONAL) .......................................................................................29 8.5 SURGE SUPPRESSOR .....................................................................................................29 9. TROUBLESHOOTING GUIDE............................................................................. 30 9.1 CONTROL SYSTEM FAILED...............................................................................................30 9.2 ELECTRODE FAILED ........................................................................................................30 9.3 ELECTRODE CABLE IS DAMAGED .....................................................................................30 9.4 ELECTRODES NEED MAINTENANCE ..................................................................................30 9.5 CONTROLLER FAILED......................................................................................................30 9.6 CONTROLLER ERROR MESSAGE .....................................................................................31 9.7 CHEMICAL PUMP FAILED .................................................................................................32 10 CONTACT ............................................................................................................ 32 Visit us Online at www.pulseinstrument.com 2 Pulse Instruments System 11 Manual Version 1 1. 1.1 OVERVIEW Introduction Fresh fruit and vegetable harvesting, post-harvest handling and cooling, packing and processing activities that involve the use of water have a higher potential of contamination by plant pathogens and microbes. Small errors in contamination prevention and water disinfection procedures can have severe consequences due to the ease of spread of microbes, particularly in re-circulated water systems. Accurate monitoring and recording of disinfection procedures is an important component of a sound post-harvest quality and safety program. Chlorine parts per million (ppm), has been introduced to fresh produce packers and shippers as an easily standardized approach to water disinfection for harvest and post-harvest handling. PPM sensors allow easy monitoring, tracking, and automated maintenance of critical disinfectant levels in water systems. For more information on www.pulseinstrument.com. 1.2 water disinfection, pH, and chlorine ppm, please visit Features The System 11 dual pH and free chlorine ppm control system is housed in a NEMA 4X weatherproof enclosure, which is an essential HACCP tool. It includes a programmed logic controller (PLC) based logic controlled alarm and safety shut down. The audio alarm is 80 decibels with a front panel pilot light. The safety shut down automatically turns off the chemical pumps to prevent any hazardous situations. This simple modular design offers affordable continuous monitoring and control, which allows unique hands-free operation and future upgrade capability for recording. • • • • • • • • • Works with any acid and free chlorine Sensors monitor pH and free chlorine ppm Controller automatically turns chemical pump ON or OFF as needed Always maintains a tight chemical concentration range Injects chemical only as needed Self maintains and adjusts to organic load Smart logic allows “Hands-Free” Operation Recording maintains continuous traceability Self-cleaning sensors allow for low maintenance Visit us Online at www.pulseinstrument.com 3 Pulse Instruments System 11 Manual Version 1 2. Specifications Condition Specifications Range pH: 0.00 to 14.00 pH ppm: 0.00 to 200.0 (depending on sensor) Temperature (Optional): 0 ºC to 50 ºC (32 ºF to 122 ºF) Resolution pH: 0.01 pH ppm: 0.01 or 0.1 ppm (depending on sensor) Temperature (Optional): 1 ºF Accuracy pH: ± 0.02 pH (± 1 digit) ppm: ± 0.1 % of FS Temperature (Optional): ± 0.2 % of FS Power 110 VAC; 10 Amps Control Panel Weight 18 lbs Control Panel Dimension Height x Width x Depth: 14 in x 12 in x 8 in Manifold Ports 1 pH sensor port, 1 flow cell bowl for ppm sensor, 1 thermal flow switch port Inlet / Outlet Ports ¾” NPT Sensor Ports ½” for pH, 1” for ppm Material PVC SCH 80 Thermal Flow Switch Pressure 100 psi Max Flow Range Adjustable via pushbuttons Chemical Pump Capacity Variable, See Pump Manual Pressure Variable, See Pump Manual Strokes per Minute 360 Max Turndown Ratio 1800:1 Stroke Length Adjustment 20% to 100% Material Variable, See Pump Manual IP Rating IP 65 / IP67 Visit us Online at www.pulseinstrument.com 4 Pulse Instruments System 11 Manual Version 1 PLC Inputs and Outputs Pins Descriptions X0 X1 X2 pH acid input pH alarm input ppm chlorine input X3 X4 X5 X6 X7 Y0 ppm chlorine alarm input Water fault input Temperature alarm -Consent pH acid pump output Y1 Y2 Y3 Y4 Y5 ppm chlorine pump output pH alarm light output ppm chlorine alarm light output Water fault output Audio alarm output Visit us Online at www.pulseinstrument.com 5 Pulse Instruments System 11 Manual Version 1 3. Function 3.1 Operation The system 11 provides complete automation of the water disinfection and chemical treatment process with unique capabilities for a “Hands-Free” operation of water treatment. This allows for true automation 24 hours a day and works with chlorine (sodium hypochlorite). pH 14 PPM 200 High Alarm High Alarm HH Acid Pump H H Normal Operation Normal Operation L Oxid. Pump L Base Pump LL Low Alarm 0 Low Alarm 0 Fig. 1 pH and PPM Control Concept pH has four set points: low alarm, base chemical injection control (not available), acid chemical injection control, and high alarm. PPM also has three set points: low alarm, oxidizer injection control, and high alarm. pH High alarm: turns on above HH Acid pump: turns on above H Low alarm: turns on below LL PPM High alarm: turns on above H Oxidation pump: turns on below L Low alarm: turns on below L Hysteresis / dead-band eliminate output chatter at the switch point (See Fig. 2). SP = Setpoint Hys = Hysteresis Fig. 2 Hysteresis / Dead-band Visit us Online at www.pulseinstrument.com 6 Pulse Instruments System 11 Manual Version 1 3.2 Control 3.2.1 pH / PPM Under normal conditions, pH is controlled by the system to the pH level set at the controller. When the pH rises above the high set point value (H), the acid pump automatically turns on via a control relay and adds acid to the water until the pH drops down to the set point value, and then shuts off. Under normal conditions, ppm is controlled by the control system to the ppm level set at the controller. When the ppm value drops below the low set point value (L), the oxidation pump automatically turns on via a control relay and adds oxidizer to the water until the ppm value rises to the set point value, and then shuts off. 3.2.2 Consent The consent jumper, (See Fig. 3), determines the precedence of the pumps controlled by the controller. In other words, when the consent jumper is in place, the acid pump takes priority over the oxidation pump. Whenever the acid pump is on, the oxidation pump will never be on, even if the value of its ppm is under the set point. The consent jumper is used to prevent harmful gases from being produced when certain chemicals are mixed together at the same time. In contrary, when the consent jumper is removed, both pumps will work independently according to each of their set point values. Consent Jumper Fig. 3 Consent Jumper 3.3 Safety Alarm An alarm condition occurs due to process failure if levels exceed the specified alarm limits of alarm set points (HH or LL for pH, H or L for ppm). The chemical pump is shut-off and an audiovisual alarm is activated until conditions fall within limit. 3.3.1 Alarm Contact If the pH value passes its High or Low Alarm set point, the pH Alarm pilot light on the front of the control panel will flash, and the Audio Alarm will sound after 2 minutes delay. pH going into its alarm condition will also cause both the pH and ppm chemical pumps to shut off, even if the ppm value is below its pumping set point. Visit us Online at www.pulseinstrument.com 7 Pulse Instruments System 11 Manual Version 1 If the ppm value passes either its High or Low Alarm set point, the ppm Alarm pilot light on the front of the control panel will flash, and the Audio Alarm will sound after 2 minutes delay. PPM going into its alarm condition will also cause its own chemical pump to shut off. The pH works independently from the ppm; the pH chemical pump will continue to pump even if the ppm goes into alarm. If the temperature value passes either its High or Low Alarm set point, the Audio Alarm will sound. The temperature alarm will not influence pH or ppm control. 3.3.2 Alarm Silence If there is an alarm, turn on the “Silence Alarm” switch on the side of the panel to silence the alarm noise. Do not forget to turn off the “Silence Alarm” switch after the problem is fixed. 3.3.3 Pump ON Too Long If the pH chemical pump / chlorine chemical pump is powered on (pumping chemical) for more than 30 minutes (fixed time), the alarm will turn on and will shut off the pump. If the consent function is active, the pH chemical pump ON Too Long alarm will shut off both the pH chemical pump and chlorine chemical pump. This alarm will stay active until the readings are back to normal. This alarm is used to protect the pump from running dry, if there is no chemical. Also, it is a good indication if the pump has lost prime or not, has failed, or has a blockage in the injection line. 3.3.4 Power ON Delay This feature is activated when the control panel is supplied with power (turned on). A logic mode is activated at power on so that for the first 30 minutes all alarms are ignored and chemical feed is allowed to occur by the acid and chlorine pumps, if required by the controller. 3.3.5 Water Fault If there is a “Water Fault”, the alarm and pump functions are disabled, and a red pilot indicator light on the front panel flashes On / Off. 3.3.6 System Alarm Delay During the process, if there is a water fault condition, the system will turn off all the alarms and pumps. After flow resumes, the system will ignore all the alarms and will allow chemical feed if required for 30 minutes. 3.4 Thermal Flow Switch A thermal flow switch interface only allows the pumps to operate if there is flow through the sensor manifold. If this feature is being utilized, the logic works so that if there is water flow through the electrode flow cell, the chemical injection will start treating the water as needed. If no flow is detected, the control system will continue monitoring and recording, but will not allow any chemical injection. No water treatment will occur in the absence of flow / pressure. In the “Water Fault” condition, the alarm function is disabled, and a pilot indicator light on the front panel flashes. 3.5 Data Recording (Optional) DL011 has 6 analog channels. It is accessed via Ethernet for online monitoring, datalogging, auto reporting through email, and auto alarm emailing. The data can be downloaded to a USB flash card. See Section 7.5.1 for a configuration check list and see manual for detail information. Visit us Online at www.pulseinstrument.com 8 Pulse Instruments System 11 Manual Version 1 DL-USB-4 is a single channel USB style recorder (Use one datalogger per parameter). The data will automatically record into the datalogger. After the datalogger is full, download the data onto your computer using the provided software. See Section 6.7 for installation, Section 7.5.2 for setup, and Section 8.5 for battery replacement. 4. System Components PLC DO-05AR pH 170E-pH Controller ppm 7635 Controller pH Electrode PI0020-pH / DA660CD ppm Electrode PICL801 or PICL802 Manifold MF-FC06-11 Thermal Flow Switch FST-700 Two Chemical Pumps EK / EW Series Temperature (optional) FD5000 Thermocouple (optional) Type RTD Recorders (optional) DL-USB-4 / DL011 Visit us Online at www.pulseinstrument.com 9 Pulse Instruments System 11 Manual Version 1 5. System Layout Fig. 4 Automation of Wash Water Sanitation System Diagram ppm sensor connection Back of Controllers pH sensor connection Fig. 5 Back of Control Panel Door Visit us Online at www.pulseinstrument.com 10 Pulse Instruments System 11 Manual Version 1 Temperature High Alarm Normal Temperature Temperature Low Alarm Fig. 6 Temperature Meter (Optional) Temperature Meter Temperature Probe Input Fig. 7 Back of the Temperature Input Visit us Online at www.pulseinstrument.com 11 Pulse Instruments System 11 Manual Version 1 pH and ppm probes go through these cord grips Connect pumps to the corresponding drop cords Fig. 8 Bottom of the Control Panel Audio Alarm Audio Alarm Silence Switch Power Switch Fig. 9 Side of the Control Panel Visit us Online at www.pulseinstrument.com 12 Pulse Instruments System 11 Manual Version 1 ppm Probe Fitting Water Inlet Water Discharge (to atmospheric pressure) Ball Valve Thermal FS pH Probe Fitting Sample Port Fig. 10 Manifold 6. Installation Installation Check List (see System Layout, Fig. 4) 6.1 Control Panel (see Section 6.1) Manifold (see Section 6.2) Electrodes / Sensors (see Section 6.3 & 6.4) Pressure Switch / Flow Switch (see Section 6.1.3 & 6.5 ) Pumps (see Section 6.1.3 & 6.6) Recorders (see Section 6.1.3 & 6.7) Instrument Control Panel 6.1.1 Mounting and Location Mount the control panel on a secure stand, bracket or wall using the mounting feet provided. The location of the control panel should be determined according to process layout, keeping in mind Visit us Online at www.pulseinstrument.com 13 Pulse Instruments System 11 Manual Version 1 that it is preferable to locate the control panel in a dry environment, whenever possible, even though it is rated for wet environments at NEMA 4X. The control panel and electrodes should be preferably mounted as close to one another as possible but no greater than 50 feet apart. The control panel should be accessible for routine maintenance and easy viewing of the front digital display as well as the Visual Alarm, and in hearing range of the 80 db Audio Alarm. It should also be located with enough space underneath of at least two feet for mounting the Injection manifold, along with the switches and cables. 6.1.2 Electrical and Power The control panel requirements are 110 VAC at 10 Amps. The control panel is supplied with a three prong grounded plug. Extra attached loads such as valves, mixers, and other such devices, should be accounted for in the total electrical requirements. WARNING: To reduce the risk of electric shock, the control panel must be plugged into a grounded outlet with ratings conforming to the requirements of the control panel, and any other electrical loads connected to it. The control panel should be connected to a good ground. DO NOT USE ADAPTERS! All wiring must conform to local electrical codes. 6.1.3 Terminal Strip Wiring From Left to Right 1. 2. 3. 4. 5. Acid Pump Oxid Pump Neutral / Thermal FS Red Ground Flow Switch AC / Thermal FS Red/White + Red/Yellow 6. Flow Switch / Thermal FS Red/Black 6.2 7. 8. 9. 10. (+) 4-20mA pH (-) 4-20mA pH (+) 4-20mA ppm (-) 4-20mA ppm Manifold The manifold allows water to enter from one end of the flow port and exit the other, while the electrodes take their measurements. The water exiting the manifold must return to atmospheric pressure to prevent damage to the ppm sensor. Max backpressure on exiting water flow is 1 bar (14.7 psi) (see Fig. 10). 6.3 Sensor Input Connection Bring in the male BNC connector of the pH probe and 2-conductor cable for the chlorine probe through the two large cord grips at the bottom of the control panel (see Fig. 8) and connect each to their appropriate connector and cable to their monitors (see Fig. 5). Bring in the temperature probe wire through the cord grips at the bottom of the control panel and connect the probe to the temperature meter (see Section 6.4.1 for connection detail). 6.4 Temperature Controller Connection (Optional) 6.4.1 Connect RTD Temperature Sensor Connect the Red wire on the sensor to terminal 1. Connect one of the White wire to terminal 2 and the other White wire to terminal 3 (see Figure 10). Visit us Online at www.pulseinstrument.com 14 Pulse Instruments System 11 Manual Version 1 6.4.2 Terminal Description 6 7 8 9 10 11 12 13 14 15 16 1 2 3 4 5 Fig. 10 Temperature Meter, Back View No. Description 1 2 3 Temperature sensor input (see Section 6.4.1) Temperature sensor input (see Section 6.4.1) Temperature sensor input (see Section 6.4.1) 4 Power terminal (No polarity) 5 Power terminal (No polarity) 6 7 8 9 Normally closed terminal for Low set point output Common terminal for Low set point output Normally open terminal for Low set point output Common terminal for GO output 10 11 12 13 GO output terminal Normally closed terminal for High set point output Common terminal for High set point output Normally open terminal for Low set point output 14 Common terminal for analog output 15 16 Current output terminal (4-20 mA) Voltage output terminal (1-5 V, 0-1 V, and 0-10 V) Visit us Online at www.pulseinstrument.com 15 Pulse Instruments System 11 Manual Version 1 6.5 Thermal Flow Switch 6.5.1 Thermal Flow Switch Connection Instructions: 1. Connect wires from the flow switch to the terminal strip on the backplate (See Section 6.1.3). 2. Connect flow switch to stainless steel fitting in the manifold. Adjustment to the flow and setting of the switch points are done by pressing the left and right push buttons. Flow and switch point are indicated by a multi-color LED display. The green LED lights represent the flow rate and the red LED light serves as the switch point. High repeatability of the switch points offers an optimum choice for use. Electronic locking of the settings and factory rest of the parameters provide additional safety. 6.6 Chemical Metering Pumps Choose a clean and dry location for the pump, which is close to an electrical outlet and allows for convenient access to stroke length control, frequency control, and tubing connections. Avoid areas where ambient temperature exceeds 122 ºF (50 ºC), falls below 32 ºF (0 ºC), or where the pump or tubing would be exposed to direct sunlight (See the pump manual for details). Visit us Online at www.pulseinstrument.com 16 Pulse Instruments System 11 Manual Version 1 Flooded Suction Mounting Recommended for liquids that out-gas Shelf Mount Maximum 5 feet suction lift Tank Mount Maximum 5 feet suction lift Connect the acid and oxidation pumps’ power cord to the corresponding drop cords located at the bottom of the control panel (see Fig. 7). This will allow the control panel to turn the pump on / off when needed. If you do not want to use the provided drop cords see section 6.1.3 for terminal strip layout. 6.7 Data Recording (Optional) Connect the data recorder to the control panel. The control panel outputs a 4 to 20mA signal for each parameter. See terminal strip description in Section 6.1.3. 6.7.1 DL011 DL011 must be configured before installation. See Section 7.5.1 for the configuration check list and see recorder manual for configuration instructions. For the DL011 recorder, connect the 4 to 20mA wires from the control panel’s terminal strip to the recorder’s terminal strip located inside on the swing out door (see recorder manual for detail). 6.7.2 DL-USB-4 For the DL-USB-4 datalogger, the 4 to 20mA wires are pre-connected by the factory. 4-20mA Input Cap Datalogger Body USB Connector Mounting Base Fig. 11 DL-USB-4 Visit us Online at www.pulseinstrument.com 17 Pulse Instruments System 11 Manual Version 1 The 4-20mA output is connected to the 4-20mA input cap of the datalogger (see Fig. 11). The USB connector fits perfectly into the 4-20mA input cap only one way. Do not use force connecting the USB connector and the 4-20mA input cap. If you are ready to download the data stored on the datalogger, disconnect the datalogger body from the 4-20mA input cap and the mounting base. Take the datalogger body to your computer and connect it to the USB connector on your computer. Open up the software and download the data (see Section 7.5.2). 7. Configuration / Setup 7.1 Power Up To set up a new unit, first check that the power supply connections are correct, that the outlet is 110 VAC, and that the connection and power source are clean of any ground loops, inductive loads or magnetic fields. Shared loads on the same circuit may cause interference; therefore a clean power circuit is recommended. Also, when using the AC supply, ensure that a 3-way grounded main lead is used to connect the unit. Switch on the power to the unit via the lighted On / Off switch that is located on the side of the control panel. The switch light should turn on the front instrument displays with indicated values on their screens. 7.2 pH and PPM Control Set Points Before beginning operations, the process parameters must be defined. Set the control and alarm set points and dead band. See Section 3.1, Fig. 1, for graphic information. Factory Preset pH Low Low Low Alarm 5.5 pH Low pH High (setpoint) pH High High pH dead band ppm Low ppm Set 1 (setpoint) Base Acid High Alarm Hysteresis Low Alarm Oxidation 6.0 6.8 8.5 0.1 5 ppm 10 ppm ppm High ppm dead band High Alarm Hysteresis 50 ppm 0.1% of FS On the pH controller, the green digit display (second display) indicates the value of the selected set point, which is indicated by the corresponding small green LED light. Choose the desired set point by pressing the “MODE” button. Pressing it again moves to the dead band (hysteresis) selection. Pressing the “MODE” button again moves to the next set point selection. Hold the “MODE” button down for 3 seconds to change the selected set point or dead band value individually for each point. When the display starts blinking, use the “UP” or “DOWN” arrows to select the desired value. Once the correct value is displayed, press the “ENT” button to accept and confirm the new value. The lower green digit display blinks 4 times rapidly and displays the new set point value. Visit us Online at www.pulseinstrument.com 18 Pulse Instruments System 11 Manual Version 1 7.2.1 pH Set Points 1. Press the “AUTO” button to go to the beginning of the menu. The green indicator light should be on “LL”. 2. Press and hold the “MODE” button until the second display starts blinking. 3. Press the UP or DOWN arrows to adjust the Low Low alarm set point value, which is shown on the second display. 4. Press the “ENT” key to save the set point. The second display will blink rapidly to confirm. 5. Press the “MODE” button twice until the “L” indicator light lights up. Repeat steps 2 – 4 to change the Low, High, and HH set points. Visit us Online at www.pulseinstrument.com 19 Pulse Instruments System 11 Manual Version 1 7.2.2 ppm Set Points 1. Press the “SET 1” button to change the ppm setpoint. Use the arrows to change the value and press ENT to save. ppm ppm 2. To adjust the alarm setpoints, follow the steps below: a. Press the MODE button until you see SET-UP Press ENT on the display and press the ENT button to enter the set-up menu. b. Press the MODE button until you see 4.1 Lo Alarm and use the arrows to enter the low alarm value, then ENT to save. c. The display will now show 4.2 Hi Alarm and use the arrows to enter the high alarm value, then ENT to save. d. Press MODE until you return to the measurement screen. Visit us Online at www.pulseinstrument.com ppm ppm 20 Pulse Instruments System 11 Manual Version 1 7.3 Temperature (Optional) Factory Preset 7.3.1 Unit High Setpoint Low Setpoint High Setpoint Hysteresis Low Setpoint Hysteresis Analog Output F 50 32 1 1 4-20mA Analog High Analog Low Thermocouple 200°F 0°F RTD Setup Temperature Unit 1. Press and hold the “E” and “M” buttons for three seconds and the screen will display “cond”. 2. Press the “M” button until the display shows “Unit” and then “c” or “F”. 3. Press the “UP” button once to change the unit. 4. Press the “M” button to go the next parameter or press the “E” button to exit the setup. 7.3.2 Setup Temperature Sensor Type 1. Press and hold the “E” and “M” buttons for three seconds. The screen will display “cond”. 2. Press the “M” button until the display shows “rAnG” and then a sensor type. 3. Press the “UP” arrow to change to “PA” if using RTD sensor. 4. Press the “M” button to go the next parameter or press the “E” button to exit the setup. 7.3.3 Setup Analog Output Mode 1. Press and hold the “E” and “M” buttons for three seconds. The screen will display “cond”. 2. Press the “M” button until the display shows “A.OUT”. 3. Press the “UP” arrow to change the analog output mode: 0-1V, 0-10V, 1-5V, or 4-20mA. 4. Press the “M” button to go the next Visit us Online at www.pulseinstrument.com 21 Pulse Instruments System 11 Manual Version 1 parameter or press the “E” button to exit the setup. 7.3.4 Setup Temperature Setpoints and Hysteresis 1. Press and hold the “E” and “M” buttons for three seconds. The screen will display “cond”. 2. Press the “RIGHT” arrow once. The display should show “con”. 3. Press the “M” button once. The display should show “S-Hi”. Then press the “M” button again to change the setpoint value. 3. Press the “UP” or “RIGHT” arrows to change the setpoint. The “RIGHT” arrow is to move between digits and the “UP” arrow is to change the number. 4. Press the “M” button until the display shows “S-Lo” and then press the “M” button again to change the setpoint value. 5. Press the “UP” or “RIGHT” arrows to change the setpoint. 6. Press the “M” button until the display shows “H-Hi” and then press the “M” button again to change the hysteresis value. 7. Press the “UP” or “RIGHT” arrows to change the value. 8. Press the “M” button until the display shows “H-Hi” and then press the “M” button again to change the hysteresis value. 9. Press the “UP” or “RIGHT” arrows to change the value. 10. Press the “E” button to exit the setup. Visit us Online at www.pulseinstrument.com 22 Pulse Instruments System 11 Manual Version 1 7.3.5 Setup Analog High and Low Range 1. Press and hold the “E” and “M” buttons for three seconds. The screen will display “cond”. 2. Press the “RIGHT” arrow twice. The display should show “NEt”. 3. Press the “M” button until the display shows “AoHI”. 4. Press the “UP” or “RIGHT” arrows to change the analog high. The “RIGHT” arrow is to move between digits and the “UP” arrow is to change the number. 5. Press the “M” button to go the next parameter or press the “E” button to exit the setup. 6. Press and hold the “E” and “M” buttons for three seconds. The screen will display “cond”. 7. Press the “RIGHT” arrow once. The display should show “NEt”. 8. Press the “M” button until the display shows “AoLo”. 9. Press the “UP” or “RIGHT” arrows to change the analog low. 10. Press the “E” button to save the change. 7.3.6 Change Offset 1. Press and hold the “M” and “RIGHT” arrow buttons for three seconds. The screen will display “SHF”. 2. Press the “UP” or “RIGHT” arrows to change the offset. The “RIGHT” arrow is to move between digits and the “UP” arrow is to change the number. 3. Press the “M” button to save the value. 4. Press the “E” button to exit the menu. Visit us Online at www.pulseinstrument.com 23 Pulse Instruments System 11 Manual Version 1 7.4 Chemical Metering Pump Control EZ Series EW Series EK Series EH Series With the pump turned on but not pumping, set stroke length to 100% and frequency to 360 strokes per minute (SPM). If the pump is equipped with an air vent valve, open the knob a half turn. Liquid should move up through the suction tubing and into the pump head. When the liquid starts running through the vent side tubing, close the air vent knob and continue with output adjustment (See pump manual for details). If the pump has no air vent valve, disconnect the discharge tubing from the injection valve. When liquid enters the discharge tubing at the pump head, stop the pump, then reconnect the discharge tubing to the injection valve. If the pump does not self prime, remove the check valve housing on the discharge and suction sides to make sure the cartridges and gaskets are in the correct position (See pump manual for details). 7.5 Data Recording (Optional) 7.5.1 DL011 Configuration Check List Connect power to the recorder and wait approximately 1 minute for it to boot. Connect the recorder to your computer using a USB cable. Launch Internet Explorer and type in the IP address 199.199.199.2. The login page will come up. Default user name is “WebAlert” and the default password is “2001” for full access, “2002” for calibration only, and “2003” for read only. After logging in, the System Summary page will be displayed in the main frame of the browser. Change the log-in name and password (recommended) by clicking on the “Access Code” link in the Menu Selection list. Click on the Communication link to setup Ethernet connection, Email address, phone number for text message, and etc. (see recorder manual for details). After all the configurations are done, mount the recorder and connect all the 4 to 20mA wires (see recorder manual for detail). 7.5.2 DL-USB-4 Software Installation for Windows XP / 2000 / 98 1. Insert the software CD into the CD-ROM of your computer. If the CD does not start automatically, click on “Start”, “Run”, and type D:\autorun.exe then click “OK”. 2. Read the “IMPORTANT NOTICE”, select “I Agree” and click “Next”. 3. Click “Next” again. Visit us Online at www.pulseinstrument.com 24 Pulse Instruments System 11 Manual Version 1 4. 5. Click “Next” to start the installation. A progress bar will be displayed until the installation is complete. Click “Close”. An icon will appear on your desktop. USB Driver Installation Make sure the software CD is in the CD drive throughout this installation. Windows XP 1. Insert the USB datalogger into a USB port on your computer. “Found New Hardware” will appear at the task tray located at the bottom right hand corner. Windows XP refers to the datalogger as “USB API” and “F32X Express USB Device” throughout this installation. 2. Make sure the software CD is in the CD drive. Select “Install the software automatically (Recommended)” then click “Next”. A screen will appear showing files being copied to your computer. 3. When the “Hardware Installation” window appears, click “Continue Anyway”. 4. Installation is now complete, click “Finish”. 5. The USB datalogger is ready to be used. 6. Open the software to configure the datalogger or to download the data. Windows 2000 1. Insert the USB datalogger into a USB port on your computer. “Found New Hardware” screen will appear. Windows 98 refers to the datalogger as “USB API”. 2. Make sure the software CD is in the CD drive. Click “Next”. 3. Select “Search for the best driver for your device (Recommended)” then click “Next”. 4. Select “CD-ROM drive” only, and then click “Next”. 5. Click “Next” again. 6. Windows 2000 now refers to the datalogger as “F32x Express USB Device”. Click “Finish”. 7. The USB datalogger is ready to be used. 8. Open the software to configure the datalogger or to download the data. Windows 98 1. Insert the USB datalogger into a USB port on your computer. “Found New Hardware” screen will appear. Windows 98 refers to the datalogger as “USB API”. 2. Make sure the software CD is in the CD drive. Click “Next”. 3. Select “Search for the best driver for your device (Recommended)” then click “Next”. 4. Select “CD-ROM drive” only, and then click on “Next” button. 5. Windows 98 now refers to the datalogger as “F32x Express USB Device”. Click “Next”. 6. Installation is now complete, click “Finish”. 7. The USB datalogger is ready to be used. 8. Open the software to configure the datalogger or to download the data. Datalogger Configuration Datalogger is pre-configured. Use the instructions below to change configurations. Visit us Online at www.pulseinstrument.com 25 Pulse Instruments System 11 Manual Version 1 1. 2. 3. 4. 5. 6. 7. 8. 9. 10. 11. Open the EasyLog USB software. Click on “Set up and start the USB Data Logger.” icon. The first field is “Logger Name”. The second field is the “Sample Rate”. Click on the drop-down list to change the sample rate. Select the “Custom Calibration. Change the units and graph scale.” to change unit and alarm scale. Click on “Next”. The first field is for the measurement unit. The second field is to setup the 4 and 20 mA input specifications. Click on “Next”. Select the alarms to be set. Enter the alarm value. Click on “Next”. Specify the starting time and date. Click on “Finish”. Download Data 1. Open the EasyLog USB software. 2. Click “Stop the USB Data Logger and download data.” icon to transfer the data onto your computer. 3. Click “OK” to acknowledge that the datalogger is in the stopped condition. 4. Save the data file to a location on your computer. 5. A graphic display of the data will pop up. 6. Make sure you go through “Datalogger Configuration” before you put the datalogger back for recording again. By going through the Configuration, you re-enable the data recording process. View Data All the data are stored in a text file. You can use Microsoft Excel to view the data. 1. Open the EasyLog USB software. 2. Click “View previously saved data.” icon to view graphical data. 3. Select the data file you want to view. Click “OK”. 4. A graphic display of the data will appear. 8. Maintenance 8.1 Electrode Cleaning Remove the electrodes from the flow cell. Take a 1:100 diluted solution of acid to water in a cup, and place the electrode front tip in the solution for at least two inches deep, for a minimum of five to fifteen minutes. Rinse the tip and re-check the calibration. 8.2 Calibration For calibrating pH, our some calibration solution out of the solution bottle into a container. Do not calibrate the sensors in the solution bottle; this will contaminate the entire bottle. The amount of the solution that is used should be enough to cover the sensor tip. Follow the instructions below to calibrate the sensor. Discard the used solution after completing the calibration successfully. For ppm calibration, take a process sample and determine the free chlorine ppm using a titration test kit or test strips. Visit us Online at www.pulseinstrument.com 26 Pulse Instruments System 11 Manual Version 1 8.2.1 pH Calibration 1. Place the pH probe in buffer solution 7.00 and allow sufficient time for the electrode to reach the buffer solution value. 2. Press and hold the “CAL” button for three seconds to initialize the calibration process. 3. The “CAL” indicator light will turn on and the top display will start blinking. The second display will show “4-7” for a few seconds. 4. The controller will automatically calibrate to the buffer solution value (pH 7.00). The first and second displays will stop blinking after the controller is calibrated to pH 7.00. The second display will show “- 7”. Visit us Online at www.pulseinstrument.com 27 Pulse Instruments System 11 Manual Version 1 5. Rinse the electrode with water and place it in the pH 4.01 buffer solution and allow sufficient time for the electrode to reach the buffer solution value. 6. Press the “ENT” button. 7. The first display will start blinking and it will not stop blinking until the controller is calibrated to the buffer solution value (pH 4.01). The second display will show “4 - 7”. 8. Press the “ENT” button to save all calibration values. Follow the same steps if you are using pH 10.00 and pH 7.00 buffer solutions. 8.2.2 PPM Calibration 1. Zero Calibration a. Place the sensor into clean water that contains no chlorine. Press the ZERO button and the display will show Zero CAL. Press ENT once to save the zero calibration. 2. One-Point Calibration a. Take a sample of the process water and determine the free chlorine ppm using test strips or a titration test kit. b. Press the SENS button and you will see Sens. Cal followed by a value. Use the arrows to enter the ppm value determined by the test and press ENT to save. 8.3 ppm ppm Chemical Metering Pump Periodically check the chemical tank level to avoid the pump from operating without liquid. Check the pump operating condition at least every 6 months: pump head position, screws, bolts, and seals. Check more frequently if using aggressive chemical. Also, clean the hydraulic parts, such as valves and filter, as often as needed (See pump manual for details). Visit us Online at www.pulseinstrument.com 28 Pulse Instruments System 11 Manual Version 1 8.4 Data Recording (Optional) DL-USB-4 Battery Replacement Use a small screw driver to push in the small holding tap to open the datalogger. Place a 3.6V ½ AA battery into the battery compartment. Close the datalogger. 8.5 Surge Suppressor A surge suppressor is used to protect the control panel to prevent damage from loads voltage surges, spikes, and electrical line noise. The green LED on the surge suppressor indicates that the surge suppressor is working. If the green LED is off, this indicates that power is not being supplied to the surge suppressor. In addition, the LED will not illuminate if there has been a utility power failure or a short circuit. Periodically check the surge suppressor to ensure reliable system performance. Visit us Online at www.pulseinstrument.com 29 Pulse Instruments System 11 Manual Version 1 9. Troubleshooting Guide 9.1 Control system failed If the control system failed to work, such as pumps are not pumping when they are supposed to, you can reset the PLC to resolve this problem. If by resetting the PLC does not fix the problem, please contact the factory. Toggle Switch 9.2 To reset the PLC located on the back plate inside of the control panel, toggle the switch to STOP (to the right), then to RUN (to the left without stopping in the middle). Finally, position the toggle switch to TERM (to the middle). Electrode failed Unscrew the electrode from the threaded holder and place in known calibration standards: pH in pH 7.00 and 4.00 solutions. For the ppm sensor, refer to the instruction guide for the specific ppm sensor you have. 9.3 Electrode cable is damaged Follow the electrode cable carefully along its length and check for any cuts, breaks, or tight kinks. If the cable is damaged, replace electrode. 9.4 Electrodes need maintenance If other parameters seem normal but the readings seem abnormal in calibration standards, service the electrodes. Follow the steps below for pH electrode maintenance, and refer to the specific free chlorine sensor for instructions on sensor maintenance. Calibration should be performed at least once per week for continuous measuring. Place the pH electrode in a cup of pH 7.00 solution immersed minimum two inches. The pH controller should read 7.00 on the display. If not, follow the instructions in Section 8.2.1 to calibrate the controller. 9.5 Controller failed In normal operation, when the display reading is above the set point value for acid control, the acid pump is turned on. When the reading reaches the set point it turns off the chemical pump turns off. During the chemical adjustment period the Y0 light (see Section 2) on the PLC controller is on. This is an indication that the acid pump should be on. If Y0 is on and the pump is not operating, it may be that the relay contact in the controller has failed. In normal operation, when the display reading is below the set point level for OXID control and the pH pump (Y0) is not on, the chlorine pump is turned. When the reading reaches the set point it turns the chemical pump off. During the chemical adjustment period the Y1 light on the PLC controller is on. This is an indication that the oxidation pump should be activated. If the Y1 light Visit us Online at www.pulseinstrument.com 30 Pulse Instruments System 11 Manual Version 1 (see Section 2) is on and the pump is not operating, it may be that the relay contact in the controller has failed. Unplug the chemical pump and use a voltmeter to check if 110VAC is being put out at the receptacle of the pump while the Y0 or Y1 light is on. If there is no power, the controller needs to be replaced. Contact the factory. 9.6 Controller Error Message The controller’s error messages are displayed on the second screen of the controller. Error Code E-oF E-uF E-C1 Explanation E-t1 pH value is below the low limit. pH value is lower than –1.0 pH. Electrode needs cleaning. Old standard calibration solution. Big difference between the displayed value and the standard calibration solution value. E-C2 E-C3 pH value is over the high limit. pH value is higher than 15.0 pH. Solution Temperature sensor or resistor is missing on controller terminals 11 and 12. Replace resistor or electrode. No temperature compensation. No temperature compensation. There is a short circuit. E-t3 Temperature is over the high limit. Temperature is higher than 110ºC. E-t4 E-S1 Temperature is below the low limit. Temperature is lower than -10ºC. Controller system error. Loss of memory. Visit us Online at www.pulseinstrument.com See Section 8.1 for electrode cleaning instructions. Change calibration solution. Change electrode. Change calibration solution. Make sure the calibration solution is pH 4, 7, or 10. E-t2 Check electrode connection and cable. Check the solution. See Section 8.1 for electrode cleaning instructions. Change calibration solution. Change electrode. Wrong standard calibration solution. Check electrode connection and cable. Check the solution. Temperature sensor or resistor is missing on controller terminals 11 and 12. Replace resistor or electrode. Temperature sensor or resistor is missing on controller terminals 11 and 12. Do not use electrode over the temperature limit. Temperature sensor or resistor is missing on controller terminals 11 and 12. Do not use electrode over the temperature limit. Contact the factory. 31 Pulse Instruments System 11 Manual Version 1 E-S2 9.7 Controller system error. Defective A/D converter. Contact the factory. Chemical Pump failed If the pump receptacle has 110VAC output, but the pump is not turning on, check to make sure the pump is in the on position and at least 50% stroke and frequency. If the pump still does not turn on, it means the pump has failed and need service. 10 Contact Pulse Instruments Phone: (800) 462-1926 email: [email protected] web: www.pulseinstrument.com Visit us Online at www.pulseinstrument.com 32