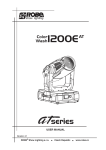
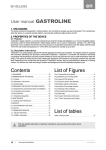
1
OPERATION AND MAINTENANCE MANUAL
No. E 0110.74
for
FIXED PITCH PROPELLER
HO( ) Series
HO4( ) Series
HOFFMANN GmbH & Co. KG
Küpferlingstraße 9
D-83022 Rosenheim
Tel.: ++49/(0)8031/1878-0
Fax: ++49/(0)8031/1878-78
Owner's Manual No. E0110.74
61-10-01
8. Edition
Feb. 2002
I
Chapter
1
Designation.................................................................................................................. 1-1
2
Construction ................................................................................................................ 2-1
3
Installation Instructions .............................................................................................. 3-1
4
Inspection and Maintenance ...................................................................................... 4-1
5
Maintenance and Repair ............................................................................................. 5-1
6
Storage and Shipping ................................................................................................. 6-1
Owner's Manual No. E0110.74
61-10-01
8. Edition
Feb. 2002
II
Record of Revisions to this Manual
Rev.
No.
Issue
Date
Date
Inserted
Owner's Manual No. E0110.74
61-10-01
Inserted by
Ref.
No.
Issue
Date
Date
Inserted
Inserted by
8. Edition
Feb. 2002
III
List of Illustrations
Fig. 2-1
Hoffmann blade tipping Type A
Chapter 2
Page 2-1
Fig. 2-2
Hoffmann blade tipping Type B or C
Chapter 2
Page 2-2
Fig. 4-1
Normal erosion, no matter of concern
Chapter 4
Page 4-1
Fig. 4-2
Erosion tipping Type A
Chapter 4
Page 4-2
Fig. 4-3
Erosion tipping Type B and C
Chapter 4
Page 4-3
Fig. 4-4
Fine cracks in the paint or the tipping
Chapter 4
Page 4-4
Fig. 4-5
Cracks in the paint or blade
Chapter 4
Page 4-5
Fig. 4-6
Hair- cracks in the paint
Chapter 4
Page 4-6
Fig. 4-7
Radial cracks
Chapter 4
Page 4-7
Fig. 4-8
Tangential cracks
Chapter 4
Page 4-8
Fig. 4-9
Cracks in paint caused by short lamellas
Chapter 4
Page 4-9
Owner's Manual No. E0110.74
61-10-01
8. Edition
Feb. 2002
Chapter 1
1
1-1
Designation
Designation of 2-bladed propeller
HO- 27 ( ) ( ) -( ) 183 ( ) 100 ( ) ( )
1
2
3
4
5
6
7
8
1:
Hoffmann GmbH & Co. KG
2:
key number of hub connection (according. to
manufacturers list)
3:
additional modification to hub connection (figure or
letter, according to manufacturer's listing
4:
blank: hardwood propeller
HM:
9 10
hardwood, fibre covering
5:
number of blade design, contains construction and
aerodynamic data (according to manufacturer's listing
6:
propeller diameter in cm
7:
blank: standard blade
S:
narrow blade
8:
B:
wide blade
pitch H at the reference station. Reference station
standard 0,75 R. Older models can differ in ref.
station.
9:
blank: right-hand tractor
10:
D:
right-hand pusher
L:
left-hand tractor
LD:
left-hand pusher
denotes hub shape
blank: cylindrical hub
K:
Owner's Manual No. E0110.74
61-10-01
conical hub
8. Edition
Feb. 2002
Chapter 1
1-2
Designation of 4-bladed propeller
HO 4 /
1
2
27 ( ) ( )
3
-170
4
5
( ) 128 ( )
6
7
1:
Hoffmann GmbH & Co. KG
2:
number of blades
3:
key number of hub connection (according to
manufacturers list)
4:
blank
hardwood
HM:
hardwood, fibre reinforced epoxy covering
5:
propeller diameter in cm
6:
blank: standard blade
S:
Owner's Manual No. E0110.74
61-10-01
8
narrow blade
7:
B:
wide blade
pitch H at reference station. Reference station
standard 0,75 R. Older models can differ in ref.
station.
8:
Blank: right-hand tractor
D:
right-hand pusher
L:
left-hand tractor
LD:
left-hand pusher
8. Edition
Feb. 2002
Chapter 2
2-1
2
Construction
2.1.
Standard hardwood composite construction
2.1.1 Basic material for these propellers is ashwood, selected for this special application
and conditioned according to our manufacturing specifications. Continuous testing
guarantees high quality. The wood is glued together to a block with water resistant glue.
During manufacturing continuous quality control is applied. Dense lamination prevents
the wood from wrapping.
This fact guarantees equal performance for propellers of the same type.
2.1.2 Leading edge protection
The special Blade-Tipping was developed by Hoffmann Propeller. There is no need to
use rivets to fasten the metal sheet onto the blade. Therefore penetration of moisture,
which causes problems on wooden propellers is nearly impossible. The blade tipping
can be replaced as often as required.
Type A is a brass metal strip soft soldered to a bronze fabric and glued to the blade
FRP cover (Figure 2-1).
Figure 2-1
Hoffmann Blade tipping (Type A)
Owner's Manual No. E0110.74
61-10-01
8. Edition
Feb. 2002
Chapter 2
2-2
Blade tipping Type B is a special aluminium strip glued directly to the wooden core of
the blade (Figure 2-2).
Blade tipping Type C is a special PU- strip (Polyurethane) blade tipping and also glued
directly to the wooden core. Due to the material the leading edge is not painted.
(Figure 2-2)
Figure 2-2
Hoffmann Blade tipping (Type B, or C)
2.1.3 Surface protection and finish
Several layers of special polyurethane paint (PU- paint) are sprayed onto the wooden
body, or the fibre reinforced epoxy covering if installed, and the erosion tipping (with the
exception of the Type C erosion tipping), this assures a high resistance to atmospheric
conditions. This polyurethane paint shows also high resistance against erosion and
mechanical damage. Coloured paint is required to protect the wood against UV-rays.
The standard thrust side is painted dull black to avoid reflection of sunlight. For safety
reasons the tips are painted with a different colour to make the transparent propeller
disc visible when the propeller is running.
2.1.4 Special design
Some propellers have a plastic covering of fibre reinforced epoxy to improve surface
protection and stability characteristics of the blade.
2.2
Light weight propeller
The wooden core of this propeller is made of specially selected spruce. The wood is
glued together in the same way as for the composite propeller.
An additional advantage is less weight at comparable stability. This propeller differs
from the composite propeller only by the decreased weight.
The leading edge protection is conform with that of the composite propeller.
Surface protection:
All light weight propellers are covered with fibre reinforced epoxy to increase torsion
stiffness and erosion protection. Then they are varnished like the composite propellers.
Owner's Manual No. E0110.74
61-10-01
8. Edition
Feb. 2002
Chapter 2
2.3.
2-3
Hoffmann 4-bladed propeller
This propeller was designed to decrease propeller noise. 4-bladed propellers allow a
smaller diameter than 2-bladed propellers at comparable performance and produce
less noise.
2.3.1 Wooden core
The ashwood lamellas are only half as thick as for a 2-bladed fixed pitch propeller.
They are glued crosswise so that one long lamella is for two opposite blades. Between
there are two short lamellas. This is done alternatively until the necessary height of the
block is reached.
2.3.2 Leading edge protection
The leading edge protection is conform with that of the 2 bladed composite propeller.
2.3.3 Surface protection
The same methods are applied as for the light weight propeller.
Owner's Manual No. E0110.74
61-10-01
8. Edition
Feb. 2002
Chapter 3
3-1
3
Installation Instructions
3.1
Installation
WARNING
Before performing any work on the propeller follow
the safety precautions given in the flight manual
3.1.1 Check propeller type and condition, clean propeller hub and let dry.
3.1.2 Clean the propeller and engine flange using solvent. Engine torque is mainly
transferred by friction, therefore the surfaces have to be smooth and clean. Check bolts
and thread for cracks and corrosion.
3.1.3 If there is a bolt hub, carefully check the connecting surface (cone, hub nut) parts and
threads.
WARNING
Check the correct length of the bolts
3.1.4 Put the propeller on the engine flange or hub flange. Install front plate, bolts, washers
and nuts, if applicable. Tighten bolts or nuts uniformly, torque crosswise (see 3.1.7).
CAUTION
If no spinner is used, the front plate must completely cover
the centre bore of the propeller, to avoid water entering
this part of the hub which destroys the propeller.
CAUTION
Propeller installation is subject to an
immediate inspection by a licensed engineer
3.1.5 In case of bolt hubs 2 - 3 mounting bolts are necessary to centre the propeller.
3.1.6 If the bushings or the mounting bolts are stuck do not install the propeller (the hub may
split open), it has to be removed and checked again. An excessive layer of lacquer in
the bore can be scraped out. In case of discrepancies contact the manufacturer.
3.1.7 Use the recommended torque for tapered-, spline- or Hirth- hub installations, as
specified by the engine manufacturer.
Owner's Manual No. E0110.74
61-10-01
8. Edition
Feb. 2002
Chapter 3
3-2
Torque values for dry threads:
M6
9 - 10 Nm ( 80 - 88 inlbs)
M 8 15 - 17 Nm (133 - 150 inlbs)
M 10 23 - 25 Nm (203 - 221 inlbs)
3 / 8 - 24 UNF 23 - 25 Nm 203 - 221 inlbs
7 / 16 - 10 UNF 25 - 27 Nm 221 - 239 inlbs
1 / 2 - 20 UNF 33 - 35 Nm 292 - 310 inlbs
Observe information on the sticker on the propeller. Use additional torque for the stop
nuts, as required. Torque bolts crosswise.
Make sure that the propeller fits to the flange or hub. No space is allowed between
those two parts.
WARNING
Not following step 3.1.9 may result
in the loss of the propeller
WARNING
Do not loosen the bolts
while performing step 3.1.9
3.1.9 Check torque after the first flight, after the first 25 hours and after that as necessary,
but at least each 50 hours by applying the required torque only. In hot and dry climate
the wood may shrink, therefore closer re-torque intervals have to be established.
NOTE:
Some bolts, not specified herein, may require different torque.
Please ask the company for the correct values.
WARNING:
Do not use any shimming material or paper
to correct the track
3.1.10 Check blade track 10 cms (4 inches) from the blade tip on the trailing edge. Max.
permissible are 3 mms (1/8"). If propeller is not within this limit, remove it, check mating
surfaces or turn propeller 180°. If this procedure doesn't change the situation, send the
propeller back to the factory.
3.1.11 Wire-lock the bolts in pairs or use the correct cotter pin to secure castellated nuts.
Secure hub nut as specified in the engine manual.
3.1.12 It is strongly recommended to send the bolt-hubs to the manufacturer if the propeller
has to be repaired or a new will be purchased. There the bolt-hubs will be checked,
installed and balanced together with the propeller.
Owner's Manual No. E0110.74
61-10-01
8. Edition
Feb. 2002
Chapter 3
3.2
3-3
Removal
WARNING
Before performing any work on the propeller follow
the safety precautions given in the flight manual
WARNING
For removing the propeller do not use
a screw driver or a chisel!
3.2.1 The removal of the propeller has to be done in the opposite sequence than installation
see paragraph. 3.1. If propeller fits very tight loosen it by knocking with the hand at the
centre of the blade near the hub. Knocking on the blade tips or the trailing edge with
hard objects would damage the propeller.
3.2.2 Protect engine flange, -cone or -spline shaft against damage and corrosion.
3.2.3 It is strongly recommended that the bolts and attaching parts are shipped with the
propeller for inspection and overhaul.
Tapered hubs, spline- hubs or any other detachable hubs should stay with the propeller.
These parts should be inspected and overhauled as well.
Owner's Manual No. E0110.74
61-10-01
8. Edition
Feb. 2002
Chapter 4
4-1
4
Inspection and Maintenance
4.1
Daily inspection
WARNING
Do not use the propeller as a handle
to move the aircraft!
WARNING
Before performing any work on the propeller follow
the safety precautions given in the flight manual
4.1.1 Inspection of the propeller.
Clean the propeller. Inspection of wooden composite propellers is easy and gives
reliable results. Critical conditions will show up early as surface cracks in the paint.
Therefore correct judgement of such cracks is very important.
4.1.2 Erosion on the leading edge of the blades is normal and not critical. Metal propellers
erode too. On a composite propeller the erosion sheet (Type A and B) becomes visible
under the paint.
Figure 4-1
Owner's Manual No. E0110.74
61-10-01
Normal erosion no matter of concern
8. Edition
Feb. 2002
Chapter 4
4-2
4.1.3 The erosion tipping (Type A) of the propeller blades ends in the inner third of the blade.
Fine cracks in the paint along the tipping are no reason for concern
Figure 4-2
Hoffmann Blade erosion (Type A)
4.1.4 The erosion tipping (Type B and C) ends in the inner third of the blade. Fine cracks in
the paint along the tipping are no reason for concern. Cracks in the tipping perpendicular to the blade axis are not dangerous as long as the tipping does not lift off from
the blade body. Slide your fingernail along the leading edge from the hub to the tip. If
the tipping lifts off from a crack, remove propeller for repair.
Figure 4-3
Owner's Manual No. E0110.74
61-10-01
Hoffmann Blade erosion (Type B or C)
8. Edition
Feb. 2002
Chapter 4
4-3
4.1.5 Fine cracks in the paint or the tipping across the blade axis, especially in the outer third
of the blade, are indications of bending vibration. In an advanced stage the tipping may
break or come off piece by piece. Notches in the tipping support this procedure. If such
cracks occur, contact the factory or a service station which is authorised by Hoffmann.
Figure 4-4
Cracks in the paint or tipping
4.1.6 Cracks in the paint or in the blade, starting from the blade tip and extending parallel or
at any angle to the blade axis, are indications for torsional vibrations. Such cracks occur
very seldom. If such cracks occur, contact the factory or a service station authorised by
Hoffmann.
Figure 4-5
Owner's Manual No. E0110.74
61-10-01
Cracks in the paint or blade
8. Edition
Feb. 2002
Chapter 4
4-4
4.1.7 Hair- cracks in the paint of the blade, starting from the blade tip and / or in the blade
root area and extending in any direction are indications of vibrations or overload of the
propeller blade. They are uncritical as long as they are paint cracks only. If they start
growing quickly and penetrating into the fibre cover contact the factory or a service
station authorised by Hoffmann.
Figure 4-6
Hair cracks in the paint
4.1.8 Radial crack, is less critical if it is limited to the outer lamella, and the crack is not longer
than the flange diameter. This is an indication that the propeller was loos. It may be
repairable.
Figure 4-7
Radial cracks
4.1.9 Tangential crack is critical and an indication of overload. The propeller has to be
removed from service immediately
Figure 4-8
Owner's Manual No. E0110.74
61-10-01
Tangential cracks
8. Edition
Feb. 2002
Chapter 4
4-5
4.1.10 A hair crack at the end of a short lamella (see para. 2.2.1) is less critical. Paint has to
be used to close the crack in order to avoid the penetration of moisture.
Figure 4-9
4.2
Cracks in paint caused by short lamellas
50 hour inspection
WARNING
Before performing any work on the propeller follow
the safety precautions given in the flight manual
Same as daily inspection from para 4.1.1 through 4.1.3.
WARNING
Do not loosen the bolts
while performing the next step
Check torque of hub bolts by, applying the necessary torque only. Lock wire bolts
again.
Recommended torque values for dry threads:
M6
9 - 10 Nm ( 80 - 88 inlbs)
3 / 8 - 24 UNF 23 - 25 Nm 203 - 221 inlbs
M8
15 - 17 Nm (133 - 150 inlbs)
7 / 16 - 10 UNF 25 - 27 Nm 221 - 239 inlbs
M 10 23 - 25 Nm (203 - 221 inlbs)
1 / 2 - 20 UNF 33 - 35 Nm 292 - 310 inlbs
Observe information on the sticker on the propeller. Use additional torque for the stop
nuts, as required. Torque bolts crosswise.
Owner's Manual No. E0110.74
61-10-01
8. Edition
Feb. 2002
Chapter 4
4.3
4-6
100 hour inspection
Same as 50 hour inspection. Check track of propeller according to para 3.1.10.
4.4
Annual inspection
Same as daily inspection from para 4.1.1 through para 4.1.9.
CAUTION
Propeller installation is subject to an
immediate inspection by a licensed engineer
While performing the annual inspection of the aircraft it is recommended to remove the
propeller from the mounting flange. This is in order to check the normally not visible hub
parts for deformation, cracks or paint damage. The wooden core should not be visible.
The paint damage has to be repaired. Install propeller following the procedures given in
chapter 3.
4.5
Over-speed
Special inspection is required if the max. rated propeller speed according the "TCDS"
(LBA - Kennblatt) has been exceeded by more than 10%. If the over - speed was above
20% of the max rated propeller - speed, the propeller has to be removed from service.
Repair is not possible. These propellers have to be marked as rejected
4.6
Extreme Climatic Conditions
Operation in hot, dry climate requires shorter inspection intervals for the torque of the
hub bolts, caused by slight shrinking of the wood, the bolts may loose the required
torque. Inspection intervals have to be established upon experience. Do NOT loosen
the bolts, apply the required torque only.
4.7
Overhaul
There is no calendar time limitation to observe. Repair or overhaul is only necessary
after damage or in case of cracks in the blade tipping, the paint or the bore. Overhaul
may only be carried out by the manufacturer of by a propeller shop, which is approved
by the manufacturer.
Owner's Manual No. E0110.74
61-10-01
8. Edition
Feb. 2002
Chapter 5
5-1
5
Maintenance and Repair
5.1
Maintenance
5.1.1 A clean propeller always gives better performance!
Clean the propeller with any gentle detergent or equivalent and protect it with regular
car polish, that doesn't contain silicone.
5.2
Minor repair
Minor damage (scratches etc.) may be repaired in the field. Please check that the
wooden core or the plastic cover is not damaged. A service kit with all necessary
materials can be ordered from the manufacturer.
5.2.1 Remove oil or grease from the damaged area with regular solvent and grind it with
abrasive paper, grit 220.
5.2.2 If necessary fill the sanded area with filler. Make sure not to apply too much filler.
5.2.3 Allow the filler to dry and polish it using abrasive paper, grit 220.
5.2.4 Repaint repaired area. Use only original paint.
5.2.5 In case the repaired area is painted repeatedly, observe drying time of the paint.
5.2.6 If moisture is penetrated into the wooden core it is necessary to send the propeller to
the manufacturer.
5.3
Major Repair
Major repair is carried out by the manufacturer only.
For example:
a)
Exchange of blade tipping
b)
Splicing of the tips, provided 90% of the blade is still existing and undamaged
c)
Repair of split trailing edges
d)
Repair of the hub
Owner's Manual No. E0110.74
61-10-01
8. Edition
Feb. 2002
Chapter 6
6-1
6
Storage and Shipping
6.1
Shipping
Careful packing is the best protection to avoid damage during shipping. Therefore
HOFFMANN provides special wooden- or cardboard- boxes which are reusable if they
will be treated carefully. The blade tips, leading and trailing edges have to be protected
sufficiently. If a wooden case is used for shipping, the propeller should be fastened
through the centre bore or the bolt holes.
6.2
Storage
No propeller should be stored standing on the blade tips. The best is to store the
propeller in the original packing.
Special preservation of HOFFMANN fixed pitch propellers is not necessary, the existing
surface protection is sufficient. The propeller should not be stored near heating systems
or in rooms with extreme temperature changes.
Owner's Manual No. E0110.74
61-10-01
8. Edition
Feb. 2002