1
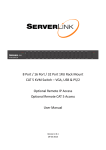
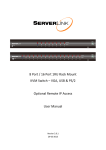
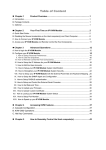
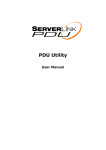
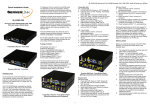
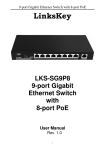
1RU 17” Full HD LCD Console Drawer with Integrated 8 Port DVI/USB/Audio KVM Switch User Manual Version 1.1 7‐11‐2013 Contents 1. Introduction ......................................................................................................................... 3 1.1 Main Features ..................................................................................................................... 3 1.2 Package Contents ................................................................................................................ 3 1.3 LED Panel ............................................................................................................................. 4 1.4 Port LED Indications ............................................................................................................. 4 1.5 Current Port LED................................................................................................................... 4 1.6 Buttons and Operations ....................................................................................................... 4 1.7 Rear of KVM Switch ............................................................................................................. 4 2. Hardware Installation .......................................................................................................... 5 2.1 Installing Console Drawer into Rack Cabinet ...................................................................... 5 2.2 Computer/Server Installation ............................................................................................. 6 2.2.1 Connecting Computers to KVM Switch ................................................................................ 6 3. Operation ............................................................................................................................ 7 3.1 Push Button Port Selection ................................................................................................. 7 3.2 Hotkey Commands .............................................................................................................. 7 4. Technical Specifications ....................................................................................................... 8 5. Drawings and Dimensions .................................................................................................... 9 6. Certifications ..................................................................................................................... 10 2 1. Introduction The ServerLink 8 port DVI LCD console drawer allows you to control and manage up to 8 DVI servers or computers in your data centre, server room or wherever rack space is at a premium. With a full size keyboard, touch pad and an A‐Grade 17" Full HD LCD panel housed in an industry standard 1U height rack drawer, the LKS‐08D17W saves you up to 70 per cent of valuable space in your rack cabinet. With an 8 port DVI/USB KVM, 1920 x 1080 LCD panel, built‐in USB 2.0 hub and integrated stereo speakers, this ServerLink LCD console drawer is your perfect choice. 1.1 Main Features Full HD 1920 x 1080 17” Widescreen LCD Integrated 8 port DVI/USB/Audio KVM USB 2.0 hub for USB flash drive, external HDD or any other USB device Built‐in 2 x 2 Watt stereo speakers Quick and simple installation Full size keyboard and touch pad Self‐locking and auto release rails for ultra‐convenience Port selection via push buttons or keyboard hotkey No software required Auto Scan Mode for monitoring of computers KVM switch is firmware upgradeable Internal AC adapter eliminates messy external power supplies Keyboard status restored when switching computers Support Mac/Sun keyboard emulation 1.2 Package Contents 1 x ServerLink 8 Port DVI LCD Console Drawer with Rack Mounting Sliding Rails 1 x AC Power Cable 1 x CD‐ROM with User Manuals, Quick Installation Guides and Utilities 1 x Quick Installation Guide 3 1.3 LED Panel Port LED indicators LED for current selected computer port Port Number Select Button Figure 1. LED Panel View 1.4 Port LED Indicators There are three LED’s for each port: ■ ■ ■ ONLINE LED: The Red LED indicates a computer is connected and powered on. USB HUB LED: The Green LED indicates the USB HUB is connected to this port. AUDIO LED: The Blue LED indicates the Audio is connected to this port. 1.5 Current Port LED The 7‐segment port LED indicates the current selected computer port. 1.6 Buttons and Operations There are 11 push buttons on the LED front panel. The buttons labelled 1 to 8 are the port number select buttons. The additional 3 buttons are not operational and are reserved for future use. 1.7 Rear of KVM Switch Optional USB Keyboard & Mouse USB 2.0 HUB Connectors for each computer AC Power Input Figure 2. Rear Panel View 4 2. Hardware Installation 2.1 Installing Console Drawer into Rack Cabinet Step 1. Loosen screw A on both sides to slide out and remove the two rear slide rails. Remove safety stopper B by loosening the two screws and moving to unlock position. Rear Slide Rails Step 2. Attach the two rear slide rails to the rear vertical mounting rails of the rack cabinet using standard M6 cage nuts and screws. Rear Cabinet Rails Step 3. Position the LCD console drawer so the two rear slide rails will slide into the main body of the LCD console drawer. Attach the mounting ears of the LCD console drawer to the front vertical mounting rails of the rack cabinet using standard M6 cage nuts and screws. 5 2.2 Computer/Server Installation Figure 3. Computer/Server Installation 2.2.1 Connecting Computers to KVM Switch Step 1. Make sure all computers and peripherals are powered off. Step 2. Power up the LCD Console Drawer by connecting the included AC power cable. Step 3. Connect any optional shared USB 2.0 devices to the USB Hub ports on the KVM switch. Step 4. Connect your computers to the KVM switch, using standard DVI cables, USB Type A to B cables and 3.5mm audio cables if you want to switch audio. Step 5. Power up the connected computers one by one. After your computers are powered up, the LCD console drawer will be ready to use. 6 3. Operation 3.1 Push Button Port Selection The most convenient way to switch between computers is via the push buttons on the front panel of the LCD console drawer. To select a computer, simply push the one the buttons labelled 1 to 8. The LCD console drawer will switch the video, keyboard and touchpad to the selected computer. The audio output and any USB devices connected to the USB hub will remain at the previously selected computer. This is to avoid accidentally switching a USB device that may be writing data to a computer. To switch audio output and devices connected to the USB hub, use the Hotkey commands described below. 3.2 Hotkey Commands You can control the LCD console drawer through simple keyboard Hotkey commands. The default hotkey is CAPS LOCK + CAPS LOCK followed by a command from the table below. To use Hotkey commands, you must press CAPS LOCK + CAPS LOCK within 2 seconds. You will hear a beep sound confirming you are entering the Hotkey mode. You must press a command key within 2 seconds or the Hotkey mode will be disabled and return the keyboard back to its normal state. Command Function 1 ~ 8 Switch to computer port 1 ~ 8 ↑ or ↓ Switch to next computer port up or down F1 ~ F8 Switch Audio to port 1 ~ 8 B Enable/disable beep sound function S Enable Auto‐scan function (ESC to stop scanning) H Switch USB Hub to currently selected computer port A Switch Audio to currently selected computer port G Switch USB Hub & Audio to currently selected computer port 7 4. Technical Specifications Part No. LKS‐08D17W No. of Computer Ports 8 LCD Screen Size 17.3” Widescreen Screen Resolution Full HD 1920 x 1080 Port Selection Push Button or Keyboard Hotkey Built‐in Speakers 2 x 2 Watt Stereo Mouse & KB Emulation USB 2.0 Hub USB 1 x Front USB 2.0 Port & 2 Rear USB 2.0 Ports Computer Monitor Connectors 8 x Single Link DVI‐D Female Computer USB Connectors 8 x USB Type B Female Computer Audio Connectors 8 x 3.5mm Stereo Female Optional Mouse & KB Connectors Default Hotkey Computer Port LEDs 2 x USB Type A Female Caps Lock + Caps Lock + Command Key Online (Red) / USB Hub (Green) / Audio (Blue) Maximum Distance to Computer 5 metres Power AC Input 100V‐240V, 50‐60Hz Dimensions 448mm (W) x 580mm (D) x 42mm (H) Shipping Weight 19.5 kg 8 5. Drawings and Dimensions Figure 4. Dimensions 9 6. Certifications FCC This equipment has been tested and found to comply with Part 15 of the FCC Rules. Operation is subject to the following two conditions: (1) This device may not cause harmful interference (2) This device must accept any interference received. Include interference that may cause undesired operation. CE This equipment is in compliance with the requirements of the following regulations: EN 55 022: CLASS B. RCM This equipment is in compliance with ACMA’s Electromagnetic Compatibility (EMC) regulatory arrangements under the Radiocommunications Act 1992. RoHS All contents of this package, including products, packing materials and documentation comply with RoHS. Trademarks All companies, brand names and product names referred to in this manual are the trademarks or registered trademarks belonging to their respective owners. 10